- Serves: -
- Prepare Time: -
- Cooking Time: -
- Calories: -
- Difficulty:
Easy
Print
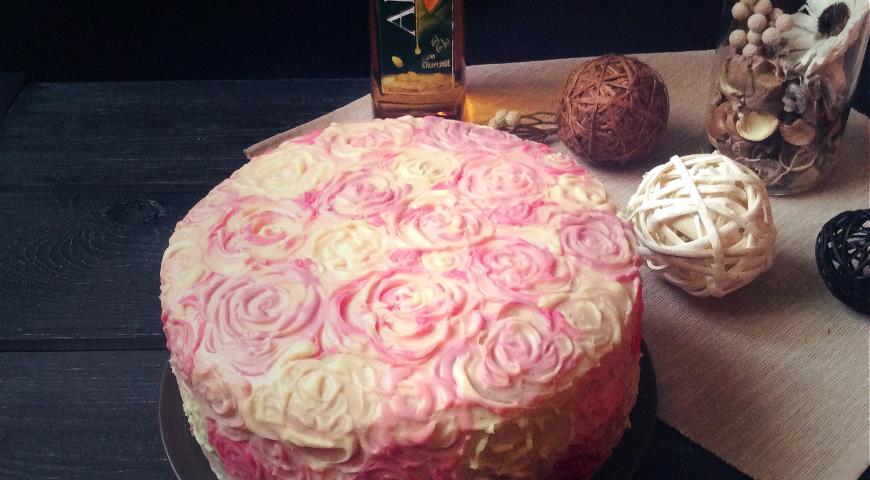
As you know, I rarely bake full-fledged cakes, preferring more complex portioned desserts. But there are different occasions in life, and some of them require serving a large delicious cake. This is exactly what we will prepare with you today. The recipe is extremely simple and does not require a lot of time and skill from the cook, you only have to sweat over the decor if you decide to reproduce it. The cake turns out to be incredibly tender and airy, the cream and cakes complement each other perfectly to taste (they stole this cake from me very quickly). The cakes rise great and keep their shape well, so this recipe is also ideal for a variety of decor. Another beauty of the cakes is their ability to acquire the taste of your favorite berry, I chose strawberries for myself, but you can make cherry, raspberry, blackberry and even sea buckthorn cake! The cream also does not lag behind in taste, although I ate the cakes with great pleasure. It is based on white chocolate, a lot of berries and delicate curd cheese, thanks to which a delicate airy consistency is ultimately obtained. The cream carefully envelops our cake, and then melts in the mouth, leaving behind a bright berry-creamy taste and some special lightness of summer. Well, have you already decided which berry to start with?
Ingredients
Directions
- The first step is to deal with the cakes. Beat butter at room temperature with sugar for 3-4 minutes. at high speed. In a separate container, mix the flour, baking powder and set aside for now. Defrost the berries and let them drain, and then cut into small pieces. We peel off the zest from four lemons, not forgetting that we only need the yellow part, because white gives bitterness. Into the mixture of butter and sugar, add 6 eggs one at a time, whisking constantly. After that, add lemon zest, Altero Beauty corn oil and berry-flavored yogurt there, and combine until smooth. We use corn oil to a greater extent for a bright, cozy aroma, the baked cakes will be incredibly fragrant! Introduce the dry mixture in parts, beating the dough each time. And now it's the turn of the most delicious component of our cakes - berries. Pour them into the dough and spread evenly with a silicone spatula.
- Preheat the oven to 165 ° C. Cover the bottom of the 16-18 cm baking tins with parchment paper. Ideally, you should have 3 identical forms in order to bake all the cakes at the same time, but if there is no such arsenal, then we will bake one by one. We fill the forms 2/3 with dough and bake for 30-40 minutes. until the dough rises and golden brown. We take out the finished cakes, let them cool to room temperature and put them in the refrigerator overnight, wrapping them in foil. For chilled cakes, cut off the upper convex part and cut each cake into 2 more parts. Try to end up with cakes of the same thickness.
- While the cakes are baking and cooling, we have time to prepare the cream. Do not forget that we need to make 2 parts of the cream: one for the layers, and the other for the primer and decor. First of all, we will prepare the berry puree, for this we puree the frozen berries together with the juice. Put the bowl of puree on fire and simmer over low heat 1/3 or more for a more concentrated taste. Beat butter, cream cheese and powdered sugar in a separate container. Melt the white chocolate in the microwave. Add chocolate to the cheese mixture and beat again until smooth, but do not overdo it, the mascarpone can turn into lumps, but we don't need this. So, we should get 2 parts of the cream (remember that we doubled the number of ingredients so that we get one part for the primer and interlayer, and the second for decoration). Separate 1/3 from one part and put it in the second. In those 2/3 that is left, stir in the berry puree with a spatula until a uniform color. We put the remaining white part in the refrigerator.
- Now is the time to assemble our cake! We spread the first cake on a substrate and apply a layer of cream on it with a silicone spatula, it should turn out to be 1 cm thick.Repeat the same procedure with the remaining cakes, without covering only the top layer with cream. Now it's priming time, it's extremely simple and very entertaining! To do this, you need the remnants of the cream with berries and the white cream that we put in the refrigerator, as well as a silicone spatula, or, even better, a flat culinary spatula. Apply the first layer with white cream, with a spoon with large “slaps” spreading the cream on the top cake, then carefully spread it with a spatula or silicone spatula, do the same with the sides of the cake, only in vertical movements along the cake layers. The cream is dense, it will not roll off the sides, or you can apply a layer of cream to the edge of the spatula, and only then distribute. After the first layer of primer is laid, put the cake in the refrigerator for 15-20 minutes, letting the layer set. We also remove the cream there.
- After the first layer of primer has hardened, apply the second white layer in the same way and put it back in the refrigerator. Now it is time for the pink layer, we will not apply it as uniformly as the white one, we will make a gradient. To do this, apply a small layer of pink cream on the spatula and distribute it on the sides. I repeat, we are not looking for layer uniformity. Apply a small layer of cream again and distribute it in another place, we do the same with the top of the cake. It is rather problematic to describe the procedure in more detail, but in the process of work it will quickly become clear to you how to make a beautiful gradient. Put the primed cake in the refrigerator. In principle, such a decor is quite enough, the white-pink cake turns out to be very beautiful, you can also additionally decorate the top layer with fresh berries, cream from a pastry bag with different attachments, chocolate or caramel decor, oreo cookies or almond slices - here for your taste. But I offer my own artistic version, which will be discussed in the paragraph below.
- If you nevertheless decide to decorate your cake with artistic roses, then divide the remaining cream into 4 parts. Leave one white, and in the other 3, add pink dye or berry puree in different proportions. Those. we go from white to bright pink, gradually increasing the amount of dye. I will warn you right away, different dyes have different degrees of coloration. For example, my favorite liquid dyes americolor, even with a small amount, stains very strongly, so try adding dye gradually on the tip of a knife, stirring with a spoon and looking at the resulting color. In my cake, I generally used the most common dry food colors that are sold in supermarkets. I made one lavender, one pale pink, one hot pink and left one white. When we have the cream of different colors ready, we lay it out in 4 m comfortable cups with low sides, take one flat artistic brush of a small size with stiff bristles (which one I used, you can see in one of the photos). Ideally, of course, such drawings are created with a palette knife, but I did not know about it then. Now for the most creative part. Before we start, let me tell you what a cream brush does. She does not paint the surface, as we are all used to, she applies a layer of cream in a volumetric strip, the thickness of which can then be edited with the same brush, therefore, our white-pink soil will be visible in the intervals between the roses. Dip the brush well in the first color we have chosen so that there is a fairly thick layer of cream on the brush and apply it to the cake in the form of a small arc, thus creating a petal. We apply the rest of the petals with the same dye, on the third rose you will understand the mechanism, while sketching my strokes from the photograph to simplify your task. Now we introduce into our rose any other of your flowers using the same technology. Next, in the same way, draw the next rose of a different size and in a different color. Make sure that there are no 2 roses of the same size and color nearby. Thus, we paint the top of the cake and the sides. Trust me, this activity is not tiring, on the contrary, it looks more like entertainment. When the cake is painted, you can add additional colors in the spaces between the roses for more artistic effect. That's all we are ready! Trust me, this cake is simply divine, it will be snatched from you right away!
Delicious Berry Cake, Let's Call it, Perhaps, "Pink Dreams"
- Serves: -
- Prepare Time: -
- Cooking Time: -
- Calories: -
- Difficulty:
Easy
As you know, I rarely bake full-fledged cakes, preferring more complex portioned desserts. But there are different occasions in life, and some of them require serving a large delicious cake. This is exactly what we will prepare with you today. The recipe is extremely simple and does not require a lot of time and skill from the cook, you only have to sweat over the decor if you decide to reproduce it. The cake turns out to be incredibly tender and airy, the cream and cakes complement each other perfectly to taste (they stole this cake from me very quickly). The cakes rise great and keep their shape well, so this recipe is also ideal for a variety of decor. Another beauty of the cakes is their ability to acquire the taste of your favorite berry, I chose strawberries for myself, but you can make cherry, raspberry, blackberry and even sea buckthorn cake! The cream also does not lag behind in taste, although I ate the cakes with great pleasure. It is based on white chocolate, a lot of berries and delicate curd cheese, thanks to which a delicate airy consistency is ultimately obtained. The cream carefully envelops our cake, and then melts in the mouth, leaving behind a bright berry-creamy taste and some special lightness of summer. Well, have you already decided which berry to start with?
Ingredients
Directions
- The first step is to deal with the cakes. Beat butter at room temperature with sugar for 3-4 minutes. at high speed. In a separate container, mix the flour, baking powder and set aside for now. Defrost the berries and let them drain, and then cut into small pieces. We peel off the zest from four lemons, not forgetting that we only need the yellow part, because white gives bitterness. Into the mixture of butter and sugar, add 6 eggs one at a time, whisking constantly. After that, add lemon zest, Altero Beauty corn oil and berry-flavored yogurt there, and combine until smooth. We use corn oil to a greater extent for a bright, cozy aroma, the baked cakes will be incredibly fragrant! Introduce the dry mixture in parts, beating the dough each time. And now it's the turn of the most delicious component of our cakes - berries. Pour them into the dough and spread evenly with a silicone spatula.
- Preheat the oven to 165 ° C. Cover the bottom of the 16-18 cm baking tins with parchment paper. Ideally, you should have 3 identical forms in order to bake all the cakes at the same time, but if there is no such arsenal, then we will bake one by one. We fill the forms 2/3 with dough and bake for 30-40 minutes. until the dough rises and golden brown. We take out the finished cakes, let them cool to room temperature and put them in the refrigerator overnight, wrapping them in foil. For chilled cakes, cut off the upper convex part and cut each cake into 2 more parts. Try to end up with cakes of the same thickness.
- While the cakes are baking and cooling, we have time to prepare the cream. Do not forget that we need to make 2 parts of the cream: one for the layers, and the other for the primer and decor. First of all, we will prepare the berry puree, for this we puree the frozen berries together with the juice. Put the bowl of puree on fire and simmer over low heat 1/3 or more for a more concentrated taste. Beat butter, cream cheese and powdered sugar in a separate container. Melt the white chocolate in the microwave. Add chocolate to the cheese mixture and beat again until smooth, but do not overdo it, the mascarpone can turn into lumps, but we don't need this. So, we should get 2 parts of the cream (remember that we doubled the number of ingredients so that we get one part for the primer and interlayer, and the second for decoration). Separate 1/3 from one part and put it in the second. In those 2/3 that is left, stir in the berry puree with a spatula until a uniform color. We put the remaining white part in the refrigerator.
- Now is the time to assemble our cake! We spread the first cake on a substrate and apply a layer of cream on it with a silicone spatula, it should turn out to be 1 cm thick.Repeat the same procedure with the remaining cakes, without covering only the top layer with cream. Now it's priming time, it's extremely simple and very entertaining! To do this, you need the remnants of the cream with berries and the white cream that we put in the refrigerator, as well as a silicone spatula, or, even better, a flat culinary spatula. Apply the first layer with white cream, with a spoon with large “slaps” spreading the cream on the top cake, then carefully spread it with a spatula or silicone spatula, do the same with the sides of the cake, only in vertical movements along the cake layers. The cream is dense, it will not roll off the sides, or you can apply a layer of cream to the edge of the spatula, and only then distribute. After the first layer of primer is laid, put the cake in the refrigerator for 15-20 minutes, letting the layer set. We also remove the cream there.
- After the first layer of primer has hardened, apply the second white layer in the same way and put it back in the refrigerator. Now it is time for the pink layer, we will not apply it as uniformly as the white one, we will make a gradient. To do this, apply a small layer of pink cream on the spatula and distribute it on the sides. I repeat, we are not looking for layer uniformity. Apply a small layer of cream again and distribute it in another place, we do the same with the top of the cake. It is rather problematic to describe the procedure in more detail, but in the process of work it will quickly become clear to you how to make a beautiful gradient. Put the primed cake in the refrigerator. In principle, such a decor is quite enough, the white-pink cake turns out to be very beautiful, you can also additionally decorate the top layer with fresh berries, cream from a pastry bag with different attachments, chocolate or caramel decor, oreo cookies or almond slices - here for your taste. But I offer my own artistic version, which will be discussed in the paragraph below.
- If you nevertheless decide to decorate your cake with artistic roses, then divide the remaining cream into 4 parts. Leave one white, and in the other 3, add pink dye or berry puree in different proportions. Those. we go from white to bright pink, gradually increasing the amount of dye. I will warn you right away, different dyes have different degrees of coloration. For example, my favorite liquid dyes americolor, even with a small amount, stains very strongly, so try adding dye gradually on the tip of a knife, stirring with a spoon and looking at the resulting color. In my cake, I generally used the most common dry food colors that are sold in supermarkets. I made one lavender, one pale pink, one hot pink and left one white. When we have the cream of different colors ready, we lay it out in 4 m comfortable cups with low sides, take one flat artistic brush of a small size with stiff bristles (which one I used, you can see in one of the photos). Ideally, of course, such drawings are created with a palette knife, but I did not know about it then. Now for the most creative part. Before we start, let me tell you what a cream brush does. She does not paint the surface, as we are all used to, she applies a layer of cream in a volumetric strip, the thickness of which can then be edited with the same brush, therefore, our white-pink soil will be visible in the intervals between the roses. Dip the brush well in the first color we have chosen so that there is a fairly thick layer of cream on the brush and apply it to the cake in the form of a small arc, thus creating a petal. We apply the rest of the petals with the same dye, on the third rose you will understand the mechanism, while sketching my strokes from the photograph to simplify your task. Now we introduce into our rose any other of your flowers using the same technology. Next, in the same way, draw the next rose of a different size and in a different color. Make sure that there are no 2 roses of the same size and color nearby. Thus, we paint the top of the cake and the sides. Trust me, this activity is not tiring, on the contrary, it looks more like entertainment. When the cake is painted, you can add additional colors in the spaces between the roses for more artistic effect. That's all we are ready! Trust me, this cake is simply divine, it will be snatched from you right away!
You may also like


.jpg)