Author

vlad

Browsing

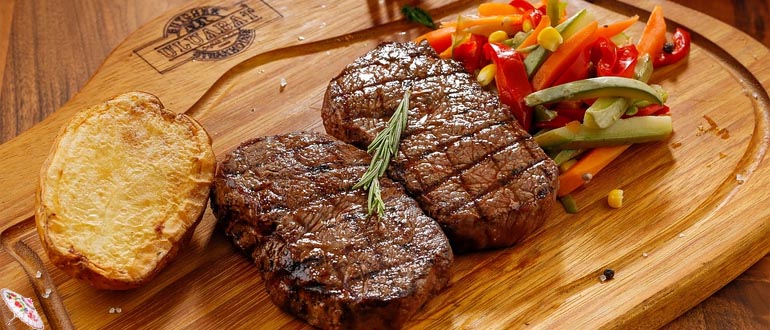
A rare hero admits that clothes as a gift are not exactly what he dreams of on his only men’s holiday. But what – at least as a “warm-up” before the main present – no real man will definitely refuse, is a juicy meat steak.

  1. Classification of steaks

According to the most popular classification, meat is divided into 3 types: marble steaks are steaks from a thick or thin edge (Ribeye, Striploin, New York), lean steaks from tenderloin (Mignon, Chateaubriand), and alternative steaks such as Machete, Tibon steak, Tomahawk. At home, you can cook almost any kind, the main thing is to be patient and understand the cooking technology of each.

  1. How to choose meat for this or that type of steak

The main mistake of those who want to get an appetizing steak at home is excessive savings on meat. A regular fillet of beef for cooking Ribeye, Chateaubriand, or any other type of steak you choose is not at all suitable, it will turn out to be very tough. It is better to buy marbled meat steaks from trusted butchers or take vacuum packaging with ready-made chopped steaks. If you take a cut of beef to cut the steaks yourself, opt for the most popular ones – Ribeye and Mignon.

The quality of meat for a Minion can be checked in the following way: a finger falls into a good cut, and after you remove it, the flesh quickly recovers. Rib-eye steak meat should be fairly marbled and soft, with streaks of fat. It is much more difficult to choose a quality Top Blade and not to confuse it with the stiffer part of the shoulder blade. It will be difficult for a layman to define quality, so it is better to stick to the classics.

  1. Is it possible to cook from frozen meat

You can also cook frozen meat steaks. The main thing is the correct defrosting process. The meat must be put from the freezer into the refrigerator a day before cooking so that the defrosting is soft and delicate. Then there will be no heat stress for the meat, which leads to a large loss of precious juice. Defrosting meat in the refrigerator will leave all the juice inside – and the steak will be soft and tasty.

  1. How to fry a steak at home and how to choose a frying pan

Frying a steak is most convenient in a grill pan or a regular skillet with a very thick bottom. The thick bottom of the pan ensures that after heating it does not lose its temperature and will keep it at the same mark for a sufficient amount of time. If the pan has a thin bottom, it cools down quickly, and the meat is not fried, but boiled in its own juice.

  1. How to prepare meat for frying

It is necessary to get the meat out of the refrigerator a couple of hours before frying and let it reach room temperature. If you do decide to cook an alternative steak, you need to marinate it (we’ll talk about this a little later). Half an hour before cooking, the meat must be freed from the film so that the tenderloin is slightly weathered around the edges and the meat is covered with a light crust, which during frying will help keep all the juices inside the steak.

Salt and pepper the meat only after cooking! On this, I would like to focus special attention. Salting the meat before or during frying will help the juices flow out, which can make the meat tough.

  1. Steak cooking technology

For the preparation of marbled steaks (Ribeye, Striploin, New York), you need to use a minimum amount of oil, giving preference to olive oil. The cooking technology is quite simple. Place the meat in a well-heated frying pan and fry for 2-3 minutes on each side, then reduce the heat to low, cover the steak with a lid and let it stand for another 1-2 minutes. Please note that the longer we leave the steak covered, the higher the degree of doneness will be. For marbled steaks, medium to medium-well roast is best. At the end of cooking, you can add garlic, rosemary, thyme, or chili pepper.

Lean tenderloin steaks (Mignon, Chateaubriand) are prepared using the same technology, but with a lot of oil. After we fry the steak on both sides and it acquires a golden crust, add butter to the pan and reduce the temperature to medium. We continue to fry the meat in a mixture of butter and olive oil, constantly pouring it with the juice that comes out of the steak itself. This will give the steak the right roast.

Alternative steaks (Machete, Tibon, Tamaghawk) must be marinated in herbs in advance. To make the meat softer, you can add a little mineral water to the marinade. For alternative steaks, medium doneness is better. It is not recommended to consume this type of steak with blood.

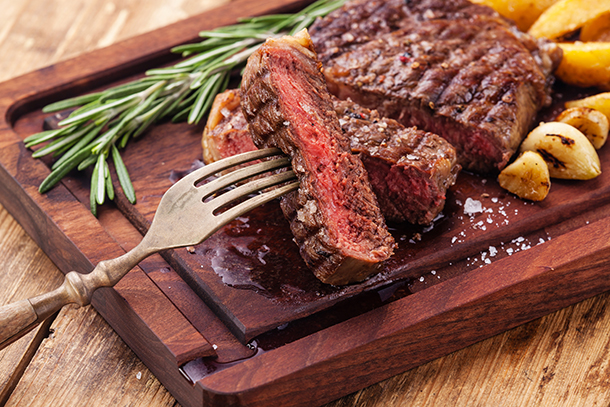
  1. How to determine the degree of doneness

Do not forget to control the degree of doneness! To determine it, it is better to use a thermal needle. Each degree of roast has its own ideal temperature: Rare – 40-43 degrees, Medium Rare – 44-46, Medium – 47-50, Medium Well – 55-57, Well Done – 60 and above. If you do not have a thermal needle at hand, you can try to determine the degree by touching with your finger. If the steak is too soft, it is not cooked enough, the meat is still raw. If the steak is dense, then the roast is high. You should not cut the meat to check readiness, as the juice will immediately flow out of the meat.

  1. Spices and sauces for steaks

The more laconic the spices on the steak sound, the better. Therefore, do not use more than 2-3 spices at a time. Rosemary, garlic, and in rare cases – thyme are ideal for steak. To convey the aroma of these spices to the dish, it is enough to put a sprig of rosemary or a clove of garlic on a ready-made steak, the meat itself will take on their rich aroma.

There are many sauces with which it is proposed to complement the taste of the steak, for example, a sauce based on fresh herbs. To prepare it, you need to take 20 grams of fresh parsley and cilantro, half a head of garlic, chop them finely and finely with a knife until they form a gruel, add a little black pepper, salt, and chili, and pour over with olive oil. It makes a wonderful sauce that goes well with any steak.

Another quick and delicious sauce is French. If you want to make it, take your time to remove the pan in which the meat was fried. Remove the meat, put the pan on medium heat, add a little red wine, butter, chicken broth, salt, and pepper. Cook the sauce over medium heat to the desired consistency. You can add not only wine and spices but also cream, interesting Asian sauces like Teriyaki – here you can give free rein to your imagination!

  1. Side dishes for steak

In this matter, everything, of course, depends on the person – who likes what more. But from the point of view of physiology and proper nutrition, it is better to eat the steak along with fresh or fried vegetables. Grilled vegetables or red fresh tomatoes with onions and herbs are the most ideal options.

  1. Serving and serving

One of the main rules of a perfect meal: steak should be served immediately. Steak is an independent dish, simple and straightforward. You should not invent an original serving, the main thing is the unsurpassed taste of the steak itself.

Enjoy your meal!

Prepare the same steak as in a restaurant? Easily. The meat tenderloin will turn out to be wonderful in taste and appetizing in appearance if you learn these simple rules. And an open fire with a grate can be replaced with a frying pan.

  • Secret # 1: you need the meat of a young bull, not a cow. For this steak, only bull meat is used. Not cows! Moreover, the animal must not be older than 20 months. Such meat is distinguished by its special juiciness and taste. And in its raw form, it looks a little dry, liquid should not flow out of it. The shade is deep red. If you touch it, the effect of a silky-smooth surface will appear. An important nuance: the meat for the steak should be matured, slightly rest in a cool room. Ideally dried. Fresh meat, only after slaughter, is not suitable for a steak – the dish can come out tough. Even marbled meat!
  • Secret number 2: marbled meat is desirable, but not at all necessary. It is commonly believed that the most delicious steaks are made from marbled meat – VIP steaks, elite, gourmet cuisine. Thanks to the intramuscular fat, such meat looks like a marble pattern, and after frying the fat it gives a unique taste. Not all meat breeds of bulls are “capable” of this. In Russia, this is Hereford, Aberdeen Angus, which sellers can proudly tell you about.
  • Secret number 3: Choosing the right piece. A steak is essentially a piece of meat that has been fried in a pan or over a fire. But meat is different from meat. Depending on the type of meat, steaks are divided into classic and alternative. The classic is carved from the dorsal or lumbar part of the bull. Each has its own name, usually, it is on the price tag. The main ones: ribeye, aka “cowboy”, club, tailbone – on a T-shaped bone, porterhouse, aka double steak, striploin, aka “New York”, and mignon. Each has its own flavor, color, and even juiciness. To choose the perfect one, you will have to try each one! However, they are all good.
  • Secret number 4: choosing a pan with a thick bottom. A modern grooved beauty or grandma’s cast-iron punt is not the point. The main thing is the thick bottom because it accumulates heat and even gives it to the steak. Alternative steaks are marinated in red wine, soy sauce, tomato pulp, onion, or pineapple juice for at least half an hour before being sent to the fire. Then the meat should be dried with cooking napkins. Necessarily! It should come dry into the pan.
  • Secret number 5: fry without unnecessary spices. The taste of a classic steak is formed by two spices: salt and black ground pepper. But if there is a craving for experimentation, you can add little caraway seeds and pink pepper. The pepper must be freshly ground. In the case of alternative steaks, add it when the meat is dry after marinade.
  • Secret number 6: choose the degree of doneness. As you know, there are no comrades to taste. Therefore, steak masters use different degrees of roasting of meat, there are only four types of them. Knowing them will come in handy when communicating with a waiter in a restaurant. And for home cooking, it is important to know the temperature inside the finished piece. You will have to regulate it with a kitchen thermometer or experimentally. Depending on the degree of doneness, cook the steak for three to nine minutes.
  • Secret # 7: fry in butter. Frying steak oil is the source of the flavor. It is customary to fry steaks in butter, the taste is softer. To make the steak as close as possible to the “live” taste of meat, you need to fry in odorless vegetable oil, especially if you like Too Well Done – a deep-fried steak without juice when the temperature inside reaches 100 ° C. This heat will burn the butter and ruin the steak.

The alpha and omega of an appetizing grill, especially meat, is a good marinade, i.e. combining the right ingredients in the right amount with the right preparation method. So, you definitely need to master this secret of a successful grill:

  1. There are many recipes for marinades, but most importantly, they include 3 main ingredients: acid, fat, and spices.
  2. Larger pieces of meat are best to cut into smaller pieces before marinating. The smaller the pieces, the faster they will marinate.
  3. It may take as little as 30 minutes to marinate the meat, but feel free to marinate longer for a better taste. The longer the meat is marinated, the more flavorful it becomes.
  4. Marinating overnight will help to increase the tenderness of beef.
  5. To prevent the chick from becoming tough on break, try not to marinate it. Marinating can not only make the chicken tough, but it can also take away the flavor.
  6. How much marinade to take? – About 2 cups for every kilogram of meat. So try to cook enough to completely saturate the meat you are about to cook.
  7. Always refrigerate meat while marinating.
  8. A plastic container or plastic bag can greatly reduce the hassle of preparing meat. Sealing in a zippered plastic bag can reduce the amount of marinade needed to prepare your barbecue.
  9. Sprinkle fat on the meat during the last 10 minutes of grilling to reveal the flavor. Avoid contaminating your meat with fresh marinade.

Many people think that making sushi at home is very difficult. But after trying it once, you will understand that everything is not so scary. It is important to know a few simple cooking secrets.

  1. The main thing in sushi is the quality of the products. Therefore, you should not try to save money on them: rice, vegetables, fish and nori – everything should be first-class.
  2. For cooking, use only special rice, which can be bought in any supermarket. It can be replaced with inexpensive round grain rice, but this will inevitably affect the taste. Rice should be cooked as written on the package. Rice should not be overcooked. To make the rice sticky, a special sauce is added to it, which is easy to prepare. To do this, take 50 ml of rice vinegar, 30 g of sugar and 10 g of salt. Heat the vinegar slightly over a fire, add salt and sugar and place until smooth.
  3. Making sushi is not a problem, the situation is a little more complicated with rolls. To prepare the rolls, you will need a special bamboo mat – makisu. You should also prepare tezu. This is vinegar water (1 part rice or other vinegar is mixed with water) that is used in the sushi making process to prevent rice from sticking to your hands. Rice for making sushi and rolls should be warm.
  4. Next, you are required to wrap all the ingredients of your rolls prepared in advance in a nori seaweed sheet. Place the nori on the makisu, aligning the edges. Using your fingers dipped in tezu, spread the rice over the entire surface of the leaf, leaving only two small strips at the bottom and top. Place the filling on the bottom third of the sheet.
  5. If you want the rice to be outside, place the rice on top of the nori, then place the nori on a damp cloth and again on the makisu with the rice facing down. This way, when you roll up the roll, the rice will be outside. When folding the roll, make sure that the edge of the makisu does not wrap inward.
  6. It is important to cut the prepared rolls correctly. To do this, they must first be cooled in the refrigerator for 20-30 minutes so that they harden and do not crumble. The knife for cutting rolls should be very sharp, and so that it does not get stuck in the roll, you can soak it in vinegar water or hold it under running water.

Only professionals who have perfected their skills for years can tell about the secrets of making perfect sushi. Just cook rice and just chop fresh fish? Not so simple! We got first-hand information about the little tricks – talking with an expert of a Japanese restaurant chain.

  1. Buy regular white rice and you’ll never boil it to perfection. You need round grain or special Japanese rice. Fish also has its own subtleties. With the one that lies on the ice in the supermarket, you can never be sure that its shelf life has not expired or is not close to that. In addition, such fish are often weathered and hygiene suffers. We recommend taking fish fillets in a vacuum, on which the production and expiration dates are stamped on the package, and not printed on a sticker – they are often re-glued.
  2. You can use a rice cooker, but a multicooker will do. Cook in the “Rice / cereal” mode for no more than 25 minutes. Do not stir the rice to avoid damaging its texture. The correct consistency of rice is not to leave it al dente, but also not to digest it. To make the rice easy to shape, it should be seasoned with a special dressing made from rice vinegar, salt, sugar and Kombu algae (you can do without algae, as this is already a “professional” level).
  3. It is very simple to clean fish fillets from bones: run your hand “against the grain” and you will feel where the bones are hidden. Tweezers are the best way to remove bones. It is necessary to cut fish fillets with a very (VERY!) Sharp knife against the fibers at an angle of about 45⁰. We never drank fish! Try to cut 1 piece at a time (for which, in fact, we need a very sharp knife). Remember – it is extremely important not to damage the fiber structure so that the fish pieces do not fall apart.
  4. There is a concentrated soy sauce, which must be diluted with boiled water before use, and there is a ready-to-use one. Pay attention to the label. Check the composition – there are only 4 (!) Ingredients in an authentic soy sauce: soybeans, salt, wheat and water. Keep in mind that in glass containers the sauce will last longer than in plastic containers. The stores sell dry wasabi powder, which turns into a sauce we are used to when mixed with boiled water at room temperature. Choose the consistency of the sauce to taste: the more water, the more liquid and less spicy the sauce will be. Do not mix wasabi with soy sauce in the same container. The Japanese do not do this, and they certainly do not soak the whole sushi in this solution, because the rice will become too salty and crumble right in the gravy boat. Sushi should be dipped in soy sauce from the side of the fish, and a little wasabi should be applied directly to the slice you are going to put in your mouth.
  5. Going the simplest way and getting by with ordinary processed cheese will not work – it does not suit the taste of nori, fish or seafood at all. The most suitable option is, of course, Philadelphia cheese. But there are also more budgetary, but no less tasty and suitable options – Buko and Almette cheese. As a last resort, you can add Viola or Feta cheese, but the taste of such rolls will be noticeably different from what we are used to eating in specialized restaurants.

Everything you need to know to make it as simple, delicious and healthy as possible. Rice will not stick to your hands, and sushi will not fall apart.

  1. Sushi fish should be cold, as should the hands of the cook. You can even dip them in ice water before cooking.
  2. The ingredients for nigiri sushi are cut into thin slices, for maki sushi (rolls) – in cubes.
  3. A sharp and long knife should be used for slicing. It, like your hands, can be moistened in a weak solution of rice vinegar (2-3 tablespoons per glass of water) to prevent the ingredients from sticking.
  4. Some types of sushi require a bamboo mat to form. If not, you can use a regular kitchen towel covered with cling film.
  5. Do not prepare sushi in advance or in reserve. It is a dish to be eaten right away as it has a shelf life of only a few hours.

For a delicious cake, it is very important to bake the base correctly. This is exactly what we will help you do!

  1. The exact oven temperature is very important, so if you do a lot of baking, an oven thermometer is a good investment. Ventilation ovens are hotter than conventional ovens, so reduce the temperature by 10-20 ° C.
  2. Place the pan in the bottom third of the oven with the top of the cake in the middle of the oven.
  3. The cake is ready when it starts to move away from the walls of the form, and its top becomes springy.
  4. As a final check, insert a toothpick into the center of the pie – it should come out dry. If no crumbs adhere, bake for another 5 minutes, then try again.

Nothing beats homemade cake. But to avoid culinary failure, you need more than just a good recipe.

  1. How to knead the dough correctly. The texture of the cake depends on the ratio of the ingredients used and the method by which they are mixed.
  2. Screening. Flour is sold pre-sieved these days, so there is usually no need to sift it again. But there are exceptions: the flour for the biscuit needs to be sieved to saturate it with oxygen and provide a light texture to the cake, and flour mixtures containing spices, cocoa powder and soda require sifting to remove any lumps.
  3. Whipping. The butter and sugar are usually whisked until lightening, and only then the rest of the ingredients are added. This saturates the dough with air, and the finished cake is fluffy and tender. Do not overdo it: after adding eggs and flour, the dough must be mixed gently, otherwise the texture of the cake will become heavy and grainy.
  4. Cake molds. The recipes are for specific cakes, so it’s important to use the sizes shown. The cake will not stick to the mold if you first grease it with butter and sprinkle with flour. You can also cover the mold with non-stick paper.
  5. Cooling. When you remove the cake from the oven, let it cool for 5-10 minutes before turning onto the wire rack to cool. Don’t leave it in the mold for longer, or it will get damp. If the cake is stuck, run the knife along the sides of the baking dish. Remove the non-stick baking paper immediately.
  6. Applying cream or glaze. Glaze the chilled cake by placing a piece of baking paper under the wire rack. The excess cream will drain freely and not accumulate at the base, while baking paper will help keep the table from staining.
  7. Eggs. Use fresh medium-sized eggs (55-60g). Remove them from the refrigerator at least an hour before kneading the dough to warm them up to room temperature.
  8. Butter. Use butter at room temperature. To quickly soften butter, simply microwave it for 20 seconds or grate it on a medium grater.
  9. Milk and fermented milk products. Always use room temperature kefir, milk or sour cream to prevent stratification of the dough.
  10. Flour. Self-rising flour already contains baking powder, but if you only have plain flour on hand, add 2 tsp. baking powder for 1 cup of plain flour.
  11. Sugar. This is what gives the cake its structure. For a finer texture, use fine sugar, powdered sugar, or light brown sugar – these will dissolve faster in the dough.

With these secrets, you will definitely get the most delicious cake!

  1. Compotes, jelly and jelly should be stored in the refrigerator at a temperature of 2-14 C.
  2. Puff pastry must be baked at a temperature of 210-230 C. It is more difficult to bake at low temperatures.
  3. You can grind yolks and whites only in enamel, porcelain, earthenware or earthenware dishes.
  4. You can beat the egg whites much faster if you keep them in the cold before that.
  5. The more fat in the dough and less liquid, the more crumbly the product is.
  6. If you add starch to the biscuit dough, it becomes more crumbly.
  7. Shortcrust pastry can be stored in the refrigerator at 10-12 C and taken as needed.
  8. When preparing shortcrust pastry, flour must be mixed with other products for no longer than 2-3 minutes, otherwise the product from such a dough will become coarse.

These secrets are very important in cooking.

  1. A cake with a filling will be better if it will stand for at least half a day.
  2. Peeled apples and pears for filling will retain their color if wrapped in a vinegar-soaked napkin before cooking.
  3. Walnuts for cakes and baked goods will taste good if they are lightly roasted before cooking.
  4. To prevent walnuts from going rancid, they must be stored in a dry and cool place.
  5. If you use only whites from eggs, then the yolks can be put in water, then they will last longer. You can also pierce the egg from both sides and blow out the white, leaving the yolk inside.
  6. You need to brew tea only in porcelain or earthenware dishes.
  7. Tea will become much more aromatic if you put a piece of orange peel, lemon or vanillin in the box where it is stored.