If you want the vinaigrette to acquire a delicate and pleasant taste, pour a tablespoon of milk into it and add a teaspoon of sugar.
Lettuce with mayonnaise and vinaigrette will taste especially good if you put a lemon crust in them for a short time before serving.
Vegetable salads are seasoned with mayonnaise, sour cream or vinegar just before meals, since after 2 to 3 hours they lose almost all their nutritional value. It is not necessary to cook a salad for several days and it is not tasty and has little benefit.
Vegetable oil should be added to the salad only after the salad has been salted, vinegar and pepper have been added (salt does not dissolve in oil).
Salt should be salted just before serving. If you add salt in advance, the vegetables will give off a lot of juice.
A “fan” of cucumbers will greatly decorate the salad. Cut strong small cucumbers lengthwise into thin slices and straighten – here’s a “fan” for you.
Cooking salads is not difficult. But this process can be made even easier and more convenient. There are many helpful hints and tips for cooking, cleaning, slicing and stacking food. Today we will introduce you to the most interesting life hacks.
To arrange a salad “like in a restaurant”, you can use an ordinary plastic water bottle as an improvised means. It is cut off at both ends – a tube is obtained. The form is placed on a flat plate and the products are laid out in the desired sequence. Pick up the tube with a gentle scrolling motion.
Before grating the cheese, grease the grater with vegetable oil. As a result, the pieces of cheese will not stick together, and the grater can be easily washed.
If you need to coat a layer of cheese in a salad with mayonnaise or sour cream, but first, it is better to gently crush it with wet hands. In this case, the grated cheese will not stick to the spoon, and it will be convenient and easy to grease.
If the greens had time to wither by the time the salad was prepared, then you can reanimate them by alternately lowering them into hot water and immediately into cold water.
For salads, potatoes are often boiled in their skins. To prevent the peel of this vegetable from cracking, it is recommended to add vinegar to the water – just a few drops.
Beets for salads are usually cooked for a very long time – about two hours. To shorten this time, boil the beets without vinegar for 50-60 minutes. After that, the hot broth is drained and the vegetable is poured with new cold water. Another 20 minutes and the beets are ready.
Carrots and green peas will retain their beautiful vibrant color when boiled in sweetened water.
So that in the morning after eating garlic salad you do not smell of its smell, you need to remove the green sprout from the garlic cloves during cooking.
The onion will not slide on the cutting board when finely sliced if you leave a “tail” on it from which the green feathers grow. For it, you can hold the onion, and then discard the “tail”.
Small onions and garlic are sometimes poorly peeled. To facilitate this matter, they are first immersed in water for a couple of minutes.
It is preferable to cut raw vegetables on a plastic cutting board, as it does not absorb juices, unlike wooden ones.
If mayonnaise is not at hand, then it can be made from sour cream. To do this, add the yolk of a boiled egg and a spoonful of mustard to it. The yolk is thoroughly ground, and the mustard is added to taste.
To clean boiled eggs without any problems, you need to add salt to the water when boiling them. As a result, the shell will peel off easily.
It is not at all necessary to book a table in a steakhouse to taste a steak, because cooking it at home is not as difficult as many might think. You just need to remember a few rules for preparing this dish:
The first and, perhaps, the main point is choosing the right meat. You cannot cook a medium-rare steak from pork or chicken. It is only beef. When choosing meat, you should pay attention to the breed and age of the animal. In most cases, the market sells the meat of an elderly cow that gave milk during its lifetime. Such meat is suitable only for stewing, as it is quite tough and does not have “marble” veins.
For steaks, cuts of special breeds of gobies, for example, Black Angus, are suitable. These animals lead a sedentary lifestyle and are specially fed (grass or grain). The breed in combination with a special diet allows us to buy marbled beef – it is tender meat with thin layers of fat.
The beefsteak must not be frozen. Ideally, this will damage the fibers of the meat during the freezing and thawing process, and as a result, it becomes less juicy. But if the beef steak has been frozen correctly (blast chilled at a very low temperature) and thawed just as correctly (in the refrigerator), then you can still make a decent meal.
Don’t buy fresh meat. The cut must go through a wet or dry maturation stage, then the meat is fermented, softened and its taste will be much improved. For steaks, we recommend buying dry-aged beef.
Do not cook all cuts in the same way. For example, the classic rib-eye steak does not require any preliminary intervention, while the alternative Flank steak should be softened with a marinade.
Once you’ve selected and purchased the right meat, dry it off with paper towels. Before sending the cut to the pan, it must be dried so that the evaporating droplets of moisture do not transfer from the frying process to stewing.
An important rule of thumb: Only cook aged beef steaks that have reached room temperature. So there will be no sharp drop and the meat will retain more juices. Salt should be immediately before cooking, or at least 40 minutes before, by including salt in the marinade. Make sure to pepper the marbled beef steak. Do not feel sorry for dry spices, as they crumble during cooking. If you are cooking a medium-rare steak in a skillet or grill pan, do not pour oil on the surface. Just brush on the cut with a cooking brush; that should be enough.
The best way to cook a medium-rare steak for the first time is to get a cooking thermometer. The temperature inside the cut for medium-rare should be 55-60 ° C. The classic steak thickness is about 3 cm. It should be cooked in a hot skillet for 3 minutes on each side. If you don’t have a cooking thermometer, you can try to feel the roast by touch, just remember to wear rubber gloves to avoid getting burned. Connect the thumb and middle finger of your left hand, and with your right, feel the stiffness of the muscle on the thumb – this is how a medium-rare steak should feel to the touch.
Well, after cooking the steak, he must be given time to rest, during which the juices are evenly distributed throughout the cut. Divide the cooking minutes in half and place the medium-rare steak under the foil during this time. You can put a small cube of butter on top for a delicate, creamy flavor.
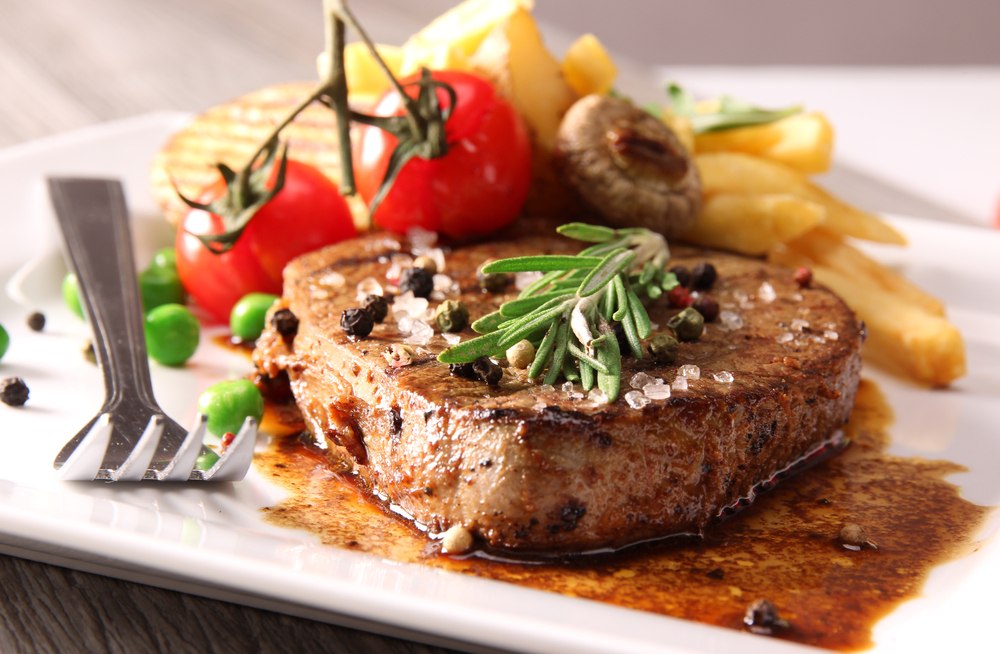
There is a culinary law: the less the steak is roasted, the juicier and tastier it will turn out. That is why medium-rare is recommended for high-quality beef with pronounced marbling. In this article, we’ll share professional tips and proven recipes on how to make a Medium Rare Steak in your home kitchen.
To begin with, the classic steak is made from aged beef, which has a layer of fat. Moreover, the higher the marbling of the meat, the higher the degree of its roasting can be. Accordingly, if there are few fat layers in the meat, it is better to cook it quickly, choosing the degree of roasting no higher than medium.
A medium-rare steak is not raw meat, as some people think of it. This is a properly cooked steak with a soft pink core inside and an abundance of red juice. Those who call such a steak “meat with blood” do not know that the red liquid is meat juice. Just under the influence of temperature, the protein myoglobin stains it in a reddish tint.
The classic boneless marbled beef steak is fried for 2-3 minutes on both sides. Add to this time another 20 minutes for the steak to heat, and another 5 minutes for the steak to “rest” after cooking.
Most chefs recommend taking steaks from marbled meat, at least 2 cm thick, optimally 2.5 cm. It is believed that this height will not allow the cut to dry out in a pan or grill. Most of the recommendations on how much to fry a medium-rare steak are based on the assumption that the steak is 2.5 cm thick. Fast frying for 4 minutes in a pan instantly seals the meat with a crust, but at the same time, it has time to warm up from the inside. The beefsteak turns out to be juicy, not overdried, and appetizing in appearance.
Our tip: By lengthening the cooking time of the steak, increase the rest time as well. Use the versatile formula by dividing the cooking time in half – this is how much the finished meat will need to evenly distribute the juices.
With a well-heated skillet, cook steaks 2–2.5 cm thick for a couple of minutes on each side. Steaks 4 cm thick – 6 minutes in total, and cuts over 4 cm – 8 minutes. The medium-rare roast has an internal temperature of 54-55 degrees. Another couple of degrees, the meat “picks up” when it is resting. Fully cooked medium-rare steaks have an internal temperature of 57 degrees.
To prepare a classic beef steak, we recommend buying Ribeye marbled beef. Use chilled meats that are moist or dry. It is better to refuse frozen. If there are no options, take blast-frozen meat. With this method of freezing, it retains the maximum useful properties and its excellent taste.
This is a very important point. Observe it if you want to get a juicy medium-rare beef steak. By allowing the meat to catch its breath, you will give it time to distribute the meat juices, which accumulate in one place during the frying process. The average “rest” time is 3-5 minutes. It is better to keep the meat under foil so that there is no sudden temperature drop.
It is important to choose steaks so that it is not a shame to lose the roast. I recommend choosing either rib eye or strip-layer – this is a thick and thin edge. They are juicy, soft, and even if you cannot “catch the roast”, it will not spoil them at all, the meat will remain tasty.
You need to wait until the pan is as hot as possible over high heat. But make sure that it does not start to “burn” and smoke. How do I check if the pan is ready? The easiest way is to drip it with water: if the water starts to “jump” over the entire surface, then the pan is ready.
My life hack: do not salt or pepper raw meat, because at this stage it will not affect its taste and condition in any way. As soon as the pan is ready, layout the steak and begin to fry.
Each part of the carcass is fried in a completely different way, so now we are talking exclusively about striploin. Considering our thickness is from 2.5 to 3 centimeters: rare – 35-40 degrees, medium-rare 45-50, medium – 50-55 degrees. Finally, the medium-well roast is over 60 degrees inside your steak. How long to fry on each side?
There are no exact rules. I like turning the meat over every 1.5-2 minutes more, thereby manually distributing the heat evenly inside the steak. And if you like a fried crust, you can achieve it at the end by holding the steak on each side for a little longer.
The rest of the steak is the same fairy tale as about the “marbling” of meat. Both the first and second is a good marketing ploy, which is now customary to talk about. Once the steak is done, I usually chop, breaking the fiber structure of the meat, and then add salt or whatever spices I like.
Today in the culinary world steaks are prepared from fish, veal, pork, and other meats, but beef is still considered a classic dish. An impeccably cooked steak can be a tough task even for a seasoned cook, as sometimes the meat comes out dry and tough, scorching on the outside before being cooked on the inside. To prevent this from happening, and the dish turned out to be correct and truly tasty, you should know some subtleties.
For the steak, choose a beef tenderloin of a mature animal, but not old or young. The meat should be red or dark red in color, but not pink or burgundy. It is advisable to choose parts of the carcass with fewer tendons and powerful muscles, with fat evenly distributed throughout the piece.
You can determine the softness of the steak with your finger by pressing on the raw meat – the finger is easily immersed, leaving a deep hole, which, after pressing, returns to its original position. If this happens, then the meat is good. If the hole does not expand, the meat is not fresh enough, and if it is difficult to press on it, the steak will be tough.
For a tasty steak, the meat should be properly prepared – remove the film and upper tendons. Cut a piece that is not too thin, and at least 7 cm long. Otherwise, the meat will lose moisture, shrink and become dry. Then, in the center of the piece on the side where the fibers are located along, an incision is made to the middle of the thickness, and the meat is opened like a butterfly.
The steak is marinated from 12 to 48 hours, and before going to the fire, it is well dried with a paper towel. The traditional marinade mixture is vegetable oil, soy sauce, wine vinegar, salt, and seasonings.
The frozen stack is thawed in the refrigerator for 12-14 hours. After that, it is wiped dry and left for 20 minutes before marinating, so that it warms up to room temperature. It is not recommended to defrost the steak in the microwave. Since the top layers of meat are already starting to cook in defrosting mode, the middle remains cold. Subsequently, it will be difficult to get an even roast. Also, it is not advised to defrost meat at room temperature and in warm water.
Meat is fried exclusively in a well-heated heavy frying pan or grill pan. In this case, the pan should not smoke, otherwise, the steak will burn on the outside, but inside will not have time to cook, which will turn out tough. During frying, the protein quickly curls up on the surface of the piece and prevents the liquid from escaping, so the steak is first fried over high heat for 1 minute on each side. This will “seal” the fibers and the meat will retain the juice, which means the steak will be juicy and soft. Next, the dish is brought to the desired degree of roasting at a lower temperature.
The finished meat should be left to lie down for a while. During this time, the juice will be distributed inside the piece, the temperature inside and outside will equalize, and the steak will become warm, tender, and juicy everywhere.
Serve the steak on warm plates, then it will not cool down so quickly. For use, you need sharp knives without chipping so that you can even cut the meat.