- Serves: 10 People
- Prepare Time: -
- Cooking Time: 3 hours 30
- Calories: 5111
- Difficulty:
Easy
Print
Homemade pies with apples can be quickly and easily cooked on the stove - for example, on kefir. But today I would like to offer you a recipe based on yeast dough, and baking pies with apples in the oven will turn out very tasty. The most delicate dough that just melts in your mouth, a lot of fragrant and juicy apple filling ... Well, what could be better than fresh homemade baking !?
As a basis for the pies, I took my favorite (well, or one of my favorite) yeast dough, which the assistant bread maker makes for me. Already more than a dozen, and maybe even a hundred fragrant ruddy plump, were cooked on this amazing yeast dough and it never let me down. Delicate, insanely soft, aromatic, and how delicious! In addition, it molds well and never cracks when baked.
From the specified number of products, I get 12 large pies with apples. By the way, there will be a lot of filling - almost as much as the dough itself. You can safely make pies with apples in the oven in half - then you get 24 average handsome men.
Ingredients
Directions
- The recipe for homemade yeast dough for pies includes the following products: premium wheat flour, sour cream, chicken eggs, refined vegetable oil (I have sunflower oil), salt, granulated sugar, vanillin and fast-acting yeast. All ingredients should be at room temperature. For the filling, take fresh apples, granulated sugar and butter. To grease the pies, we will use egg yolk and a little milk of any fat content.
- You can knead the dough by hand or use kitchen helpers. I make this yeast dough in a bread maker. Depending on the model, the filling of ingredients can be of two types: first liquid, then loose and vice versa. I have the first option. Pour vegetable oil (odorless), sour cream into the container of the bread machine and break the eggs. Let's talk a little, everyone.
- Now add the sifted premium wheat flour. In general, it is for this recipe that I always use exactly 500 grams of flour, but you may need a little more or less (depending on its moisture content).
- At the end, add salt, sugar, a pinch of vanillin (can be replaced with a teaspoon of vanilla sugar) and fast-acting yeast in different corners of the bowl.
- In my bread maker, the Dough mode provides for the kneading and proofing duration for exactly 1 hour. But I don't like that, because yeast dough needs at least 2 hours. That is why I recommend doing the following: setting the program Basic (3 hours) or French bread (3 hours 50 minutes). The kneading begins: in the first program, the first batch lasts 10 minutes, and in the second - 15 minutes. So much time is great enough to knead the dough well and get an elastic, but at the same time soft and tender kolobok. Literally after 5 minutes from the beginning of the batch, it should be formed. Moreover, this is a very important point, because the quality and moisture content of flour is different for everyone, so this product may require more or less than according to the recipe. If the bun still cannot form, feel free to add a tablespoon of flour each and watch the kneading. When the dough has completely moved away from the walls and is sufficiently elastic (that is, not to spread, but to keep its shape well), stop adding flour. This is how my kolobok looked after 8 minutes of kneading. Now we leave the dough alone and let it grow. This will take about another 1 hour 40 minutes (Basic) or 2 hours 25 minutes (French bread), during which the bread maker will knead twice (three times). I prefer to use the second program. If you knead the dough with your hands, knead it for 10-15 minutes, then tighten the bowl with plastic wrap or cover with a towel. Dough fermentation lasts 2 hours in the heat. After 1 hour, we do a light kneading of the dough, rounding and re-fermentation for another 1 hour.
- While the dough is fermenting, let's tackle our delicious filling. To do this, take fresh apples (preferably sour or sweet and sour), peel them from the skin and seed pods. To prevent the apples from darkening quickly, I advise you to put the slices in a bowl of cold water, which you acidify with lemon juice or citric acid. In pies, of course, you can use apples and sweet varieties, but when finished, the filling will turn into mashed potatoes. I give the mass of apples (1 kilogram) in an already peeled form - I like it when there are a lot of fillings in pies.
- We dry the halves and cut the apples into large cubes so that they retain their shape and do not fall apart during the heat treatment.
- We take a larger pan (preferably wider so that the liquid evaporates faster) and heat it up. Put 100 grams of butter and let it melt completely over medium heat. After that, put the apples and cook over high heat, stirring constantly, for about 5 minutes.
- Pies with apples in the oven. Step 9
- Then add 100 grams of sugar and cook the apples again with constant stirring for about 5-7 minutes.
- When the apples soften a little, and the excess moisture evaporates, add ground cinnamon (optional), mix. The apple slices should not fall apart and be completely steamed - you just need to bring them to a half-cooked state.
- The filling for future apple pies is ready.
- You see, there is absolutely no liquid at the bottom that can leak out in the dough. Now the filling must be cooled, since yeast dough does not tolerate high temperatures (yeast may die before it reaches the oven)
- You can divide all the filling into equal portions in advance, so that later you can quickly stick the pies. I got 850 grams of filling (70 grams of filling per serving) and I made 12 large pies.
- Well, the dough has already come up. Turn off the program when the timer is 1:10 (Main and French bread). That is, we take out the dough 10 minutes before the helper starts baking the bread.
- It remains to knead the yeast dough to release the air, transfer it to the board and start forming the pies.
- We divide the dough into pieces of the same size - I have 12 pieces (about 80-82 grams each). It is very convenient to use a kitchen scale here so that the workpieces are of the same weight. This is important not only from an aesthetic point of view, but also so that the baked goods are evenly roasted and baked in the same way. We roll each piece into a ball and put it on a board, very lightly sprinkled with flour. If you have not yet gotten your hand in sculpting pies, that is, the process takes a lot of your time, cover all the pieces of dough with a film or towel so that they do not wind up.
- Let's start forming the pies. Take one ball of dough and flatten it with the palm of your hand. If you want, you can roll it out with a rolling pin - this is not important, since the dough is very tender and pliable, stretches perfectly with your hands.
- We put the apple filling in the center, which has already cooled down completely.
- Depending on your preferences, we choose a shape for future apple pies. I have these traditional boats.
- We pinch the dough so that the filling is not visible. The yeast dough according to this recipe turns out to be very plastic and perfectly molded. Just a couple of movements and the pie is ready.
- Gently roll the blank in the palms to get an even shape and put the future pie with the seam down. In general, it is not necessary to make pies of this shape - you can make them round, square or triangular.
- Cover the baking sheet with baking paper and place the blanks on it with the seam down. Cover with a towel or cling film and leave to stand for 25-30 minutes. We immediately turn on the oven to warm up to 180 degrees.
- To make the apple pies look beautiful and ruddy, I propose to grease them with egg yolk and milk. I have homemade eggs and the yolk, respectively, straight orange. Just wiggle it with a fork, add a little milk, and the grease is ready. A little secret: If your oven doesn't want to brown your baked goods, add a pinch of powdered sugar to the yolk. Then, during the baking process, the sugar is caramelized and the top of the buns or pies will brown. I used to do this sometimes with baked goods, because the old oven sometimes let me down. We lubricate the workpieces that have already fit well with yolk and send them to the hot oven to bake for about 25-35 minutes at 180 degrees.
- Choose the degree of ruddiness of the pies yourself - someone loves only slightly golden, and someone likes an almost brown crust.
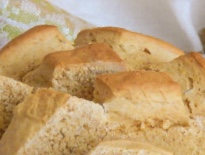
- Remove hot pies from a baking sheet and let them cool.
- Ready-made pies with apples turn out to be unusually fragrant, so appetizing and very tasty.
- The most delicate dough that just melts in your mouth, a lot of fragrant and juicy apple filling ... Well, what could be better than fresh homemade baking !?
Pies with apples in the oven
- Serves: 10 People
- Prepare Time: -
- Cooking Time: 3 hours 30
- Calories: 5111
- Difficulty:
Easy
Homemade pies with apples can be quickly and easily cooked on the stove - for example, on kefir. But today I would like to offer you a recipe based on yeast dough, and baking pies with apples in the oven will turn out very tasty. The most delicate dough that just melts in your mouth, a lot of fragrant and juicy apple filling ... Well, what could be better than fresh homemade baking !?
As a basis for the pies, I took my favorite (well, or one of my favorite) yeast dough, which the assistant bread maker makes for me. Already more than a dozen, and maybe even a hundred fragrant ruddy plump, were cooked on this amazing yeast dough and it never let me down. Delicate, insanely soft, aromatic, and how delicious! In addition, it molds well and never cracks when baked.
From the specified number of products, I get 12 large pies with apples. By the way, there will be a lot of filling - almost as much as the dough itself. You can safely make pies with apples in the oven in half - then you get 24 average handsome men.
Ingredients
Directions
- The recipe for homemade yeast dough for pies includes the following products: premium wheat flour, sour cream, chicken eggs, refined vegetable oil (I have sunflower oil), salt, granulated sugar, vanillin and fast-acting yeast. All ingredients should be at room temperature. For the filling, take fresh apples, granulated sugar and butter. To grease the pies, we will use egg yolk and a little milk of any fat content.
- You can knead the dough by hand or use kitchen helpers. I make this yeast dough in a bread maker. Depending on the model, the filling of ingredients can be of two types: first liquid, then loose and vice versa. I have the first option. Pour vegetable oil (odorless), sour cream into the container of the bread machine and break the eggs. Let's talk a little, everyone.
- Now add the sifted premium wheat flour. In general, it is for this recipe that I always use exactly 500 grams of flour, but you may need a little more or less (depending on its moisture content).
- At the end, add salt, sugar, a pinch of vanillin (can be replaced with a teaspoon of vanilla sugar) and fast-acting yeast in different corners of the bowl.
- In my bread maker, the Dough mode provides for the kneading and proofing duration for exactly 1 hour. But I don't like that, because yeast dough needs at least 2 hours. That is why I recommend doing the following: setting the program Basic (3 hours) or French bread (3 hours 50 minutes). The kneading begins: in the first program, the first batch lasts 10 minutes, and in the second - 15 minutes. So much time is great enough to knead the dough well and get an elastic, but at the same time soft and tender kolobok. Literally after 5 minutes from the beginning of the batch, it should be formed. Moreover, this is a very important point, because the quality and moisture content of flour is different for everyone, so this product may require more or less than according to the recipe. If the bun still cannot form, feel free to add a tablespoon of flour each and watch the kneading. When the dough has completely moved away from the walls and is sufficiently elastic (that is, not to spread, but to keep its shape well), stop adding flour. This is how my kolobok looked after 8 minutes of kneading. Now we leave the dough alone and let it grow. This will take about another 1 hour 40 minutes (Basic) or 2 hours 25 minutes (French bread), during which the bread maker will knead twice (three times). I prefer to use the second program. If you knead the dough with your hands, knead it for 10-15 minutes, then tighten the bowl with plastic wrap or cover with a towel. Dough fermentation lasts 2 hours in the heat. After 1 hour, we do a light kneading of the dough, rounding and re-fermentation for another 1 hour.
- While the dough is fermenting, let's tackle our delicious filling. To do this, take fresh apples (preferably sour or sweet and sour), peel them from the skin and seed pods. To prevent the apples from darkening quickly, I advise you to put the slices in a bowl of cold water, which you acidify with lemon juice or citric acid. In pies, of course, you can use apples and sweet varieties, but when finished, the filling will turn into mashed potatoes. I give the mass of apples (1 kilogram) in an already peeled form - I like it when there are a lot of fillings in pies.
- We dry the halves and cut the apples into large cubes so that they retain their shape and do not fall apart during the heat treatment.
- We take a larger pan (preferably wider so that the liquid evaporates faster) and heat it up. Put 100 grams of butter and let it melt completely over medium heat. After that, put the apples and cook over high heat, stirring constantly, for about 5 minutes.
- Pies with apples in the oven. Step 9
- Then add 100 grams of sugar and cook the apples again with constant stirring for about 5-7 minutes.
- When the apples soften a little, and the excess moisture evaporates, add ground cinnamon (optional), mix. The apple slices should not fall apart and be completely steamed - you just need to bring them to a half-cooked state.
- The filling for future apple pies is ready.
- You see, there is absolutely no liquid at the bottom that can leak out in the dough. Now the filling must be cooled, since yeast dough does not tolerate high temperatures (yeast may die before it reaches the oven)
- You can divide all the filling into equal portions in advance, so that later you can quickly stick the pies. I got 850 grams of filling (70 grams of filling per serving) and I made 12 large pies.
- Well, the dough has already come up. Turn off the program when the timer is 1:10 (Main and French bread). That is, we take out the dough 10 minutes before the helper starts baking the bread.
- It remains to knead the yeast dough to release the air, transfer it to the board and start forming the pies.
- We divide the dough into pieces of the same size - I have 12 pieces (about 80-82 grams each). It is very convenient to use a kitchen scale here so that the workpieces are of the same weight. This is important not only from an aesthetic point of view, but also so that the baked goods are evenly roasted and baked in the same way. We roll each piece into a ball and put it on a board, very lightly sprinkled with flour. If you have not yet gotten your hand in sculpting pies, that is, the process takes a lot of your time, cover all the pieces of dough with a film or towel so that they do not wind up.
- Let's start forming the pies. Take one ball of dough and flatten it with the palm of your hand. If you want, you can roll it out with a rolling pin - this is not important, since the dough is very tender and pliable, stretches perfectly with your hands.
- We put the apple filling in the center, which has already cooled down completely.
- Depending on your preferences, we choose a shape for future apple pies. I have these traditional boats.
- We pinch the dough so that the filling is not visible. The yeast dough according to this recipe turns out to be very plastic and perfectly molded. Just a couple of movements and the pie is ready.
- Gently roll the blank in the palms to get an even shape and put the future pie with the seam down. In general, it is not necessary to make pies of this shape - you can make them round, square or triangular.
- Cover the baking sheet with baking paper and place the blanks on it with the seam down. Cover with a towel or cling film and leave to stand for 25-30 minutes. We immediately turn on the oven to warm up to 180 degrees.
- To make the apple pies look beautiful and ruddy, I propose to grease them with egg yolk and milk. I have homemade eggs and the yolk, respectively, straight orange. Just wiggle it with a fork, add a little milk, and the grease is ready. A little secret: If your oven doesn't want to brown your baked goods, add a pinch of powdered sugar to the yolk. Then, during the baking process, the sugar is caramelized and the top of the buns or pies will brown. I used to do this sometimes with baked goods, because the old oven sometimes let me down. We lubricate the workpieces that have already fit well with yolk and send them to the hot oven to bake for about 25-35 minutes at 180 degrees.
- Choose the degree of ruddiness of the pies yourself - someone loves only slightly golden, and someone likes an almost brown crust.
- Remove hot pies from a baking sheet and let them cool.
- Ready-made pies with apples turn out to be unusually fragrant, so appetizing and very tasty.
- The most delicate dough that just melts in your mouth, a lot of fragrant and juicy apple filling ... Well, what could be better than fresh homemade baking !?
You may also like


.jpg)