Tag

creating

Browsing

Nowadays we have a wide range of greenhouses of different sizes and designs. In the shops, we find not only easily reconstructable models but also expensive, complex designs. We give advice on the different possibilities.

Having your own greenhouse offers you a new and exciting area of ​​gardening. You no longer have to worry about extreme weather conditions for your garden under glass. In your greenhouse, you can organize the amount of water your plants need yourself.

Which greenhouse model?

Many greenhouses are glazed to the ground. This is a great advantage because a lot of sunlight gets in, and the light is better stored and used in glass greenhouses. This way, more plants can benefit from the heat and thrive better and faster. A wide variety of plants can be grown in a greenhouse made of glass, such as tomatoes, cucumbers, and indoor plants.

Greenhouse planning

If you want to buy a small greenhouse and set it up in your garden, you should make sure that you don’t break any regulations. For example, it is important for a tenant to obtain the consent of the homeowner. If you move, you can of course take the greenhouse with you. You do not need a building permit to construct a greenhouse. You only have to take into account the minimum distance to the neighboring garden.

Before that, you also need to think about the foundation of your prospective greenhouse. You can use old railway sleepers or lay a concrete foundation on which the greenhouse will later stand freely or be bolted. A path made of concrete, stone slabs, or bricks in the greenhouse is useful and practical at the same time. On the one hand, this gives you dry feet and, on the other hand, you can work more cleanly.

Location of the greenhouse

Freestanding and rectangular greenhouses make the best use of sunlight when one long side faces south. If your greenhouse is only glass on one side, you should attach the glass side to the south. In this way, you ensure that as much light and sun as possible are stored in winter.

Racks in it should always be on the north side. A house wall to the east or west of the garden would be advantageous, as this would give the plants in the greenhouse both light and shade. If it faces north, it will be very shady and would only do well with pot and house plants (primrose, cyclamen, slipper flower). A house wall facing south can get very hot in summer. If you don’t have prospects for shading, you should choose sun-loving plants.

Creating order helps you to feel more comfortable in everyday life. Because you can relax better in a tidy home. So use clever tidying tips and new methods to tidy up and have more free time for yourself.

A tidy home for more well-being

Many people are employed and, in addition to work, children, and leisure time, they also have to manage the annoying household chores. This often creates chaos and you quickly feel drained. But with simple tricks, tidying up doesn’t feel so difficult anymore and you can find the right motivation.

A tidy home in which we feel comfortable is important in order to be able to relax and recharge our energy reserves. Because your own home should be a feel-good place where you like to be and feel safe. But if this is not the case, your own apartment can quickly trigger a feeling of discomfort. It helps to create order so that you feel comfortable in everyday life and in your apartment. Therefore, heed our tips for tidying up:

1) Clean up in small steps

Many people do housework on a given day and leave work until that day. For example, during the annual spring cleaning. But that’s a huge mountain of work. Consequently, it would be better to do the work in small steps and on different days. This keeps you motivated and gives you more time for yourself. So start cleaning up where you can do most of the work quickly and easily. Read also valuable tips for a relaxed spring cleaning.

2) Assign fixed places and clear them away immediately

Things and clothing are often quickly dumped in places where they don’t belong. And excuses are easy to find. Because lack of time is the most common reason here. Therefore, everything in your household should have a fixed place. Very important: everything is put back in this place immediately after use. Without exception! Then creating and keeping order will no longer be a problem for you in the future and save a lot of time. Also, note our tips for cleaning up after parties.

3) Create an order with storage boxes

Storage boxes or similar also help to quickly create order. Many objects find a permanent place here and can quickly disappear from view. So your home will look tidy in no time. And such storage options can be easily designed in everyday life. There are also clever storage space ideas in different colors and shapes. You can also motivate your children to put away their toys properly. You can also buy boxes or footstools with space to store toys. Organizer systems, with which you can sort different things clearly, are also in demand.

4) Write a to-do list

Cleaning according to a plan can be a tremendous help. This way you know what needs to be done and can split the tasks over different days. Here you can set priorities and ticking off the completed tasks provides more motivation. In addition, this results in a sensible order to create order.

5) Find motivation to create order

In addition to a to-do list, you should find other ways to motivate yourself to tidy up in order to be able to overcome your weaker self. Otherwise, you quickly fall into old habits and postpone the unpleasant task of tidying up to another day. So try the following to motivate yourself:

  • Turn up your favorite music and start tidying up in a good mood.
  • Let in fresh air and light. Because that fights fatigue and the weaker self.
  • Take before and after pictures to compare if you like and share them with others.
  • Create a competition. Either with your children or with you alone by giving yourself a fixed time frame and stopping the time.

6) Fixed times for cleaning up

It can also be helpful if you always clean up at fixed times. Because then it will become a habit and regular order will prevent too much clutter from accumulating. As a result, take 10 minutes to tidy up in the morning before you leave your home for work. Or do it for 10 minutes every day after work. You can set an alarm clock to stay focused. You’ll be amazed at how much you can accomplish in just 10 minutes. In addition, note useful tips for tidying up and clearing out the kitchen.

7) Clean out old things

Many things accumulate over the course of the year. Many of them are no longer needed and only waste space unnecessarily. Therefore, you should throw away anything that you have not used in a while. The rule of thumb here is 1 year. Even if it may be difficult for you, this is the only way you can keep order permanently. You can also turn discarded items into cash or have a lot of fun with a clothes party and get rid of your clothes in a sensible way.

8) Try different methods of cleaning up

If you have dealt a little with the topic of tidying up and decluttering, you have certainly already got to know one or the other promising method. And indeed, these methods are not bad and well thought out. It is therefore worth trying them out. So you can clean up like Marie Kondo or try the Complete the Cycle method.

Before your own garden becomes a place of retreat and relaxation in the first days of spring, some gardening needs to be done. Therefore, you should create a vegetable patch in the spring. But planning the vegetable patch can begin as early as winter.

Create vegetable beds in the garden

A healthy diet includes dishes with vegetables. A small garden also offers the opportunity to grow vegetables. However, the vegetable patch must be properly planned, laid out, and regularly maintained. You can grow different types of vegetables in your own vegetable garden. And then use it for healthy cooking. Every hobby gardener knows how good their own vegetables from the garden taste. So start planning early and make sure you have the right equipment for gardening. Consequently, we have collected the most important tips for creating a vegetable patch.

1) Plan a vegetable patch

So that freshly sown plants do not freeze to death overnight, ground frost must not occur before sowing. So don’t start planting the vegetable patch until spring. However, you can start planning your own vegetable garden in winter. For this purpose, first, create a planting plan. Expertise in vegetable cultivation and mixed cultures is an advantage. However, you can easily find out more about growing vegetables in advance on the Internet or in magazines. You can also order the necessary equipment and clever tools for gardening online.

2) Which vegetables to use for the vegetable patch?

When creating a vegetable bed in your own garden, it is important to pay attention to which vegetables are in season and at what time. In addition, a mixed culture table from the Internet shows you which types of vegetables you can combine well with each other. This is important because you should plant different types of vegetables next to each other in a vegetable patch.

3) Determine the size of the bed

Before creating vegetable beds, the size of the vegetable garden and the individual beds must first be determined. When designing the garden, most hobby gardeners opt for a rectangular or square shape. A vegetable bed is about 80 to 120 centimeters long. However, it is also possible to create narrower vegetable beds so that the marked ground does not have to be walked on when tending. Also, note important tasks in the garden in winter.

4) Choose a suitable location and construct a bed edging

In order for your vegetables to thrive, you should choose a sunny and wind-protected place for your vegetable patch. You can build the bed edging with different materials. You can also use wooden boards, stones, or old slatted frames for this. When using slatted frames as a bed edging, carefully separate the individual slats and place them next to each other as a border for the vegetable bed.

5) Prepare the soil in front of the vegetable patch

But before planting vegetables, you need to prepare the soil. If the soil stores a lot of water and is well aerated, the plants can optimally develop roots. Therefore, dig up the soil spade deep and mix it with vegetable soil or fresh compost. This loosens the soil and you can start sowing. In addition, you should pay attention to sufficient safety when doing any gardening work.

6) Sowing tips for planting

Seed tapes are very helpful when creating a vegetable garden. With these products, the seeds are in a paper band, making it easier for you to sow. The tape will later decompose by itself in the soil. But before sowing, you should level the soil again and water it. Then plant the young vegetable plants directly in the vegetable patch. Depending on the vegetable crop, you can also use seedlings. After planting the plants or seeds, cover them with some soil and water them again. With regular care, you can soon be harvesting healthy vegetables that you have grown yourself. Then you can grill the vegetables or make delicious smoothies yourself.

Old plant residues transform themselves into fresh fertilizer and soil conditioner – this is what happens in the marvelous compost heap. We would like to explain why everyone with a garden should have a compost.

How do I create a compost?

In six steps to the perfect compost

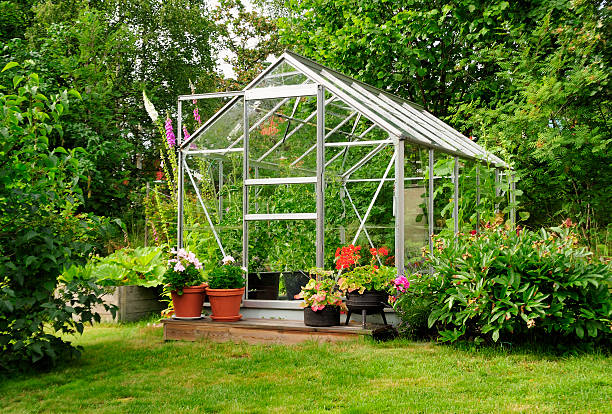
1. Choose a place that is as sheltered as possible
Because a compost heap should neither be dried out by strong sunlight nor overly soaked by heavy rain, a place under a tree is a good idea, which can be a little apart, as a compost heap is usually not one of the visual highlights in the garden.

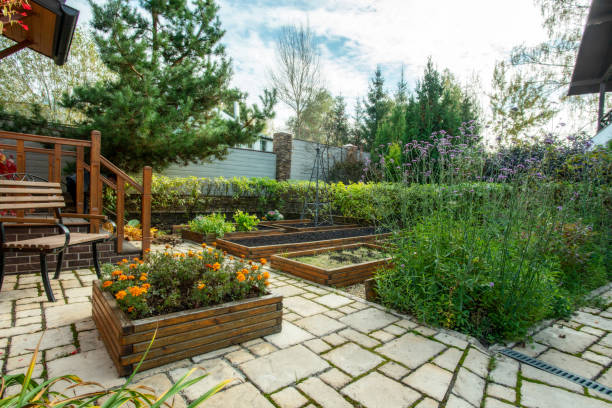
2. Decide on a shape
It doesn’t matter whether you use an open pile, for which you need a lot of “raw materials”, or whether you use a form or a frame made of wood or metal, since good results can be expected in all variants. Thermocomposters have the advantage that the heat is retained well inside, which speeds up the rotting process.

3. Do not create a base plate
However, it is important that the compost lies directly on the ground and not on stone slabs, for example, since useful rotting helpers such as earthworms can migrate on their own. In addition, excess moisture can drain off better.

4. Layer loosely
The material should be loosely stacked so that there is sufficient oxygen. So don’t compress your compost. Also, do not put too thick layers of one material on the heap, as this can result in disadvantages depending on the material. A layer of autumn leaves that is too thick can be too dry and lacking in nutrients, while a layer of grass clippings that is too thick tends to rot. So mix up the materials.

5. Switch every 3 months
To ensure good rotting, you can move your compost after about 3 months: shovel your pile to a spot next to it. This mixes and aerates all the layers again, so that the pile can mature well. In the case of prefabricated compost bins, 2 or 3 components are therefore often offered together for implementation.

6. Cover or water as needed
The compost should be moist but not wet at all times. You can therefore cover it with mulch fleece, for example, so that both dehydration and excessive moisture after rainfall are avoided. In very dry phases, it makes sense to water your compost.

What goes in the compost?

Too good for the bin

If plant residues or certain kitchen waste are disposed of with the residual waste, valuable substances from the natural cycle are lost. To prevent this from happening, you can either dispose of them in the organic bin – the contents of which are composted professionally and on a large scale – or even better on your own compost. But what exactly can go on the compost?

Valuable raw materials for a compost are:

Plant residues from the garden, including flowers and ornamental plants
lawn clippings
leaves
leftover fruit and vegetables
coffee grounds
Crushed egg shells
Teabag
In small quantities cardboard, kitchen paper and newspaper

Not to be composted or only to a limited extent are:

Plants with soil-borne diseases such as clubroot or sclerotinia or with late blight should be discarded with household waste because the diseases survive composting and are then spread throughout the garden, while composting of plants affected by powdery mildew is unproblematic.
Weeds should not have flowered yet because the seeds can survive composting. Some garden operations therefore have their own weed compost heaps, which remain in place much longer so that the seeds are also decomposed. Root weeds such as goutweed or couch grass should be allowed to dry out well before being put on the compost.
Wood in a compact form, i.e. a thick branch, is problematic on the compost heap because it rots very slowly and blocks the energy of many microorganisms. However, if a compost pile is too damp, a layer of shrub cuttings or chopped branches can provide better aeration.
Citrus fruit peels also rot very slowly and are therefore unsuitable for compost.
Cooked or animal leftovers, baked goods, fat and oil are also not intended for the compost heap as they attract rats.
Ash is not suitable either, as it is often contaminated with heavy metals.

Why compost?

Bacteria, protozoa, fungi and other microorganisms, but also worms, isopods and springtails are responsible for a fascinating process that turns kitchen waste, plant remains, grass clippings, leaves and other things into a particularly valuable and nutrient-rich substrate – the compost. Compost enhances any soil: it enriches sandy soil with structure and nutrients, loamy and clayey soil becomes looser and easier to work with by continuously adding compost. In addition, the humus content in the soil is increased, soil life is stimulated and, depending on the degree of maturity of the compost, the soil is also fertilized. So no garden should have to do without compost.

What happens in the compost heap?

Rotting in the compost begins when the microorganisms first break down proteins and sugars. Organisms such as bacteria and fungi multiply rapidly, and the temperature in the compost also rises. After about 2 weeks, the temperature in the compost heap can rise to 60 degrees, so that heat-loving fungi take over further implementation. However, this so-called hot rotting is not achieved in most compost heaps in the hobby sector because the heaps are too small for this and material is usually thrown onto the compost heap one after the other. After about 3 months, the temperature drops back to about 40 degrees and the so-called main rotting begins. The compost heap can now be moved. Substances that are difficult to decompose are then mineralized during post-rotting.

You can get these types of compost

Compost is not just compost

Depending on when you remove the compost, you will get different degrees of maturity of the compost, which accordingly have different properties.

Fresh compost

But fresh compost, which you can remove after about 3 months and in which some of the raw materials can still be identified, can also play an important role in the vegetable garden. Since this contains significantly more nutrients than the mature version, you can use this as a mulch for your heavy feeders or berry bushes, as you have an excellent fertilizer with it.

Mature compost

At the end of the rotting process you get classic mature compost. Depending on the starting materials, this can be the case after 6-12 months. It is dark, finely crumbly and smells pleasantly of forest soil. You can now apply about 3 liters of this to one square meter of vegetable patch. To do this, rake it in evenly and superficially. Since immature compost can be harmful to seedlings, you can simply sow some watercress on a 1:1 mix of garden soil and your compost. If it germinates and grows without any problems, the compost is ripe.

Compost soil

If you wait longer, the mature compost will become compost soil. The organic content of the compost breaks down again over time, so that there is hardly any fertilizing effect. However, compost is still excellent as a soil improver.