Tag

for

Browsing

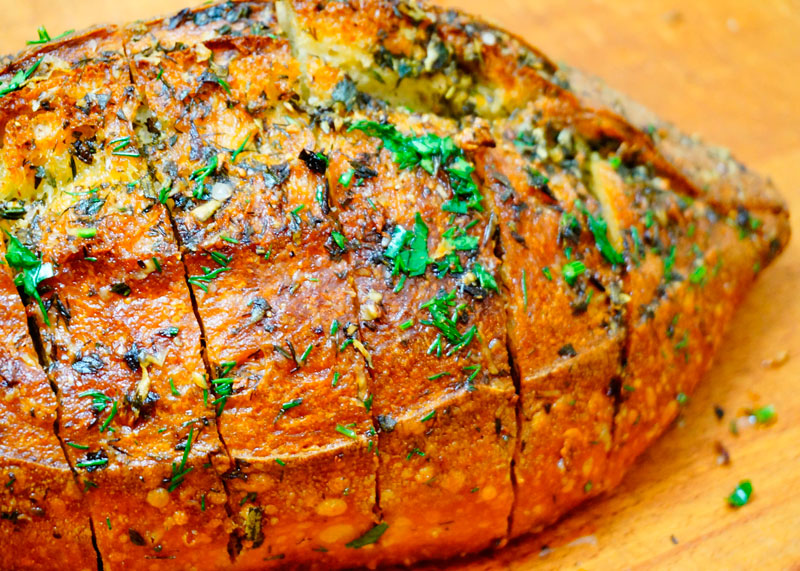
A raisin mare is a delicious Easter pastry made from yeast dough. We present a recipe that you can use to easily bake a raisin mare yourself.

Raisin mares are also known by other names depending on the region. In any case, it is a large, bread-like pastry made from a medium-heavy yeast dough. It contains a relatively large amount of fat and sugar. If you like it less sweet, you can also reduce the amount of sugar.

Make sure the ingredients are organic. This is particularly important with ingredients of animal origin, because you can support more species-appropriate animal husbandry.

In general, by buying organic products, you support agriculture that does not use chemical-synthetic pesticides and thus protects the environment and health.

A recipe for raisin mares

Ingredients:

500 g flour (+ something for dusting the mold)
0.5 tsp salt
50 gsugar
50 g butter (+ something to grease the mold)
250 ml milk (+ something for brushing)
1 pack(s) fresh yeast (42g)
1 egg
150 g raisins

Directions:

In a bowl, mix the flour with the salt and sugar. Make a well in the middle.
In a small saucepan, melt the butter. Add the milk and warm it to lukewarm. Add the yeast in small pieces and stir the mixture until the yeast has dissolved.
Pour the yeast milk into the flour well. Gently stir in a little flour with a fork. Let the mixture sit for five minutes.
Add the egg. Using your hands or the dough hooks of a hand mixer or food processor, knead everything together for about 5 minutes until you have a smooth dough. Add some flour or milk if needed. The dough should pull away from the bowl easily and be neither very firm nor very sticky.
Cover the bowl with a clean kitchen towel, put it in a warm place and let the dough rise for about 40 minutes. It should roughly double.
Grease a loaf tin (about 30 centimeters long) with some butter and dust it with flour.
Add the raisins to the dough and knead it again for five minutes.
Shape the dough to fit your baking pan and place it in the pan. Cover and let rise in a warm place for another 45 minutes.
Brush the dough with a little milk for a nice browning and shine. Bake the raisin mares at 170 degrees Celsius for about 40 minutes.

This is how you can vary the raisin mares

If you don’t like raisins, you can replace them with other dried fruits. Dried cranberries or dried cherries are suitable, for example. Fresh fruit is not suitable because it loses too much liquid and the dough then becomes mushy.

You can use plant milk of your choice instead of milk. You can easily replace the butter with margarine.

With 500 grams of flour, the recipe results in a fairly large mare of raisins. It stays fresh in a bread bin for two to three days. You can use leftovers to make French toasts.

Alternatively, you can slice the raisin mares and freeze them. Then you can defrost individual slices. They are particularly tasty if you toast them briefly.

Baking wild garlic bread yourself is easy with this vegan recipe, even as a baking beginner:in. You can pick the spicy herb yourself in many parks and forests during the wild garlic season.

The vegan wild garlic bread with spelled flour not only tastes good for dinner, but is also an excellent accompaniment to a cream soup. The recipe is not very complex, but needs a bit more preparation time due to the rising time.

Wild garlic bread: recipe and preparation

Ingredients:

0.5 cubes of fresh yeast
150 ml lukewarm water
500 g spelled flour (type 630)
10 g salt
5 gsugar
150 ml oat drink
2 tbsp olive oil
50 g fresh wild garlic leaves

Directions:

Dissolve the yeast in the lukewarm water.
Put the spelled flour in a mixing bowl and add the salt and sugar.
Pour in the yeast water, the oat drink and the olive oil and mix all the ingredients together well.
Knead the dough with the dough hook of a food processor or a hand mixer until it gets a smooth and silky surface. This can take ten to 15 minutes. The longer you knead, the nicer the structure of your wild garlic bread will be later. Tip: If you don’t have a food processor, you can also knead the yeast dough by hand. You should take at least 15 minutes to do this.
Cover and let the ball of dough rest in a warm place for about 60 minutes. During this time, its volume should double.
Towards the end of the resting time, wash the wild garlic leaves and chop them roughly.
Knead the bread dough thoroughly with the chopped wild garlic and divide the dough into four parts.

Shape each of the pieces into a roll 10 to 12 inches long. Twist two rolls of dough together and place them on a baking sheet greased with olive oil.

Bake the two wild garlic breads in the oven at 220 degrees Celsius top and bottom heat for 20 to 30 minutes until light brown.
Allow the wild garlic bread to cool before serving.

Wild garlic bread: tips for preparation

With just a few changes, you can easily vary the recipe for wild garlic bread:

If you use dry yeast, you need a whole packet for the wild garlic bread.
As an alternative to the simple twisted braid, you can also bake the wild garlic bread in a greased and floured loaf tin.
Finally, knead a handful of sunflower seeds into the dough, then the wild garlic bread has a bit more bite.
Sprinkle the wild garlic bread with sesame seeds before baking. Not only does it look pretty, it also tastes delicious.
For a Mediterranean flavor, chop a handful of sun-dried tomatoes and mix them into the batter.
Depending on the season, you can use other herbs instead of wild garlic, e.g. rocket, basil or herb mixtures.
Use up your bread as quickly as possible – it tastes best fresh!

Tip: Your freshly baked wild garlic bread tastes best if you spread it with homemade wild garlic butter.

Ingredients for your wild garlic bread

Depending on the region, the wild garlic season in Germany begins in early to mid-March. Wild garlic is one of the most popular wild herbs in local cuisine. The leaves contain valuable essential oils, as well as vitamin C and minerals such as iron, manganese and magnesium.

It is best to harvest wild garlic yourself and process it fresh. Wild garlic wilts quickly and tends to mold, which is why you rarely find it in the supermarket. Alternatively, you can buy it at the farmer’s market or from regional direct suppliers.

Use organic spelled flour for the wild garlic bread: It is free of pesticides and you support ecologically sustainable agriculture. Also pay attention to regional cultivation: products from the region have shorter transport routes and are therefore better for the climate.

Tip: Wild garlic bread can also be frozen well. It’s best to freeze it in slices, then you can thaw them individually in the toaster or on the grill and roast them until crispy.

Torta Camilla is the Italian version of the classic carrot cake. Here you will find a vegan recipe for the fluffy and juicy carrot cake.

Torta Camilla is a moist carrot cake that is very popular in Italy. Ground almonds and the juice and grated zest of an orange give it its special aroma.

When it comes to the ingredients for the Torta Camilla, make sure that they are organic if possible. You are supporting ecologically more sustainable agriculture that uses natural resources sparingly and, for example, does not use chemical-synthetic pesticides. The organic seals from Demeter, Bioland and Naturland are particularly recommended, as they specify stricter criteria than the EU organic seal.

Torta Camilla: A vegan recipe

Ingredients:

200 g carrots
1organic orange
40 mlsunflower oil
20 g ground almonds
80 gsugar
1 packet(s) of vanilla sugar
180 g spelled flour
0.5 pack(s)cream of tartar baking powder
1 tbsp powdered sugar

Directions:

Wash the carrots thoroughly. Then grate them as small as possible with a kitchen grater.
Grate the zest of an organic orange and squeeze out the juice.
In a medium bowl, combine the carrots, orange zest and juice, and sunflower oil.
Add the sugar, vanilla sugar, spelled flour and cream of tartar and mix all ingredients into a smooth batter. Tip: If the dough is too tough, you can simply stir in a sip of water.
Grease a suitable cake tin with some sunflower oil and pour in the batter.
Bake the Torta Camilla at 180 degrees for about 40 minutes. The chopstick test shows you whether the Italian carrot cake is ready.
Dust the Torta Camilla with some powdered sugar before serving.

Torta Camilla: tips and hints

You can also easily make the Torta Camilla gluten-free: replace the spelled flour with the same amount of brown rice flour.

You can also halve the cake horizontally and fill it with jam if you want an even fruitier result – for example with orange marmalade.

The Italian carrot cake will keep in the fridge in an airtight container for about 4 to 5 days.

Resistant starch can benefit your gut health. In this article, we explain what’s behind it and how you can incorporate resistant starch into your diet.

Resistant starch is a type of dietary fiber. Resistant starch has a special structure that prevents the small intestine from absorbing it. It ends up undigested in our large intestine, where it is broken down by lactic acid bacteria. Resistant starch serves as food for the intestinal bacteria, which improves intestinal health and bowel movements.

In the following we will show you how resistant starch is created and works. We also introduce you to foods and recipe ideas that you can use to integrate resistant starch into your diet.

This is how resistant starch is created

Starch is particularly found in foods such as potatoes, rice, cereals and cereal products such as pasta or bread. Resistant starch is formed when these starchy foods are boiled or cooked and then allowed to cool. The chemical structure of the starch changes as a result of the cooling process, making it no longer digestible for us humans. Strength has become resistant strength. Even reheating the cooled food does not destroy the resistant starch.

Legumes, unripe bananas and oatmeal are particularly rich in resistant starch. In unripe bananas, the resistant starch is based on a specific arrangement of the starch molecules and is therefore not the result of a heating and cooling process.

How does resistant starch affect your body?

In the colon, beneficial gut bacteria ferment resistant starch. This not only promotes intestinal health, but also has other positive effects:

  • The breakdown products of the resistant starch by the intestinal bacteria can counteract inflammatory diseases such as arthritis.
  • They can have cancer-preventive properties within a balanced diet.
  • They are associated with blood sugar regulating properties.
  • They may also have a positive effect on blood lipid levels.

Recipes that contain resistant starch

With these recipes, you can incorporate resistant starch into your diet. It is important that the starchy ingredients can be completely cooled and converted. This takes between twelve and 24 hours.

Sweet Potato Salad: Recipe with fresh cauliflower and arugula
Bavarian potato salad with cucumber: a traditional recipe
Mediterranean pasta salad with tomatoes and rocket
Coconut Rice Pudding: An Easy Vegan Recipe
Bake spelled bread yourself: ingredients and recipe
Couscous salad: 3 quick recipes for the oriental classic
Banana bread recipe: The juicy cake in 3 variants
Overnights Oats: Recipes for a quick and healthy breakfast
Make hummus yourself: A simple recipe

Rice cream is a deliciously full-bodied dessert. In this article we will show you a recipe that is very easy to prepare – with a vegan version.

Rice cream is a delicious alternative to pudding that you can easily make yourself. So you can freely choose all components – whether cow or plant milk or sugar or maple syrup – and decide for yourself how sweet or cinnamon you like the rice cream.

We recommend buying all ingredients in organic quality. In this way you avoid chemical-synthetic pesticides and artificial fertilizers, which pollute the environment and can remain as residues on the food.

A basic recipe for rice cream

Ingredients:

500 mlmilk or plant milk
80 grice flour
3 tablespoons raw cane sugar or maple syrup
1 packet(s) of vanilla sugar
0.5 tsp
1 pinch(s) of salt

Directions:

Put the milk or plant-based milk (oat milk works particularly well) in a saucepan and heat it up.
Place all other dry ingredients in a bowl and mix together while the milk heats up.
Add the contents of the bowl and any liquid maple syrup to the milk in the saucepan. Turn the stove down to a low temperature. Mix everything together well and let it swell for ten minutes. Stir the mixture occasionally during this time.
Turn off the stove and let the rice cream swell for another five minutes.
Now you can serve the rice cream and put some extra cinnamon on top as a topping.

Tips about the sweet rice cream

You can vary the rice cream according to your taste:

For example, if you like it sweeter, you can add more sugar. If you want a sweet and spicy note, you can add a pinch of nutmeg, for example. If you like it chocolaty, add some Fairtrade cocoa powder or a piece of chocolate.
The rice cream tastes best when served fresh and warm. If you have any leftovers, you can store them in the fridge for a few days. You can of course eat the rice cream cold afterwards. If you want to heat them up again, heat some milk in a saucepan and add the rice cream. Mix everything together and let it warm up a bit.
There are many options when it comes to topping selection. For example, you can add berries or apple compote, currant jelly, fruit or fruit puree, cinnamon-sugar or maple syrup, nuts or pieces of chocolate. Of course, you can also combine these components with each other.

You can prepare asparagus risotto with green and white asparagus. You also need risotto rice, of course. We will show you a simple basic recipe for asparagus risotto.

When the asparagus season begins in April, you can prepare the fresh asparagus from the region in many different ways. If you don’t just want to eat it as a vegetable side dish, you can also use it in an asparagus risotto. You can find an easy recipe for it here.

Make sure to buy the ingredients for your asparagus risotto in organic quality and regionally. We can particularly recommend the organic seals from Demeter, Bioland and Naturland, as they follow stricter criteria than the EU organic guidelines.

Asparagus risotto: ingredients for the recipe

For the asparagus risotto you can use white and green asparagus – whichever you prefer. You can also combine the two varieties, as in our recipe. For two portions of risotto with asparagus you need these ingredients:

250 g white asparagus
250 g green asparagus
2 shallots
150 g risotto rice
3 tbsp butter
100 ml white wine (e.g. organic wine)
500 ml vegetable stock (tip: make your own vegetable stock)
sugar, salt and pepper
the juice of half a lemon
a few walnuts
80 g (vegan) Parmesan

Tip: If you would rather only use one type of asparagus for your asparagus risotto, simply use 500 grams of the preferred variant. You can also use broken pieces of asparagus or leftovers of cooked asparagus from other dishes.

Recipe: Cook asparagus risotto in 7 steps

You should plan about an hour for the cooking of the asparagus risotto:

First you wash and peel the asparagus. Peel white asparagus completely, green asparagus you peel only the lower centimeters. You should cut off the woody ends.
Cut the asparagus into pieces about 3 centimeters long. You should not throw away the remaining skin of the asparagus. Instead, you can make an asparagus soup out of the shell.
Pour about 500 milliliters of water into a saucepan and add some sugar. Bring the mixture to a boil and then add the asparagus pieces. Let the asparagus simmer on low heat for about ten minutes. Then drain well.
Peel and dice the shallots. Heat some butter in a saucepan and sauté until translucent. Add the risotto rice and steam it until translucent. But be careful: he shouldn’t get brown.
Pour the white wine into the saucepan and stir well until it has completely evaporated. Now gradually add some vegetable broth so that the rice is always just covered. This all takes about 20 to 25 minutes. Meanwhile, you should keep stirring well so that nothing burns. At the end, the asparagus risotto should have a creamy consistency and not be too runny. So if you don’t use up all of the vegetable broth, that’s no problem.
When the risotto has reached the desired consistency, add the asparagus pieces, a tablespoon of butter, the juice of half a lemon and about 50 grams of grated (vegan) Parmesan.
Season with salt and pepper and gently stir the asparagus risotto. Divide between two plates and garnish with the remaining Parmesan and walnuts. Tip: You can roast the walnut kernels in the pan for a few minutes beforehand.

Making herbal liqueur yourself is not difficult. If you prepare your own liqueur, you are free to choose which herbs you use. Here you will find tips for choosing herbs and a simple basic recipe.

Herbal liqueurs are part of the culinary tradition in many cultures. In Europe, they are often served after a rich meal to stimulate digestion. Many also appreciate them simply for their aromatic taste.

Herbal liqueurs can vary greatly in composition. Normally, a mixture of different herbs forms the basis of the taste. Which varieties are used and the proportions in which they are to each other depends on the recipe in question.

If you make your herbal liqueur yourself, you can decide for yourself which herbs you use. This makes it easy to adapt the liqueur to your personal taste. In this article, we give you an overview of different flavors and present a basic recipe that you can modify as you like.

Make herbal liqueur yourself: fresh or dried herbs?

You can prepare herbal liqueur with either fresh or dried herbs.

If you want to use fresh herbs, pay attention to the respective harvest times. Basically, you should buy organic kitchen herbs to avoid chemical-synthetic pesticides. This applies not only to fresh goods, but also to dried ones. Conventional dried spices in particular are often contaminated.

Make herbal liqueur yourself – these herbs are suitable

Which varieties you use is entirely up to you if you make herbal liqueur yourself. For example, the following varieties are good:

Mediterranean herbs such as rosemary, thyme, oregano or basil. Thyme and rosemary are evergreen varieties that you can harvest fresh all year round. This is also often possible with basil if the plant is perennial. The best time to harvest oregano is between July and August when it is in bloom. In principle, however, you can harvest it in the entire period between spring and autumn.
Lovage has a spicy, very characteristic taste of its own, to which it also owes the nickname “Maggikraut”. You can harvest fresh lovage from spring to autumn.
Sage is a strong spice with a slight bitter note. Its aroma is also sometimes compared to camphor or pine. Its harvest time is between May and August.
Mint contains menthol and therefore tastes cool and refreshing, but also slightly spicy. You can harvest fresh mint from spring until the first frost.
Chamomile has a mild, floral and slightly earthy flavor. Their harvest time coincides with the flowering period between June and September.
Aniseed has a strong, liquorice-like taste of its own. You can harvest them a few weeks after flowering, i.e. in September or October.
Fennel seeds are very similar in taste to anise seeds. They are ready for harvest in late summer or early autumn as soon as they turn grey-brown.
Laurel tastes very bitter when fresh. If you are making herbal liqueur at home, it is better to use dried leaves for a more pleasant taste.
Cloves are very flavorful and taste flowery and a bit spicy at the same time. You should only use them when they are dry.
If you want the individual herbs to harmonize with each other, you should use them in equal amounts. As a rule of thumb, we recommend adding two grams of each variety to the liqueur. However, you can also use certain herbs in larger quantities if you want them to have a stronger flavor. It is best to use a clear spirit such as Korn or vodka as the alcoholic basis.

Herbal liqueur: The basic recipe

Ingredients:

1 l clear alcohol (e.g. vodka or schnapps)
800 gsugar
2 g herbs (per variety)
Zest of an organic lemon (optional)
honey or agave syrup (optional)

Directions:

Pour the alcohol into an airtight container, such as a bottle. Note that the bottle must be big enough to hold the rest of the ingredients afterwards.
Add the sugar. The easiest way to do this is with a funnel.
Wash, clean and chop the herbs of your choice. Then pour it into the bottle as well.
Finally, you can add some grated lemon zest if you like. Be sure to use an organic lemon that is not contaminated with synthetic pesticides.
Seal the bottle or jar airtight and leave the homemade herbal liqueur in a warm place for four to six weeks. Shake or stir the liqueur well every day.
When the brewing time is up, strain the herbal liqueur through a fine-mesh sieve. Then fill it into a dark glass bottle and refine it with a little honey or agave syrup if you wish.
Keep the herbal liqueur cool and dark. Due to the high sugar content, it can be kept for several years without any problems.

If you dry wild garlic, you can also use the delicious wild herb out of season. Here you can find out how you can dry wild garlic yourself and what you should consider.

It is worth drying wild garlic. The weed is only fresh and ready to harvest in spring, but you can use it dried all year round.

Wild garlic normally grows outdoors as a weed. But you can also plant wild garlic in the garden. Find out beforehand when wild garlic season is.

To dry wild garlic, you have two options: let the leaves dry in the air or in the oven. We recommend that you air-dry the wild garlic if possible to save energy.

Dried wild garlic can be kept for a few months if you store it in a dry place that is protected from light.

Wild garlic dry in the air: This is how you do it

How to air dry wild garlic:

Wash the leaves and gently pat dry with a kitchen towel.
Tie the leaves at the stems into a small bouquet. Use a cord made of natural materials, such as raffia, or kitchen twine.
Hang the bouquet in a dark and dry place. Make sure the place doesn’t have high humidity.
Let the wild garlic dry for about a week or two.
Pick up the dried bouquets. If necessary, you can crumble the wild garlic or keep it in the form of a leaf. Store the dried wild garlic in a dry and cool place, preferably in an opaque container.
Tip: You can tell if the leaves are done drying by the fact that they rustle when they rub against each other. You can also easily rub the dried leaves between your fingers and snap off the stems.

Dry wild garlic in the oven

If you don’t have a suitable place for air drying, you can alternatively dry the wild garlic in the oven. However, this process is very energy-intensive.

How to do it:

Wash the leaves and gently pat dry with a kitchen towel.
Remove the stalks from the wild garlic leaves.
Spread them out on a wire rack or baking sheet so they don’t touch each other
Set the oven to 40 degrees Celsius and put the tray in the oven.
Leave the door slightly ajar to allow the moisture to escape.
Turn the leaves regularly so they dry evenly.
After three to four hours, the leaves should be dry. However, check the degree of drying regularly beforehand to avoid burning the leaves.

Use dried wild garlic

Wild garlic is a popular herb for cooking and seasoning. The taste is reminiscent of garlic and gives your food a subtle spiciness. Use your dried wild garlic in a variety of ways in the kitchen.

Make your own wild garlic butter or wild garlic soup. Dried wild garlic is also a suitable spice for wild garlic bread or wild garlic dumplings, or you can use it to refine a wild garlic pizza.

Easter is over, boiled eggs are still there? We’ll show you three delicious dishes that you can use to use up Easter eggs so you don’t have to throw anything away.

Recipe: Boiled eggs as a salad with cornichons

How to use six boiled Easter eggs (two servings):

125 g (vegan) yoghurt
1 tbsp (vegan) mayonnaise
2 teaspoons mustard, medium hot
salt and pepper
1 tsp capers
8 gherkins
chives

To taste: a crushed clove of garlic, cayenne pepper

Directions:

Peel the eggs and cut them into slices.
Drain the capers and cut the gherkins into small pieces.
Stir yogurt, mayonnaise, and mustard into a smooth sauce and season with salt and pepper.
Then add the eggs, capers, and gherkins.
Finally, you can use scissors to cut the chives into fine rolls and sprinkle them over the finished salad.

Recipe: Boiled Easter eggs as a vinaigrette for asparagus

With these ingredients and two boiled eggs you can prepare a delicious asparagus dish (two servings):

1 clove of garlic
7 tbsp olive oil
2 tbsp parsley
3 tablespoons balsamic bianco
salt and pepper
750 g green asparagus

How to cook an asparagus vinaigrette with boiled Easter eggs:

Peel the Easter eggs and mash them in a bowl with a fork. Press in the garlic clove and stir the mixture with five tablespoons of olive oil, the parsley and the balsamic vinegar until smooth. Season the mass with salt and pepper.
Cut off the woody ends of the asparagus and peel the bottom third of the spears with the vegetable peeler. Then heat a baking sheet in the preheated oven for five minutes.
Put two tablespoons of olive oil on the baking sheet, place the asparagus side by side on it and season with salt.
Set the oven to 240 degrees top/bottom heat. Let the asparagus roast for a quarter of an hour, turning them twice. Depending on the oven, it may take a few minutes longer.
You can serve the asparagus salad warm or cold: To do this, place the spears next to each other on a plate and pour the egg vinaigrette over them.

Senfeier recipe: Easter eggs as a warm dish

How to use eight boiled Easter eggs (four servings):

2 tablespoons margarine or butter
2 tbsp flour
1/4 l hot vegetable stock
1/4 l hot (plant) milk
3-4 tbsp medium hot mustard
1 tbsp wine vinegar
salt and pepper
2 pinches of sugar

How to cook the mustard party:

Melt the butter in a saucepan, stir in the flour and let the mixture brown slightly. Pour in the broth and milk: make sure you keep stirring to avoid lumps. Allow the sauce to simmer for about two minutes.
Stir the mustard and wine vinegar into the creamy sauce and season with salt, pepper and sugar.
Peel the eggs and add them whole to the sauce.

Your choice when buying eggs

It is known that chickens from conventional farms are often kept in poor conditions. They often only have little space and sometimes no outlet at all. Male chicks are often not reared in the first place but are shredded as soon as they hatch.

But there are also alternatives: If available, it is best to choose brother rooster eggs. These producers renounce the cruel practice, raise the roosters with them and want to show that laying hens can be reared without killing the chicks. Organic eggs also enable the hens and chicks to have a better life: Because in order for their products to be allowed to bear the organic seal, a farmer must comply with strict standards – also when it comes to animal husbandry.

There are many ways to use up leftover chocolate that you no longer want to eat. We present you with suitable recipes for the leftovers of your Easter chocolate.

Especially after festivities, Easter bunnies, Santa Clauses and chocolate bars are often left over. Maybe you are unsure if you can still eat one or the other leftover chocolate. In our article on expired chocolate, you will learn how long chocolate stays edible and the role of the best-before date.

Instead of throwing it away, you can use chocolate in a variety of ways, as long as it’s still edible. One possibility, for example, is to melt them down and use them for chocolate fondue. In this article we will present you with other ideas and recipes on how to use chocolate.

Tip: If you feel like chocolate, only buy as much as you actually want to eat. In this way you avoid leftovers from the outset. Also make sure that you buy chocolate products with an organic certificate and from fair trade if possible: On the one hand, you make sure that the chocolate comes from organic farming and has no residues of chemical-synthetic pesticides. On the other hand, you know that it was traded fairly and that the local cocoa farmers received a reasonable wage. If you are looking for chocolate without animal products, please take a look at our article about vegan chocolate.

The classic: hot chocolate

Ingredients:

100 g chocolate
400 ml plant milk, e.g. oat or soy drink
2 tablespoons cocoa
1 pinch(s) of cinnamon
optionally sugar or other sweetener

Directions:

Zerkleinere die Schokolade in einem Multizerkleinerer oder hacke sie mit einem scharfen Messer.
Erhitze die Pflanzenmilch in einem Topf.
Vermenge in der Zwischenzeit die zerkleinerte Schokolade mit Kakaopulver und Zimt.
Rühre die Schokoladen-Kakao-Mischung mit einem Schneebesen in die warme Milch.
Je nachdem, welche Schokolade und welchen Pflanzendrink du verwendest, kannst du die heiße Schokolade abschließend noch mit Zucker oder einer Alternative deiner Wahl süßen. Optional kannst du auch Vanillezucker verwenden.

Use chocolate in cakes, muffins, and cookies

Using chocolate also works wonderfully in various cake, muffin and biscuit recipes. Here you can find some ideas:

Vegan sponge cake
Muffins without eggs
Muffins (basic recipe)
Сhocolate cake

You can simply chop the chocolate and then fold it into the finished dough. Or you melt them in a water bath and use them to glaze the finished cake or muffins. Chocolate is already part of the recipe here:

Сhocolate muffins
Chocolate Chip Cookies (the fourth recipe)
You can use chocolate not only in pastries but also in other sweet desserts:

Chocolate salami
After Eight Ice Cream
Chocolate sauce for ice cream, waffles, and pancakes

Use chocolate: homemade chocolate spread

Ingredients:

6 EL plant drink
4 tablespoons sugar, optionally one part vanilla sugar
60 g vegetable margarine
100 g chocolate
50 g finely ground hazelnuts
1 pinch(s) of salt

Directions:

Heat the plant drink together with sugar and margarine in a saucepan.
Break the chocolate into pieces and add to the saucepan with the rest of the ingredients. Let the chocolate melt, stirring constantly so nothing burns. If the spread is too thick, carefully stir in some plant drink.
Finally, add the ground hazelnuts and a pinch of salt to the pot and stir everything into an even chocolate cream.
Pour the spread into a screw-top jar and let it cool down.