Tag

how

Browsing

Cozy afternoons can be perfectly enjoyed with a Pumpkin Spice Latte. We explain why pumpkin coffee is so popular, where it comes from and how you can easily make it yourself.

What is a Pumpkin Spice Latte?

A Pumpkin Spice Latte is a coffee variation that is essentially made with espresso or strong coffee, pumpkin puree, spices and milk froth. Depending on the season, mainly autumnal spices such as cinnamon or cloves are used.

The drink was made famous by the American coffee chain Starbucks, which offers the drink in its branches every year around Halloween. The first Pumpkin Spice Latte went over the counter in January 2003. At that time, the company tried to extend the Christmas season with the drink by launching a hot drink with Christmas spices.

Since the drink was very well received by customers, but the pumpkin season generally begins in autumn, the decision was subsequently made to sell the pumpkin coffee in the branches as early as September. Since then, the Pumpkin Spice Latte has developed into a real cult drink that is so popular that Starbucks was already offering the drink in selected branches in mid-August.

This is how the Pumpkin Spice Latte works

If you are looking for a pumpkin and coffee recipe to take home, you’ve come to the right place. The recipe is quite simple, but requires some preparation if you want to make all the ingredients yourself.

List of ingredients for about 0.4 l Pumpkin Spice Latte:

1-2 tbsp fine pumpkin puree
1 tsp Pumpkin Spice spice mix
2 tbsp agave syrup
Milk/milk alternative for milk froth
espresso
Options:
Coffee syrup for refining or sweetening, such as vanilla or caramel

Step 1: Prepare the pumpkin puree

In the USA you can get the ready-made pumpkin puree in almost every supermarket. In Germany you can occasionally find the puree at the weekly market or in some delicatessens. You can also easily prepare pumpkin puree yourself in just three steps:
cut pumpkin
Cut a Hokkaido pumpkin into four equal parts and remove the seeds.
Cook Pumpkin
Put the pieces, including the peel, in boiling water and leave them there for around 15 to 20 minutes.
puree
Using a hand blender, mash the soft pumpkin pieces into a puree.
Storage Tip: You’ll probably need a lot less puree than you get from a whole squash. But that doesn’t matter. If you pack the puree airtight, it will keep in the fridge for about a week for further processing. Of course, you can also plan ahead and store the finished puree in the freezer.

Step 2: Preparation of the spice mixture

The listed ingredients for our pumpkin recipe can be found in almost every supermarket or easily ordered online. You can also make the spice mixture yourself and create your own individual taste. Depending on your preference, you can change the proportion accordingly. To make it, simply mix the following ground ingredients together:
3 tbsp cinnamon
2 tsp ginger
2 tsp nutmeg
1.5 tsp allspice
1 tsp cloves

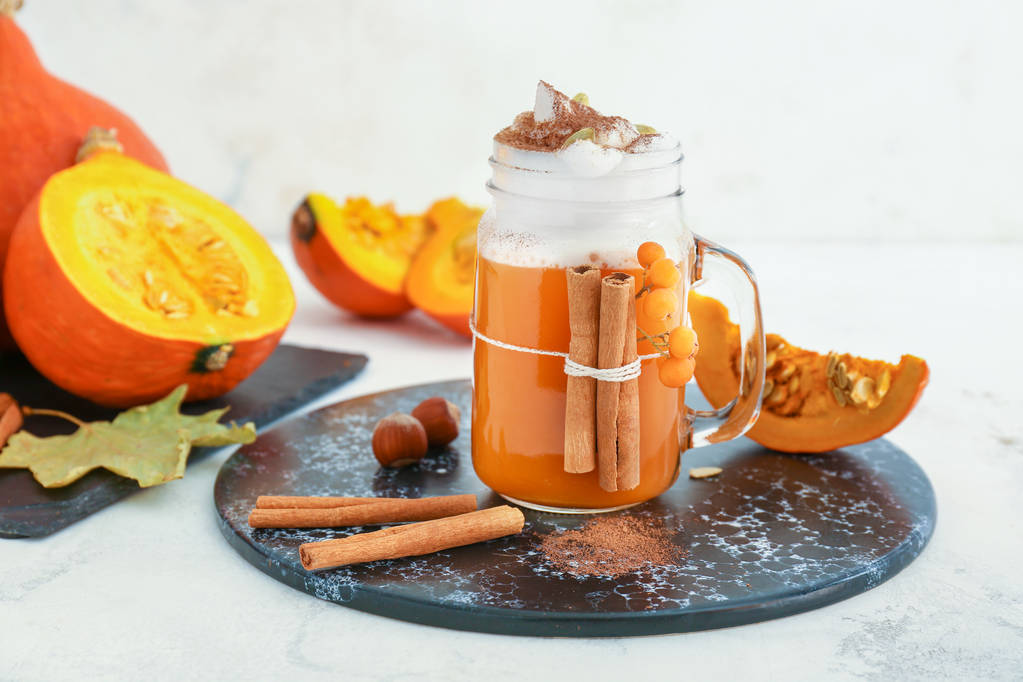
Step 3: Prepare Pumpkin Spice Latte

Now the ingredients for the pumpkin coffee can finally be mixed together:
Pour pumpkin puree into a glass
Prepare a large glass and fill it with 1-2 tablespoons of fine pumpkin puree. To get it particularly fine, you can scrape it through a sieve into the glass again.
mix ingredients
Take a small bowl and mix 1 teaspoon of the spice mixture with the 2 tablespoons of agave syrup. Then spread the mixture over the pumpkin puree.
Add milk froth
In the next step you need milk foam. You can open it yourself or get it quickly and easily from a fully automatic coffee machine. Then add the milk froth to the glass.
Add espresso
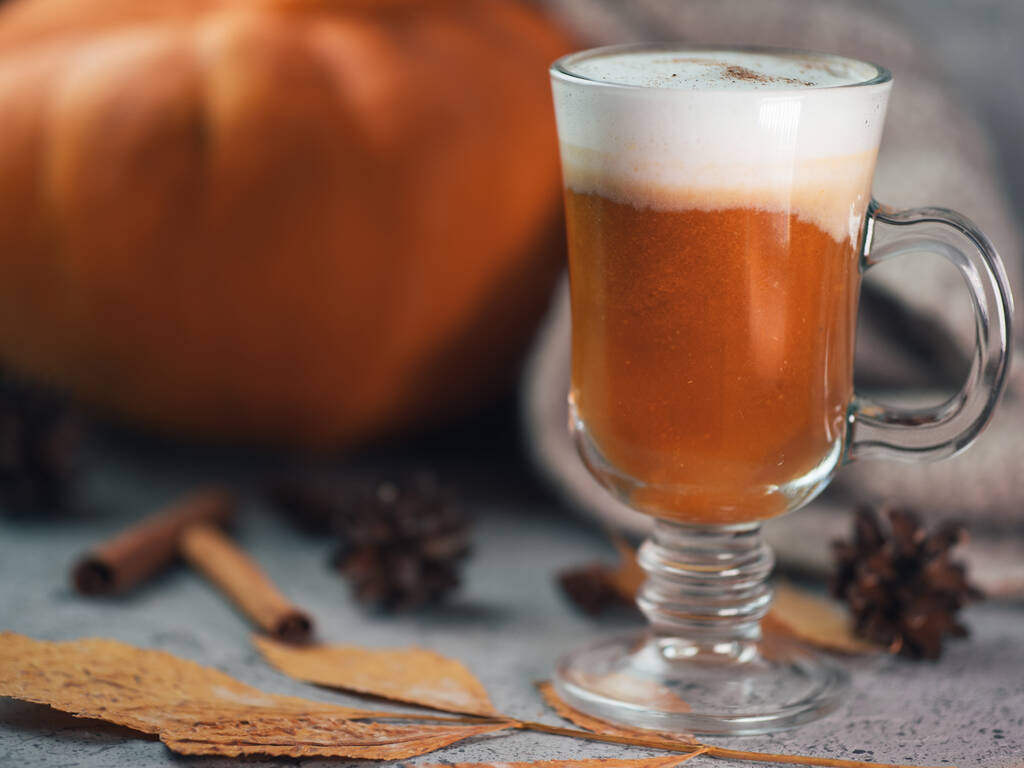
Now it is important to make a particularly strong espresso. This is only possible with the help of a fully automatic machine or portafilter. A strong coffee can be made with an espresso maker, for example. Now pour the espresso into the glass very slowly so that the individual layers do not mix with each other. This creates a great visual effect when serving.
Stir
The Pumpkin Spice Latte is ready and ready to be enjoyed. Just before drinking, you should stir the drink well with a long-handled spoon so that all the ingredients mix together and the typical pumpkin taste can unfold.
Optional: Add syrup and cream
If you would like to refine your pumpkin coffee, you can optionally add cream to the PSL as a topping or add coffee syrup instead of agave syrup.

Vegan Pumpkin Coffee

For the vegan variant of the Pumpkin Spice Latte, you can also easily become a milk alternative. Soy milk or oat milk are best suited for frothing. Rice, coconut, almond or spelled milk are less suitable. After all, the milk froth is an essential part of the pumpkin latte. But in the end it’s a matter of taste.

Pumpkin Spice Latte without coffee – the version for children

For people who don’t want to drink coffee, malt coffee is an alternative preparation option. It’s actually not real coffee, since it’s made from grain, but the taste is similar and the pumpkin malt coffee is also very tasty. So that it doesn’t get too sweet, you can also do without the agave syrup and use honey instead.

How many calories does a Pumpkin Spice Latte have?

You may have guessed it: Starbucks finished PSL is anything but a diet drink. A 12 ounce Tall cup contains approximately 300 calories. The calories of the Pumpkin Spice Latte are divided into about 10 g of fat and 40 g of sugar, which corresponds to about 10 sugar cubes. This increases the daily energy requirement. If you prepare the coffee with pumpkin puree at home, you can of course control the addition of sugar and fat. This delicious and homemade alternative is not quite as impressive. A glass (250 ml) with fine puree and 1.5% milk has approx. 135 Kcal.

Do you like to order cappuccino in the café and would you like to prepare this coffee variation at home? No problem: we will show you step by step how to prepare a cappuccino.

Chocolate cake with a cup of hot cappuccino on the table with Shell.

Where does the cappuccino come from?

Anyone who thinks that cappuccino is a purely Italian coffee specialty is wrong. The origins of the drink are in Austria. The cappuccino as we know it today came from a Viennese coffee speciality, the so-called “Kapuziner”. This consists of mocha and liquid whipped cream. The “Capuchin” owes its name to the typical light brown colour, which is reminiscent of the habit of the Capuchin monks. In German, the related word “cappuccio” means hood or haupe, which can be associated with the monk’s habit. During World War I, Austrian soldiers brought their specialty to Italy. Here the “Capuchin” was further developed and refined into the “Cappuccino”. The name “Cappuccino” is derived from the name of the original drink “Kapuziner”. Today, the Italian version of the cappuccino is usually served in cafés around the world.

When is cappuccino drunk?

In Italy, cappuccino is usually drunk at breakfast. Italians like to dip hard pastries such as rusks or cantuccini into their drink. In this country, the coffee specialty is drunk throughout the day. For example, at the start of the day, but also in the afternoon with coffee and cake.

How is a cappuccino prepared?

Like a latte macchiato, cappuccino only needs two ingredients, but in comparison it is a little more skilful when it comes to the figures in the foam. But read more here.

Ingredients needed for a cappuccino:

An espresso
150 ml milk (alternative)

Step 1:

Prepare an espresso and pour it into a thick-walled cup with a capacity of around 200 ml. You will get the best result if the cup is preheated.

Step 2:

Froth about 150ml of milk with a milk frother and warm it up. Be careful with the temperature: it must not exceed 60 degrees. Otherwise the foam falls apart and the creamy consistency is lost. The milk froth is ready when the volume has roughly doubled. The number of calories in a cappuccino depends on the fat content of the milk used. Therefore, a cappuccino can have anywhere from 70 to 150 calories.

Step 3:

Pour the milk into the cup with the espresso shortly after frothing. With the right speed and technique when pouring, artistic images can be conjured up in the rising crema of the espresso. Find out more about this in the text.

Whether dry yeast or fresh yeast – you can bake airy pizza dough and bread with both types of yeast. In this guide you will find out what the differences are and how you can use fresh yeast and dry yeast.

Yeast is a unicellular microorganism that belongs to the fungi family. This living organism feeds on the sugars and starches in the dough and converts them into carbon dioxide gas, among other things. This is reflected in the bubbles in the dough, which allow it to rise and make it more airy. We use this property of yeast for many recipes – whether pizza dough, home-baked bread or cinnamon rolls.

You can find yeast in two main forms on the market: as dry yeast and fresh yeast, which is also called block yeast. We will explain how the two differ, what you need to look out for when storing and using them, and how you can convert one type of yeast and replace it with the other.

Dry yeast and fresh yeast: differences in yeast types

Dry yeast and fresh yeast have much more in common than differences:

Both dry yeast and fresh yeast are the same strains of yeast (Saccharomyces cerevisiae), also known as baker’s yeast or brewer’s yeast.
Dry yeast and fresh yeast serve the same purpose in the bakery: they convert sugar and starch into gaseous carbon dioxide, allowing the dough to rise.
The yeast cultures were also grown and propagated in the same way: on a carbohydrate-rich culture medium. The exact cultivation form depends on whether it is conventional yeast or organic yeast – but not whether it is dry yeast or fresh yeast. You can find out below how organic yeast differs from conventional yeast.

But there are also big differences between dry yeast and fresh yeast:

While fresh yeast consists of around 70 percent water, dry yeast only contains around five percent residual moisture. Therein lies the biggest difference: For dry yeast, fresh yeast is dried.
As a result, dry yeast has a significantly longer shelf life than fresh yeast. While you can store fresh yeast in the fridge for a maximum of two weeks, dry yeast can be stored at room temperature for between several months and a year.
The fungal cultures contained in the dry yeast are inactivated and are only activated by adding liquid. Nevertheless, they are living microorganisms – only in a “resting state”.

Dry yeast or fresh yeast – which is better?

Both dry yeast and fresh yeast do an excellent job as leavening agents. In the finished recipe, the difference is hardly or not at all noticeable.

The benefits of fresh yeast are rather subjective:

Some (hobby) bakers swear by fresh yeast because it gives the baked goods a rounder, slightly sweeter taste.
Some also report that yeast dough rises slightly better with fresh yeast than with dry yeast.
If baked goods require a particularly long fermentation time or several resting phases to rise, fresh yeast is usually recommended. Because it is said to have a longer-lasting driving force than dry yeast.
On the other hand, dry yeast has prevailed today mainly because of its practical advantages over fresh yeast:

Dry yeast can be stored at room temperature for several months in a closed packet. Once opened, you can store the packet tightly sealed in the fridge for another two weeks. Fresh yeast, on the other hand, must be stored in the refrigerator and used within two weeks of purchase.
You don’t have to stir the dry yeast into liquid beforehand, you can mix it directly with the dry baking ingredients. This makes it a little easier to mix the dry yeast with the dough than fresh yeast.
In addition, thanks to its shape, dry yeast is a little easier to dose than fresh yeast in block form.

Conclusion of the comparison:

Fresh yeast should give the baked goods a slightly better taste and also have a higher raising power than dry yeast. For a few recipes like yeast loaf or Berlin pancakes, this is possibly the better yeast.
On the other hand, dry yeast is the much more practical form of yeast, especially for hobby bakers: it lasts much longer and is easier and faster to process.

Using dry yeast and fresh yeast: tips for the kitchen

If you want to make yeast dough yourself, you should consider the following points when preparing it:

First stir fresh yeast with some of the lukewarm liquid from the recipe and some sugar and let this mixture stand for about ten minutes. You can tell by the formation of bubbles that the yeast have started their activity. After the ten minutes, you can mix the liquid with the remaining baking ingredients.
You don’t need to mix dry yeast with liquid first. Mix directly into the dry ingredients in the recipe. Make sure that the remaining ingredients are not too cold: you should therefore take them out of the fridge some time beforehand.
Whether fresh yeast or dry yeast: yeast has the best raising power at temperatures between 25 and 30 degrees. At more than 45 degrees, the yeast fungi die off, while at less than ten degrees, the metabolic processes run considerably more slowly. That means: The cooler, the more walking time you have to plan.
When baking, you can easily convert and replace fresh yeast with dry yeast:

You can replace one cube of fresh yeast (42 grams) with two packets of dry yeast (fourteen grams).
As a result, one packet of dry yeast is equivalent to about half a cube of fresh yeast (21 grams).
As a rule of thumb, half a cube of fresh yeast or a packet of dry yeast is sufficient for 500 grams of flour. However, this amount varies greatly depending on the recipe.
In principle, you can also mix fresh yeast and dry yeast in a recipe, should this ever be necessary.

Buy yeast: organic quality and list of ingredients

It doesn’t matter whether it’s dry yeast or fresh yeast: we recommend that you pay attention to organic quality when buying. Because there are some differences between organic yeast and conventional yeast:

Growth medium: Conventional yeasts are often cultivated on molasses (a by-product of sugar production), phosphorus or inorganic nitrogen. Organic yeasts, on the other hand, are cultivated on natural raw materials from controlled organic cultivation, often on grain or sugar beet syrup.
Defoaming agent: To prevent growth-inhibiting foam from forming, sunflower oil is added to organic yeast as a defoaming agent. With conventional yeasts, synthetic substances are used for this purpose, which later have to be rinsed out with plenty of water. Therefore, according to the Bavarian Consumer Center, more water is used in the production of conventional yeast than in the case of organic yeast.
Genetic engineering: In addition, no genetically modified organisms (GMOs) are used in the production of organic yeast. Since there are still no reliable long-term studies on the health effects of GMOs, we recommend non-GMO foods.
If you want to buy dry yeast, you should also take a closer look at the ingredients:

Some of the dry yeast contains emulsifiers so that the yeast does not dry out. The most commonly used emulsifier is sorbitan monostearate with the E number 491. There are even some emulsifiers in fresh yeast.
Organic manufacturers in particular usually deliberately avoid using emulsifiers. With their yeast, there is nothing else in the packet but yeast.

How does the heart actually get into the milk froth of a cappuccino? Anyone who has always wondered how the artistic motifs get into the milk crown of a coffee drink will find out all the important information about latte art in this article.

What is latte art?

Latte art is the predominant method for creating beautiful patterns and decorations on the surface of coffee. By pouring the milk froth – or the milk – in a special way, patterns and images are worked into the surface of the drink. Popular patterns are the heart, the fern leaf and the swan. The motifs can even be combined with a little practice.

In addition to simple pouring, there are also many tools that can be used for more precise and extensive creations. For example, pens, stencils or chocolate syrup can be used. The master of latte art is the so-called barista. He is responsible for artistic and tasty coffee creations. In the meantime, even championships for the most beautiful latte art are held.

Dense crema thanks to Robusta

Since the espresso is first poured into the bulbous cup, the crema should have a thick consistency and a hazelnut-brown colour. In this way, optimal motifs can be created in it. If a part of Robusta is in the coffee beans, a stable crema should succeed. The slightly reduced oil content compared to Arabica is an advantage here.

Milk (alternative) needs protein

The quality of the milk foam plays an important role so that the barista can fully develop his artistic streak, after all, the foam is the artist’s canvas. The milk froth must be of optimal consistency, temperature and density.

Which milk or milk alternative is used to prepare the milk froth can be decided individually. The most important thing is the protein content. The protein gives the foam its stability and density. The fat content makes the milk foam creamy and looks good.

Many prefer fresh whole milk, but condensed milk and UHT milk work just as well. Milk alternatives are also suitable for producing a nice milk froth. Frothing works particularly well with soy, oat, almond or spelled milk. We even recorded this in an in-house test.

In general, care should be taken to ensure that the milk froth has a dense, creamy consistency that is not too firm.

Equipment needed

Mastering latte art is a lot harder than it first appears. The barista needs:

Espresso, either from the portafilter or the fully automatic coffee machine
Milk frother or a steam wand
milk jug
Bulbous cup, e.g. for cappuccino

Good to know: milk can be foamed on professional fully automatic machines or produced manually using a steam lance. Both are possible.
The cup should ideally have a round bottom and open upwards. A wide opening offers space for pouring in the motifs. The ideal size for the milk jug is 0.6 to 1 liter. The espresso is now used as the basis for the new coffee creation. The actual work begins with pouring the milk froth.

Step 1: Frothing the milk

For frothing, the milk jug should only be filled halfway, as the volume can quickly double during the frothing process. In addition, the milk should be chilled before frothing, as the milk froth must not be warmer than 60 to 70 degrees. Otherwise it will fall apart.

The most important factor in frothing is the pulling and rolling movement of the milk in the jug. It doesn’t matter whether the milk is set in motion via the frother of the portafilter machine or by means of an electric milk frother. First, air is drawn under the surface of the milk. The rotation of the milk distributes the air in the milk and creates foam. For even better creaminess, the milk froth is then swirled around. You can find out more about this in our article on milk foam.

Step 2: Pour in the milk froth

Incidentally, after frothing, pouring should be done quite quickly, since the foam and milk can separate again within about 20 seconds. The desired pattern is now created when pouring the milk froth into the espresso.

The cup with the espresso must be held at a 45 degree angle. Begin pouring from the deepest part of the cup, pouring in the frothed milk in a circular motion to create a base. The crema rises to the edge of the cup and the color is a nice, even brown. Now place the pot with the spout close to the surface of the coffee and carefully pour the pattern into the crema. The angle of the cup becomes smaller and smaller until the cup is full.

The most popular motifs for latte art

Not every motif is equally suitable for learning latte art. We have compiled a few of the most popular milk froth artworks per level for you here.

beginner

The following works of art are ideal for beginners:
heart
Sun
shamrock

Advanced

If you already have some barista skills, then you will like these motifs:
fern leaf
Rosette
star

professional

The absolute latte art professionals can be recognized by these motifs in the coffee:
swan
Angel

In our guide you will find helpful tips for preparing your espresso with the portafilter machine. We show you how it works.

What is a portafilter machine?

The portafilter machine was developed in Italy to simplify the preparation of an espresso. No wonder it is often referred to as an espresso machine. The first portafilter machine came onto the market as early as the beginning of the 19th century. The aim of such a machine was to better extract the aromatic substances from the coffee beans. When preparing an espresso manually, the contact time between water and coffee powder was too long, so the coffee often tasted bitter. The right pressure with which the water is pressed through the coffee powder is decisive for a short contact time. In the beginning, portafilter machines worked with a lever. Then semi-automatic machines followed, and there are now modern devices with many parameters that can be set individually.

How a portafilter machine works

The portafilter machine is named after the removable portafilter. This is the holder for the sieve. The sieve is filled with freshly ground coffee powder and fixed in the machine. For perfect coffee enjoyment, water is pressed through the coffee powder in the sieve at high pressure. In addition to the portafilter, the machine consists of the following elements:
Electric pump for optimal pressure
Heating element and boiler to achieve the right brewing temperature
Steam lance for frothing the milk
water tank
brew group

This is how the perfect espresso succeeds

Use our eight-step guide for an espresso from the portafilter machine. This shows you all the important basics:

Preheat the espresso cup and machine
To ensure that the espresso does not cool down too quickly and that the drink is not exposed to severe temperature changes that negatively affect the coffee aroma, you should fill the cup with hot water in advance and set it aside. Most portafilter machines have an integrated hot water dispenser for this purpose. The portafilter machine itself must also be warm. Therefore, turn on the machine at least 25 minutes before preparation and let it warm up.
Clean portafilter machine
As with any coffee maker, you should first remove old coffee grounds from the portafilter and then carefully wipe off oils, fats and other residues. These can then no longer influence the taste of the espresso. Make sure the portafilter is dry before filling.
grind the coffee finely
A coffee grinder with a disc grinder grinds the beans extremely evenly and thus delivers a perfect grinding result. Be sure to grind the coffee beans finely. Beans that are ground too coarsely can quickly taste bitter. In addition, finely ground beans have more surface area and therefore require less contact time to release the aromas.
Dose the coffee powder correctly
The portafilter should ideally be filled to the base for dosing. The dose is crucial – the powder should therefore only be slightly heaped. In most cases, a portafilter contains around 7 – 9 grams of coffee powder for 25 ml of espresso.
Smooth the surface
As soon as you have filled the portafilter to the brim, you can gently tap the espresso powder and smooth it out with your index finger. With an optimal surface you do the preparatory work for the subsequent tamping.
Tamp espresso powder
When it comes to the tamper, one usually speaks of the so-called “coffee tamper”. This is used to compress the powder and compact it enough to withstand the incoming water pressure, allowing the flavors to unfold slowly. For an optimal result, a pressure of 10 – 15 kilograms is recommended.
Pre-rinse group head
Like almost all parts of the portafilter machine, the brewing head must be cleaned before use. To do this, you can simply run hot water through the group head. This is called making an empty reference. Any coffee residues from the last extraction are loosened and the water that is too hot is drained.
Clamp in the portafilter
Now all the precautions for a perfect espresso have been taken. Finally, clamp the portafilter into the machine and press the lever to brew. After about eight seconds, the first espresso flows into the preheated cup. For 25 ml of espresso, wait around 25 seconds before you pull the lever up again. Stir in the crema before drinking so that the aromas can unfold in the espresso.

Espresso without portafilter

In order for the perfect espresso to be successful even for beginners, the right equipment must of course be used. In the home, the user usually does not have professional catering equipment. Even a small portafilter machine is not cheap. Part of the investment is in accessories such as the espresso grinder. This does a crucial part of the work and helps you to find the perfect degree of grinding. If you want something a little less artisanal, but still just as tasteful, then rely on a fully automatic coffee machine. At the push of a button, this not only brews espresso, but also all coffee specialties with espresso, such as cappuccino or latte macchiato. Good to know: The espresso maker cannot make an espresso at all because there is not enough pressure. Nevertheless, the coffee can be espresso-like.

Sage honey is an effective home remedy for cold and flu symptoms. Here you can find out how sage honey works and how you can make it yourself.

A sore throat, cough and hoarseness are among the most common symptoms of a cold or flu. Sage honey can provide quick relief and aid in healing. It is also a natural alternative to conventional cough syrups, which often contain questionable ingredients and should be used with caution, especially in children. You can find out more about this in our article cough syrup for children: risks, home remedies and what you should consider.

As the name suggests, sage honey consists of only two ingredients: sage and honey.

Sage is a well-known medicinal herb that has anti-inflammatory, analgesic and antibacterial properties. That is why it is a popular home remedy for sore throats and coughs.
Honey also has anti-inflammatory and antibacterial properties. It is therefore well suited as a carrier for the sage.
Important: If possible, use regional organic honey from Germany for the sage honey. This way you can be sure that it was not imported via CO2-intensive transport routes. In another Utopia article you will find out what you should consider when buying honey.

Make sage honey yourself: Here’s how

Ingredients:

20leaves of fresh sage
500 ghoney
optional: lemon juice

Directions:

Wash the sage leaves thoroughly and then drain them. Then cut them into small pieces.
Place the honey in a large sterilized jar. The glass should be able to hold at least 700 grams.
Stir in the chopped sage. Tip: If the honey is very thick and stirring is too difficult, you can dilute it with a little lemon juice.
Place the sage honey in a dark place and let it steep for at least four weeks. After this time he is finished.

Sage honey: tips and hints

The earlier you take the sage honey, the better it can work. At the first scratchy throat, start applying the sage honey. Let it slowly melt on your tongue.

Since sage contains the neurotoxin thujone, you should consider the following points when using sage honey:

Overdoses of thujone can cause symptoms of poisoning such as tachycardia, dizziness and cramps. Since the thujone content of sage honey is difficult to determine, to be on the safe side, you should consume a maximum of five teaspoons of sage honey a day.
New studies have shown that sage is suitable for long-term use without hesitation. However, you should seek medical help if your symptoms have not improved within three days.
Children younger than one year should not eat honey. As a natural product, honey can contain bacteria that can cause life-threatening bacterial infections in babies.
Pregnant and breastfeeding women should also avoid taking sage honey.

Zavtrák is the name of the traditional Russian breakfast. If you like it hearty, this is the right place for you in this country, because things get really rich here early in the morning.

Milk porridge (kascha), sausages, fried potatoes, scrambled eggs, pancakes (blini), quark pancakes (syrniki), bread, butter, jam, kefir and much more are what Russians love to eat with their morning meal. In this way, despite the harsh climate, they are already equipped with enough energy for the day in the morning.

These Russian specialties are very popular at breakfast: a national dish called kasha, a porridge made with milk, mostly made from buckwheat, but also made from oats, barley or rye, and blini – also affectionately called blinchiki – the traditional Russian pancakes.

For all lovers of hearty, hearty cuisine, this delicious breakfast offers a really tasty and energetic start to the day.

Food culture in Russia

In general, Russian cuisine is very diverse: this is because in this large country different ethnic groups live together and mix their traditions. In addition, the food culture in the city differs greatly from that in rural areas: Most people in the country eat richer and heartier food, while people in the city are also influenced by international eating habits and eat a little more “globalized”.

How do you prepare a Russian breakfast?

get hungry and want to prepare a breakfast like in Russia? Then let’s see together how to do it and what ingredients you need for it.

The first thing you should do is open your fridge and see what’s left over from yesterday, because Russians often have leftovers from the day before for breakfast, such as rice, noodles or fried potatoes.

Now set up a hearty sausage and cheese platter, warm up a few sausages and prepare the eggs – either scrambled or fried, just as you like. Don’t forget the bread: white bread is fine, although the Russians themselves prefer black bread. Just like in Russia, your morning meal should not be without various dairy products such as cottage cheese, kefir and sour cream.

That was the easiest part, now comes the preparation of the Russian kasha (milk porridge) and the blini (Russian pancakes). For this we give you the following breakfast recipes:

1. Recipe kasha – Russian milk porridge:

Ingredients (2 people)
75 grams of buckwheat
250 ml milk (1.5% fat)
1 pinch of salt
2 tbsp poppy seeds
As you like: some sugar, butter, jam, fruit or meat preparation

preparation

Briefly toast the buckwheat in a saucepan and add the cold milk, salt and poppy seeds. Let the porridge cook on low heat for about 10 minutes. Stir the kasha from time to time.
Russians usually serve their kasha with sugar and melted butter, more often with fruit, or sometimes with meat dishes for a savory version.

2. Recipe Blini- Russian pancakes:

Ingredients (2 people)
150 grams of wheat flour
12 grams of yeast
250ml milk
12 grams of butter
1 egg
50 ml cream
1 tsp sugar
½ tsp salt
some oil
At will: jam, sour cream

preparation

Dissolve the yeast in the milk and add half the flour and the melted butter. Leave the mixture to rest for about 30 minutes. Now separate the egg and mix the yolk with the sugar in a bowl. Now whip the cream and then the egg white until stiff. Then fold it into the whipped cream. Stir the dough and add the remaining flour, salt, egg yolks with sugar while continuing to mix. Finally, add the cream and egg white mixture and let the dough rest for a few hours. Now heat some oil in the pan, add some batter and fry your Russian blinis on both sides.
In Russia, blinis are either filled with jam or served folded, then dipped in sour cream.

Have you ever made coffee with the Chemex? No? No problem, we’ll explain how you can use the glass filter carafe to make a particularly clear and aromatic coffee.

What is a Chemex?

The Chemex is a traditional way of preparing filter coffee. The German chemist Peter Schlumbohm invented the filter carafe in the mid-20th century by building a glass funnel onto a simple Erlenmeyer flask. You may remember the latter from your school lessons, because the Erlenmeyer flask is normally used for chemical experiments. Schlumbohm traveled to the United States to sell patents for other inventions there. In 1941 Schlumbohm registered the patent for the invented filter carafe. To this day, the Chemex and its special filters are manufactured by the Chemex Corporation in Chicopee (Massachusetts, USA) and distributed worldwide.

At the time, Schlumbohm was probably not aware that he had invented a real cult device. The shape of the machine is reminiscent of an hourglass. The heat-resistant wooden belt that connects the two pieces of glass and also serves as a handle is striking.

What is special about a Chemex?

In 1958, thanks to its design, the Chemex even made it into the New York Metropolitan Museum of Modern Art, one of the most important art museums in the world, and it is still there today. However, the long-standing popularity of the machine can be explained above all with the consistently high-quality coffee result. Its secret lies in the extra thick coffee filter, in which oils, suspended matter or sediments are retained. This gives you a very pure and tasty coffee without a lot of bitter substances. In addition, the filter is shaped like a cone, which means that the coffee is extracted very evenly with this pour-over method. You usually have to buy the coffee filters separately.

How to make coffee with a Chemex

Preparation with a Chemex is quick and easy. Nevertheless, it is important that you follow the individual steps in order to be able to enjoy the full coffee aroma at the end. This is the pour-over method with a filter, which we will now present in more detail.

Ingredients needed for one liter:

60 grams of ground coffee with a medium to coarse grind
1 L of water with a temperature of 96 degrees

Step 1: Heat the water

The ideal water temperature is about 96 degrees. If you don’t have a thermometer, heat water in a kettle and then wait two minutes. The water is then almost at the perfect temperature.

Step 2: Unfold and insert the filter

When you unfold the filter, you get a page with three layers of paper. It is very important that this side is on the Chemex spout. This makes the filter paper more stable on this side and prevents it from getting stuck in the spout during extraction and preventing air from escaping from the carafe.

Step 3: Rinse the filter

Pour hot water into the filter without coffee in it. In this way, you already warm up the filter and can use the water that has passed through to remove any residue from previous preparations. At the same time, the inherent odor of the filter disappears. Then throw away the water that has run through. Then reinsert the filter.

Step 4: grind coffee

Grind the coffee on a medium to coarse setting. After grinding, the coffee should resemble the structure of sea salt.

In general, the more coffee you use, the coarser the grind should be.

Maybe try a little bit here. You have found the best result when the extraction of the coffee, i.e. the process in which the coffee runs through the filter, takes between four and five minutes.

Step 5: Start blooming process

Put the appropriate amount of coffee  in the filter and add some water. The amount of water depends on the amount of coffee. For blooming, you should always take twice as much water as coffee. It is advisable to add the water slowly and in circles from the inside out. The ground coffee should be completely covered with water. Now wait about 40-45 seconds. During this time, the remaining CO2 escapes and the coffee soaks up the water. By allowing the CO2 to escape, blooming ensures a more even extraction and a more stable coffee bed.

Step 6: Add water

Slowly pour in the rest of the water in a circular motion. There should be at least an inch of space between the water and the top of the funnel. Avoid pouring water directly onto the filter. In this case, the water would pull through the paper and not come into contact with the coffee. You may have to refill several times.
If the coffee has seeped into the lower part of the Chemex, remove the filter. The Chemex coffee is ready!

Grilling healthy is not difficult at all: If you are creative and open to new things, you will have many great options – even without meat.

When it comes to grilling, most people think of sausages and steaks first. But it doesn’t always have to be (just) meat: There are also many other options for the barbecue party that are not only delicious, but also healthy. In the following you will find recipes for tasty grilled food and other tips on how to grill as healthily as possible in your own garden.

Grilling healthy: vegetarian and vegan grilled food

Grilling vegetarian or even vegan: For many meat lovers, that doesn’t sound appetizing at all. Meatless grilling is too often associated with dry corn on the cob or boring baked potatoes. There are now countless delicious options if you want to grill sustainably and healthily:

Try the classic: vegetable skewers! The colorful skewers are well known and popular. You can equip them according to your wishes. Just test yourself through your favorite vegetables, from mushrooms to peppers to zucchini. You can find four variants here: Grilling vegetable skewers: 4 vegetarian variants.
Peppers, courgettes and aubergines are not the only things that are suitable for healthy grilling. You can also throw some more unusual vegetables on your grid and grill them healthy. For example, try grilled fennel, grilled asparagus or grilled stuffed mushrooms.
A very important tip for vegetarian or vegan grilled food is the marinade. Because this is not only crucial for steaks, but also for vegetables. You can find a recipe here: Marinate grilled vegetables: This recipe is really tasty.

If you are a fan of potatoes in any form, you should not forget them at your healthy barbecue. By the way, you can not only grill conventional potatoes, but also grill sweet potatoes, for example.
Grilled cheese is also great for vegetarian barbecues. When buying dairy products, make sure that they are organic if possible. In this way you not only support more species-appropriate animal husbandry, but also do something for your own health by avoiding chemical-synthetic pesticides. Also read: Grilling feta: 2 delicious recipes.
Fancy a sweet dessert? No problem! You can grill not only vegetables, but also healthy fruit.

Side dishes for a healthy barbecue evening

Matching side dishes for the barbecue should not be missing at the barbecue evening. These include delicious dips and homemade salads. You can find links to the best recipes for healthy grilling here:

Recipes for salads:

Vegan Potato Salad
Vegan pasta salad
Vegetarian Layered Salad Recipe
Couscous Salad
lentil salad
Party Salad

Tip: Of course, enough bread for grilling is also included. For example, you can bake a fresh baguette yourself. Herb baguette or spelled baguette are also great side dishes.

Healthy grilling with meat

If you don’t want to completely do without fish and meat when grilling, you should consider a few points to grill more healthily:

Buy meat with an organic seal. Avoid the cheap meat from the supermarket.
Support butchers in your region.
Try to reduce your meat consumption and if possible not eat meat every day.
You should also be picky about fish. You can find important tips here: Eating fish: You should definitely keep this in mind.
Tip: Meat substitutes are controversial because of the many additives, but if you like meat and really don’t want to eat it anymore because of animals and the environment, you can consider trying meat-free alternatives instead.

Grilling healthy and sustainable: important tips

Healthy grilling isn’t just about the right food. You should also keep a few general tips in mind:

For healthy grilling, be careful not to drip marinade or other liquids onto the hot charcoal: this can create potentially carcinogenic smoke. You should therefore use metal skewers for vegetables – this way no whole pieces fall through the grate.
Grilling without aluminum foil is more sustainable and poses fewer health risks.
Protect yourself from the heat emitted by the grill. Do not touch the grilled food with your bare hands to avoid burning yourself. Use grill tongs and preferably a grill apron to keep you healthy.
Be careful when using a gas grill. Make sure the surface is stable and only use it outdoors.
If you want to buy a new grill, you should think about an electric grill. This not only saves you time, but also avoids the formation of toxic smoke.

In the best case, you not only grill healthy, but also sustainably. For example, use local charcoal, natural grill lighters and avoid disposable crockery and cutlery.

To keep peppers fresh and crisp for a long time, you can freeze the delicious vegetables. Here we explain what you should pay attention to and how to do it without plastic.

Freezing peppers: how it works

Whether as a side dish in a pasta sauce or as a healthy snack in between: paprika can be used in many ways. However, you should use up the crunchy vegetables within a few days. If you want to store peppers longer, you can freeze them.

Prep: Unlike other vegetables, you don’t need to blanch peppers beforehand. You don’t have to skin the peppers either.

This is how easy it is to freeze peppers:

Wash the peppers thoroughly.
Cut them into smaller pieces. For example, you can cut the peppers lengthwise into thin strips and then dice them further.
Put the chunks of pepper in a small tin and store them in the freezer.

Alternatives to plastic

Freezing peppers or other vegetables in plastic bags is often recommended. However, we recommend avoiding plastic as far as possible. There are some greener alternatives to plastic freezer bags:

You can use lunch boxes made of wood or glass several times.
Stainless steel cans are also suitable for freezing vegetables.
You can also freeze peppers in glasses (e.g. washed jam jars).
You can even freeze peppers in cotton or jute bags. You should first pat them as dry as possible with a kitchen towel.
By the way: A great alternative to freezing is to soak peppers in oil or vinegar. This way the vegetables will last longer.