Tag

making

Browsing

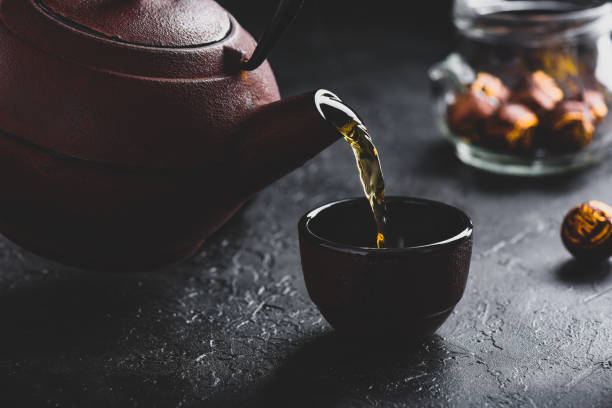
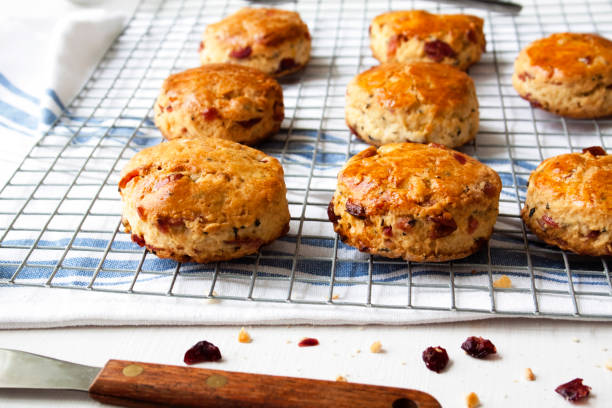
Scones are a staple of tea time in the British Isles. But the delicious pastries can also be served with our Sunday coffee. We will therefore tell you how you can easily make scones yourself.

Anyone who has ever tried scones will have quickly noticed that the pastries have a very special consistency. This is due to the addition of eggs and sweet cream and the very gentle mixing of all the ingredients. Scones can be eaten on their own like cakes or biscuits, or – as in Britain and Ireland – eaten warm with butter, jam, honey, or clotted cream. Of course, sugar, flour, eggs, and cream don’t make scones easy. But our variant only has 160 calories per piece. You can have a snack on Sundays.

Make scones yourself: the ingredients

For 12 scones

  • 150 grams of flour
  • 100 g ground almonds
  • 2 tablespoons sugar (40g)
  • 1 packet of vanilla sugar
  • 1 pinch of salt
  • 3 tsp baking powder
  • 50 g butter (at room temperature)
  • 50g dried cranberries
  • 50 ml milk (1.5% fat)
  • 1 egg

Make scones yourself: Here’s how

  1. Mix flour, almonds, sugar, vanilla sugar, salt, and baking powder in a bowl.
  2. Add soft butter in flakes and quickly rub everything into crumbles with your hands or use the dough hook of a hand mixer to make crumbles.
  3. Add the cranberries and milk to the crumbles and knead in as quickly as possible (the dough will become tough if kneaded for a long time). Chill the dough for 30 minutes.
  4. Sprinkle the work surface with flour and roll out the dough to a thickness of about 1.5 cm.
  5. Dip a ring cutter (5 cm Ø) in flour and cut out circles from the dough.
  6. Roll out the leftover dough again and cut it out the same way (there should be 12 circles of dough in total).
  7. Line a baking sheet with parchment paper and place the circles on it.
  8. Separate the egg. Whisk the egg yolk with 1 tablespoon of water in a small bowl, brush over the cakes and refrigerate for another 30 minutes. (Use the egg white for something else.)
  9. Bake in a preheated oven at 200 °C (convection: 180 °C, gas: level 3) on the 2nd shelf from the bottom for 15-17 minutes and leave to cool on a wire rack.

It’s tea time!

Clever tips for making wine and instructions for making wine yourself. Become your own winemaker now and become a hobby winemaker.

The vines have also crept into private gardens for a long time, and so many people dream of not only harvesting the grapes in autumn but also of making their own real wine. It’s not about big business, but simply about enjoyment and of course the pride when you can serve the house wine to your guests.

But what do you need to make your own wine?

Not only grapes are suitable for making wine yourself, but strawberries, elderberries, plums, or blackberries can also be processed into a bottle of delicious wine. You also need sugar, yeast, and antigen. The last two ingredients are available at drugstores and are used to stimulate the fermentation process and prevent the fruit from gelling during production and leaving you with jam instead of wine. The last ingredient is caloumpyrosulfite, which is also available in drugstores.

The best way to benefit here with regard to application and dosage is from the advice of the local experts. But the right equipment is also important, which is usually already available in the household: a scale, a thermometer to check the fermentation temperature, a few bowls, and buckets, and a funnel. You also need a fermentation lock and a fermentation tube, as well as a filter cloth and a fermentation container.

Your own wine production can start

The fruit must be cleaned, pitted, and stoned before it is chopped up in the food processor or immersion blender. It is also important that all rotten spots have been removed, as these can lead to an unpleasant aftertaste. For about one liter of wine, you need two kilograms of fruit and add two and a half liters of water. The mixture is heated to fifty degrees and mixed with the anti-gel and left to rest for a day. This resting period is important for the fermentation process, even if you can hardly wait for your own wine.

For one liter of wine, you need two grams of yeast nutrient salt, half a gram of potassium pyrosulfite, and one and a half kilograms of sugar. Now the fermentation process continues, but this time a temperature of twelve to eighteen degrees is ideal. Finally, the house wine can be poured out of the fermentation vessel into bottles with a funnel and corked.

  • Accessories for wine making
  • A fermentation vessel made of plastic or glass
  • A cover for the fermentation vessel
  • A fermenter
  • A suction hose
  • A precisely tuned scale
  • A vinometer is used to measure the alcohol content of wine
  • sugar
  • citric or lactic acid
  • yeast nutrient salt
  • Pure, liquid yeast (not to be confused with the common baker’s yeast)
  • lime
  • potassium pyrosulfite

Whole wine-making sets are great for the first time, but they’re only worth buying if you plan on making wine more than once. The accessories, which you don’t have in the household anyway, are not cheap, but careful use is very important to get a tasty result.

Winemaking tips and tricks

There are a few points that you absolutely have to consider in order to be satisfied with your own wine afterward. This includes working very precisely and hygienically, starting with the preparation of the fruit. The ingredients should also not be weighed roughly, but really carefully.

There are two types of winemaking: Maceration, described above, which uses all the fruit in a pureed form. This process is easier and the wine also gets a great color. Juice fermentation uses only fruit juice, which requires a good press. No bitter substances or other flavor influences can form and the finished wine has lighter color. This type is not suitable for some types of fruit, such as bananas.

Variants for experienced hobby winemakers

Changing the type of fruit suddenly results in a completely different wine and enjoyment, so we encourage experimentation as the process itself remains the same. Have fun! In addition, note how you can make bottle corks fit and our tips for a perfect party, maybe even with your own wine.

Not only fresh and high-quality food must be prepared properly, but also the tea. This is the only way to get the best taste. In general, making tea is much easier than cooking food. Still, it makes sense to consider things like water temperature, the exact amount of tea and water, and brewing time.

However, the only way to find the perfect recipe is to try it out. The tips and instructions on the Internet can point you in the right direction. Later, brewing the tea becomes a habit, and things like temperature and co. are automatically complied with. The following article explains which other tips can help when making tea and what you need to pay attention to.

1) General rules on the topic of making tea

Overall, there are a few rules and guidelines that should always be followed. What these are is explained below:

  • The more tea leaves used, the stronger the taste.
  • The longer the tea is steeped, the more intense the taste.
  • The fresher the tea is, the higher the quality and taste.
  • The hotter the tea water, the shorter the brewing time.
  • Each different type of tea requires a different temperature.
  • Smaller teapots are better suited for infusing the tea.

2) Store tea properly

For a good and tasty tea, you need to be careful when storing it. Proper storage plays a crucial role. After all, the leaves must not lose their freshness. Therefore, the tea should not be kept in the following places:

  • exposure to light
  • exposure to moisture
  • exposure to foreign odors

All of these factors have a direct impact on the taste of the tea. Much better are dark places where it is dry and cool. In the best case, the tea is kept in sealed cans. For example, glass jars or jars with a viewing window are not suitable for storage. This also applies to plastic and paper bags. They are only suitable for transporting the tea from the supermarket to your own four walls. Under no circumstances should the same tin be used for different types of tea. That changes the taste. It is advisable to use up the tea completely within 2 months in order to preserve as much taste as possible.

3) Cups and pots for tea

Tea is enjoyed not only in Germany but also in other countries around the world. The preparation of the tea plays an important role in health and bliss, regardless of culture. For this reason, the right crockery can increase the enjoyment of tea. On the one hand, they help to prepare the tea ideally, and on the other hand, the shape and the material of the dishes create an extraordinary atmosphere. The taste cannot be changed, but the experience can.

4) Water when making tea

The quality of any tea depends much more on the water used than on the actual tea. Water accounts for about 80 percent of flavor, which is confused by many. The freshness of the water is crucial when preparing tea. The water contains oxygen, which contributes to the taste experience. Tap water or water that has been standing for a long time is not suitable. Furthermore, the water should not be overboiled. With each boil, the water loses oxygen and a bland taste develops.

5) water temperature

As already mentioned above, in addition to the quality of the water, the temperature plays a not unimportant role. Some types of tea taste better when provided with the right water temperature. A classic misconception: the tea always has to be infused with sparkling hot water. However, the flavor can evaporate faster this way. The ideal amount of water in a kettle is about 1 to 1.5 liters.

6) steeping time

The last point deals with the brewing time of the tea. The more leaves there are in the tea, the shorter the brewing time. This also applies to hot water and broken tea leaves. For even more taste, it is advisable to add milk and sugar. However, this is more a matter of taste. The motto here is: the proof of the pudding is in the eating.

Making delicious, acid-free coffee is all about balancing the variables. One of the most overlooked, but extremely important, variables is the water temperature. It’s also one of the easiest to control, adjustable factors.

Understanding how water temperature affects your coffee can do a few things for you. It gives you the knowledge you need to use water that is consistent and reliable. Let me give you an overview of the best water temperature for coffee.

How water affects coffee processing

As you probably already know, the hotter your water, the faster it extracts things from the coffee grounds. Near-boiling water only takes 2-4 minutes to achieve a balanced extraction. However, cold water can take anywhere from 3 to 24 hours to produce cold coffee.

The ideal temperature range for hot brewing is 90 to 95 degrees Celsius. This is hot enough to extract gently and quickly, but not so hot that it’s uncontrollable.

  • Coffee above 1 degree Fahrenheit tends to pull things out of the ground very easily, resulting in bitter coffee
  • Water below 95 degrees has difficulty in extraction, often resulting in sour, immature coffee

The 90-95 degree range is not the target standard for water temperature when brewing coffee. It’s just the spectrum that most people around the world use the most because it tends to make the best, most balanced coffee. You are always able to deviate from this tried and true temperature range, but I don’t suggest it unless you’re a seasoned coffee enthusiast.

There are quite a few coffee pros who use lower temperatures to get different results in their coffee.

The way to consistent and reliable water

If you’re really just looking for a way to get the water to the right temperature evenly and easily, that’s a good thing! Finding your water’s sweet spot is an easy way to reliably achieve the best water temperature. First, you need to determine the altitude of your place of residence. The boiling point at sea level is 100 degrees Celsius. The higher you are, the lower the temperature the water needs to be to boil.

If you live in an area where boiling occurs between 90 and 95 degrees, you’re one of the lucky ones. You can just take your water right off the kettle as it will boil at the ideal range. If you live at sea level, you should let your water cool for a minute or two after it boils before using it. I suggest using a thermometer and a stopwatch to see how long it takes your water to cool to an acceptable temperature. It could be as little as 1 minute, but it could also be 5, depending on your height and the size/material of the kettle.

If you’re near sea level, you can also skip preheating your coffee maker. If you then pour in your water, which is over 95 degrees hot, it will immediately cool down as the coffee maker absorbs some of the heat.

If you live at a very high altitude where boiling starts below 94 degrees, you risk running out of your coffee extraction by boiling with just a little too cold water. You may need to adjust your brewing style slightly to brew the best coffee possible. I suggest trying a few things:

  • Heat your brewing vessel very well to reduce the temperature loss when filling the water
  • Increase extraction by either grinding your coffee a little finer or increasing the brewing time

Change water temperature to improve the coffee taste?

There are ways you can use water temperature to achieve specific flavors, but it’s quite difficult to do this consistently unless you have a dedicated kettle that heats water to specific temperatures. These are very convenient, but they are often very expensive. If you’re looking to improve your coffee, it’s much easier to keep your water temperature in the ideal zone and instead use the grind size to make small changes. Adjusting the grind size is quicker and easier to control than adjusting the water temperature. You can also use the best fully automatic coffee machines for perfect coffee enjoyment.

Lots of useful tips for making pasta dough and making pasta yourself. With instructions on how to make your own pasta. Now conjure up your own pasta with your own homemade pasta dough.

Just make your own noodles

They are on everyone’s lips and almost everyone knows them: pasta. They are among the most popular side dishes and simply make connoisseurs happy. Noodles can be prepared quickly and are a taste experience in salty and sweet forms. We usually enjoy industrially produced pasta. Fresh pasta that tastes like it was made by mom or grandma is rare. Freshly made noodles are sold commercially as a delicacy. The price is correspondingly high. But making pasta yourself is not rocket science. With a little patience and practice, anyone can make their own delicious pasta dough.

The ingredients for the pasta dough

For a good pasta dough weighing approx. 550 g, the following ingredients should be ready.

  • 300gr wheat flour type 405
  • 200gr durum wheat semolina
  • 6 egg yolks
  • 1 egg
  • 2 teaspoons oil
  • 3 tablespoons of water
  • and a pinch of salt

This amount makes about four servings when cooked.

The tool for making pasta yourself:

For kitchen tools we need:

  • a cooking spoon
  • a large mixing bowl
  • a teaspoon
  • and a tablespoon

The steps of the DIY pasta

Place the flour and semolina in a mixing bowl. Make a small well in the middle of the mixture with your hands and pour in the yolks and the whole egg.

Now add the oil and salt. If you are not afraid of raw eggs in the dough and thus of salmonella poisoning, you can try the raw dough and possibly spice it up a little to taste. Since the noodles will later be cooked in salt water, the seasoning should not be overdone. Finally, add the water to the dough. Muscle strength is required now. The dough must be kneaded for at least a quarter of an hour. The dough is good when it rolls smoothly into a ball and doesn’t crumble.

If despite all caution, it crumbles, a tablespoon of water and a few drops of cooking oil can quickly restore the elasticity of the dough.

When the dough is well wrapped in cling film and has been flattened with muscle power, it can be placed in the fridge and left to rest for about half an hour. The break should really be observed. If the dough is not really cool, it can become sticky and processing with a great result is not possible.

The purchase of pasta machines and Co.

If you want to make your pasta dough, you don’t necessarily need an expensive pasta machine to roll out and cut the dough. However, it can be a great kitchen helper for the household if fresh pasta is made more often.

You can also make your own noodles with a simple, sharp knife. Anyone who is toying with the idea of ​​making their own pasta dough in the future and avoiding industrially manufactured products will definitely find what they are looking for in the large market of pasta machines.

By the way: You can also make pasta dough with other ingredients such as fresh vegetables, herbs, and cocoa. Vegetables such as carrots or beetroot and spinach color the pasta dough and make the pasta taste like the vegetables used. If you have a sweet tooth, you can try a type of pasta with cocoa in a sweet version.

Whether vegetables, cocoa, herbs, or simply plain. Homemade noodles just taste good. An attempt to make the pasta dough yourself will be rewarded with pure enjoyment. And if the pasta attempt doesn’t work right away, it will definitely work next time. Pasta that has “accidentally” also tastes delicious.

Useful tips for making ice cream and making simple ice cream recipes yourself. For your own ice cream making in summer or for a great dessert with homemade ice cream.

Cool ice cream in the summer is one of the best rewards after a long day at work or school. If there is no ice cream in their own freezer, families can now easily make their own ice cream. It can be made either with an ice cream machine or simply in the freezer.

What is an ice machine?

An ice machine is generally a device that produces an ice cream mass from a liquid. The ice cream machines all have a very similar structure. They usually consist of a large bowl into which the liquid is filled. There is a cooling liquid on the rim of the bowl. The bowl is chilled in the freezer for about 10 hours before making. The cooling liquid on the edge then continues to cool and freeze the ice mass.

A small motor with a dough hook ensures the movement of the mass and the even icing of the entire liquid. An ice machine can usually be purchased for 50 euros. However, it must be stored in the freezer for around ten hours before each use so that the walls of the key are permanently cooled.

What ingredients do you need to make ice cream?

There are countless recipes for making ice cream, but most of them are based on the same ingredients. These include milk or cream, sugar, fruit, or chocolate. The best flavors of ice cream can be made with these simple ingredients. The milk or cream provides the creamy consistency of the ice cream. Although cream naturally tastes better, milk has far less fat and fewer calories.

So if you want to make low-calorie ice cream, you should choose milk instead of cream. Sugar is also an integral part of ice cream. It makes the ice cream sweet and makes it taste better. Sugar is a natural flavor carrier and intensifies the taste of the ice cream. Although sugar increases the calories, of course, it should still be present in the ice cream. Most ice cream flavors contain fruit or chocolate (or both). The fruits are usually pureed or chopped.

Which fruits are suitable for making ice cream yourself?

The fruits, which can be easily pureed and chopped, are particularly suitable for making ice cream. Hard fruits like apples are not suitable for making ice cream yourself. So if you want to make your own ice cream, you should use fruits such as bananas, blueberries, raspberries, or strawberries. But exotic fruits such as mangoes or watermelons can also be used. Frozen fruit is also ideal for ice cream. These are already chilled and just need to be pureed.

Which chocolate when making ice cream?

Here the user has a free choice. You can use the chocolate you like best. If you add chocolate to the ice cream, you no longer need additional sugar because it is already contained in the chocolate.

What to look out for when making ice cream yourself?

Actually, all the ingredients are simply pureed together to create a creamy mass of milk/cream, sugar, and fruit/chocolate. This mass should then rest in the fridge for at least an hour to get a lower temperature. If you immediately put the warm mass in the ice cream machine, you will not get a satisfactory result. When using frozen fruit, this step is no longer necessary, the mass can be put into the machine immediately. Make some recipes for ice cream yourself

General fruit ice cream (for two people):

  • A cup of cream or 250 milliliters of milk
  • Two tablespoons of sugar
  • Approximately 250g grams of fruit (strawberries, bananas, blueberries…)

All ingredients are pureed together until a creamy mass is formed. This is chilled for about an hour and finally added to the ice cream maker. After about thirty minutes in the machine, the ice cream is ready.

Chocolate ice cream (for two people):

  • A cup of cream or 250 milliliters of milk
  • Half a bar of chocolate (about 50 grams)
  • Possibly nuts

The chocolate needs to be liquefied. To do this, liquefy the chocolate either in a water bath or in the microwave. This is then added to the cream or milk and mixed with the nuts. Be sure to refrigerate afterward as the chocolate will be hot. After cooling, simply put in the ice cream maker, after about 20 minutes the ice cream is ready.

Preparation of the roux

The preparation is simple and easy to remember. Because all you need is fat, such as butter, margarine, or oil. Butter tastes best in the roux. You will also need flour and some broth. You can use vegetable or beef broth, depending on your preference. Then you proceed as follows. Also, note the delicious recipe for homemade Bolognese sauce.

Instructions and recipes for making muesli yourself. Easy as pie homemade muesli. With many delicious recipes for your personal muesli.

Breakfast should be the most important meal of the day. Especially for children, breakfast is the basis before an often long school day. Children should come to school fit and healthy. A healthy breakfast in the morning, with carbohydrates, vitamins, and nutrients that ensure a healthy start to the day, is all the more important. What could be more obvious than freshly preparing tasty muesli yourself?

The basic ingredients for a healthy muesli

Cereals, millet, quinoa, spelled, oats, or millet are the basis for every muesli. They are good suppliers of energy because they contain a lot of important roughage and thus ensure a long-lasting feeling of satiety. Their vitamin B content, as well as minerals, ensure a good immune system.

Nuts

Since nuts are very rich in healthy fats, minerals, and proteins, they are essential for nourishing our nerves. They should not be missing in any homemade muesli. It doesn’t matter whether walnuts, hazelnuts, cashews, or other types of nuts are used. You can freely choose from the range of nuts according to your mood.

Seeds and kernels

Seeds and kernels of all kinds provide important omega-3 fatty acids and thus protect the body from stress. Sunflower seeds, sesame, hemp seeds, chia seeds, and other seeds are suitable for the fresh muesli.

Spices

Spices give the muesli a special touch. Cinnamon and vanilla have an extremely mood-enhancing effect. Since they are able to regulate the blood sugar level, they are particularly valuable and healthy and therefore the perfect addition to our fresh, homemade muesli.

Dairy products

Dairy products such as yogurt, kefir, quark, milk, or cream cheese are excellent sources of protein and are essential for healthy intestinal flora. Use dairy products without sugar or added sugar to mix your muesli healthily. Avoid ready-made, store-bought muesli mixes, as sugar is often added to them.
If you suffer from lactose intolerance, replace the dairy products with plant-based products such as oat milk, soy milk, almond milk, rice milk, or similar.

Fruit

Fresh seasonal fruit, such as strawberries, blueberries, apricots, mangoes, apples, pears…etc. gives your muesli freshness and also provides you with important vitamins. Pay attention to good quality and use unsprayed fruit if possible, or fruit of organic quality for your homemade muesli.

Sweeten the muesli

To avoid refined sugar, choose natural variants such as honey, maple syrup, or coconut blossom sugar. Unlike refined sugar, these contain carbohydrates, minerals, and other nutrients.

Our muesli tip

Now that we have explained the basic ingredients of muesli to you in more detail, we would now like to present a recipe that will certainly get you off to a good start in the day. The ingredients can of course be exchanged or added to as desired; there is no limit to the imagination. Have fun trying!

Muesli Ingredients for 750g about 7-8 portions

  • 500g coarse oat flakes
  • 140g walnuts
  • 50g grated coconut
  • 60g chia seeds
  • 1 tsp coconut powder
  • 2½ tsp ground vanilla
  • 3 teaspoons cinnamon
  • 85 ml olive oil
  • 300 grams of honey

Tips and instructions for making popcorn yourself at home. The best tricks and popcorn recipes for making popcorn yourself in a pot on the stovetop.

Popcorn is popular and delicious when a long evening of TV is imminent or a snack is missing for the party. And this delicious snack can be prepared very quickly and without much effort or fuss.

Tips for making popcorn yourself

Below are the best tips and tricks on how to quickly and cheaply prepare popcorn that is tasty and fresh. Great cooking skills and complicated ingredients are not required for this. You need dried corn kernels, some cooking oil, and, depending on your taste, sweet or savory ingredients. No special machine or device is required other than a regular saucepan with a matching lid and a stovetop. And if you don’t have a cooking pot at hand, you can also prepare the popcorn in a pan with a lid.

How is popcorn actually made?

Popcorn is made from corn kernels. The corn kernels contain water and also some oil. If the corn kernels are now heated in the pot, these components change. From the liquid water and oil version in the grain, the components suddenly become gaseous. The corn husk breaks open due to the heat input. And with this small popping up, each individual kernel of corn automatically expands and the popcorn is ready.

In order to get a good result quickly, a pot temperature of around 180 degrees Celsius is required. Then the corn kernel shell tears open and water vapor escapes from the corn kernel. The corn starch gets out of the grain and offers a well-known popcorn shape.

Easy popcorn recipe for everyone

For the basic popcorn recipe, put some cooking oil in a saucepan. A small amount of cooking oil that wets the bottom of the pot is sufficient. Then put the corn kernels in the oil. Then you should definitely put a suitable lid on the pot. This is necessary so that the finished popcorn does not pop out of the pot when it pops up.

Then turn on the stove and heat the pot until a little over half the corn kernels have popped up. Most of the time, the grains pop up very quickly. For this reason, it is better to stay at the stove. After popping up, you should immediately turn off the heat supply. You must immediately remove the finished popcorn from the stovetop so that it does not burn in the hot pot.

Make sweet or savory popcorn yourself

Depending on your taste, the finished popcorn can now be seasoned. Mostly sweet variants with sugar are chosen. But hearty seasoning, for example with paprika, chili, tomato, or curry, is also possible and popular. It is important that the popcorn is still warm when it is seasoned. This way, the selected ingredients stick better to the popcorn.

A little tip for the slimline

The popcorn can be prepared very low in calories. If, for example, a coated pot is selected for the preparation, then no cooking oil needs to be added. The corn kernels pop up even without the addition of fat. However, the popcorn should also be seasoned heartily. Because all sweet variants with sugar or caramel contain a lot of calories.

Make your own mustard and simply make it yourself? Simply mix five ingredients together and you have your own mustard to season to taste. You can let your creativity run free in mustard production.

Make delicious mustard

Are you making a salad or breakfast with white sausage but don’t have any mustard to hand? Or would you like to try something new in the kitchen? Then just make your own mustard, because it’s easier than you might think and you only need 5 ingredients.

You can find the ingredients for this in any grocery store. And you can give your mustard a personal touch with simple things like the degree of flour in the mustard seeds or the ratio of black to white mustard seeds. And the best thing is, you can taste it individually, just as you would like it.

What do you need to make mustard yourself?

  • 50 g mustard seeds (white or black)
  • 40ml of water
  • 30 grams of wine vinegar
  • 30 g sugar (alternatively honey)
  • 5 grams of salt

Step-by-step instructions

  1. The mustard seeds must first be washed and dried.
  2. Then they are crushed with the help of a mortar. You can do this finely or coarsely as you like. Alternatively, you can of course mix the grains. (To save yourself this step, you can also use mustard powder.
  3. You can then mix the remaining components together and slowly stir them into the mustard flour that has been created before.
  4. This mixture is left to swell and then you can season it to taste.
  5. Now you can fill your mustard in well-sealable jars so that it keeps for a while.

Make an alternative recipe to the mustard yourself

  1. Blend the mustard seeds with food and water until paste forms.
  2. Then add the remaining components

Tips for making mustard

  • The mustard seeds should not have a temperature above 30°C, otherwise, they will become bitter.
  • If you want to give your mustard that certain something, you can refine it with fresh spices, paprika or curry powder, and many other spices.
  • The mustard is also suitable as a gift. Simply fill the mustard in a nice glass and label it. Everyone is sure to be happy about a gift that you have put so much work into!
  • If you like it spicy, you should use dark mustard seeds, because the darker the seeds, the hotter they are.
    But if you prefer it sweet, you should simply add more sugar or honey.
  • To make medium-hot mustard, you can simply mix white and black mustard seeds in a 50:50 ratio.
  • After opening a jar of mustard, make sure to keep it closed in the fridge, otherwise, it will lose its sharpness
  • Consequently, you can leave the jar at room temperature for a day if the mustard is too hot for you.