Tag

recipe

Browsing

Torta Camilla is the Italian version of the classic carrot cake. Here you will find a vegan recipe for the fluffy and juicy carrot cake.

Torta Camilla is a moist carrot cake that is very popular in Italy. Ground almonds and the juice and grated zest of an orange give it its special aroma.

When it comes to the ingredients for the Torta Camilla, make sure that they are organic if possible. You are supporting ecologically more sustainable agriculture that uses natural resources sparingly and, for example, does not use chemical-synthetic pesticides. The organic seals from Demeter, Bioland and Naturland are particularly recommended, as they specify stricter criteria than the EU organic seal.

Torta Camilla: A vegan recipe

Ingredients:

200 g carrots
1organic orange
40 mlsunflower oil
20 g ground almonds
80 gsugar
1 packet(s) of vanilla sugar
180 g spelled flour
0.5 pack(s)cream of tartar baking powder
1 tbsp powdered sugar

Directions:

Wash the carrots thoroughly. Then grate them as small as possible with a kitchen grater.
Grate the zest of an organic orange and squeeze out the juice.
In a medium bowl, combine the carrots, orange zest and juice, and sunflower oil.
Add the sugar, vanilla sugar, spelled flour and cream of tartar and mix all ingredients into a smooth batter. Tip: If the dough is too tough, you can simply stir in a sip of water.
Grease a suitable cake tin with some sunflower oil and pour in the batter.
Bake the Torta Camilla at 180 degrees for about 40 minutes. The chopstick test shows you whether the Italian carrot cake is ready.
Dust the Torta Camilla with some powdered sugar before serving.

Torta Camilla: tips and hints

You can also easily make the Torta Camilla gluten-free: replace the spelled flour with the same amount of brown rice flour.

You can also halve the cake horizontally and fill it with jam if you want an even fruitier result – for example with orange marmalade.

The Italian carrot cake will keep in the fridge in an airtight container for about 4 to 5 days.

You should never throw away asparagus peel, because you can use it to cook a tasty asparagus soup. In our simple recipe, we show you how easy it is to cook a delicious asparagus soup with just a few ingredients.

Cooking asparagus soup from asparagus peels – the ingredients

It is best to buy white asparagus during the asparagus season from mid-April to June. Make sure that the asparagus comes from the region, as long transport routes are bad for the climate. In addition, you should only use organic asparagus, since conventional asparagus spears are treated with chemical-synthetic pesticides. Organically grown asparagus is usually a bit more expensive, so you should definitely use the asparagus skin as well – for example for an asparagus soup. Because the peel is also very aromatic and you avoid wasting food. With three small changes to the recipe, you can also prepare the asparagus soup vegan.

For two servings you need the following ingredients:

Peel of 500 g white asparagus
1 tsp sugar
1 tsp lemon juice
1/2 tsp salt
10 g butter or vegan margarine
2 tbsp flour
optionally 1 egg yolk
50 g whipped cream or vegan cream
Pepper, nutmeg and chervil to taste

Recipe: cook asparagus soup from bowls

Wash the asparagus shells.
Put the peels in a saucepan with the salt, sugar and lemon juice and add enough water to cover the peels.
Bring the water with the peels to a boil and then let them simmer for about ten minutes.
Pour the soup through a sieve and collect the liquid in a saucepan. The asparagus shells are now boiled and you can dispose of them in the organic waste.
Then, in a tall saucepan, prepare a roux by heating butter in a separate saucepan, adding the flour and mixing well.
Then gradually add the asparagus peel water to the roux. Be sure to stir regularly and vigorously to avoid lumps later in the soup.
Season the soup with a little salt and then briefly boil it again.
Take the pot off the stove, mix the egg yolks and cream together and add both to the soup.
Tip: Asparagus contains bitter substances, especially under the skin. Therefore, do not cook the peel for too long. This way you avoid too many bitter substances going into your soup.

You can serve the soup now and serve it with chervil or grilled asparagus, for example. However, you should not boil the soup again, otherwise the egg would clump together.

Buttered turnips taste similar to swedes, but are smaller and milder. The old vegetable variety has been enjoying greater popularity again for some time. Here you can find out interesting facts about their properties as well as cultivation and use.

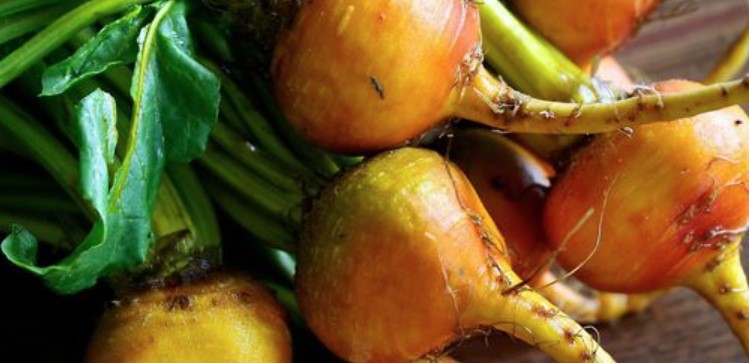
Butter beets are an old type of vegetable that can be found increasingly at weekly markets and in (organic) supermarkets. The butter beet belongs to the subspecies of turnips and is distinguished from other varieties such as the navette by the golden yellow color of its skin. It is therefore also known under the name “gold beet”. The taste is more comparable to the swede. The butter beet is not only smaller, it also tastes tenderer and milder.

Good to know: Despite the similarity in taste, the butter beet is not directly related to the swede. Botanically speaking, turnips are a subspecies of oilseed rape and belong to the same genus, but not the same species as turnips. However, the swede is also sometimes referred to colloquially as butter turnip – this can cause confusion.

Nutritional values and ingredients of butter beets

Turnips are generally considered to be rich in nutrients. In addition to butter beets and navettes, this subspecies also includes the small, cone-shaped Teltower turnips. The amounts of nutrients can of course vary slightly from variety to variety. On average, raw turnips contain the following basic nutritional values per 100 grams:

Calorific value: 28 kcl (117 kJ)
Protein: 0.9 grams
Fat: 0.1 grams
Carbohydrates: 6.43 grams (including 3.8 grams of sugar)
Fiber: 1.8 grams

In addition, turnips are rich in minerals. Per 100 grams they provide, among other things:

191 milligrams of potassium
67 milligrams of sodium
30 milligrams of calcium
27 milligrams of phosphorus
11 milligrams of magnesium
0.3 milligrams of iron
15 micrograms of folic acid

Vitamin C (21 milligrams) and vitamin K (0.1 micrograms) are also contained in turnips such as butter beet. For better classification: The daily requirement of vitamin C is 110 milligrams for men and 95 milligrams for women.

Butter beets: seasonal and home-grown

Butter beets can be grown as May beets, but also as autumn beets. Accordingly, the harvest time falls either in May or between October and November. Butter beets are often available from storage for up to two months after the end of the harvest.

The butter beet is an easy-care vegetable and can also be easily grown in your own garden. Depending on whether you want to harvest in May or in the fall, you should plant the seeds in late March/early April or mid-July/late August. You do this as follows:

First select a suitable location. A sunny and not too dry location is particularly important. Butter beets, on the other hand, do not make any special demands on the soil conditions.
Prepare the soil for sowing by loosening the soil a bit. If necessary, remove weeds from the bed.
Make seed furrows in the soil 30 to 40 centimeters apart. They should be an inch or two deep.
Spread the seeds evenly over the grooves, then cover them with soil.
Finally, water the seeds generously.
Butter beets do not require much care after sowing. Just make sure to water them regularly, but avoid waterlogging.

After a week, the first germs should appear. The butter beets are ready for harvest after about eight weeks. Once harvested, they will keep in a cool place for about a week or two.

The butter beet in the kitchen: this is how you use it

In the kitchen you can use the butter beet both raw and cooked. Freshly harvested butter beets taste particularly fine and mild when raw. Grated or cut into fine strips, they make a delicious raw vegetable salad, for example. You can also add them to mixed salads.

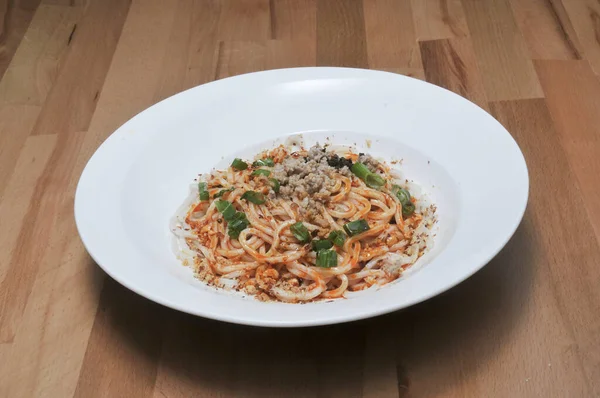
Because of the similar taste, buttered turnips are generally a good alternative to swedes. You can easily prepare many swede recipes with buttered turnips, for example the classic swede stew, a simple swede soup or an exotic swede curry.

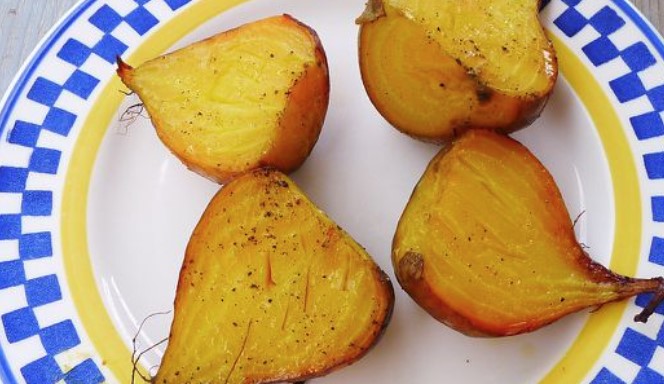
You can also prepare butter beets as a hearty side dish or starter – for example as beet puree or steamed in a little butter or margarine. Here we present a simple recipe for spicy seasoned butter beets from the pan.

Recipe: Spicy buttered beets from the pan

Ingredients:

1 kg butter beets 4 sprigs of rosemary
30 g butter or margarine salt chili flakes
1 tbsp honey
200 ml apple juice

Directions:

Wash the butter beets under running water. Remove the stalk and root end. Peel the beets and cut them into quarters.
Wash the rosemary and shake dry.
Heat butter or margarine in a pan. Add the beets and rosemary and sauté for 3 to 5 minutes.
Then add the salt, chili flakes, honey, and apple juice to the pan. Mix everything together well.
Cover the butter beets and let them cook in the pan over low heat for about ten minutes. Remove the lid just before the end of the cooking time and let the remaining liquid boil down over high heat. Toss the vegetables occasionally to keep them from burning.
Finally, remove the rosemary sprigs and season the buttered beets with salt and chilli flakes.

Rice cream is a deliciously full-bodied dessert. In this article we will show you a recipe that is very easy to prepare – with a vegan version.

Rice cream is a delicious alternative to pudding that you can easily make yourself. So you can freely choose all components – whether cow or plant milk or sugar or maple syrup – and decide for yourself how sweet or cinnamon you like the rice cream.

We recommend buying all ingredients in organic quality. In this way you avoid chemical-synthetic pesticides and artificial fertilizers, which pollute the environment and can remain as residues on the food.

A basic recipe for rice cream

Ingredients:

500 mlmilk or plant milk
80 grice flour
3 tablespoons raw cane sugar or maple syrup
1 packet(s) of vanilla sugar
0.5 tsp
1 pinch(s) of salt

Directions:

Put the milk or plant-based milk (oat milk works particularly well) in a saucepan and heat it up.
Place all other dry ingredients in a bowl and mix together while the milk heats up.
Add the contents of the bowl and any liquid maple syrup to the milk in the saucepan. Turn the stove down to a low temperature. Mix everything together well and let it swell for ten minutes. Stir the mixture occasionally during this time.
Turn off the stove and let the rice cream swell for another five minutes.
Now you can serve the rice cream and put some extra cinnamon on top as a topping.

Tips about the sweet rice cream

You can vary the rice cream according to your taste:

For example, if you like it sweeter, you can add more sugar. If you want a sweet and spicy note, you can add a pinch of nutmeg, for example. If you like it chocolaty, add some Fairtrade cocoa powder or a piece of chocolate.
The rice cream tastes best when served fresh and warm. If you have any leftovers, you can store them in the fridge for a few days. You can of course eat the rice cream cold afterwards. If you want to heat them up again, heat some milk in a saucepan and add the rice cream. Mix everything together and let it warm up a bit.
There are many options when it comes to topping selection. For example, you can add berries or apple compote, currant jelly, fruit or fruit puree, cinnamon-sugar or maple syrup, nuts or pieces of chocolate. Of course, you can also combine these components with each other.

You can prepare our vegan crumble cake with just a few ingredients. We’ll also tell you which seasonal fruit you can use to change it up depending on the season.

This vegan crumble cake is a great basic recipe that you can modify in many ways. Crumb cake is often prepared with pudding. However, our recipe replaces the pudding with fresh seasonal fruit. The recipe is also vegan, so it does not contain any animal products.

You don’t need any fancy ingredients for the vegan crumble cake. You can get most of the products from regional and organic retailers. This saves CO2 emissions and you avoid residues of chemical-synthetic pesticides on your food. Follow the recipe to find out which seasonal fruit goes particularly well with the crumble cake.

Tip: You can easily grow many types of fruit yourself in the garden or on the balcony.

Crumble Cake: A Basic Recipe

This recipe is suitable for a springform pan with a diameter of 26 centimeters.

Ingredients:

1 tbsp fat for the mold
280 g flour
120 gcane sugar
200 g vegan margarine
1 teaspoon Baking powder
500 g Seasonal fruit

Directions:

Grease the springform pan with some margarine or cooking oil.
For the base: Mix 180 grams of flour, 50 grams of sugar, 120 grams of vegan margarine and the baking powder together. Pour the batter into the springform pan.
For the crumble: Knead 100 grams of flour, 70 grams of sugar and 80 grams of margarine into a crumbly dough. You can find out how this works best here: Make Streusel: Simple step-by-step instructions with 3 ingredients.
Sort and wash seasonal fruit. Peel as needed and cut into small pieces if necessary.
Spread the fruit on the cake base and sprinkle the crumbles over it.
Bake the cake at 180 degrees Celsius (top/bottom heat) for about 50 minutes. After 40 minutes, do a chopstick test.

This fruit goes well with the vegan crumble cake

If you prepare the vegan crumble cake with seasonal fruit, you will always have variety on the coffee table throughout the year. The following types of fruit are particularly suitable:

Rhubarb: April to June inclusive
Blueberries: June to September inclusive
Strawberries: June to September inclusive
Raspberries: July to September inclusive
Blackberries: July to September inclusive
Plums and damsons: July to October inclusive
Apples: August up to and including November (from storage until April)
Pears: September (from storage until January)

In our seasonal calendar, you will find an even larger overview of when which fruit is in season.

You can prepare asparagus risotto with green and white asparagus. You also need risotto rice, of course. We will show you a simple basic recipe for asparagus risotto.

When the asparagus season begins in April, you can prepare the fresh asparagus from the region in many different ways. If you don’t just want to eat it as a vegetable side dish, you can also use it in an asparagus risotto. You can find an easy recipe for it here.

Make sure to buy the ingredients for your asparagus risotto in organic quality and regionally. We can particularly recommend the organic seals from Demeter, Bioland and Naturland, as they follow stricter criteria than the EU organic guidelines.

Asparagus risotto: ingredients for the recipe

For the asparagus risotto you can use white and green asparagus – whichever you prefer. You can also combine the two varieties, as in our recipe. For two portions of risotto with asparagus you need these ingredients:

250 g white asparagus
250 g green asparagus
2 shallots
150 g risotto rice
3 tbsp butter
100 ml white wine (e.g. organic wine)
500 ml vegetable stock (tip: make your own vegetable stock)
sugar, salt and pepper
the juice of half a lemon
a few walnuts
80 g (vegan) Parmesan

Tip: If you would rather only use one type of asparagus for your asparagus risotto, simply use 500 grams of the preferred variant. You can also use broken pieces of asparagus or leftovers of cooked asparagus from other dishes.

Recipe: Cook asparagus risotto in 7 steps

You should plan about an hour for the cooking of the asparagus risotto:

First you wash and peel the asparagus. Peel white asparagus completely, green asparagus you peel only the lower centimeters. You should cut off the woody ends.
Cut the asparagus into pieces about 3 centimeters long. You should not throw away the remaining skin of the asparagus. Instead, you can make an asparagus soup out of the shell.
Pour about 500 milliliters of water into a saucepan and add some sugar. Bring the mixture to a boil and then add the asparagus pieces. Let the asparagus simmer on low heat for about ten minutes. Then drain well.
Peel and dice the shallots. Heat some butter in a saucepan and sauté until translucent. Add the risotto rice and steam it until translucent. But be careful: he shouldn’t get brown.
Pour the white wine into the saucepan and stir well until it has completely evaporated. Now gradually add some vegetable broth so that the rice is always just covered. This all takes about 20 to 25 minutes. Meanwhile, you should keep stirring well so that nothing burns. At the end, the asparagus risotto should have a creamy consistency and not be too runny. So if you don’t use up all of the vegetable broth, that’s no problem.
When the risotto has reached the desired consistency, add the asparagus pieces, a tablespoon of butter, the juice of half a lemon and about 50 grams of grated (vegan) Parmesan.
Season with salt and pepper and gently stir the asparagus risotto. Divide between two plates and garnish with the remaining Parmesan and walnuts. Tip: You can roast the walnut kernels in the pan for a few minutes beforehand.

Making herbal liqueur yourself is not difficult. If you prepare your own liqueur, you are free to choose which herbs you use. Here you will find tips for choosing herbs and a simple basic recipe.

Herbal liqueurs are part of the culinary tradition in many cultures. In Europe, they are often served after a rich meal to stimulate digestion. Many also appreciate them simply for their aromatic taste.

Herbal liqueurs can vary greatly in composition. Normally, a mixture of different herbs forms the basis of the taste. Which varieties are used and the proportions in which they are to each other depends on the recipe in question.

If you make your herbal liqueur yourself, you can decide for yourself which herbs you use. This makes it easy to adapt the liqueur to your personal taste. In this article, we give you an overview of different flavors and present a basic recipe that you can modify as you like.

Make herbal liqueur yourself: fresh or dried herbs?

You can prepare herbal liqueur with either fresh or dried herbs.

If you want to use fresh herbs, pay attention to the respective harvest times. Basically, you should buy organic kitchen herbs to avoid chemical-synthetic pesticides. This applies not only to fresh goods, but also to dried ones. Conventional dried spices in particular are often contaminated.

Make herbal liqueur yourself – these herbs are suitable

Which varieties you use is entirely up to you if you make herbal liqueur yourself. For example, the following varieties are good:

Mediterranean herbs such as rosemary, thyme, oregano or basil. Thyme and rosemary are evergreen varieties that you can harvest fresh all year round. This is also often possible with basil if the plant is perennial. The best time to harvest oregano is between July and August when it is in bloom. In principle, however, you can harvest it in the entire period between spring and autumn.
Lovage has a spicy, very characteristic taste of its own, to which it also owes the nickname “Maggikraut”. You can harvest fresh lovage from spring to autumn.
Sage is a strong spice with a slight bitter note. Its aroma is also sometimes compared to camphor or pine. Its harvest time is between May and August.
Mint contains menthol and therefore tastes cool and refreshing, but also slightly spicy. You can harvest fresh mint from spring until the first frost.
Chamomile has a mild, floral and slightly earthy flavor. Their harvest time coincides with the flowering period between June and September.
Aniseed has a strong, liquorice-like taste of its own. You can harvest them a few weeks after flowering, i.e. in September or October.
Fennel seeds are very similar in taste to anise seeds. They are ready for harvest in late summer or early autumn as soon as they turn grey-brown.
Laurel tastes very bitter when fresh. If you are making herbal liqueur at home, it is better to use dried leaves for a more pleasant taste.
Cloves are very flavorful and taste flowery and a bit spicy at the same time. You should only use them when they are dry.
If you want the individual herbs to harmonize with each other, you should use them in equal amounts. As a rule of thumb, we recommend adding two grams of each variety to the liqueur. However, you can also use certain herbs in larger quantities if you want them to have a stronger flavor. It is best to use a clear spirit such as Korn or vodka as the alcoholic basis.

Herbal liqueur: The basic recipe

Ingredients:

1 l clear alcohol (e.g. vodka or schnapps)
800 gsugar
2 g herbs (per variety)
Zest of an organic lemon (optional)
honey or agave syrup (optional)

Directions:

Pour the alcohol into an airtight container, such as a bottle. Note that the bottle must be big enough to hold the rest of the ingredients afterwards.
Add the sugar. The easiest way to do this is with a funnel.
Wash, clean and chop the herbs of your choice. Then pour it into the bottle as well.
Finally, you can add some grated lemon zest if you like. Be sure to use an organic lemon that is not contaminated with synthetic pesticides.
Seal the bottle or jar airtight and leave the homemade herbal liqueur in a warm place for four to six weeks. Shake or stir the liqueur well every day.
When the brewing time is up, strain the herbal liqueur through a fine-mesh sieve. Then fill it into a dark glass bottle and refine it with a little honey or agave syrup if you wish.
Keep the herbal liqueur cool and dark. Due to the high sugar content, it can be kept for several years without any problems.

Dan Dan Mian is a Chinese noodle dish traditionally made with minced meat. We’ll show you how to cook it vegan instead.

The Chinese street food Dan Dan Mian combines noodles with a spicy sauce, green vegetables and traditionally minced meat. But it can also be made vegan. The “Dan Dan” in the name denotes the long bamboo poles from which the baskets dangle, in which the vendors hand the dish to the customers on the street. “Mian” simply means “noodle”.

As an alternative to minced meat, we suggest a mixture of tofu and mushrooms that you can make yourself. Alternatively, you can also buy vegan minced meat. Make sure all ingredients are organic. By buying organic products, you support ecological agriculture that does not use chemical-synthetic pesticides and thus protects the environment and health.

Recipe: How to prepare vegan Dan Dan Mian

Ingredients:

200 g tofu
100 gmushrooms
1 clove(s) garlic
4 tablespoons soy sauce
2 tbsp sesame oil
0.5 tsp Zechuan pepper
2 tsp Tahin
1 tsp sugar
0.5 tsp five spice powder
Chilli flakes to taste
20 gpeanuts
200 g pak choi
2spring onions
oil for frying
200 g Chinese noodles without egg

Directions:

Crumble the tofu and finely dice the mushrooms. Peel and chop the garlic. Mix everything in a bowl with 2 tablespoons soy sauce and 1 tablespoon sesame oil. Let the mixture steep for 15 minutes.
Grind the Szechuan pepper. Mix with the remaining sesame oil, remaining soy sauce, tahini, sugar, five spice powder, and chili flakes in a small bowl.
Roughly chop the peanuts. Wash the bok choy and remove the core so that you have individual leaves. Wash the spring onions and cut them into rings.
Heat some oil for frying in a pan. Sauté the tofu and mushroom mixture over high heat until most of the liquid has evaporated.
Cook the noodles according to package directions. Add the pak choi about three minutes before the end of the cooking time.
In each of the bowls you plan to serve in, mix one part of the condiment sauce you prepared in step two with 5 tablespoons of the pasta water. Drain the remaining water from the noodles.
Put the noodles on the sauce. Serve the tofu-mushroom mixture and the pak choi on top. Sprinkle with the spring onions and peanuts. This is how you can serve your Dan Dan Mian. Before eating, you can stir it so that everything mixes with the sauce.

This is how you can modify the Dan Dan Mian

You can make Dan Dan Mian as spicy as you like by varying the amounts of chilli flakes and Szechuan pepper.

You can buy Five Spice Powder at the store or make your own using our Five Spice Powder recipe. Alternatively, you can use another Chinese spice mix.

Instead of the pak choi, you can also simply use Chinese cabbage. With the mushrooms, you can also decide whether you choose button mushrooms, try oyster mushrooms or take shiitake mushrooms.

Quinoa patties go well on vegetarian burgers or with a salad and also taste great as a snack in between meals. We present you a recipe with which you can prepare delicious quinoa fritters yourself.

Contrary to what is often assumed, quinoa is not a grain but belongs to the foxtail plant family. It is therefore more closely related to sugar beet than to wheat. Unlike the sugar beet, however, the quinoa plant is a subspecies in which the seeds, rather than the roots, are harvested.

You can cook quinoa and then process it in a variety of ways. For example, serve the seeds as a filling side dish or add them to a delicious vegetable stir-fry. Another popular way to prepare them is quinoa fritters. Here is a simple recipe for you.

Recipe: Quino Patties with Vegetables

Ingredients:

250 ml vegetable broth (homemade or powdered)
125 g quinoa (or millet)
1 small zucchini
1carrot
2 tsp cornstarch
20 ml cold water
3 tablespoons breadcrumbs
1 teaspoon curry powder
Salt
pepper
1 tbsp oil for frying

Directions:

Boil the vegetable broth in a saucepan. Add the quinoa and let it simmer over low heat until it absorbs all the liquid.
Wash the zucchini and carrot and grate them into fine strips.
Mix the cornstarch with the water in a small bowl.
In a bowl, combine the quinoa, vegetables, starch mixture, breadcrumbs, and spices. If the mixture still seems too wet for you, you can add a little more breadcrumbs.
Form patties from the mass.
Heat the oil in a pan and fry the quinoa patties until golden brown on both sides.
You can serve the qunoa patties with a salad. Various dips also go well with it.

To make the patties even heartier, add onions or garlic to the mixture. Instead of curry, you can use any other spices or herbs you like. You can also experiment with the vegetables: For example, replace the zucchini with mushrooms or the carrot with dried tomatoes.

Quinoa and Sustainability: You Should Know That

Quinoa is considered a superfood and has become increasingly popular in recent years. The problem with quinoa, like many other superfoods, is that the seeds come from overseas. Quinoa originally comes from South America and is still mainly grown in Peru, Bolivia and Ecuador. There are now companies that grow quinoa in Germany. But they only make up a small part of the total offer.

From a sustainable point of view, regional alternatives are usually more advisable. For example, you can easily replace quinoa with millet in most recipes. This is also easily possible with the quinoa patties. Millet is grown in Germany on a larger scale than quinoa, but often also comes from Asia or the USA. Therefore, pay close attention to the origin when buying. Also, value organic quality for all ingredients. In this way you support agriculture that does not use chemical-synthetic pesticides and is therefore better for the environment and your health.

Baked oats have become popular as a breakfast trend on TikTok. And rightly so, because the baked oatmeal tastes like cake for breakfast. We’ll show you how to make baked oats yourself.

Baked oats have been arguably the most popular breakfast trend on social media for a while. Although they are very similar to baked oatmeal, i.e. baked porridge, they do have their own reason for being. Because thanks to the finely ground oat flakes, baked oats have a finer and juicier consistency.

For the Baked Oats you need a blender in addition to a few basic ingredients. With this you have prepared the dough in a few minutes. The basis for the baked oats is oat flakes, plant milk, banana, dates or maple syrup for sweetness.

It is best to buy the ingredients in organic quality. In this way you support organic agriculture that does not use chemical-synthetic pesticides, which could end up in your food and in the environment. Recommended organic seals are, for example, Demeter, Naturland and Bioland. For products such as chocolate, cocoa or vanilla, you should also pay attention to Fairtrade certification. The seal shows you that the product was manufactured and traded under acceptable social conditions.

We will show you a basic recipe for vegan baked oats with light and dark variants. Of course, you can change the recipe as you like.

Vegan Baked Oats: Basic recipe for two servings

Ingredients:

80 goat flakes
240 ml plant-based milk
1ripe banana
3dates
1 tablespoon peanut butter
1 teaspoon Baking powder
0.25 tsp salt
vanilla (optional)
1 ELFairtrade cocoa powder
fair trade dark chocolate

Directions:

Add oatmeal, plant-based milk, ripe banana, pitted dates, peanut butter, baking powder, salt and optionally some vanilla or other spices such as cinnamon to the blender and blend the ingredients into a viscous paste.
For the light variant, fill half of the dough into a small ovenproof dish. You can also use an ovenproof cereal bowl or a screw-top jar here.
For the chocolate version, stir the Fairtrade cocoa into the rest of the batter and fill the second mold with it. The chocolate version tastes particularly delicious with a teaspoon of peanut butter as the core.
Top the cakes with chopped dark Fairtrade chocolate, nuts or other ingredients of your choice and bake them in a preheated oven at 180 degrees for about 20 minutes.
The baked oats taste warm or cold and keep in the fridge for several days.

Baked Oats: Tips and variations for a healthy breakfast

You can change the ingredients according to your own taste. Instead of peanut butter, almond butter or hazelnut butter go well with it and you can replace the dates with a sweetener of your choice, for example: maple syrup, apple syrup, date syrup or sugar alternatives such as stevia or birch sugar.

You are in control of the length of the baking time. If you prefer a mushy, porridge-like consistency, remove the cakes from the oven after about 20 minutes. For a firmer, cake-like texture, bake them for 25 to 30 minutes. You can do the chopstick test as a test. The baking time also depends heavily on the shape and size of your molds.

Ideas for variations on vegan baked oats:

Baked oats without banana: For a more neutral taste, you can mix the banana with 100 grams of apple pulp or with 1.5 tablespoons of ground flaxseed and 5 tablespoons of plant-based milk (leave to soak before use). Alternatively, the baked oats also work well if you simply leave out the banana and add a little more milk or plant-based yoghurt instead. However, since the banana brings a lot of sweetness with it, you may have to sweeten it here.
Baked oats with a liquid core: Put a teaspoon of nut butter, jam, some chocolate, chocolate cream or a dollop of vegan yoghurt or vegan cream cheese mixed with maple syrup in the middle of the mold.
Additional toppings and ingredients: In addition to chocolate and nuts, grated coconut, cocoa nibs, dried fruit, blueberries or finely chopped fresh fruit also go very well with the recipe. You can also refine the cakes with poppy seeds and grated lemon zest, for example, or make a carrot cake variant with grated carrots, raisins and walnuts.