Tag

roast

Browsing

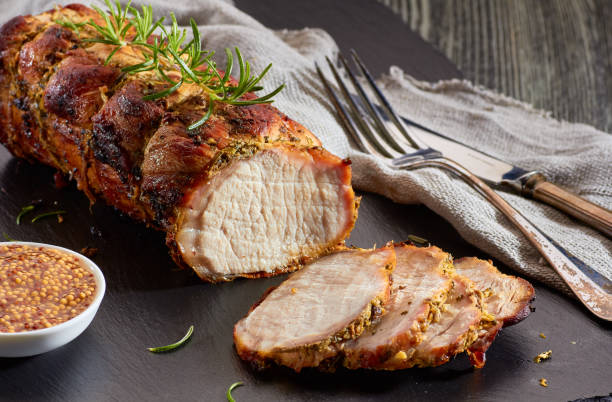
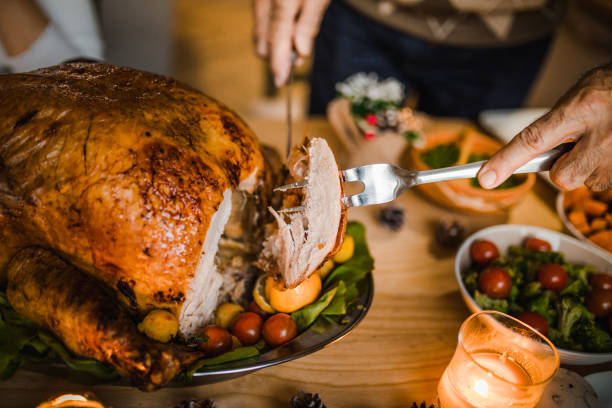
Turkey roast is an excellent alternative to pork and beef roast. It has fewer calories and is very tender and mild in taste.

The turkey roast offers an alternative to pork and beef roast and is also lower in calories. The amaretto sauce gives the dish a very special touch and underlines the delicate taste of the turkey. Rosemary potatoes are a good side dish, as they soak up the sauce well.

Ingredients for 4 persons

– 2 medium onions
– 4 cloves of garlic
– 3 tbsp oil
– 250g spinach leaves
– 1 kg roast turkey
– 8 slices of smoked ham
– 4 slices of young Gouda
– 4 tablespoons of clarified butter
– 600 ml chicken stock
– 4cl amaretto
– 8 tbsp tomato paste
– 150 g of crème fraîche
– Salt
– Pepper
– Nutmeg

Preparation of the rolled roast

As a first step, peel the onions and cut them into small cubes. Peel and chop the garlic cloves or crush them with a garlic press. Then heat some oil or in a pan and add the onion pieces and garlic until they are cooked translucent. Next, add the spinach and season with salt, pepper, and nutmeg.

Wash and dry the roast turkey and place it on the work surface. Since the usually quite round roast is to be turned into a roll, it is necessary to flatten the roast. To do this, make a so-called butterfly cut. Using a large knife, cut across the roast, but not through it. It is important that you do not cut against the grain of the meat but with it. Then unfold the parts of the roast that are still connected at the end. If the roast doesn’t seem big or thin enough for you, you can repeat this process a little higher from the other side so that you can open the roast into three parts. Now use a meat mallet to pound the roast to desired thickness, 1-1.5cm seems ideal for rolling. Then season the roast with salt and pepper and cover the inside first with the ham and then with the cheese. Finally, add the spinach and roll up the roast. To secure it, tie the roll together with twine. Then sear them on all sides and put them in the oven at 120°C for 1 hour.

Preparation of the sauce

Boil the vegetable broth with the amaretto and then add the tomato paste and the crème fraîche. Mix the sauce well and let it simmer for about 10 minutes at a low temperature.

Useful additional knowledge

When serving, you can cut the rolled roast into slices and arrange them in the saucepan. Don’t forget to remove the binding thread beforehand though. Do not use wooden or metal skewers to hold the roll together or the cheese and meat juices will spill out from the inside.

Tender veal is gently roasted in the oven and then served on the plate with an aromatic sauce and crispy cooked vegetables. The fine roast veal is the outstanding focal point of a festive menu, which is ideal for preparing and pre-cooking so that the chef is able to enjoy the meal in peace and celebrate with them.

Ingredients for 6 people

– 1.5 kg saddle of veal with rind
– Salt and pepper
– 200 g onions, 2 cloves of garlic
– 2 tablespoons of oil
– 500 g carrots, 500 g zucchini
– 1 leek
– 15 grams of flour
– 45 grams of butter
– 150 ml Riesling wine
– 350 ml veal stock
– 250 g of crème fraîche
– Nutmeg
– 1 pinch of sugar
– 1 tbsp dry vermouth

Preparation

  1. Cut the rind of the saddle of veal sharply and deeply, salt and pepper the meat, and chop the onions.
    Put the oil in a frying pan and sauté the meat over medium heat until golden brown, add the onions and the crushed garlic cloves.
  2. Place the frying pan with the meat in the preheated oven on the lower shelf. Pour in 1/8 l of water, set the oven to 200° with convection, and roast the roast for about 45 minutes with the oven door open.
  3. Clean the vegetables and use a vegetable peeler to cut them lengthwise into thin strips and the leek into fine rings. Knead the flour and 15 g of butter and chill in the refrigerator.
  4. Remove the roast from the oven and the frying pan, wrap in suitable aluminum foil and leave to rest in the switched-off oven.
  5. Deglaze the roasting stock with wine, remove the settled toasted substances from the frying pan with a spatula and stir into the stock. Then reduce the roast stock until thick. Pour in 250 ml of purchased veal stock, and bring to a boil. If necessary, puree the stock with a hand blender and let it run through a sieve.
  6. Stir the crème fraîche into the strained stock, then season with salt, pepper, nutmeg, a pinch of sugar, and vermouth. To thicken the sauce, stir the floured butter into the boiling sauce little by little.
  7. Lightly roast the prepared vegetables in a pan with butter and steam until soft, add some roast veal stock, and bring to a boil. When the vegetables are soft, season lightly and continue cooking, covered, for a few minutes.
  8. Remove the roast veal from the aluminum foil and stir the collected roast juices into the sauce. Cut the meat into approx. 1 cm slices, arrange on a large, preheated plate, and garnish with the vegetable noodles.
  9. Serve the sauce separately in a gravy boat.
  10. Wide, al dente-cooked ribbon noodles are served as a side dish.

Roast pork with malt beer sauce is a hearty dish for a Sunday dinner with many guests.

Ingredients for 1 roast

  • 2 kg pork leg with crust
  • 2-3 carrots
  • 2 onions

  • 0.75 l clear broth (instant broth also possible)
  • 3 tbsp honey
  • 200 ml malt beer
  • 1 bunch marjoram
  • 1 tbsp mustard
  • Salt pepper
  • 1/2 cup cream
  • sauce binder

Preparation of roast pork with malt beer sauce

  • Score the rind from the leg. Then season the meat with salt and pepper and place in a roasting pan. Wash the carrots and onions, cut them into small pieces, and add to the pork leg. Fry the whole thing at 200° (gas mark 3) for about 2 hours.
  • After 30 minutes of roasting, pour 1/4 liter of broth over the leg. Gradually add another 1/4 liter of broth over time.
  • 15 minutes before the end of the roasting time, mix a marinade of honey and malt beer and brush the meat in the oven with it.

  • After about 2 hours, remove the roast and pour the remaining stock through a sieve and then strain.
  • Add the rest of the broth and the marjoram to the stock and let it simmer for a while.
  • Then thicken the sauce with the sauce thickened and refine with a dash of cream.
  • Season with salt and pepper.

You can prepare chicory quickly and deliciously. We will explain to you which types of preparation there are for the winter salad and how it tastes the least bitter.

Preparing chicory: This is how you recognize good chicory

You can buy chicory particularly well at the weekly market from local farmers. It is best to choose organic chicory, as it is not contaminated with pesticides. Mostly you get white chicory. But there is also a red variant that was created by crossing chicory with radicchio. Red chicory tastes a little milder than white. Here are more tips for your chicory purchase:
You can recognize good chicory by the fact that it is relatively firm and has no brown or wilted spots.
Small chicory bulbs are less bitter than large ones.
The greener the leaves are, the more bitter they are. It is best to buy chicory whose leaves are white and only yellow at the tips.
You can store fresh chicory in the vegetable compartment of your refrigerator for a few days. If you want to prepare it, you should wash it (cleaning the outermost leaves is usually enough) and cut out the stalk – this is particularly bitter and woody.

Prepare raw chicory in refreshing salads

In a delicious winter salad, chicory provides you with a particularly large number of vitamins. Since raw chicory tastes the bitterest, you should use small, mild bulbs when preparing it in a salad. If you then cut the leaves into fine strips, they mix particularly well with the other flavors of the salad.

What goes particularly well with chicory?

Salads with citrus fruits, apples or pears are classic. In fact, the fruity sweetness is a good balance to the slightly bitter chicory.
Strong cheeses such as Gorgonzola are particularly suitable as hearty counterparts.
You can then mix the whole thing with a spicy-sweet salad dressing and sprinkle with roasted nuts.

Prepare chicory in the pan: fry or steam

When you cook chicory, it loses most of its bitterness and takes on a slightly sweet, nutty flavor. Chicory tastes particularly delicious if you roast it in oil or butter for a few minutes until golden brown:
To do this, cut the tubers into small pieces or just halve them and cut out the stalk.
All you have to do is season the finished chicory with salt and pepper and sprinkle with a little lemon juice if you like.
Then put it in the pan for a few minutes.
It also tastes delicious if you serve the fried chicory with a white wine sauce.
You can prepare chicory particularly gently if you steam it.

It’s enough if you cut the chicory in half.
Place the halves in a pan and cover halfway with water.
If you add a little more lemon juice, you prevent the chicory from turning gray.
Bring the water to a boil, put a lid on the pan and let the chicory simmer over low heat for about 15 minutes.
Then lift it out of the pan or let the remaining water evaporate. Season the chicory to taste.
Tip: If you add a little sugar to the water when steaming, the chicory will be particularly mild.

Prepare the chicory in the pot

You can prepare chicory particularly quickly and easily if you blanch it.

To do this, bring a large amount of salted water to a boil in a saucepan and add the whole chicory bulbs.
Blanch the vegetables for about five minutes, then rinse them in cold water to keep them crisp.

Prepare chicory in the oven

Chicory takes a little longer to prepare in the oven, but it is also particularly mild. Since the tender vegetables disintegrate quickly, you should not cut them into small pieces, just halve them or separate the individual leaves. Otherwise, all that’s left is chicory slush.

Tip: Roast the chicory in a pan, season with salt, pepper, lemon juice and fresh herbs, place in a casserole dish coated with olive oil and bake in the oven with a strong cheese.

Pumpkin seeds contain many good nutrients. We have put together instructions for you on how to roast, season, and enjoy pumpkin seeds. Nibbling on pumpkin seeds is delicious and contributes to a balanced diet. You can enhance any salad with the rich seeds.

Pumpkin seeds are healthy

Pumpkin seeds are extremely rich in important nutrients such as unsaturated omega-6 fatty acids, iron, magnesium, potassium, and vitamin E. That is why pumpkin seeds are so much more than just a waste product. You can prepare the pumpkin seeds just like the pumpkins properly.

The nutritional value of pumpkin seeds

Not only pumpkin soup as one of the tastiest soups for the cold winter has it all, but also the small seeds of the pumpkin. The delicious roasted kernels are considered a nutrient supplier and a real zinc bomb. Zinc can help with menopause symptoms, and zinc also alleviates problems in diabetics. Pumpkin seeds also contain magnesium, iron, and selenium. The famous pumpkin seed oil is often used in every salad kitchen because it contains high-quality, polyunsaturated fatty acids and vitamin E. You can then add some pumpkin seeds to your salad or soup as a topping, or simply enjoy the seeds as a snack.

Prepare kernels for roasting

When processing pumpkins, the seeds are often leftover. But since the kernels are real nutrient bombs, it is best to process them fresh right away. In order to be able to dry, season or roast them well, first remove the pulp from the seeds.

  • If you have plenty of space, you can let the seeds dry overnight in a warm, dry place. The next morning, the seeds then easily separate from the pulp.
  • Or you knead the kernels in saltwater until all the fibers come loose and the kernels are clean. If necessary, leave them in the water/saltwater overnight.
  • The clean cores then float to the surface and you can fish them out.
  • Place them on a tea towel and rub them dry.
  • You can then eat them fresh or process them further.

Dry pumpkin seeds

Pumpkin seeds can be dried in a number of ways. It is important to dry them well before roasting or seasoning. And so it goes:

  • The kernels can dry in a bowl or on a tray on the heater.
  • The pumpkin seeds can dry in the residual heat of the oven or with the oven light switched on. Sticking a wooden spoon in the oven door will allow excess moisture to escape.
  • Or you can dry the kernels at 180°C in a preheated oven for 20 minutes. Then make sure to distribute the cores evenly on the tray and place them individually if possible. Also, turn them after 10 minutes.
  • You can also dry pumpkin seeds, as well as many other foods, in the dehydrator.

Roast delicious pumpkin seeds

You can now roast and season the kernels or simply enjoy them raw and dried. In the pan, roasting works as follows: Place the pan on the stove over medium-high heat. Turn the pumpkin seeds in it under constant supervision. Standard-sized pumpkin seeds are roasted for three to four minutes. Then take them out of the pan immediately, as the seeds will darken. Then let the pumpkin seeds cool down.

Refine pumpkin seeds with spices

If you want, you can also roast the pumpkin seeds in a pan with spices. Roasted pumpkin seeds with a little pressed garlic taste wonderfully spicy and are also very healthy. Roast pumpkin seeds with chili and peppers? In any case, spicy pumpkin seeds taste great as a snack or are perfect for refining salads. If you want to refine pumpkin seeds with sea salt and paprika, eat a healthy salty meal. Maybe that’s a better snack than potato chips during a cozy evening. Do you love it sweet? Roasted pumpkin seeds caramelized with sugar and cinnamon taste great as a sweet snack or to refine any dessert. Mmmmh delicious!!!

Roasted pumpkin seed ideas

Roasted pumpkin seeds are perfect for refining delicious soups, just sprinkle a few seeds on the finished soup. If you like to prepare muesli bars yourself, pumpkin seeds are a tasty ingredient. And they are also a very healthy ingredient in a homemade muesli mix. Classically, pumpkin seeds are also suitable for baking bread. In addition, all types of vegetables or salads can be deliciously refined with roasted pumpkin seeds. For example, delicious vegan spreads can be conjured up from peeled kernels. You can also use them as a substitute for pine nuts in pesto.

Coffee is popular with young and old. If you are not satisfied with ordinary beans from the department store, you can also try your hand at roasting coffee.

If you want to drink fresh coffee with a full aroma, you can also roast the coffee beans yourself. But how does that work in your own four walls?

Coffee is very popular around the world. The coffee drink has now become a highly coveted drink and is available as standard in every bakery, café and restaurant. According to a study by the 2016 coffee report, roasted or bean coffee is one of the most popular coffee and tea drinks in Germany.

Through many inventions over the decades and even centuries, the coffee drinks have been further developed and optimized. They all want to achieve one thing: get the right aromas out of the coffee and optimize the taste. But coffee drinkers can also do something to give their coffee a better taste. This includes the use of freshly roasted coffee beans. This is due to the fact that after the coffee bean has been roasted, the bean quickly loses its aroma and changes in taste. It would therefore be best to roast the coffee shortly before preparation. But is it also possible to roast coffee at home? What methods are there for this and which ones really work?

Coffee bean roasting process

The coffee roasting process takes just 10 to 20 minutes. The ideal internal bean temperature is between 180 and 230 degrees Celsius. While the beans are heated to this temperature and then held, their color changes during the roasting process: from an initial light green to a more intense shade of green, yellow, yellow-brown and brown to dark brown or black. Now it depends on many variables such as the duration of the roasting process of the coffee beans that determine the final taste. The chemical Maillard reaction is one of the most important reactions in the roasting of green coffee. When a sufficiently high temperature is reached – between 145 and 200 degrees – various sugars and proteins, more precisely their amino acids, combine to form new compounds. This creates so-called roasting substances. This connection can also be found when baking bread, for example, when the crispy crust is created. There are also many other reactions that take place in the coffee bean. However, not all of them have been elucidated to this day. Roast coffee contains quite a lot of aromatic compounds, somewhere between 800 and 1,200. However, they are all intertwined, so no flavoring can be isolated from the others. Rather, they all together in different concentrations make up the coffee aroma that we are familiar with.

However, it is possible to divide the coffee roasting process into a few phases. These phases differ according to the appearance and volume of the beans. During the roasting process, coffee beans lose weight and become more voluminous. This reduces the density of the roasted coffee bean to 1/3 of the original, raw bean.

Depending on the degree of roasting, the bean can lose between 12 and 18% in weight.

However, they are most clearly distinguishable by the sounds of the first and second cracks of the raw beans. With the help of the degree of roasting of the coffee bean, aromas, acidity, taste and body of the later coffee beverage can be identified. During the first roasting phase, for example, a strong and sparkling acidity develops. However, it decreases again during the further roasting of the coffee beans. If the coffee beans are removed from the heat source, the roasting reaction continues for at least 12 hours. This process usually takes even longer: it takes up to 72 hours for the roasting reactions to subside completely and for the roasted coffee beans to achieve their final taste. During the internal after-reactions, carbon dioxide is released for a while.

Coffee roasting using pan and oven

There are quite a few ways to roast coffee in your own four walls. One of the most common methods you can find online is to roast coffee in a pan or in the oven. If you decide to roast the coffee beans in a pan, you will need an infrared thermometer in addition to the pan in order to be able to monitor the temperature constantly. It is important that the coffee beans are continuously stirred during the roasting process. However, this method roasts the beans very unevenly, if at all, as many remain completely unroasted, while others may already be burnt. In some cases, individual beans can be unroasted in some places and roasted in others. So if you don’t have strong taste buds, you shouldn’t use this method. In addition, it can be quite dangerous if the beans “crack”. The so-called crack is the bursting of the coffee bean, as the new gases in the bean create high pressure. This causes the cell walls of the bean to become more porous. If the coffee bean, which is up to 200 degrees hot, jumps into the air with the first or second crack, it can quickly catch your eye.

Another method is to roast the coffee beans in the oven. If you decide to do this, first preheat the oven to 200 degrees circulating air. Next, the green coffee is spread out on a baking sheet and placed in the preheated oven. This method is definitely safer than roasting the coffee beans in the pan, since the oven door can be used as a protective wall. In addition, the coffee beans are roasted more evenly. However, a disadvantage arises from the fact that the roasting coffee beans cannot be stirred without interrupting the roasting process at a constant temperature. After about 10 to 20 minutes, the roasted coffee is put into a sieve and quickly cooled. If you make sure that the beans are washed before roasting in order to remove as many skins as possible, you will prevent the skins from flying through the oven when roasting the coffee beans. Coffee roasting in the oven is therefore ideal for a more pleasant and even roast.

Intense, with a tart-sweet note and extremely digestible – coffee from a dark roast, the so-called Dark Roast, is the favorite coffee of the Italians. And coffee lovers elsewhere also praise the aroma and tolerability of beans from this roasting process. But what exactly is the secret of Dark Roast? Mommy’s Caffè explains.

Dark Roast requires sensitivity from the coffee roaster

Outstanding coffee is characterized by one thing above all: its incomparable aroma. But that is no coincidence. In addition to the quality of the coffee bean, the way it is roasted is particularly important. Because it is a science in itself and the trademark of every passionate coffee roaster. In order to obtain a special taste and smell, roasting is about the ideal interplay of temperature and time.

A few seconds can decide the aroma and characteristics of the beans in the roaster. For the dark roast called Dark Roast, the coffee beans are heated for a particularly long time at a relatively high temperature. Special sensitivity is required here, because the beans should certainly develop a slightly smoky aroma. But of course you can’t burn them.

What happens when coffee beans are roasted?

When the coffee beans are heated, the water they contain is also heated.

It changes its physical state from liquid to gaseous.

This enlarges the bean.

Eventually the walls of the coffee bean will burst with a crack – similar to popcorn.

This is the first crack moment. Only then can the coffee be enjoyed. If the coffee roaster stops at this point, it is a so-called light roast.

For a medium or dark roast, the coffee roaster continues the roasting process.

Dark roasts usually remain in the coffee roaster until the second crack.

This is how dark roast coffee develops its typical character

Acids are broken down during roasting, i.e. the longer the bean is heated, the less acid it will contain in the end. Dark roasts are therefore particularly recommended for coffee lovers with a sensitive stomach. In dark roasting, the acids are replaced by bitter substances, which are responsible for the slightly tart taste of dark roasts.

In addition, the sugar in the coffee bean begins to caramelize during the roasting process. This gives dark roast coffee a sweet note, which – depending on the bean – is reminiscent of nuances of dark chocolate, hazelnut or caramel.

Apart from the taste: Have you ever noticed that beans from the dark roast process are not only particularly dark, but also very shiny? This is because the coffee bean releases oils through long, intense roasting. In addition, dark roasts contain less caffeine than medium or light roasts and can have positive health effects.

Degree of roast of coffee: From cinnamon roast to Italian roast

Dark roasts are particularly popular in southern Europe. Very dark roasts are therefore also called “Italian roasts”. The classification into degrees of roasting is common in the coffee industry, but it is handled differently. In German-speaking countries, the following gradations usually apply:

Light roast (cinnamon roast): high acidity, fruity, mild coffee taste

Medium Roast (American Roast): Balanced flavor

Strong roasting (Vienna roasting): strong roasted aroma

Dark roast (French roast): intense coffee taste

Very dark roast (Italian roast): strong body, slightly sweet, slightly bitter, low in acidity.

Grinding degree for a dark roast and more: tips for connoisseurs of the dark roast

In order to fully enjoy your Dark Roast coffee, make sure you use the correct degree of grinding for the dark roast. Rule of thumb: The darker the bean, the coarser you can set the grinding level. If you grind the dark roasted coffee beans too finely, too many bitter substances will be released. The result: a slightly burnt taste. Of course, the way you prepare your coffee is also crucial. Whether a portafilter, moka or French press can make a big difference here.

Once you have found the perfect degree of grinding, different coffee specialties can be conjured up from Dark Roasts. Of course, an espresso with an Italian roast is typical. Either pure or as the basis of a delicious flat white, cappuccino or latte macchiato. But dark roasts are also ideal for a strong filter coffee. Just try out which variant you like best!


Cook chestnuts however you like: Roast them in the oven, cook them in a pot or eat them raw. Depending on the method of preparation, you have to prepare the chestnuts differently. We show you how to prepare chestnuts.

Cook chestnuts correctly: Roast them in the oven

Chestnuts from the oven taste particularly delicious. Because here the edible chestnuts keep their typical taste. Roasted chestnuts from the oven are particularly good for snacking. How to prepare chestnuts in the oven:

First cut off the pointed brush of the chestnuts with scissors.
Use a sharp knife to slit a cross into the skin of the chestnuts. This is important so that the chestnuts do not burst open from the heat. Depending on the size of the sweet chestnut, the cross cut should be about one and a half centimeters long.
Now you can put the chestnuts in the oven at 175 degrees and circulating air.
Place a bowl of tap water next to the chestnuts so that the chestnuts don’t dry out while roasting.
Cut the chestnuts correctly: It doesn’t matter whether you make the cross on the flat side or on the lower end. It is only important that the shell is really severed and the cut is big enough. It doesn’t matter at all if you cut the flesh in the process.

Tip: You don’t have to preheat the oven to prepare the chestnuts. After about 20 minutes, check if the chestnuts are ready. You can tell by the fact that the indentations have clearly opened up and the shell is a bit darker (see picture). Then you can take them out of the oven and remove the shells. If your oven only heats up slowly to 175 degrees, the chestnuts can take up to 30 minutes in the oven.

Cook the chestnuts in the pot

You can also prepare chestnuts as a side dish. Because chestnuts contain a lot of starch and thus replace potatoes. The dish is particularly useful if you have your own tree in the garden – because bought chestnuts are quite expensive. How to prepare chestnuts in a pot:

First, slit the chestnuts crosswise. The incision should be about one and a half centimeters long and reach down to the flesh of the fruit.
Then boil the chestnuts in lightly salted water for about 20 minutes.
The chestnuts are done when the skin has split open at the indentations.
Then you can let them cool down a bit and remove the shell.

Alternatively: prepare chestnuts raw or fry them in a pan

You can also eat chestnuts raw. The taste is very reminiscent of walnuts. You have to remove the peel with a sharp knife beforehand, then the light-colored flesh is already in front of you.

Alternatively, you can roast chestnuts in a cast-iron pan with a lid. To do this, you have to slit open the chestnuts, otherwise they will burst. Keep the following in mind when preparing the chestnuts like this:

Don’t use oil, instead put the chestnuts directly into the hot pan.
Roast the chestnuts at low temperature until the shell opens.
To prevent the chestnuts from burning, you should keep tossing them in the pan.

How healthy are chestnuts really?

Chestnuts are available from the end of September/beginning of October. They are a real power food: chestnuts contain a lot of high-quality protein and much less fat than nuts. In addition, they are rich in potassium, calcium, iron, magnesium, as well as vitamin E, vitamin C and almost all B vitamins as well as beta carotene.

If you buy chestnuts at the market in autumn or at the Christmas market in winter, they are usually very expensive. But chestnuts also grow in many parks and deciduous forests. Although they are much rarer than the normal chestnuts (which are poisonous, by the way), once you have found a few trees, you can harvest many chestnuts there every year. Because there are up to three chestnuts in each shell. Walking carefully through parks and forests can therefore be worthwhile.

Vegan duck based on seitan, with side dishes such as potato dumplings and red cabbage – and you have a delicious Christmas menu without any animal cruelty. With this recipe you can prepare the plant-based Christmas roast.

Whether for Christmas, Easter or another special occasion such as a birthday: On some days, a fine meal is simply part of it. You don’t necessarily need an animal for a juicy roast. We will show you how to prepare and serve vegan duck.

Vegan Duck: The basis for the recipe

Theoretically, you can also make seitan yourself and use it to make your own vegan duck – but this takes time and skill. It’s faster if you use ready-made products. Some manufacturers now have vegan seitan-based duck in their range. This is similar in consistency and appearance to a duck breast fillet – and with the right preparation, it tastes the same. We recommend, for example, the vegan duck from Veganz. You should plan around 500 grams of vegan duck for three to four people.

You can serve the vegan duck with side dishes of your choice. Potato dumplings and red cabbage as well as a dark gravy are ideal for a classic Christmas menu. We’ll show you how to do it.

Ingredients for the vegan duck:

500 g vegan duck

Vegan duck with red cabbage: Recipe for the side dish

It is best to start the menu with apple and red cabbage: this tastes particularly delicious if it can still infuse a bit. For about four large servings you need the following ingredients:

a red cabbage (medium size)
2 onions
oil for frying
3 apples
3 oranges for squeezing or 250 ml orange juice
250 ml red wine
500ml of water
2 bay leaves
6 juniper berries
4 cloves
1 tsp cinnamon
pepper
Salt

Potato dumplings with vegan duck: recipe instructions

You will also need the following ingredients for about twelve smaller potato dumplings:

1 kg of potatoes
250 g potato flour
150-200 ml lukewarm water
Salt

Vegan gravy for the duck: recipe

To ensure that the vegan duck tastes juicy, a hearty gravy is a must. The porcini or shiitake mushrooms in the sauce provide the umami taste. For the vegan version you need these ingredients:

600-700 ml vegetable stock, preferably homemade
30 g dried porcini mushrooms (or 200 g fresh mushrooms such as button mushrooms or shiitake)
2 medium onions
3 cloves of garlic
2 tbsp organic olive oil
3 tablespoons cornstarch or flour
1 tsp thyme
3 tsp rosemary
salt and pepper to taste
fresh parsley for garnish (optional)

Roast and serve vegan duck: instructions

When you have prepared the side dishes and sauces, you can prepare the vegan duck:

Heat enough oil in a pan and then add the vegan duck breast fillet pieces.
Fry the vegan duck on all sides for several minutes until it is crispy.
Remove the roasted duck pieces from the pan and place them in the warm gravy until ready to serve. Tip: Leave the vegan duck in the sauce for a few minutes. So it absorbs a little more aroma and tastes particularly juicy in the end.

Roasting Brussels sprouts is easy with these instructions. Roasted Brussels sprouts are a popular side dish in wintry temperatures. Three variants bring variety to the plate.

You can prepare Brussels sprouts in different ways – for example in a pan. We’ll show you three varied ways of roasting Brussels sprouts.

Brussels sprouts are a typical winter vegetable from the cabbage family. Harvest time in Germany begins at the end of September. Brussels sprouts are in high season between November and December. Since cabbage can be stored very well, you can buy regional Brussels sprouts until March.

The best way to buy fresh Brussels sprouts is organic and from regional suppliers. Because organic food usually contains far less pesticide residues – synthetic pesticides are forbidden in organic cultivation. In addition, Brussels sprouts from the region do not have to be transported so far, which saves CO2. An alternative to the shop or market around the corner is the delivery of an eco box** with regional fruit and vegetables directly to your home.

Roast Brussels sprouts: the ingredients

You need the following ingredients for four to six side dishes of roasted Brussels sprouts:

500 grams of Brussels sprouts
3-4 tbsp vegetable oil (e.g. olive oil)
Salt
pepper
1/2 tsp ground cumin
Be sure to use fresh Brussels sprouts for this recipe. Frozen cabbage florets cannot be fried until brown because they lose too much water.

Tip: The ground cumin will help you digest the cabbage better.

Roast Brussels sprouts properly

If you want to roast Brussels sprouts, you should be careful not to burn them. How to properly roast Brussels sprouts:

Clean the Brussels sprouts carefully.
Cut the cabbage florets in half.
Heat the olive oil in a pan on high.
Add the Brussels sprouts once the oil is hot.
Then reduce the heat and fry the halves of Brussels sprouts for about five minutes on medium-high. Stir constantly so the vegetables don’t burn.
Add the salt, pepper and ground cumin and mix the spices with the Brussels sprouts. Reduce the temperature to the lowest level and cover the pan with a lid.
Roast the Brussels sprouts for an additional 15 to 20 minutes, depending on how al dente you want them to be. Stir every 3 to 5 minutes to avoid burning the Brussels sprouts. Add 1-2 tablespoons of water if the veggies are too dry and sticking. Alternatively, you can also increase the amount of oil in this case.

Roast Brussels sprouts: three delicious variants

Roasted Brussels sprouts don’t have to taste boring: With a few simple steps and little effort, you can change the winter vegetables and add variety to your plate.

Brussels sprouts go very well with nuts. For example, add some roasted peanuts or cashew nuts to the finished dish.
With leftover rice from the day before, you can turn the fried Brussels sprouts into a delicious rice pan. Mix the cold rice with the fried florets and heat the rice pan for five more minutes. As a spice, curry goes very well here.
If you’re roasting Brussels sprouts, you can use breadcrumbs to give them a crispy crust. Simply add some oil or butter along with 2-3 tablespoons of breadcrumbs to the already cooked Brussels sprouts and sear them again.
Roast Brussels sprouts in the oven: Put the Brussels sprouts halves in a casserole dish and mix the vegetables with the spices. Pour some oil over it and put the mold in the oven. Then roast the Brussels sprouts for 45 to 50 minutes at 200 degrees Celsius top and bottom heat.
Brussels sprouts can also be combined with other types of vegetables to create a vegetable pan. But pay attention to the different cooking times of the vegetables.