Tag

way

Browsing

Freezing yeast makes sense if you have leftover yeast after baking or you bought it in advance. Here we explain how you can freeze the fresh yeast.

Freeze yeast: in jars and in cans

Would you like to stock up on fresh yeast or did you only need half a yeast cube for your yeast dough? Then simply freeze the fresh yeast. Frozen yeast keeps for several months and you don’t have to waste food
Place the yeast cube in a small tin or jar

Thaw yeast after freezing

If you want to use the frozen yeast, thaw it ahead of time. There are two variants:
Defrost gently: Put the yeast in the fridge the day before you want to bake and let it thaw slowly.
If you’re in a hurry: Thaw the yeast in a warm liquid if your recipe uses that liquid. Note, however, that yeast does not tolerate temperatures above 45°C, as the yeast then loses its effectiveness.
The yeast may become slightly softer and runnier after thawing than before freezing. But that’s not a problem, you can use them normally for baking.

We recommend organic yeast

Organic yeast is the ecologically better yeast:
While conventional yeast is produced using chemical substances that have to be washed out afterwards, organic yeast is much more sustainable. Because organic yeast does not have to be washed out, it requires less water during production and no unnecessary chemical substances get into the waste water.
In addition, genetically engineered enzymes can be used in the production of conventional yeast. Since there are no long-term studies on the use of genetic engineering, it can harbor undiscovered risks. The production processes of organic products do not contain any genetically modified substances.

Strawberries are very delicate and perishable. Therefore, it is important to store strawberries properly. You can find out here how they stay fresh the longest.

Freshly picked strawberries are very aromatic and rich in vitamin C, folic acid and other important nutrients. Unfortunately, they are also easily perishable and quickly lose their aroma. That’s why you should always buy them fresh from the region or pick them yourself. In addition, it is important that the strawberries are not crushed during transport and get fresh air.

It is best if you store the strawberries at room temperature and eat them the same day. Since water strips the flavor of the fruit, wash it and remove the stems and leaves just before eating. You should always cut out bad spots immediately, as mold in strawberries spreads quickly due to the high water content.

Store strawberries in the fridge

Strawberries will keep in the crisper drawer of the refrigerator for up to two days if you store them properly. For this it is important that you keep the strawberries unwashed in the fridge. Additional moisture would cause the fruit to spoil faster.

So that the strawberries get enough air, it is best to put them in a large sieve. But be careful not to stack them too high. It also makes sense to line the bottom of the crisper with kitchen paper, as it will absorb excess moisture. If you don’t have a large colander, you can store the strawberries on a large plate or tray lined with paper towels.

Freeze strawberries

If you want to store the fruit longer, you can also freeze the strawberries. Unfortunately, they get a bit mushy when defrosting, but you can still make a delicious strawberry sauce or a smoothie out of them, for example.

Tip: In order to be able to portion the fruit better later, you can freeze them individually before you freeze them properly. To do this, place them on a tray or large plate and freeze them for a few hours. Then fill them together in a freezer.

canning strawberries

Instead of freezing them, you can also cannish the strawberries. It works like this:
Wash the strawberries thoroughly and remove the pulp.
Place them in clean, boiled mason jars.
Boil water with sugar in a ratio of 3:1 in a saucepan.
Allow the resulting sugar water to cool.
Pour the sugar water over the strawberries up to the rim of the jar and seal tightly.
Now you boil the jars. If you don’t have a pressure cooker, you can also do this in the oven:
Place the mason jars on the rack in the oven.
Fill a baking sheet two inches high with water and slide it onto the rail under the rack.
Heat the oven to 130 degrees until the water on the tray starts to boil.
Turn off the oven and let the jars cool in the oven for about 30 minutes.
When the jars have cooled, you can remove them from the oven, label them, and store them in a cool, dark, and dry place.

Peeling ginger is only necessary if it is a bit older or not from organic farming. On this page we will show you why this is the case and how best to remove the shell.

Peel ginger: when is it necessary and when not?

Ginger is considered antibacterial and anti-inflammatory. But most of the active ingredients are located directly under the shell. For this reason, it makes sense not to peel the ginger but to process it directly. For example, cut it into small pieces and make your own ginger tea from it.

You don’t have to peel fresh organic ginger. The organic seal guarantees that the ginger has not been treated with synthetic chemical pesticides. Nevertheless, you should wash it thoroughly and clean it with a vegetable brush.
If the ginger is a bit older, you should remove the peel. It often tastes woody, and that flavor can carry over into the food, tea, or soda.
If the tuber comes from conventional agriculture, you should also peel the ginger. It was probably treated with pesticides.
You can also plant ginger yourself. It’s worth it, for example, if the ginger sprout or you can’t use everything.

Remove the ginger peel – instructions

Removing the peel from the ginger is often not that easy. Because the shape of the ginger, the leaf scars and the many outgrowths make it difficult to peel. How to do it anyway:

The easiest way to peel ginger is with a vegetable peeler. First you save excesses and then peel them off with a normal kitchen knife.
If you prefer to grab the kitchen knife right away, just use it to scrape off the skin. With fresh ginger, the skin is very thin and the flesh of the ginger is hard. Therefore, scraping goes without problems.
Even suitable for children: You can also easily remove the soft, thin shell with a teaspoon. Hold the spoon firmly and simply scrape the edge over the surface. The skin peels off like this, you can get into all the difficult spots and on top of that you only have very little section. So there is no risk of injury here.

If you want to store eggplants, you should consider a few things. In this article you will find out how to recognize fresh aubergines and at what temperature you should store them.

Although aubergines are warm-loving vegetables, they can only be stored for a limited time at room temperature. We explain how to store aubergines correctly and what you should pay attention to.

Aubergines belong to the nightshade family and originally come from India. Also known as eggplant, this vegetable is very common in Mediterranean cuisine. Aubergines come in many different colors and shapes, with the dark purple version being the most well-known in this country.

If possible, use organic aubergines for cooking: They are free of chemical-synthetic pesticides and come from more sustainable agriculture. If you get the aubergines from regional cultivation, you also avoid long, energy-intensive transport routes.

Aubergines are in season in Germany between August and October. You can get unpackaged organic aubergines at farmers’ markets, directly from farmers or in organic boxes.

Storing aubergines: You should pay attention to this

When you buy eggplants, you should pay attention to the quality and degree of ripeness. A ripe eggplant has a shiny skin and is firm. If you press gently, it gives slightly. If the aubergine doesn’t yield to pressure, it’s unripe and tasteless. On the other hand, if it is too soft, it will soon spoil. Aubergines taste best when you prepare them fresh. However, you should not eat eggplants raw.

How to store aubergines correctly:

Store eggplants in a dark, cool place in the pantry or basement. Temperatures between ten and 13 degrees Celsius are well suited. Properly stored aubergines stay fresh for around three to four days.
The fridge is actually too cold for aubergines. If you don’t have a pantry or basement, you can still store the eggplants in the crisper of the refrigerator, which is better than storing them at room temperature. It is best to wrap the eggplants in paper to absorb excess moisture. Alternatively, you can place them loosely in the crisper in your fridge. Aubergines stored in the refrigerator quickly become stained and soft. You should process them within a day or two.
Eggplants stored at room temperature are best prepared on the same day or the next day at the latest.
Don’t store eggplants near apples or tomatoes. The escaping ethylene allows the aubergines to ripen more quickly.

Store sliced aubergines

You can store cut aubergines in the fridge until the next day before they spoil.

Place the sliced eggplant in a sealable container.
Keep the container in the fridge and use the leftover eggplant quickly.
Then remove the dried part of the eggplant and wash the fruit thoroughly again.
Aubergine slices turn brown in the air within a short time. It is therefore better to overcook them immediately and not to keep them raw. You can store cooked aubergine dishes in the refrigerator for two to three days.

Store eggplants in the freezer

To store eggplants for a particularly long time, you should freeze them. Eggplants can be frozen for up to nine months.

Wash the eggplants thoroughly.
Cut the vegetables into cubes.
Blanch the eggplant pieces for three minutes.
Immediately cool the vegetables in ice water.
Drain the aubergine pieces well in a hair strainer. Alternatively, you can pat them dry with a tea towel.
Place the blanched cubes in a freezer container. You can also freeze aubergines in jars.
Label the freezer container so you can remember what’s inside later.
Also write the date. This will help you keep track of your freezer.
Frozen aubergines are particularly good for soups, sauces and spreads.

If you want to store cucumbers, you should consider a few things. In this article you will learn what you need to know to keep cucumbers fresh for a long time.

Cucumbers consist of 97 percent water and are therefore relatively sensitive. If you store them incorrectly, they are prone to staining and mildew. In this article you will get many tips on how to store cucumbers properly.

Since the micronutrients are concentrated in and under the skin, you should eat cucumbers unpeeled. Therefore, use cucumbers of organic quality: they are free of chemical-synthetic pesticides.

In Germany, cucumbers are in season between June and September. During this time they are available from regional cultivation. Regional products have shorter transport routes and therefore have a smaller CO2 footprint. You can get unpackaged organic cucumbers at farmer’s markets, from direct sellers in your area or in organic boxes. You can find more information about the season of different vegetables in the Utopia Seasonal Calendar.

Storing cucumbers: You should pay attention to this

It is best to buy cucumbers unpackaged. The plastic wrap is meant to protect the cucumber. However, sometimes the cucumber starts to mold faster due to the condensation under the foil because it is packed airtight. However, opinions differ on this. You can also read online that cucumbers wrapped in plastic wrap last longer. From the point of view of environmental protection, however, unpackaged cucumbers are preferable to those sealed in plastic. More about this here: What is more sustainable: organic or unpackaged?

How to store cucumbers correctly:

Store the cucumber in a dark and cool place in the pantry or basement. Cucumbers do well at temperatures between ten and 13 degrees Celsius. Properly stored cucumbers can be kept for up to three weeks.
If you don’t have a pantry or basement, store the cucumber in the crisper of your refrigerator. This is better than storing the cucumber at room temperature. Cucumbers only last four to five days in the fridge.
Stored at room temperature, you should use cucumbers within a day or two.
Avoid storing cucumbers near apples or tomatoes. The cucumbers ripen faster due to the escaping ethylene.
Because of the high water content, you should not freeze cucumbers. The cold destroys the cell structure and the cucumber becomes mushy.

Storing Cucumbers: Store chopped cucumbers

Once you cut the cucumber, you should use it as soon as possible.

Place the sliced cucumber in a sealable container. You can also store small leftover cucumbers in a jar.
Store the container in the refrigerator and use the cucumber within a day or two.
Before the next meal, remove the dried part of the cucumber and wash it thoroughly again.

Loose buttons are often a problem. You often lose them on the way and your favorite piece of clothing is broken. So that this doesn’t happen to you again in the future, you have to fix buttons with a simple trick. Because buttons last longer and don’t get lost.

Trick to fix buttons

You’re in a hurry and need to change quickly for the meeting. That’s when it usually happens – a button tears off! Bad luck! But there is a great trick to prevent this in the long run. This button trick worked in the self-test. All you have to do is to fix the button correctly, for this take the following tools at hand and fasten your buttons:

1) Buttons last longer with nail polish

With nail polish, you not only get beautiful nails but you can also fix your buttons. To secure the button, dab the yarn under the button with clear nail polish after purchasing the new item of clothing. Then the buttons are guaranteed to stay on longer thanks to the “sealing”. Try to put the clear nail polish in the holes of the button without getting your clothes dirty. You can also use nail polish to repair minor paint damage that affects the appearance of your household appliances.

2) Sew the button again

Small sewing jobs are not rocket science. Whether patching small holes in T-shirts, repairing loose stitches, or sewing on buttons. In order for your buttons to last longer and not come loose, you should react quickly and sew the button back on firmly. Sewing on the button is very easy and a good tip even for sewing beginners.

Eating garlic raw is worthwhile – the healthy components of the tuber are better preserved. In this article you will find out why this is and which preparation methods are recommended for garlic.

Garlic adds flavor to many warm dishes, but it can also be eaten raw. The aroma of the fresh cloves is significantly sharper and more intense than that of fried garlic and therefore does not appeal to everyone. For people who generally appreciate the taste, it is worth eating garlic raw: the tuber has healthy components that are better preserved.

Why is garlic healthy?

Science has been studying the health benefits of garlic for a long time. The exact interaction of the ingredients has still not been clearly clarified to this day. Garlic, for example, is said to protect the vessels and thus prevent cardiovascular diseases – according to the Apotheken-Umschau, however, there is still no clear evidence of this. Garlic is also repeatedly attributed an antimicrobial and blood sugar-lowering effect.

Scientists often attribute these effects to the ingredient allicin, a cleavage product of the amino acid alliin. When garlic is crushed, the enzyme alliinase is formed and combines with alliin to form alicin. Among other things, this also creates the characteristic smell.

However, garlic also contains the secondary plant substance saponin, which is said to have a cholesterol-lowering effect. However, this effect can only develop from a quantity of four grams per day, reports the NDR. To do this, you would need to eat a large clove of raw garlic per day.

Is it Healthier to Eat Garlic Raw?

Allicin quickly loses its effectiveness after cutting or pressing. It is therefore advisable to consume the garlic as soon as possible afterwards in order to be able to benefit from this effect. A study from 2020 was able to detect allicin in the blood and excretions of test subjects after they had consumed pressed raw garlic.

In general, the nutrient and vitamin content of vegetables often decreases when they are boiled or roasted. Therefore, other types of vegetables are also healthier if you eat them raw.

Another study published in 2015 examined different garlic preparation methods and found the highest allicin content in (minced) raw garlic. The authors of the study, on the other hand, recommend stir-frying as the most gentle warm form of preparation.

If you don’t want to eat garlic raw, you can also mix pureed cloves with oil to make a garlic paste and gently cook them at 70 degrees. According to the NDR, some sulfur compounds are destroyed in the process – but the taste is milder and there are still enough healthy ingredients left.

You can use raw garlic in dips and spreads such as homemade tzatziki, homemade vegan aioli, skordalia or garlic butter.

Freezing gooseberries is a good solution if you’ve harvested too many to eat them all fresh. Here you can find out what you should pay attention to.

Freezing gooseberries works very well if you pay attention to a few things. The green, smooth gooseberries are particularly suitable for freezing. The berries don’t have to be quite ripe yet, because that way you reduce the risk of them bursting later.

Unlike other fruits, you don’t have to freeze gooseberries immediately after picking them – you can store them for a few days beforehand.

Freezing gooseberries: the preparation

Wash and trim gooseberries

Wash the gooseberries in the sink or a bucket, then remove their flowers and stems. The water should only be lukewarm or even cold.

Blanch gooseberries

To prepare, you should also blanch the gooseberries. To do this, put them in a pot of boiling water for about two minutes and then take them out again. Then pour cold water over them.

Sugar or not?

Optionally, you can sugar the gooseberries before freezing. This is not a must, but sugar makes the berries even more durable. Simply sprinkle the berries with a little sugar or boil it in some water and then pour the liquid over the berries.

Recommendation: shock-freeze gooseberries

Fruit often freezes together in the freezer and you can no longer remove it in portions. To prevent this, you should flash freeze the gooseberries before freezing:

Place them individually next to each other on a baking sheet or large plate.
Then store them in the freezer for two hours.
Important: The gooseberries should not touch each other and the freezer compartment should be set to the highest level for a short time.

The actual freezing

The last step follows: Freezing.

Take the shock-frozen gooseberries out of your freezer after two hours and store them in containers.
Make sure not to use plastic bags, but rather more environmentally friendly variants. Old jam jars or stainless steel cans, for example, are well suited. You can find out what other options are available here: Freezing food without plastic: 5 tips.
Store the jars in the freezer or freezer compartment.
The berries can now be kept for eight months. You can even store them in the freezer for up to a year.

If you have a surplus harvest or simply want to prepare cauliflower out of season, you can freeze it and preserve it that way. We’ll show you how.

Cauliflower is in season in Germany from June to October. Then you can harvest the vegetables in your garden or buy them at the market. But you shouldn’t freeze it raw – otherwise it will probably become soft after thawing. We will show you how to proceed as gently as possible and how to preserve the important nutrients in the vegetables.

Before freezing: chop the cauliflower

  • Wash the cauliflower and remove any leaves.
  • Cut the cauliflower into pieces. Depending on the intended use, you can decide how big the pieces should be. We recommend cutting the cauliflower into bite-sized pieces.

Freezing cauliflower: this is how it works

To preserve the nutrients in cauliflower, you need to blanch it before freezing.
Bring water to a boil in a saucepan.
Meanwhile, have a bowl of ice water ready.
When the water boils, add a squeeze of lemon juice. This prevents the cauliflower from turning brown.
Place the cauliflower in the boiling water for about three minutes.
Then take the cauliflower out of the hot water with a slotted spoon and place it in the ice water.
Remove the cauliflower from the ice water and gently pat dry with a towel.


Place the cauliflower in freezer-safe containers and place them in the fridge. It’s important to portion the cauliflower or it will freeze together. This makes it difficult to separate and portion.
The cauliflower will keep for several months. When you prepare the cauliflower, add it to the cooking water from frozen. If you thaw it beforehand, it will quickly become mushy.

They still exist! The traditionalists, the nostalgic, the idealists and perfectionists. Those who see a craft in coffee culture and practice it with devotion. Those who still prepare filter coffee with a coffee machine and ignore fully automatic coffee machines in favor of the espresso maker – the elite of coffee makers, so to speak. They often stand in groups in front of the filter coffee machine in the office and talk shop together about the different ways of making coffee. If you want to have a say, you have to be very knowledgeable!

Even before there were professional coffee machines and filter coffee machines, grinding was done by hand. Even today, the coffee beans are often ground by hand with cone grinders, where the degree of grinding can be adjusted. But all of this is no longer necessary. However, the basic principle of coffee grinding has not changed to this day. Do you know the process of maceration? That means something like wearing down or leaching. Here, the ground coffee is poured over with boiling water and left to steep for at least five minutes. Today, for example, the popular mocha coffee is also prepared with maceration. The coffee preparation of percolation means the usual filtering of the ground coffee beans.

Coffee making in the traditional way at a glance:

Oldie but goldie: the espresso maker

Let’s start with the most traditional of all types of coffee preparation: The espresso maker is, so to speak, the mother of all coffee makers. The classic design of the small coffee pot made of stainless steel or aluminum originally dates from 1933 by Alfonso Bialetti and brings tears of joy to the eyes of coffee enthusiasts and treasure collectors alike.

Especially in Italy, the preparation with the espresso maker is very popular. Connoisseurs appreciate the coffee preparation in Italian, which means celebrating the process extensively – a lout who only thinks of quick enjoyment. It starts by pre-boiling water to speed up the brewing process, to the right water temperature, and grinding fresh coffee. The degree of grinding should tend to be coarser than that of espresso for the portafilter, similar to sand. The water tank of the espresso maker is filled with water up to the valve and the coffee filter above it is filled to the brim with coffee powder and smoothed out. And now: screw the pot on, place it on the stove over medium heat and, with the lid open, watch how creamy, aromatic coffee is extracted. Maintain this state until only steam rises from the pot.

Then remove the pot from the heat and wrap the bottom part with a cold, damp cloth to stop the extraction. The self-brewed coffee is then ready to be served and released for tasting in – attention, Pro-Tip – preheated (!) cups.

Coffee making by hand filter

Anyone who has overheard the coffee nerds in their technical discussions may be familiar with the term pour over method. This means coffee preparation with a hand filter; a way of making coffee, where the filigree technicians are in demand among coffee lovers. By the way, the principle of filter coffee machines is very similar:

Hot water is poured from above onto a filter filled with ground coffee until it drips through the bottom end. The big difference to the filter coffee of the coffee machine is that the coffee preparation with a hand filter allows more individuality. This means that the taste of the coffee can be influenced according to your own preferences by skilfully pouring in the hot water and the degree of grinding of the ground coffee.

The hand filter is the bedrock of coffee brewing styles, who would have thought that brewing a coffee by hand could become a science? And as science likes to do, let’s start by calculating the right amount of coffee. The amount of ground coffee depends on the amount of coffee that is to be drunk later; however, the amount of coffee powder does not increase proportionally to the amount of water. As a guide, half a liter of coffee requires about 30 grams of finely ground coffee; a cup about 10 grams. In the end, however, it is your personal taste that counts. By using a paper filter, coffee oils and coffee grounds are retained.

Speaking of taste: In order not to lose it, there are a few simple points to consider.

1. The paper filter is easily rinsed with water after inserting it into the hand filter. Sounds strange, but the inveterate coffee maker swears that otherwise there will be notes of paper on his taste buds afterwards. In addition, the paper filter fits better to the hand filter, which promotes a more even extraction of the coffee.

2. After filling the ground coffee into the filter and placing a pot or cup underneath to catch the coffee, hot water is poured in from above. The ideal water temperature is 95 degrees. When brewing the coffee, only enough water is poured on in the first step so that the ground coffee is soaked to the surface and swells a little.

3. After half a minute, in which the coffee “blooms” (the process is also called blooming), water is poured out. It should be poured in smooth, circular motions and never touch the filter. The water should never stand in the filter, but always seep through completely.

4. After three to four minutes of brewing time, the coffee should be completely infused and ready to be enjoyed. Depending on how the end result tastes, more or less ground coffee can be used next time.

Pure nostalgia: the espresso machine

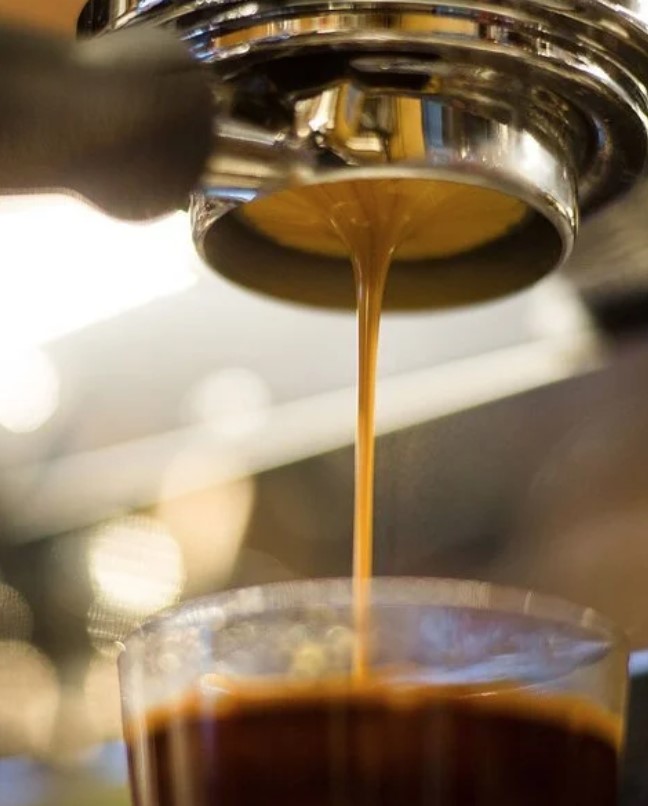
Admittedly, the placement of an espresso machine in this list of coffee makers is debatable. At the thought of buying an espresso machine, one or the other representative of the coffee elite may even roll their eyes, but true enthusiasts also appreciate the coffee preparation with a portafilter machine.

Apart from that, the first attempts to produce an espresso using a steam machine date back to the 19th century – so in terms of tradition, this type of coffee preparation can easily keep up with the others. It is therefore important to broaden one’s French Press-influenced horizon of experience and to open oneself up to the fine art of espresso preparation. Ready?

The few steps that are required when using an espresso machine are quickly explained: When it comes to the right temperature, the espresso is the diva among the types of coffee – nothing works without a preheated cup. Rinsing the latter with hot water is therefore a must. It continues with the coffee, which should be freshly ground in the finest setting. Fill the portafilter to the brim with ground coffee and smooth down the surface. When “tamping” a kind of tamper is used, with the help of which the coffee in the portafilter is compressed into an even and firm shape. In the last step, the portafilter is attached to the previously cleaned brew head. Just 25 seconds later, you’re holding a dark, oily espresso with a distinctive crema that all coffee connoisseurs are sure to appreciate.