Tag

art

Browsing

How does the heart actually get into the milk froth of a cappuccino? Anyone who has always wondered how the artistic motifs get into the milk crown of a coffee drink will find out all the important information about latte art in this article.

What is latte art?

Latte art is the predominant method for creating beautiful patterns and decorations on the surface of coffee. By pouring the milk froth – or the milk – in a special way, patterns and images are worked into the surface of the drink. Popular patterns are the heart, the fern leaf and the swan. The motifs can even be combined with a little practice.

In addition to simple pouring, there are also many tools that can be used for more precise and extensive creations. For example, pens, stencils or chocolate syrup can be used. The master of latte art is the so-called barista. He is responsible for artistic and tasty coffee creations. In the meantime, even championships for the most beautiful latte art are held.

Dense crema thanks to Robusta

Since the espresso is first poured into the bulbous cup, the crema should have a thick consistency and a hazelnut-brown colour. In this way, optimal motifs can be created in it. If a part of Robusta is in the coffee beans, a stable crema should succeed. The slightly reduced oil content compared to Arabica is an advantage here.

Milk (alternative) needs protein

The quality of the milk foam plays an important role so that the barista can fully develop his artistic streak, after all, the foam is the artist’s canvas. The milk froth must be of optimal consistency, temperature and density.

Which milk or milk alternative is used to prepare the milk froth can be decided individually. The most important thing is the protein content. The protein gives the foam its stability and density. The fat content makes the milk foam creamy and looks good.

Many prefer fresh whole milk, but condensed milk and UHT milk work just as well. Milk alternatives are also suitable for producing a nice milk froth. Frothing works particularly well with soy, oat, almond or spelled milk. We even recorded this in an in-house test.

In general, care should be taken to ensure that the milk froth has a dense, creamy consistency that is not too firm.

Equipment needed

Mastering latte art is a lot harder than it first appears. The barista needs:

Espresso, either from the portafilter or the fully automatic coffee machine
Milk frother or a steam wand
milk jug
Bulbous cup, e.g. for cappuccino

Good to know: milk can be foamed on professional fully automatic machines or produced manually using a steam lance. Both are possible.
The cup should ideally have a round bottom and open upwards. A wide opening offers space for pouring in the motifs. The ideal size for the milk jug is 0.6 to 1 liter. The espresso is now used as the basis for the new coffee creation. The actual work begins with pouring the milk froth.

Step 1: Frothing the milk

For frothing, the milk jug should only be filled halfway, as the volume can quickly double during the frothing process. In addition, the milk should be chilled before frothing, as the milk froth must not be warmer than 60 to 70 degrees. Otherwise it will fall apart.

The most important factor in frothing is the pulling and rolling movement of the milk in the jug. It doesn’t matter whether the milk is set in motion via the frother of the portafilter machine or by means of an electric milk frother. First, air is drawn under the surface of the milk. The rotation of the milk distributes the air in the milk and creates foam. For even better creaminess, the milk froth is then swirled around. You can find out more about this in our article on milk foam.

Step 2: Pour in the milk froth

Incidentally, after frothing, pouring should be done quite quickly, since the foam and milk can separate again within about 20 seconds. The desired pattern is now created when pouring the milk froth into the espresso.

The cup with the espresso must be held at a 45 degree angle. Begin pouring from the deepest part of the cup, pouring in the frothed milk in a circular motion to create a base. The crema rises to the edge of the cup and the color is a nice, even brown. Now place the pot with the spout close to the surface of the coffee and carefully pour the pattern into the crema. The angle of the cup becomes smaller and smaller until the cup is full.

The most popular motifs for latte art

Not every motif is equally suitable for learning latte art. We have compiled a few of the most popular milk froth artworks per level for you here.

beginner

The following works of art are ideal for beginners:
heart
Sun
shamrock

Advanced

If you already have some barista skills, then you will like these motifs:
fern leaf
Rosette
star

professional

The absolute latte art professionals can be recognized by these motifs in the coffee:
swan
Angel

Asparagus is often said to have a certain complexity. Cooking asparagus properly is not difficult at all.

Tips for buying asparagus

The sticks must be bright and firm, the tips should be closed. If you rub two spears of asparagus together, they should squeak with freshness!

The best thing to do is to start thinking about it when you go shopping: local asparagus will be available from mid-April. Freshly cut, without long transport routes, asparagus simply tastes best. Check interfaces when shopping: They must not be dry or even moldy and juice should come out when you squeeze them. The sticks must be bright and firm, the tips should be closed. If you rub two spears of asparagus together, they should squeak with freshness!

Store asparagus properly

If you don’t want to overcook your freshly bought stick vegetables right away, you can wrap them in a cloth (e.g. tea towel) moistened with lemon water and keep them in the vegetable compartment of your refrigerator for a few days (max. 3). If you want to freeze asparagus, you should prepare it ready to cook beforehand, i.e. cut off any woody ends and peel the rest. It is not necessary to blanch asparagus before freezing. Do not thaw the frozen asparagus before preparation, but place it directly in the boiling water.

Peel the asparagus properly

Before preparation, wash the asparagus briefly, pat dry, and peel with a vegetable or asparagus peeler. To do this, place the asparagus on your forearm and hold it with all your fingers except your little finger. Then use an asparagus peeler to peel from the bottom of the tip to the end of the stalk; meanwhile, turn the asparagus with your fingers. Green asparagus does not have to be peeled that far, the lower third is usually enough. With white asparagus, it pays to peel a little more generously, preferably starting under the head. Don’t throw away the asparagus shells! You can boil them for an aromatic asparagus broth that can be used to infuse creamy soups and sauces.

More about asparagus

Asparagus (lat. Asparagus Officinalis) belongs to the lily family. The perennial shrub grows to a height of about 1 m and has a woody rootstock. The asparagus buds begin to sprout at the top of the root. In spring from a soil temperature of 15 °C, the rhizome puts out many finger-thick sprouts that are white in color and turn green as soon as they come out into the open.

White and variegated asparagus

White asparagus has a typically fine asparagus aroma, is very tender, and has fewer bitter substances than other asparagus. The rungs are protected from the sunlight by mounds of earth to keep them white. White asparagus is cut 20 to 25 cm below the ground.

Green asparagus is cultivated without ridges, is tender and fine, but has a more intense taste. It is becoming increasingly popular and cultivated more and more often. Today, the proportion of green asparagus is over ten percent.

Purple asparagus contains more anthocyanins, which turns it purple. It originally comes from Italy and therefore needs more sun and warmth. Occasionally you can buy the slightly sweeter purple asparagus in Austria, more towards the end of the season.

That’s why you should eat asparagus

Asparagus consists of 90% water, the rest is valuable vitamins, minerals such as potassium, and hardly any calories (20 kcal per 100 g). It also scores vitamins A, C, and folic acid.

It’s a good thing that asparagus grows in spring, because it stimulates the metabolism, supports the liver and kidneys, and has a draining effect. However, people with a tendency to have kidney stones and high blood uric acid levels should be more careful with asparagus. Asparagus gets its typical taste from aspartic acid, which is important for the urea cycle and stimulates kidney function. After eating asparagus, the urine gets a peculiar smell.

Harvesting asparagus is manual work!

From mid-April to at the latest on St. John’s Day on June 24th, asparagus is harvested, as the harvest of the spear is known in technical jargon. Incidentally, asparagus can only be harvested by hand!

A great milk foam makes the cappuccino or latte macchiato twice as delicious! You always look forward to a beautiful motif made of milk foam on the coffee you order, don’t you? Whether the classic heart on the cappuccino or a fern leaf on the milk coffee – the sweet and creative motifs are usually too good to destroy with the first sip of coffee. It’s just the little things that make our coffee enjoyment perfect.

The term latte art is composed of the Italian word latte (milk) and the English expression art (art). Latte art is the art of conjuring graphic motifs from milk foam onto the surface of coffee drinks. They are usually created by a professional barista by skilfully pouring the milk and using tools such as templates or a milk jug. Leaves, flowers or hearts are always a sure sign that your barista has made the coffee with passion.

This is how latte art works – coffee enjoyment and heavenly reputation

Latte art artists paint their pictures on the coffee surface and decorate it with unique motifs. The painting material is the milk: This is first frothed perfectly, and then skilfully poured into the coffee using a specific technique. This method creates the coffee pictures that are beautiful for us and leave a lot of room for creativity.

In recent years, milk art on coffee has become increasingly popular. There are now international barista championships, where baristi are awarded for their creations in the art of milk foam.

Your latte art at home

Try the beautiful milk froth art in your own cup. Only a few pieces of equipment are required for perfect latte art: a coffee maker for the base, a milk frother, a milk jug and of course a nice big cup so that the drawn pattern comes into its own. However, the ideal consistency of the milk froth needs to be learned – it must be creamy and thick, but not too firm.

The correct filling technique is also decisive for the beautiful art of the cup, because the milk froth has to go directly under the coffee crema in order to form a pattern. A practiced swing and even movements are already half the battle. But don’t despair if a heart doesn’t form in the first cup. As always, practice makes perfect!

It is now well known that the preparation of coffee, cappuccino, espresso or latte macchiato can be an art. However, the work of a barista is not only to achieve a balanced mix of coffee and process it, but above all in the visual design of the different coffee specialties. After all, a cappuccino should not only address taste and smell. Elaborate decorations of the milk foam layer represent an art in itself – the so -called “latte art”. With the help of the “current” by pouring the milk and the milk foam correctly, patterns and images are created on the surface of the drink. Special pens, chocolate syrup or stencils sometimes serve as aids for design. There are no limits to creativity: from the “simple” heart to clover leaves, stars or angels – almost everything can be shown on the foam by the baristas. International competitions challenge the coffee artists to produce ever more complex images.

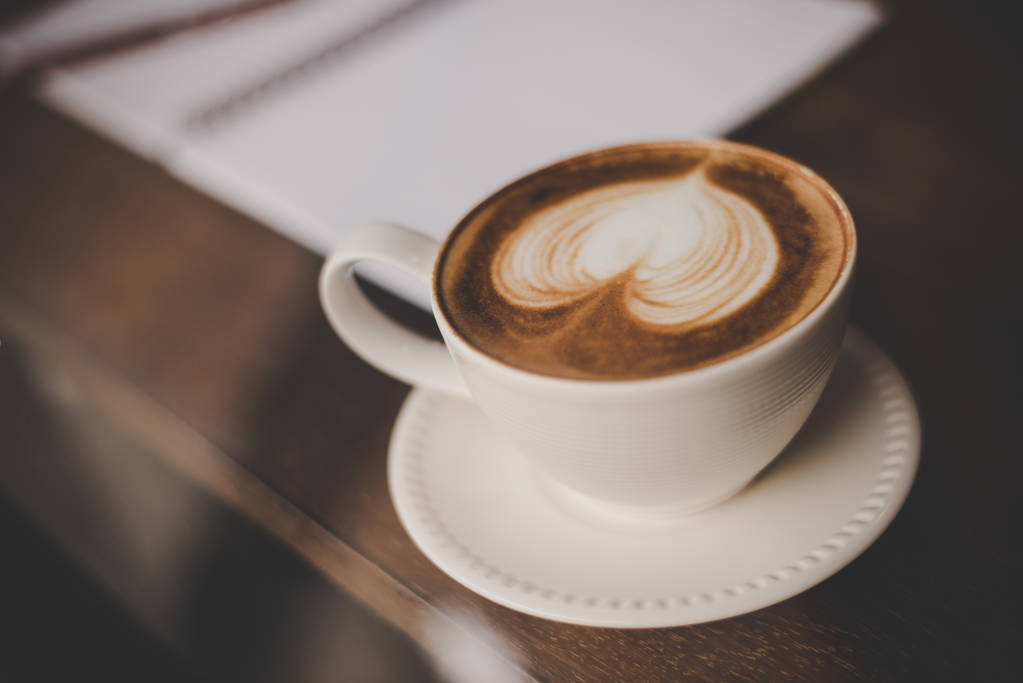
However, in order to produce the structure of milk, milk foam and espresso, you need the right accessories – and a lot of practice. Because as simple as it may look, even the supposedly simple figures, such as the heart, represent a challenge. The equipment of a milk foam artist consists of an espresso machine or jug, a milk frother and, last but not least, a milk jug and cappuccino cups. The latter should not have a diameter that is not too small so that the patterns can have a larger area. The milk jug should also be big enough. The ideal size is between 0.6 and 1 liter of volume. The larger the jug, the easier the foam succeeds. The basis for the preparation is the espresso, which in the best case has a dense crema. This ensures that the espresso stays hot longer and is also an important flavor carrier.

On the other hand, the spirits differ from the preparation of the milk foam: while they prefer a fresh whole milk, others swear by H or condensed milk. In principle, however, the following applies: A creamy, dense, not too solid consistency of the milk foam. The milk jug should be filled up to half at most, since the foaming of the volume of the milk increases by twice. The milk frother of an espresso machine is best suited. After draining the condensed water, the technology of the so -called “pulling”, in which the air is pulled under the milk surface and the subsequent “roll”. Here, the air is evenly distributed in the milk and “undermined”. The subsequent swiveling of the milk foam in the jug improves the creaminess again. In addition to the nature of the foam, the rapid pouring out after the foam is important, since otherwise milk and foam can separate. The milk foam should get under the crema of the espresso when watering in order to achieve the desired effect. Because the right vertebrae when the milk occurs into the coffee creates the characteristic patterns. The jug should therefore be attached on the edge of the cup if possible and the milk should be poured into a place in front of the center of the cup. The evenly moving back and forth of the milk jug is created, the leaf or “tree”- a popular figure and quickly learned for beginners.