Tag

caring

Browsing

Lots of useful tips for caring for wool. Now properly care for woolen clothing and wash woolen jumpers gently. Because clothing made from the natural material wool is still trendy. But many do not even know about the special care for the extremely sensitive material.

Wool is a natural material that is comfortable to wear. And with the right care, it can keep you nice and warm for a long time. But good, high-quality wool, such as mohair, cashmere, or silk, is expensive. You should also take good care of your woolen clothing so that you can wear it for as long as possible.

The advantages of soft wool

Wool has the extremely useful property that its outer skin repels both water and dirt. It is often sufficient if you shake out clothes made of real wool. Or brush the woolen clothes to get them clean again. Since the wool fiber has a scaly structure similar to that of human hair, it requires a particularly gentle washing program. If you look at them under the microscope, you can see the scaly structure of the wool fiber.

How do I wash wool sweaters?

How should I care for my new wool sweater? Should I wash the new wool sweater in the washing machine or by hand? Most of the time, the label on the sweater will give you an answer. Because if it is a machine washable knitwear, you can wash the sweater in the washing machine without hesitation. Because in this case the wool is covered with a wafer-thin layer of synthetic resin. Otherwise, you should prefer a hand wash. Consequently, we give you tips for washing wool.

1) The right detergent for wool

Basically, wool consists of creatine, a protein that makes it very elastic. In order to maintain this elasticity and not lose it during washing, you should always wash wool garments with a special detergent for wool. Or at least use a mild detergent. Because the detergent must be tailored to the sensitive fiber. If it is too strong, there is a risk that the wool fiber will become brittle and hard or otherwise damaged. You might also be interested in our article on making your own laundry detergent.

2) wool sweater in the washing machine

There are many tips for washing and caring for laundry. But you should wash wool at a maximum of 30 degrees or cold. If the sweater is to be washed on the full cycle, you can first put a large amount of water in the washing machine before adding the knitwear. However, you should only fill the washing machine a third full with clothes. You should also avoid using fabric softener. Because this would smooth the surface of the wool fibers too much. This allows the wool to wear out.

3) Hand wash program for wool

Some washing machines have a special hand wash program. That’s why you can use it to wash your woolen clothes without hesitation. Because the clothes are only moved slightly, as would be the case with hand washing. Here too, the rinsing water has the same temperature as the washing water. But if you want to be on the safe side, wash your wool clothes by hand. This way you can avoid matted laundry.

4) Note sorting of the same color

If you want to wash several items of clothing made of wool, you should always sort them by color. Because colored clothing is often chemically treated. If the color is then not washfast, the color may bleed. Color bleeding from dark clothing causes light clothing to discolor quickly. You should also avoid other common mistakes when doing laundry.

5) Dry wool clothes properly

After each wash, you should only wring out the woolen clothing moderately. Then lay them out on a dry towel. Thus, the moisture is sucked out of the garment more quickly. Under no circumstances should you hang up the wool sweater on a clothes hanger or clothesline. Because this would lead to unsightly deformations. Drying in the tumble dryer should also be avoided, as the sweater would otherwise shrink enormously. Also, read our clever tips for drying laundry.

Patent leather is more delicate than some other types of leather. You should therefore protect it particularly well and take proper care of your patent leather. So your shoes made of this material will stay with you for a long time.

What is patent leather?

Patent leather is a high-gloss, mostly scar-free material. Various items are made from patent leather. For example shoes, bags, hats, or purses. In contrast, this material is less suitable for clothing and is used more for the manufacture of clothing for sexual preferences.

1) Cleaning patent leather

To keep your patent leather shoes or bags made of this material clean and shiny, you should clean them regularly. A damp cloth is usually sufficient for cleaning. If you discover stubborn dirt, such as ballpoint ink, then you should react quickly. You can use cleaning spirit for this. But test this on an inconspicuous spot first. Please also note tips for cleaning leather.

2) Maintain patent leather properly

If you own shoes, bags, or other items made of patent leather, you should take care of the patent leather. Because this is very sensitive and needs certain protection. And with the right care, it stays attractive for longer. Therefore, note the following care tips for your patent leather. Also, note the helpful article on repairing minor paintwork damage.

  • Put on the patent leather shoes at least half an hour before going out. Thus, the material is pre-warmed by the feet, and cracks from the cold are avoided.
  • Use a shoe tree to avoid creases and to care for the patent leather. This ensures optimal air supply and moisture removal.
  • To protect and care for patent leather, you should impregnate your patent leather shoes with a good product. Consequently, the material is protected against moisture, wind, dirt, and other environmental influences.
  • It is best to store patent leather products in a cupboard or box. A sufficient air supply should be ensured so that the leather can breathe.

3) Maintain patent leather with special products

Whether shoes or handbags made of patent leather, they all should be cared for regularly. Because only those who care for their patent leather ensure long-lasting suppleness and shine. That’s why you should use the right product for your patent leather care and avoid tried-and-tested home remedies.

Connoisseurs have always appreciated leather. Because the furniture with leather covers becomes more and more beautiful with age. Provided they are properly cared for and cleaned over the years. We show you which cleaning agents are good and which should be avoided.

The leather and its properties

Leather is a material made from animal skin. Centuries ago, people used the material as tent walls and for the production of clothing and containers. Because the leather has positive properties, such as its durability and breathability. In addition, it is flame-retardant and keeps you warm. It is so popular because it is very durable with proper cleaning and care. But you should use the right tools. Otherwise, you can destroy the leather during cleaning.

Tips for the correct cleaning of leather

Leather is hard-wearing, but if you want it to look good for a long time, it needs gentle cleansing. In addition, you should take care of it regularly. You shouldn’t do it thoughtlessly. Because there are some important things to consider in order not to ruin the beautiful leather furniture and leather upholstery. That’s why we’ve collected tips for the right treatment of your leather covers. Also, read how to refresh and polish old leather.

1) Refrain from using chemical cleaning agents

The following substances are considered absolutely unsuitable and dangerous for the leather fabric: stain removers, solvents, floor wax, and shoe polish. You should also avoid using petrol and turpentine when cleaning leather. All of these detergents can damage the fabric. Instead, use natural home remedies for cleaning or a special cleaner for leather from the internet.

2) Note the type of leather when cleaning

Contrary to popular belief, simple leather care does not necessarily have to be expensive to be effective. But different types of leather require special care. Thus, the effect can be targeted. Therefore, you should first determine the type of leather. Once you know the species, you can start cleaning.

Cleaning aniline leather

These are the so-called uncovered leathers. This type of leather does not require complicated maintenance. But you should protect it from too much sunlight. You should also dust it off regularly with a damp cloth (at least once a week). And twice a year, treatment with a special cleaning agent should be carried out. Also, note how you can clean leather upholstery with cornmeal.

3) Use a little curd soap

If you want to remove stains from smooth leather, using curd soap can help. You should be careful not to use too much of it. Large-scale use is also not advisable. And you should foam up the curd soap a little beforehand. Then test it on a small spot before you really start. Then care for the material with leather grease. So it doesn’t dry out. Also, note our tips for removing carpet stains.

4) Clean leather with hair shampoo

If you don’t have a special leather cleaner on hand, you can use hair shampoo to clean smooth leather. To do this, dilute it in water. Then you can rub it into greasy spots and dirt. But you should also test the mixture on a small area beforehand. And it is important to let everything dry well afterward. Also, read our ideas for making hair shampoo yourself.

5) Make your own leather care products

Leather furniture tends to develop its own beautiful patina with age. You can make your own care product to keep the leather soft and elastic. To do this, mix 150 ml of water and milk with an egg white. Then use a sponge to apply the mixture thinly to the previously brushed furniture and let it work for a short time. Finally, remove the excess solution with a dry cloth. After this procedure, your leather furniture will be well cared for and shine like new. In addition, note how to remove ink stains from leather.

6) Remove bad smell from leather

If your leather sofa or leather jacket has gotten a bad smell, you don’t have to throw it away right away. Instead, use the popular home remedy vinegar to neutralize the smell. To do this, take a cloth and add some vinegar. Then wipe the respective piece of leather with it.

7) Protect leather upholstery from sunlight

Leather suites are sensitive to light and should not be exposed to direct sunlight over the years. Because they can easily fade in this way or darken in patches. Also, note our article on cleaning and caring for car seats.

8) Enough humidity for leather

You should also ensure that there is sufficient humidity in the living room. Because the leather needs moisture to stay soft and supple over the long term. This is just as important for the care of old furniture and antiques.

Wild apple is a small tree that attracts attention in summer with its lush flowers and provides you with numerous fruits in autumn. Here you can find out what you should consider when planting, caring for and eating.

The winter apple (also known as the crab apple) is a native plant: it has been cultivated regionally and its fruits eaten for centuries. Today, however, the winter apple is rarely found in Germany. It is also a popular refuge for birds and mammals and an important food source for various insects.

Characteristic is the thin trunk, which only reaches a diameter of two to four centimeters, and the slightly woody consistency. Some branches have thorns. Some varieties also have slightly wrinkled skin. However, this does not affect the health of the tree or the taste of the apples.

The flowering period of the tree extends from April to May and lets it shine in a white to light pink splendour. The apples ripen in early autumn and are yellowish to reddish in color, depending on the variety. Be sure to choose local varieties for planting.

Plant wild apple: The basic conditions

Before you plant wild apples, you should think about the time and place of planting. Please note the following:

Timing: Autumn is the best time to plant. In principle, however, it is possible all year round.
Location: Choose a sunny to partially shaded spot. The tree likes sun and warmth and should not be overshadowed by other plants. Otherwise it is quite robust, so that wind and rain cannot harm it. Note that the apple tree can grow between 3 and 6 meters tall. However, this varies depending on the variety. At the same time, the roots grow quite extensively and close below the surface of the earth. There are also varieties that are suitable for hedge planting.
Soil: Since the wild apple tree is a wild tree, it can get along with almost any soil. He just doesn’t particularly like extremely wet soil like moor. Nevertheless, you can enrich the particularly nutrient-poor soil with nutrients and sand.

This is how you plant the wild apple

Planting a wild apple is not difficult. To do this, follow the steps below:

Place the young tree in a bucket of water so the roots can soak.
Dig a planting hole. This should be at least twice as large as the plant ball of the wild apple tree.
Enrich the soil with some compost or other organic fertilizer.
Place the small tree in the hole and refill the soil. Squeeze them tight.
Water the freshly planted wild apple tree properly.
Depending on the location, it may make sense to initially secure the young tree with a stake.
If you sprinkle bark mulch around the tree, you prevent weeds and at the same time protect the tree from unwanted competing plants.

Caring for a tree: tips and hints

The wild apple tree is robust and quite undemanding. For care, it is sufficient if you observe the following tips:

The most important thing is that you protect the wild apple from drought. Especially when young, you should water the tree regularly during long periods of drought. We recommend collecting rainwater and using it to feed your plants.
If you want to do something good for your wild apple, you can fertilize it in the first half of the year (spring to June), preferably with compost.
Basically, it is not necessary to trim the wild apple tree. However, if it is not developing in the way that is best for your garden and other plants, or if you want to shape it, you should cut it from time to time. You can read here how to best make the cut: Cutting an apple tree: The right tree cut in spring and autumn
Wild apple is hardy. So you don’t have to take any special precautions for the cold season.
If you want to propagate the apple, the best way to do this is by sowing: Scatter the seeds of the fruit in a pot outside in autumn and keep it moist. Cutting a cutting and cultivating it is often not successful.
Diseases and pests do not worry the wild apple tree for the most part. However, typical apple tree diseases such as apple scab or fire blight can sometimes occur.

Here’s how you can use the wild apple

Wild apples are edible. However, young apples of the tree are rather sour and tart because they contain a lot of tannin. You can cook them to tone down the flavor. In addition, the kernels of wild apples, like other apples, contain the substance amygdalin, which is converted to toxic hydrocyanic acid in the body. Even if you bite into the seeds, they are harmless in small amounts.

Wild apples contain a comparatively large amount of pectin. You may know the substance as a vegan gelling agent. They also have a firmer consistency than cultivated apples. You can take advantage of these two properties by using the fruit for homemade applesauce or apple jelly. You can also make tea, juice or syrup from wild apples.

The fruits are also often used as a decorative element in arrangements or wreaths.

As a pasture for insects, the wild pear is an important food source for bees and the like. The wild form of the pear, which grows in sparse forests, also thrives in domestic gardens. We will show you how to properly plant and care for the rare pear tree.

Plant wild pears in your own garden

The wild pear is the original form of the pear tree and originally grows mainly on the edges of forests and in clearings. Unlike cultivated pears, the wild fruits can only be eaten in processed form, but the gnarled wild pear should not be missing in any natural garden simply because of its ecological benefits. The white umbelliferous flowers provide food for bees and other insects, while the fruits that are stuck are eaten by native birds.

You can buy the wild pear as a young tree in well-stocked garden shops. Before you plant the fruit tree, however, you should pay attention to a few points:

Location: You can plant the wild pear almost anywhere. The only important thing is that it gets a sunny and warm place in your garden. Even on slopes, the wild pear thrives thanks to its deep roots. The blazing sun doesn’t bother her either. On the contrary, in order for the leaves to turn fully colored in autumn, the tree even has to be in full sun.
Soil: Since the wild pear is very adaptable, it grows well on all permeable soils. The only thing you should not plant the tree in is very wet or acidic soil. You can recognize acidic soils, for example, by means of special indicator plants.
When to plant: As with most fruit trees, spring or autumn is the best time to plant the wild pear.
Plant neighbors: In order to reproduce, the wild pear needs nearby pollinators. Apple trees or other types of pears are well suited for this.
Plant wild pear:

First dig a planting hole at the site. Make sure it’s at least twice the size of the wild pear’s root ball.
Slightly loosen the soil at the bottom of the hole and lay a drainage layer of gravel or sand.
Now place the wild pear with the root ball in the hole and fill it up again with the excavation from the plant.
Put a support stick in the ground and tie the young wild pear to it.
Finally, lightly press down the top layer of soil and water the pear tree generously.

The right care for the wild pear

Even if the wild pear is very easy to care for and robust overall, it is worth taking the following care instructions into account:

Watering: The wild pear’s water requirements are usually covered by the occasional rainwater that falls. In particularly long periods of drought, however, you should water them so that the soil does not dry out completely. You should definitely avoid watering too often, as the pear species is very sensitive to waterlogging.
Fertilizer: The frugal wild pear does not depend on additional nutrients.
Pruning: The wild pear is very tolerant of pruning. Once a year, in spring, you can safely remove dead and laterally growing branches. In addition, you should leave the naturally growing fruit tree unpruned.
Harvesting: In autumn, the real wild pear develops round fruits that are about three centimeters in size. At first glance, they don’t look like typical pears at all. The pears only lose their bitter taste when they are overripe or after the first frost. Then you can harvest and process them. The fruits of the Chinese wild pear, on the other hand, are inedible and remain on the branches until they are softened by the frost and serve as food for birds.
Overwintering: In order to protect the wild pear from frost in winter, you should mulch its treetop in autumn with a thick layer of bark mulch or autumn leaves.
Diseases and pests: You no longer need to worry about pests with the robust wild pear. Even the dreaded pear rust rarely occurs with her.

You can use the wild pear in so many different ways

The fruits of the wild pear contain many tannins and fruit acids. In the raw state, they are therefore hardly edible due to the bitter taste. Nevertheless, there are a few ways in which you can still use the wild pear in the kitchen:

Using wild pears in the kitchen: After the first frost, wild pears lose their bitter taste. If you want to speed up this process and process the fruit faster, you can dry and bake the pears. In combination with cultivated pears or apples, you can then process the wild pear into pear syrup or pear puree.
Use wild pear blossoms: Wild pear blossoms can also be useful in the kitchen. As a side dish, the flower buds taste good in a wild herb salad. You can also process the mild-tasting flowers into tea or lemonade. If you sprinkle the buds with sugar water, you can candy them in the oven over low heat and use them to decorate desserts.

Tulips should never be given fresh water during water changes. Why does this damage the cut flowers?

A colorful bouquet of tulips can make your heart happy and bring the fresh scent of spring into your home. Quickly fetch a vase from the cupboard, fill it at the tap and then drape it nicely on the windowsill: You can already feel the spring mood in the apartment.

After a certain time, however, there is less and less water in the vase because the tulips have drawn it. Should I drain the water and fill in new? This would be a mistake that would make the beautiful flowers look ugly sooner.

That way you can keep your tulips for longer

If you have the impulse to give your tulips new water, caution is advised: the water already in the vase should never be poured out, instead you should only refill the vase with fresh water. Because: Fresh water gives the cut flowers new energy, it allows them to grow or bloom much faster. But that also means that they age and wither faster. With the mixture of older and fresh water, the tulips will continue to grow, but more slowly.

However, it is important to refill in good time so that the nutrient content in the water does not become too high. So check regularly how much water your tulips have left. These cut flowers in particular draw water quickly, which is why repeated watering may be necessary.

So no fresh water for tulips! If you heed this tip, you can enjoy colorful flowers for longer.

Housewife tips to care for orchids properly and keep them light. Watering and caring for orchids made easy. Those who have not yet dealt with the care of orchids may think that these beautiful flowering plants are very demanding when it comes to caring. After all, they originally come from the rainforest and thrive there, especially on trees.

Water orchids properly

At least as far as “watering it right” is concerned, caring for orchids is absolutely simple! It is usually sufficient if the orchid is watered once a week. Simply submerge the planter with the plant in its own plastic pot and let it sit for 5-10 minutes. This allows the plant substrate to absorb and store water.

Then pour off all the water and let the plastic pot with the plant dry on the drainboard of the sink until no more water drips out. In this way, you avoid the formation of waterlogging – something that orchids do not tolerate at all because they rot quickly! Then put the plants back in the cachepot and the plants are taken care of for a week.

Here is a little tip that you can use to check whether the plants need water: lift the pot, if it feels very light or too light, the plant needs to be watered, if the pot feels rather heavy, Is the plant substrate still moist enough? With the right watering technique, you will surely enjoy your beautiful plants for a long time!

The right potting soil for orchids (substrate)

Normal potting soil is not recommended for orchids, since orchids are mostly epiphytes (tree-tops). You, therefore, need special potting soil or a special substrate made of scattered peat, fern roots, and crushed bark. Perlite or Styromull should be added to these organic substrate components to promote aeration of the soil.

Not too much sun for orchids

Don’t put your orchids in a sunny spot and water them wisely. If you give it too much water, the roots will rot. Orchids don’t like footbaths. It is best to only water them once a week.

The rose is one of the most popular and beautiful flowers. And the great thing about roses is that they thrive in almost every garden and there are many different varieties. Planting and caring for roses is not particularly difficult, provided you calm down a few rules.

Proper care for roses

If you want to have magnificent rose blossoms in the garden, it depends on the right care of these flowers. The rose belongs to the rose family and comes in many varieties. Above all, their different colors are magical and attract numerous rose lovers. A bouquet of roses has always served not only in the garden but also as a particularly romantic gift. So that you too can plant perfect roses, we have the most important tips for growing and caring for them.

1) Plant roses properly

The rose loves it sunny, you should take that to heart when planting roses. But it also thrives well in partial shade. Before planting, you should water the rose root sufficiently, for example by placing the whole pot or the root ball in a bucket of water for a few hours.

2) Spring pruning for roses

When the forsythia bushes bloom bright yellow, it’s time to dare to cut the roses. Bedding and hybrid tea roses in particular should be cut back every spring. As a result, you can stimulate them to bloom lushly, because the flowers only form on the fresh branches of these varieties. Those who orient themselves to the forsythia blossom are guaranteed to get the right time and risk no damage to the roses. Also, note tips for planting tomatoes.

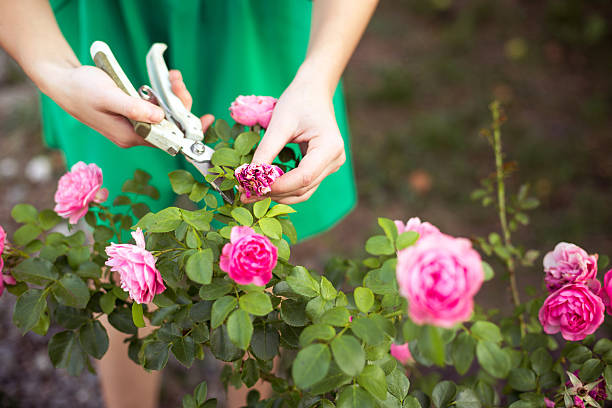
3) Caring for roses with the right rose cut

There is a lot to consider when it comes to pruning roses. The most important thing is to remove the old and dead parts during spring pruning. Otherwise, you can also remove thinner branches generously, especially if the rose has not bloomed in the past year. A cut always runs just above a branch pointing outwards. Especially when pruning in spring, you can prune the rose vigorously.

4) Use a suitable tool for cutting

The right tools and great gadgets for gardening should not be missing. In order not to damage the rose, the scissors should be very sharp. Then the branches will not be crushed. Also, make sure that the edge is rather slanted when cutting. As a result, no rainwater will remain on the injured area and the edge will close cleanly. In addition, the surface of the cut edge should be as small as possible.

5) Water roses moderately

Watering tips should always be followed. Roses aren’t too thirsty, so don’t overdo it with the water. Watering them once or twice a week is often enough. If it rains, of course, there is no watering. It is more important to water the rose directly at the roots. In addition, the greatest dangers are lice and fungal diseases. But you can prevent them with moderate moisture and proper watering.

6) Nutrients for a lush rose bloom

Especially in spring, from the first cut, you should supply the rose with nutrients. A special rose fertilizer gives the roses everything they need. You can also use horse manure and compost for fertilizing. Horn shavings can also be used as fertilizer. You can then fertilize twice more in the course of the year – ideally also after the first flowering. It is very important not to fertilize too late. Fertilization can still be done in late summer. If you fertilize too late, the branches will not lignify enough and they could suffer frost damage.

7) Stimulate flowering

In order to enjoy the rose for a long time, you should regularly cut off faded flowers. After the first bloom ends, you can cut back a bit. The cut runs over the strongest bud. You should also water regularly and sufficiently in summer when it is hot to stimulate flowering.

8) Keep roses weed-free

To keep the soil weed-free, it is a good idea to combine the roses with other plants. Accordingly, a well-established neighbor is a beautiful lavender, as it goes perfectly with the roses. You should also regularly rake the soil around the rose, being careful not to damage the roots.

9) Winter protection for roses

Suitable winter protection for plants is essential for many plants. Although bed roses usually survive the winter without any problems, it can be helpful to take special care of roses in winter. Therefore, protect the root area from too much cold. To do this, pile leaves or brushwood about 30 cm high in the lower area. But be careful not to make the pile too dense.

10) Potted roses for the home

If you don’t want to do without beautiful roses at home, then choose potted roses. They should be as cool and bright as possible. Nevertheless, the roses usually suffer from a lack of light after a while. After flowering, it is often best to cut back the rose and place it outside or plant it directly in the bed. Then the rose can bloom again in the same year, provided you planted it in time.

All tips for lawn mowers and lawn mowing at a glance. In addition to flower beds, ponds, and the like, most garden owners opt for large lawns. In summer, these offer the ideal setting for parties or just to relax. Consequently, good lawn care is important.

Maintain the lawn properly

Without proper lawn care, the lawn can quickly become dry and unsightly. Therefore, you need to take good care of the lawn and mow the lawn properly so that it can reveal its true splendor and make the neighbors jealous. Since many mistakes are made when mowing and caring for the lawn and thus negatively affect the quality and appearance of the green area, you should follow a few rules. If you own a garden, we have some gardening tips. You will have fun and enjoy your own green for a long time.

1) The basic rules for proper lawn mowing

Basically, two important components can be listed as important tips when mowing the lawn: If you follow these components, that’s half the battle.

  • For one thing, timing is important.
  • And on the other hand the intensity of mowing.

When gardening in winter you can do without mowing. Because the general gardening season usually begins in spring, when the frost gradually subsides and the first flowers bloom. That means for the lawn: It also has a “winter break” and only needs the first lawn care after the frosty nights. Because if you mow your lawn too early, frost can penetrate the ground and permanently damage the lawn. In addition, the lawn only begins to grow when the temperatures are warmer, so early mowing is not necessary. And applied to autumn/winter, this means that the mowing season ends when the temperatures drop noticeably (and the lawn also no longer grows sustainably).

2) Pay attention to the time of day when mowing the lawn

You should choose the right time to take care of your lawn. The right time of day is either in the morning or in the evening. On the other hand, you should not take out the lawnmower when the midday temperatures are high. Because that damages your green space unnecessarily since high temperatures and little precipitation quickly dry out your own green. As a result, the area quickly looks worn out. At the same time, you should keep quiet times to protect your neighborhood.

3) Lawn care when the weather is right

The weather is also crucial when it comes to good lawn care. Basically, you should only mow the lawn when it is not too wet and not too dry. Otherwise, it can happen that the grass tears quickly and is, therefore, more susceptible to damage (not to mention the bad optics…). So go ahead and trim the grass in the morning hours.

4) Adjust the cutting blade when mowing the lawn

But the right equipment for the garden is just as important as the time and the weather. That means your lawnmower should be up to date. In order to be able to mow the green area of ​​your garden optimally, you should make sure that the cutting blade is optimally adjusted. The grass should not be cut too short, but should not be left too long either. It is therefore advisable to test the cutting length on a small spot in the garden first.

5) Which cutting height is correct?

When it comes to mowing, you can use the rule of thirds in most cases. This states that only a third of the current lawn height should be cut. Consequently, two-thirds remain. However, depending on the type of lawn, a different cutting height as usual. A lawn for use has a height of approx. 4 cm. On the other hand, the decorative lawn is 1.5 to 2.5 cm shorter.

6) Buy a new lawnmower

If you don’t own a decent lawnmower, it’s high time to buy a lawnmower. Depending on the size of the green area and personal needs, you can choose from a variety of different models. There are now not only classic devices but also high-tech devices that make life easier.

Planting runner beans is easy. The plants are undemanding and bring good yields. We explain to you what you have to pay attention to when growing.

Planting pole beans – you should know that

If you want to provide yourself with vegetables, runner beans should not be missing in your garden. They are easy to grow and produce good yields over a long period of time. The plants keep forming new pods and you can harvest regularly over a long period of time. Because they mainly grow tall, you can harvest a lot of vegetables from a relatively small area in your garden.

Planting runner beans – These points are important

If you want to grow runner beans, you have to consider several points:
Beans are weak eaters – meaning they only need a small amount of nutrients. Pole beans, however, have slightly higher requirements than other types of beans. Therefore, it makes sense if you prepare the bed with some compost.
Runner beans live up to their name: they need a pole to help them climb. Depending on the variety, they grow 1.5 to 4 meters in height.
A good climbing aid are long bamboo sticks. Plant four equally spaced in the ground and tie the top ends together. If you want to grow more beans, you can set up the poles in two rows using the same principle. Then tie two together at the top and connect them to each other with a crossbar at the top.
Pole beans only germinate above 12 degrees Celsius. Therefore, only plant them when the soil has warmed up and no more frosts are to be expected. From the “Ice Saints” in mid-May you are on the safe side.
The beans need a sunny, warm location if possible.

Prepare the bed for runner beans

Even if runner beans are quite undemanding, you should prepare the bed properly. In this case, this means that you have to loosen the soil well. Now you should set up the climbing aids. Make sure the trellises are long enough for your type of bean. Set up the poles at a distance of 50 to 70 centimeters from each other.

Then place five beans three centimeters deep in the soil at equal intervals around each pole. The warmer it is, the faster they germinate.

Maintain runner beans

Pole beans begin to germinate just a few days after sowing. Once they are about 6 inches tall, cover them with soil. This makes them more stable and forms additional roots. As a rule, the young shoots quickly find their way to the climbing aid. If that doesn’t work, you can easily tie them up with a piece of string.

Runner beans grow incredibly fast. You will be amazed. Once the beans have sprouted and found support on the trellis, your task is limited to regular, thorough watering. Pole beans need a lot of water.

Harvest runner beans

It won’t be long before your runner beans start producing flowers, which eventually become pods. Harvest time is from the end of July. The young beans are particularly tender. When ripening, the individual beans form a hard skin in the pod.

You should always use two hands to harvest beans. With one hand you hold the tendril just above the pod, with the other you pluck off the pod.

IMPORTANT: Raw beans are poisonous! They contain the protein phasin. The substance is only broken down by cooking.

Regular harvesting and thorough watering ensure you high and consistent yields. As the gardening season draws to a close, allow some pods to fully mature. When the husk is brown and dried up in late fall, you can harvest it and have your own seed for next year.