Tag

clean

Browsing

You should peel the celery before eating it – regardless of whether you dip it or prepare it as an oven vegetable. The interior of the perennials and the hard threads are particularly important. We’ll show you how to remove them.

Clean and peel the celery

1. Trim celery:
First you separate the stems from each other and remove the leaves inside the celery.
Then cut off the bottom ends of the perennials. It is best to remove everything white to avoid bitter substances.
You should also cut off the top ends once they have dried.
2. Wash Celery:
Now you can wash the celery to get rid of dirt: make sure to also remove the dirt from the grooves and clean the celery thoroughly.
Hot water and a vegetable brush are best for this.

3. Peel the celery

After cleaning, you can remove the hard fibers. You can use either a knife or a peeler to do this:
Use the knife to cut about 1mm into the celery and then pull off the thread between the knife and your thumb.
If you use a vegetable peeler, you’ll remove the threads just as effectively. However, you will also remove much of the edible celery.
Tip: Basically, when peeling and cleaning celery, you can proceed in a similar way to rhubarb. If you are used to peeling rhubarb, it is also very easy to peel celery.

Once you have washed and peeled the celery, you can eat it as finger food with a delicious dip, or fry, steam or cook a celery soup.

For simple and regular oral care, we recommend three basic techniques to have beautiful, healthy, and clean teeth in the long term and at the same time to show fresh and neutral bad breath.

Dental floss and tongue scraper against bad breath

Many foods leave residues in our body, especially in the oral cavity, which can lead to bad breath. It doesn’t matter whether it’s garlic, onions, or far less odorous foods – leftovers form a coating on the tongue or in the spaces between the teeth and provide the ideal breeding ground for odor-causing bacteria.

While we hardly notice our own bad breath, the bad companion can quickly become a disruptive factor for the partner or work colleagues. Bad breath is also not well received when dealing with customers. But what can you do to be able to enjoy everyday life with your fellow human beings without any worries?

Clean between teeth with dental floss

Brushing your teeth alone is often not enough to permanently get rid of bad breath. Chewing gum or lollipops only masks the smell and does not fight the cause. If organic diseases such as stomach problems have been ruled out, the reason for bad breath is often a lack of oral hygiene.

Although brushing your teeth removes bacteria and leftover food from your teeth, even the most expensive high-tech toothbrush cannot get to the spaces between them. Dental floss is the only way to reach and clean these hiding places for bad breath and tooth decay-causing bacteria. On the one hand, there is the classic dental floss, which resembles a string and is stretched between the fingers and pressed into the interdental spaces in order to be able to clean the interdental spaces.

On the other hand, you can also use practical plastic sticks in which a piece of dental floss has been clamped. After using dental floss, you should always rinse your mouth well and clean your teeth with a toothbrush in order to completely remove plaque from the oral cavity that was scratched off with the dental floss.

Clean the tongue regularly

Bad breath-promoting bacteria also accumulate on the tongue. Food leftovers or coffee leave a white or yellowish coating that you can only remove with a so-called tongue scraper. Even an inexpensive plastic scraper, used regularly, can ensure better breath. To clean the tongue, it is advisable to scrape the tongue from the pharynx towards the front and to remove any plaque from the tongue scraper under running water. If you hold the side of your tongue lightly with a paper towel, the gag reflex that often occurs can be delayed somewhat.

Many natural home remedies for blemished skin and homemade face masks for pimples. With the masks against pimples, you will quickly get beautiful, youthful, and pimple-free skin. These masks are also very suitable for young girls because they contain no chemical substances. Most importantly, allergic reactions cannot occur.

If your skin has just been cleansed, you should avoid wearing make-up, as the make-up could worsen the problem of acne. However, you should definitely consult a dermatologist if you suffer from severe acne problems.

Home remedies help with impure skin

Our instructions for a face mask to cleanse your impure skin. Skincare with masks can be used very well as a home remedy for impure skin, especially on the face. The reasons for impure skin are pimples and blackheads. Furthermore, stressed facial skin and greasy facial skin, psoriasis or herpes.

Preparations for the face masks

Face masks for skincare should always be applied for 20-30 minutes in the evening before going to bed. The reason is simple: the skin gets a restful sleep after the treatment. Before the face mask, you should clean the skin of the face and neck with hot compresses or hot water. and thus prepare the mask for about 10 minutes.

1) Cucumber mask with honey against pimples

The mask made of cucumber, clay, and honey helps against pimples even at a young age, quickly and cheaply. If you tend to have oily skin and don’t want to use chemicals, try a mask made from purely natural products. You can mix them fresh at any time and it’s also very cheap.

For this, you need half a cucumber, 2 tablespoons of acacia honey, and a tablespoon of green clay powder. Now peel the cucumber and best puree it, add the honey and the clay and mix everything very well until you get an even mass… Apply the mask evenly and leave it on for about 20 minutes, then wash it off with lukewarm water.

2) The egg yolk honey mask against pimples

An egg yolk and honey mask, which can also be applied regularly, is particularly helpful for unpleasant pimples. For the mask, all you have to do is mix a little egg yolk and honey, then the mass should work on the skin for an hour. Although the pimple does not disappear as quickly as it came, for example, with regular use, blemishes can be effectively prevented.

3) Tomatoes as an anti-pimple mask

Do you need urgent relief for pimples on your face? Try a fresh tomato mask that has an antibacterial effect on the skin. To do this, mix two tomatoes with a teaspoon of honey in a blender and apply the mask to impure, oily skin for 10 minutes. You can then rinse off the mask with lukewarm water and your skin will be noticeably cleaner.

4) Eliminate blemishes with healing earth

If you want to fight the blackheads and pimples on your face, you can do this best with the help of a mask made of healing clay. To do this, mix three tablespoons of healing earth with chamomile tea until a spreadable paste is formed. Leave the cream on for about 15 minutes and then rinse off with lukewarm water to remove any blemishes.

Small pimples and blackheads can sometimes form on even the clearest skin and are often annoying and difficult to combat. However, if you cannot get rid of your impurities with creams and care products, you should try a weekly steam bath. A steam bath with chamomile blossoms, in particular, cleans the pores and quickly gives them a clear, pimple-free complexion.

5) Cottage cheese and parsley pack for inflamed skin

A face mask as a home remedy for inflamed skin or pimples always helps when your facial skin is blotchy or reddened or even slight inflammation can be seen. Then you should treat your skin to a nourishing and soothing face mask made from quark and parsley (quark and parsley pack). To do this, mix three tablespoons of cream quark (or whole milk or natural yogurt) with half a cup of finely chopped parsley and apply the mask to your face. After about 20-30 minutes you can remove the mask and experience a pleasant feeling of freshness.

Applying the face masks

The face mask is then applied with a flat, soft, and wide brush. You should rest as relaxed as possible for the entire duration of the face mask (exposure time). After the exposure time, you can carefully wash off your face mask with lukewarm water and then care for your facial skin with mild and nourishing skin oil.

Ear cleaning home remedies and earwax removal tips. The formation of earwax varies greatly from person to person and has nothing to do with physical hygiene. Older people, especially men, produce a lot of earwax. With age, the earwax glands begin to shrink and less secretion is released as a result. As a result, the secreted earwax becomes drier, and dead skin particles accumulate in the ear canals.

If there is a large amount of earwax and this can no longer be transported to the outside as well due to the lack of secretion, there is a high probability that a plug will form, which will then also affect hearing. Experts estimate that removing such a plug of earwax can improve hearing by 10 decibels.

Self-cleaning of the ear

The self-cleaning of the external ear canal can also be disturbed, regardless of age. Such a situation can arise when, for example, you try to clean your ears with cotton swabs, keys, hairpins, or similar objects. This only partially removes the earwax, because the remaining part is pushed deeper and deeper into the ear by these actions. This part then solidifies and leads to the formation of a plug. With such a procedure there is also the risk that the skin of the external auditory canal or the eardrum can be injured and irritated.

The use of loudspeakers in the ear canal (hearing aid loudspeakers or “in-ear” headphones are worn) or earplugs worn to protect against dust, water or noise can, with very extensive use over a long period of time, lead to a situation where earwax hardens and accumulates.

Remove earwax

As a rule, you can remove the leaked earwax after showering or washing with the help of a cosmetic tissue or a rag. However, when there are large amounts of earwax in the external ear canal or a wax plug has formed, other options must be used.

If you use warm almond or olive oil with water or special ear drop sprays, the earwax will be softened and can flow out of the ears better.

An ear rinse can also be used to solve the problem. Here, the ear is then rinsed out by the doctor with the help of certain water pressure. The doctor then uses special instruments to suck out the earwax. However, before you resort to the remedy “ear rinse”, you should try the procedure mentioned before.

Eardrop sprays (so-called cerumenolytics) can also be used to prepare for an ear rinse. However, when suffering from otitis media, ear irrigation or other mechanical procedures should be avoided. This also applies to eardrum injuries or other inflammations and diseases in the ear.

Scientific studies also show that earwax can be easily removed by using cerumenolytics or oils. The preparation of an ear rinse with the help of verumenolytics then improves the treatment result of an ear rinse.

A healing method of alternative medicine is the “ear candles”. Candles are inserted into the ear canal and the candle is lit at the outer end. Whether such a method helps to loosen earwax has not yet been knowingly proven.

This is how you can clean and sterilize pacifiers and baby bottles. With tips, tricks, and instructions on how to properly clean baby pacifiers, cleaning the baby bottle is child’s play. When a baby comes into the household as a new family member, the usual daily routine is turned upside down. Feeding, diaper changing, washing clothes – many parents often wish for an extra pair of hands to do all the work that needs to be done. Sterilizing the pacifier and cleaning the baby’s pacifier and milk bottle is a time-consuming task.

In the fight against viruses and bacteria

A newborn’s immune system is not as developed as that of an adult. To prevent your baby from developing a gastrointestinal infection in the first few weeks, it is important that bottles and pacifiers are sterilized regularly. Various methods are available for sterilization, which differ significantly in terms of handling, the time required, and costs.

Time-consuming tradition: decoction

Traditional boiling is initially the cheapest method because parents do not have to buy any additional equipment apart from a pot. However, it takes a lot of time and is impractical to use. Furthermore, a large amount of water has to be heated and it can even melt pacifiers or plastic parts. The risk of getting burned is particularly high.

Expensive alternative: the vaporizer

The vaporizer, an electrical device for sterilization with hot steam, is a safe and energy-saving alternative to boiling. Bottles are sterilized within 10-15 minutes with significantly less water. Most devices turn themselves off, leaving you free to focus on other tasks. Probably the biggest disadvantage of the vaporizer is the price, which is very high with an average of 40-50 €, especially since you will probably use this household appliance for a maximum of one year. The following method of sterilization is much cheaper but just as effective.

Fast and inexpensive: the microwave

Many households already have a microwave. It is all the more practical if you can also use this device to sterilize bottles. All you have to do is buy a microwave steam sterilizer, which is significantly cheaper than the electric vaporizer at €10-15.

Bottles and pacifiers are placed in a tray on a grid. Then, as in the vaporizer, add a small amount of water and close the container. After about 5 – 7 minutes in the microwave, you should wait about 2 minutes until the container has cooled down, and then remove it from the microwave. You can use the bottles immediately or take them out on the grid and let them dry.

Cleaning mushrooms requires a little finesse. We’ll tell you how you can get rid of the dirt particles on the popular mushrooms and what you should look out for when buying them.

Clean mushrooms carefully!

Mushrooms are an all-round ingredient. For example, they can be used to conjure up delicious mushroom pans and soups. But bought or collected mushrooms sometimes show slight soiling and soil residue. That’s why you should clean your mushrooms before you use them in the kitchen. You should keep these tips in mind:
Mushrooms are very delicate mushrooms. Store-bought mushrooms are not always dirty. So it is enough to clean them with a brush or cloth.

Do the following:
Hold the mushrooms by their stems so you can gently brush the dirt off the head from top to bottom.
Then use a brush to remove coarse dirt from the underside of the head and the handle itself. Tip: If the dirt cannot be removed, you can sprinkle the brush with a few drops of water.
At the end you can rub the fungus again with a cloth. This is how you clean the mushroom from finer dirt residues or dry it.

Cutting and cleaning fennel is not very complicated. We will explain how to cut fennel correctly to process the vegetables.

Clean the fennel properly

Unlike other vegetables, fennel is easy to prepare.

To clean fennel properly:
First remove the herb and root ends from the tuber. Tip: If you want, you can also process them later. For example, you can conjure up a homemade vegetable broth from the vegetable cuts. Or you can add the herb to the dish, finely chopped, or use it as a garnish for the finished dish.
Now wash the fennel bulb under running water.
Cut out dry and yellow spots from the tuber.

Cut the fennel properly

Fennel can be prepared both raw and cooked. For this you should remove the stalk.

Cut the fennel by removing the stalks and cutting the bulb in half.
Now cut the halves in half again.
Remove the stalk.
Cut the remaining bulb into strips.
You can now easily process the fennel strips. For example, you can boil them as soup vegetables, fry the fennel or prepare a fennel salad.

Tips for cleaning the coated tongue and removing tongue coating with natural home remedies and tricks. The coating on the tongue is usually harmless. Nevertheless, tongue cleaning can be useful. This prevents bad breath, caries, and periodontitis.

The removal of the tongue coating makes sense to prevent diseases. However, a different discoloration of the tongue can also indicate a disease. If cleaning with our home remedies is not enough, you should consult a doctor.

What is a coated tongue?

You use your tongue to taste, speak, and move food around your mouth. You can also learn a lot about your health by looking at your tongue. Because it can give us information about possible diseases of the body. The healthy tongue is usually pink or pale red, moist, and smooth.

It is usually covered by a thin whitish coating. This is the lining of the tongue. It consists of germs, food remains, and old cells. But as a rule, this coating is rubbed off when eating. Consequently, a coating on the tongue is usually harmless. However, if your tongue coating becomes unusually discolored or thicker, you may have a medical condition. Therefore, a visit to the doctor may be advisable.

The causes of tongue coating

There are many causes of a coated tongue. The type of discoloration plays a role here. Because different colors indicate different diseases. Consequently, possible causes can be infectious diseases, fungal diseases, or problems with the digestive system. In addition, poor oral hygiene or certain diets can be responsible for tongue coating.

Symptoms and diagnosis

If you don’t notice any unusual coating on your tongue, you can clean your tongue with simple home remedies. If your tongue shows an unusual coloration of the tongue coating, you may have another condition. A red coating (raspberry tongue) can indicate infectious diseases such as scarlet fever. In contrast, a greyish coating can indicate anemia or iron deficiency. Also, read our tips on diet for iron deficiency. Other discolorations of the tongue are as follows:

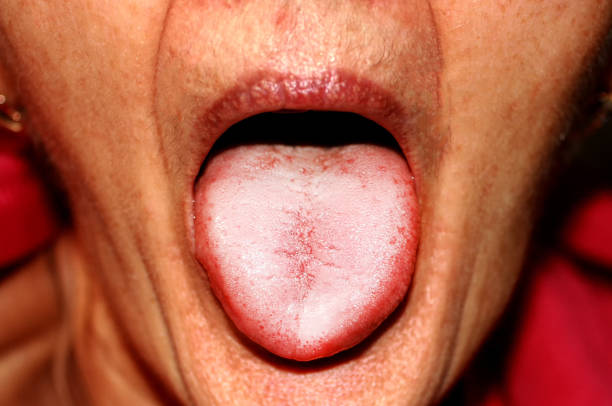
White tongue coating

A white tongue coating tells you something about the condition of your gastrointestinal tract and your digestion. But you can also get a thick white coating on your tongue if you have a pancreas disorder or a cold. Then you should drink a lot and leave longer breaks between meals. In addition, note our natural home remedies for colds and our tips for gastrointestinal complaints.

Yellow coated tongue

Drinking too much coffee or smoking can lead to a yellow coating on the tongue. However, it can also indicate that you have a yeast infection or have bile or liver problems. If tongue cleaning doesn’t solve the problem, you should see a doctor and get the trigger cleared. Also, note our natural home remedies for lowering liver values ​​or our tips on becoming a non-smoker.

The brownish coating on the tongue

Food such as coffee or black tea can also play a role here. And habits like smoking can also cause a brown discoloration. In addition, you can recognize a disorder of the intestine with a brown tongue coating. It can also be an indication of kidney failure. Please also note our article on home remedies for colon cleansing.

Home remedies to clean the coated tongue

As long as your tongue is not heavily coated and does not show any unusual discoloration, you can clean your coated tongue with natural home remedies. Consequently, removing the coating on the tongue is easy and effective against bad breath, caries, or periodontitis. We have collected the best natural methods for you. In addition, note our contribution to oral care for clean teeth.

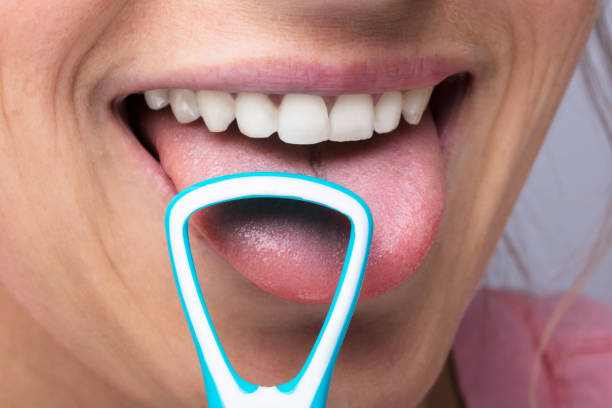
1) Cleaning with a tongue scraper

The easiest way to clean your coated tongue is to use a tongue scraper. In India, this has long been used to clean the tongue every day. This allows you to effectively remove bacteria and tongue coating. You have to put the tongue scraper on the back of the tongue. Then gently pull forward to the tip of the tongue with a little pressure. Then rinse off the residue sticking to the scraper with water and repeat the process until the scraper stays clean. Also, note our tips and home remedies for removing plaque.

2) Regular oil pulling

Traditional oil pulling is said to have a positive impact on dental and oral health. Because regular use kills bacteria and the body is supported in detoxification. Before oil pulling, the tongue is cleaned with a scraper. Then take a tablespoon of the effective coconut oil (or another oil) into your mouth and draw it back and forth through your teeth for about 20 minutes. Finally, you have to spit out the liquid. In addition, it is said to whiten teeth naturally.

3) Mouthwash against the coated tongue

Excessive tongue coating often causes bad breath. Therefore, you should effectively remove the tongue coating. Use a mouthwash for this. Since the chemical mouthwashes from the drugstore are usually aggressive, you can simply make a saline solution yourself. To do this, dissolve 1 teaspoon of salt in 250 ml of water. Then gargle with this mixture for 2-3 minutes. So you have a good home remedy for bad breath and can effectively relieve inflammation in the mouth.

If your hands are very dirty after cleaning the house, cooking, or gardening, lemon juice is a simple and effective way to clean them. Lemon juice works wonders not only for short-term cleaning of the hands but also for long-term care.

Cleansing with lemon juice

Rub your hands with the juice of half a lemon, leave it on for a moment and then wash your hands as normal with soap. Cleaning with lemon juice is also a great help against discoloration, e.g. from carrots or cherries, and against odors, such as the smell of fish or onions.

Every housewife has at least once experienced that a pot has been set on fire. You have just put the food on the stove and just want to hang up the laundry or clean the apartment with the vacuum cleaner, then you pick up an all too familiar scent, leave everything and rush into the kitchen. Then you see the mess! Not only is the food gone, but no, but the pot also doesn’t seem to be salvageable, either.

Grandma’s advice on burnt pots

She said to me, “Child, you’re going to clean the pot as much as you can. Fill it halfway with water and add 2-3 tablespoons of washing powder. Mix well. Bring it to a boil on the stove and let it soak overnight. The next day you boil the liquid again and try to slowly loosen the bottom of the burnt with a flat wooden spoon. It will be all right.”

And she was right. The pot came out like new again and I didn’t have that much scrubbing or scraping work. Because that way the burned-in substance comes off almost by itself and the pot is not damaged. Also, note tips for overcooking and preventing food from burning.