Tag

clean

Browsing

Wash and thoroughly clean the Lego bricks with our household tips. Also suitable for Lego toys, entire Lego sets, or Lego collections. Cleaning and cleaning Lego bricks made easy. Maybe you know this too – you bought a large bag of used Lego bricks at a flea market or you got your own bricks back from the attic or from the basement years later and the bricks are so dirty that you don’t want to give them to your child to play with?

Wash Lego bricks in the washing machine

Then there is a very simple solution: instead of laboriously scrubbing each stone clean by hand, you can wash the entire stone in the washing machine! So that no small stones disappear in the nirvana of the washing machine, it is best to use a washing net with a zipper (used for delicate textiles such as sweaters or bras), alternatively, you can also use a pillowcase and tie it tightly. Simply fill in the stones, pop the bag in the washing machine and wash the stones at 30 degrees with detergent without bleach. Then spread the stones out on a blanket or towel to dry.

Clean up after the Lego bricks

After washing and cleaning the Lego bricks, the Lego bricks and Lego toys are finally thoroughly clean again. And ready for many new children’s building projects. As soon as the Lego bricks get dirty in the future, simply start a new wash cycle.

Cleaning copper and cleaning copper made it easy. We give you tips and tricks on how you can easily clean your copper without expensive special agents. Especially if you still have old copper objects at home, you often have to clean and polish copper whenever the copper turns green. If you want to save money around the house, you can make specialty cleaners yourself using things around the house. You will no longer have to buy expensive special cleaners. Simple household ingredients will help you easily clean copper and polish your copper.

The cause is green or gray tarnishing copper

After some time, copper tarnishes and turns green. Then the copper loses its beautiful shine and looks very unattractive and dirty. Copper discolors because copper oxidizes with oxygen and copper oxide forms on the surface. As a rule, expensive special cleaning agents for copper are then used. However, you only need the copper cleaning agents for this one special treatment and the agent stagnates or just stands around uselessly and the money was wasted in vain.

1) Clean copper with lemon

There is no need to buy expensive cleaning agents to bring copper back to shine. It is sufficient if you rub the copper part with the flesh of a divided lemon, let the juice work in and then polish it with a soft cloth. You can also simply sprinkle some salt on the cut side of a lemon half to get the same effect. Usually, the juice of half a lemon is enough to clean copper and make it shine again.

2) Clean copper with buttermilk

Mix buttermilk with a little salt and stir this mixture well. You can rub the copper in with this salted buttermilk and leave it on for a few minutes. After a while, wipe off the milk with a dry cloth and polish the copper thoroughly. You’ll see that the homemade buttermilk solution has a similar effect to an expensive drugstore copper cleaner.

3) Vinegar and salt cleaner against copper stains

A special cleaner made of water with vinegar and salt is also possible for the copper. To do this, simply mix 10 ml of vinegar concentrate with 500 ml of water and then add a tablespoon of salt. Then rub onto the copper object with a cloth and leave to take effect. Especially with small copper parts, such as copper coins that have darkened, you can put the copper in the solution and leave it to work for longer.

4) Salt paste with vinegar for hard to reach places

A paste made of salt and vinegar is suitable for cleaning cracks and other hard-to-reach places. Simply mix together enough salt and vinegar to form a salty paste. Then put the paste on a toothbrush like toothpaste and rub it thoroughly into the hard-to-reach areas and leave it to take effect. After a few minutes, simply wash off the salt mush with water and let the copper object air dry.

5) Clean copper with sauerkraut juice

You can also clean your copper with the juice from the sauerkraut. Leave the copper in the sauerkraut juice for some time and then wash the copper off with water. Then let the copper object dry well and polish it.

6) Clean copper with toothpaste

To clean copper you can apply a thick layer of toothpaste. After the toothpaste has dried and taken effect, you can wash it off with water. Then rub the copper objects dry and polish them. So you can also clean silver easily.

Tips and tricks for sharpening knives and cleaning knives properly. Anyone who likes to cook a lot certainly has at least one favorite knife that they prefer to work with. Because without a really good and above all sharp knife, at least the preparation of the cooking is not much fun.

Clean knives

To keep your knife as sharp as you love it, you should definitely consider the following tip: Always clean your knife by hand and do not put it in the dishwasher! Cleaning knives in the dishwasher will dull them.

To sharpen a knife

In addition, a knife that is used every day should be sharpened regularly, about once a week. It is best to use sharpening steel for this. The knife should be moved over the steel with light pressure at an angle of approx. 20° from the handle to the tip. Be sure to sand both sides evenly. Also, note how you can sharpen blunt scissors and use other useful kitchen aids.

Clean and thoroughly clean chopping boards and kitchen boards made of wood with home remedies. If you want to give a wooden cutting board or breadboard a thorough clean, don’t usually set it up with soapy water because over time bacteria and germs will build up in the cutting grooves and it wouldn’t be entirely clean. There is a very efficient trick to getting your cutting boards and breadboards clean and tidy:

Clean kitchen boards with the microwave

To clean the cutting boards, place the boards in the microwave and allow only the germs to heat up and die. Then you can wash the cutting boards as normal, preferably in the dishwasher. The nice side effect of the microwave is that the unpleasant smell of old wooden chopping boards also disappears. So first the microwave and then the dishwasher and you have nice, fresh cutting boards at home again. In addition, note other sources of germs in the household and find out how you can effectively eliminate them.

Clean kitchen boards and remove odors

Do you regularly use wooden cutting boards, e.g. for breakfast or as a cutting board when preparing food? Then you have probably already experienced that some foods leave stubborn stains or odors on them. But removing these odors is easy to do: Use a lemon to clean.

So just rub the boards with lemon and then apply toothpaste. After a few minutes, simply rinse off the toothpaste thoroughly. This simple cleaning method not only removes stains but also stubborn odors.

Maintain teak boards

Teak boards are easy and quick to care for. Teak boards should be rubbed with ordinary cooking oil in a circular motion from time to time. This maintains the teak board

Cleaning contact lenses is made easy. Many useful tips for cleaning contact lenses with instructions. Now cleverly clean contact lenses and care for contact lenses. Roughly summarized, all types of contact lenses need care products, because intensive and correct cleaning, disinfection, and storage not only maintain the general wearing comfort but ultimately of course also the health of the eyes!

By constantly wearing contact lenses, deposits can form on the surface of the lenses, and here all dirt and dust particles are an ideal breeding ground for germs. The consequences here can be reddened and dry eyes, as well as the general wearing comfort, can decrease. In order to be able to benefit from the advantages of contact lenses in the long term, you have to clean and care for them regularly – here are a few tips.

Clean contact lenses

The question often arises of whether glasses or contact lenses can be worn with sensitive eyes. You have to make a very individual decision. However, it is very important to use and clean the contact lenses properly. Basically, you should only touch contact lenses if you have washed your hands thoroughly beforehand.

If you prefer cleaning in the evening, it is advisable to carry out an additional manual pre-cleaning beforehand: To do this, simply rub the lens between your fingers with a few drops of table salt or a so-called all-in-one solution and rinse it then rinse off with clear water. In this way, any residual particles are removed. Then you should disinfect the lenses in a storage solution, in a lens case provided for this purpose, in which you can optimally store the contact lenses overnight.

Care for contact lenses

Caring for contact lenses and the choice of care product for contact lenses differs depending on the type of lens: Various care systems are available, which differ between all-in-one solutions and peroxide systems:

  • All-in-one solutions are easy to use and are considered to be extremely convenient because they are suitable for all care steps.
  • Peroxide systems use the cleaning power of hydrogen peroxide and are particularly suitable for sensitive eyes.

In addition, you should treat your contact lenses with extra care with protein removal tablets once a week, and the lens case should also be cleaned regularly, at least every three months. This is how you can combat and avoid burning eyes.

Lots of tips for cleaning the microwave and tricks for cleaning the microwave thoroughly. It is not always possible to immediately remove greasy splashes and dirt after heating food in the microwave. The very next day, these present themselves as sticky, stubborn monsters that require considerable effort to remove. But there are effective cleaning methods from grandma’s box of tricks that do not require chemicals, are easy to use, and are also available in every household.

Clean the microwave with steam

Grease and light soiling can be easily removed with steam. Simply place 1/2 cup of water in the microwave and heat on the highest setting for 3-4 minutes. The interior of the device is misted, the steam, which easily gets into all corners, loosens dirt and grease. Carefully remove the mug from the microwave. Finally, wipe well with a cloth.

Clean the microwave with citric acid

Here, 2-3 slices of lemon are added to a cup of water. Now heat the whole thing in the microwave for about 5 minutes at the highest level. Then wipe off with a sponge or cloth. This method works according to the same method as cleaning with steam, but cleaning with citric acid is a little more intensive – i.e. also suitable for heavier soiling – and also smells good. The same effect can also be achieved with vinegar. Here the lemon is replaced by vinegar.

Clean the microwave with washing-up liquid

Place a large bowl in the microwave with a squirt of dish soap and heat on high for about 1 minute. Then leave it on for a few minutes. The “soap vapor” softens the dirt and encrustations. Now just wipe with a damp cloth.

Clean the microwave oven housing

The microwave should not only be hygienically clean on the inside but also shine on the outside. But especially devices with stainless steel housing cause some housewives to despair because of the constant finger taps. If, on the other hand, you rub the stainless steel housing sparingly with baby oil and then polish it thoroughly with a soft kitchen towel, you do not only get a clean and shiny surface, but you also have peace of mind from annoying fingerprints for about 6 weeks.

An everyday tip for cleaning skylights and Velux windows is to wipe and dry with a broom handle. Conventional window wipers often leave stripes and streaks in the hard-to-reach corners of the outside area. With simple tools, cleaning windows is easy to do without a ladder. All you need is a broomstick, a microfiber cloth, and hot soapy water – a glass scraper or a simple razor blade will help with very stubborn dirt.

Cleaning the skylight

Anyone who has sloping walls in their home knows the problem of dirty Velux windows. Either the windows cannot be turned far enough so that you could get into every corner of the outside window when cleaning and there are streaks or deposits in the areas that cannot be reached, or the windows are mounted so high that cleaning is not possible without a ladder or stool, let alone removing more stubborn dirt.

Cleaning the Velux windows

Since I’m only 1.60m tall, I’ve always had problems reaching the upper window frontage. I used to clean the windows with one of the commercially available window wipers with a telescopic rod, but I always had the problem of the window corners not really being wiped clean, especially on the outside of the Velux windows. Today I use a simple microfiber cloth and regular hot soapy water – I wrap the microfiber cloth around a broom handle long enough for me to reach every corner. The pressure that you exert on the window with this handle is enough to easily remove even more stubborn stains and deposits.

Dry skylight

I do the same thing with a broomstick to dry the windows. Incidentally, the microfiber cloth absorbs so well that no streaks or streaks remain. The broomstick also gets into every corner of the window when drying, from the outside and from the inside. The entire window area is quickly dried in this way.

Remove stubborn dirt

Very rarely there is dirt on Velux windows that cannot be removed with normal hot soapy water, for example, deposits such as cement or fungi that also settle on roofs. For this purpose, you can easily use a glass scraper for a ceramic hob in the lower area of ​​a Velux window. But you can’t get to the upper area again. For this purpose, I bought very simple razor blades, which I carefully hammer into the handle end of the broom with the help of a hammer. There they stay firmly in place, allowing the deposits on the glass surface of the Velux window to be scraped off.

Ind and weather leave rust on the grill grate and stains on the whole grill. Not very appetizing and above all unhygienic.

In an hour the guests will be at the door and you have just discovered that your grill has suffered over the winter. Rusty spots and stains everywhere. Unhygienic and unaesthetic! Of course, you don’t want to expect that from any guest. There are a few simple tricks to avoid embarrassment and raised eyebrows without having to rush to get a new grill.

Also, note the tips on charcoal and types of charcoal and the clever tips for grilling vegetables.

Remove rust stains on grillage with aluminum foil

To remove the rusty spots, there is a quick and easy housewife tip. Wrap the grill grate tightly in household aluminum foil. Make sure that the foil is firmly pressed together at the edges. It is also important that aluminum foil encloses the grill grate airtight. Hang the packed grill grate over the glowing charcoal for about ten minutes as if you wanted to grill normally. Then simply set it aside to cool. After the grate has cooled, you can remove the aluminum foil. The rust spots are gone. Now just wipe again and the guests can stand in front of the door.

Clean the grill grate with newspaper

The easiest way to get any grill clean again without any effort: Cover the grill grate with wet newspaper immediately after it has cooled down. The encrustations can be easily removed after soaking with a sponge and washing-up liquid. You can also put the grill grate on the meadow or in the grass overnight. This allows the wet grass to soak overnight and the morning dew to soak. Moisture softens the hard incrustations. The next morning you can simply remove it with a newspaper

Cleaning the grill grate with ashes

When grilling with charcoal, the ash can be used to clean up. Simply rub the grill grate with a damp old cloth and the ashes from the grill. A mash of ash will write off the grill crusts. Then rinse the grill grate with water. As a side effect, you can use the ash mixture in the garden as fertilizer. Ash is a natural fertilizer.

Prevent rust stains on the grill

To protect the cleaned grill grate from stains, it is best to grease it with cooking oil before each use. This protects the rust but is also suitable for consumption at the same time. Be careful not to use too much oil so that none of it drips into the fire later. You should also make sure that the grate is always dried well after cleaning with water.

Let the grill shine with coffee grounds

To clean the body of the grill, remove the grate. Sprinkle your old coffee grounds (e.g. from breakfast) on the grill. This tip works best when the grill is still slightly warm, but a cold grill also comes out clean. However, you should not use this tip immediately after the fire has been extinguished. Wipe vigorously. The grill is cleaned quickly, gently, and above all without toxic chemicals. Stains and burnt-on grill residue are sanded off by the coffee powder. The result is amazing!

Caring for parquet well is uncomplicated, but takes some time. Only if you clean your wooden floor properly and care for it with the right products will you be able to maintain its attractive appearance. Parquet floors made of wood always look particularly elegant and are therefore very popular. But they only stay that special if you take good care of them.

The basic cleaning works very easily with a broom or vacuum cleaner, for larger dirt with a slightly damp wiper. Since parquet tends to be damaged by too much water, everything should be dried well afterward. Special parquet care products help to preserve the look and shine of the parquet.

Removing stains when caring for parquet

If you walk across the parquet floor in shoes, there are sometimes unsightly contaminations caused by rubber abrasion. These can be easily removed with lukewarm water to which a dash of ordinary dishwashing liquid is added. Vinegar cleaner can also be used.

These agents can also be used to rub off other dirt such as grease stains or sticky substances. Very stubborn stains of all kinds can be counteracted with a mixture of water and alcohol in equal parts. So you can also remove wax stains and even chewing gum. Also, note tricks for removing wax stains from wood and how to remove grease stains from wood.

The biggest mistakes when caring for parquet

It would be fundamentally wrong to use scouring agents for stubborn dirt because the parquet can be scratched so easily. You should also avoid cleaners that contain too many aggressive ingredients, as they attack the parquet. Ammonia should also not appear on the detergent label.

Auxiliary devices such as steam cleaners are also taboo, as they cause the parquet to swell due to the high level of moisture. In general, the following applies to care: Always dry well. See also what you should consider when cleaning marble floors. Here, too, certain cleaning agents can cause damage.

The correct cleaning agent for every type of parquet

In addition to proper cleaning to care for the parquet, it should also be thoroughly cleaned with special parquet care products. If the parquet is sealed, this does not have to happen more than twice a year. It is important to apply the cleaner sparingly because this is the best way to achieve the desired effect. In addition to the sealed floors, there is also a waxed parquet, where it is sufficient to apply fresh wax once a year.

Like solid furniture, oiled floors can be treated with the right oil at irregular intervals, as desired. For each type of parquet floor, there are special means to buy. Always using the right maintenance product for the right floor is important. Here you should also use a higher quality product and not save at the wrong end. Also, note the informative guide to laying vinyl floors.

Oiled or sealed?

Oiled and sealed parquet floors have about the same importance in terms of quality and care. Both can be cleaned normally with special cleaning agents. Depending on the wear and tear, it can take years for oiled parquet floors to require further oiling. This is not easy and most people who are not technically gifted prefer to leave it to a professional. If you do not want to have oiled floors oiled by a specialist, you should make sure that you use a high-quality oil, preferably without solvents.

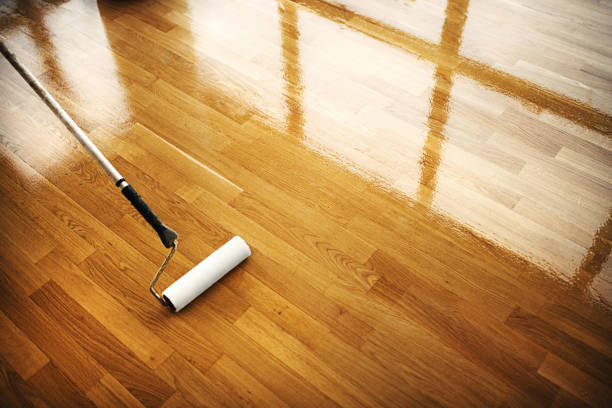
Ventilation is still essential when oiling, not only because of possible pollutants in the air from the contents of the oil but also because a good, constant room climate helps to achieve the desired result. The easiest way to apply the oil is with a brush or paint roller.

Excess oil is removed again after a short period of exposure. If there is too much oil on the floor, there may be stains. A normal rubber wiper is suitable for removing. Then work the oil into the soil with circular movements using a cloth. In addition, read useful tips for wiping the floor and note useful tips for cleaning the fireplace.

All tips for cleaning the ceramic hob and cleaning the ceramic at a glance. In this way, the glass-ceramic becomes really clean again. Now thoroughly clean the ceramic with a ceramic hob scraper and ceramic hob cleaner.

In order to always have a clean stove, the ceramic hobs must be cleaned regularly. In the best case, this is done after each preparation of a meal, since the impurities have little time to burn onto the plate. If this happens, it is extremely difficult to get them clean again.

1) Clean Ceran with a cloth or sponge

The easiest way to remove the dirt is to use a cloth or sponge and some washing-up liquid to counteract the residue on the stove. This turns out to be very easy and quick. It should be noted that only dirt can be removed that has not yet firmly settled. If the residue has already dried up, some water must be used to soften it.

2) Use of a special ceramic hob scraper

You can purchase this at many retail or specialty stores. It was designed precisely for this type of problem. Despite the attached sharp blade, the hob will not be scratched. The advantage is that you can quickly remove even dried-on leftovers with little effort.

3) Clean dishwasher tabs for the ceramic hob

If you do not have a scraper and you want to remove the dirt quickly, a successful way is to use a dishwasher tab. Dissolve this in some water. The consistency should not be too runny and comparable to toothpaste. Now put the mixture on the dirty hotplate and give the tab time to spread its effects. After that, take a damp cloth and wipe the stove. You will notice that the dirt has dissolved and can be wiped away. Wipe again with a dry cloth and the hob will look like new.

4) Use ceramic hob cleaner

A special ceramic hob cleaner is cheap and a fast, very reliable method. The active formula of this special cleaner is specially designed for stubborn burns.

5) Clean the lemon juice to the ceramic hob

If you don’t want to work with the “chemical club” and you prefer biological solutions, there is a solution for this that is simple and quick. Take lemon juice and drizzle it on the dirty spots. It doesn’t matter whether you use fresh lemon or prepackaged juice, which can be found in almost every household. The acid attacks the leftovers and after a few minutes, you only have to wipe away the leftovers with a damp cloth.

6) Baking powder for cleaning ceramic hob

Another biological and quick-to-use way that leads to success is the use of baking soda. Because it can be found or bought cheaply in every well-stocked household. The powder is mixed with water to form a paste-like substance and then applied to the dirt. After a short exposure time of a few minutes, the areas are wiped off with a damp cloth. You will notice that the impurities now come off very easily. Rework with a dry cloth and the cooker looks like new.

7) Repurpose cleaning substances

There are also other cleaning agents that can be used to remove dirt. For example, they can decide to use a window cleaner. Sprays that are intended for the oven are also very successful.