Instructions for thorough mattress cleaning and successful stain removal. Our housewife tips help to keep the mattress fresh and attractive over a longer period of time without great expense.
Most people spend more than a third of the day in bed on their mattresses. Over time, more and more sweat, skin flakes and other dirt accumulated in this area. On the one hand, this leads to an unsightly appearance and, on the other hand, it promotes the spread of mites.
Good reasons to clean your mattress
A mattress is a place where we spend a lot of time. So you should clean them regularly. Because up to 10 million house dust mites live in the bed. The small arachnids are basically harmless. However, their excretions can trigger house dust mite allergies in sensitive people. Possible signs of a mite allergy are sneezing attacks or a stuffy nose. In addition, sweat and skin flakes accumulate over months and years. And stains can also appear on the mattress.
Mattress cleaning methods
There are several methods you can use to clean your mattress. Likewise, you should perform some methods regularly. While intensive cleaning is only necessary once a year. But the rule is: the more often, the better. You should definitely air, turn and brush your mattress regularly. Proper care of the bedding is also important. In the following, we will show you which methods you can use to get your mattress clean again.
1) Wash mattress cover
If you have a removable cover, you can most likely machine wash it. This is the easiest way to clean your mattress. But before doing so, be sure to read the information on the care label. Because using the right temperature (often max. 60 degrees) and a recommended detergent are important. Then let it air dry. Or if possible in a good tumble dryer.
2) Dry cleaning with baking soda
This quick mattress cleaning is good for in between. To do this, first remove any hair, dander, and dirt from your mattress with a brush. Then spread baking soda evenly and leave it on for a few hours. It is a good help for odor neutralization. It also kills germs, fungi, and bacteria. You can then vacuum up the powder with the vacuum cleaner. Repeat this cleaning every 3-4 months on both sides of the mattress.
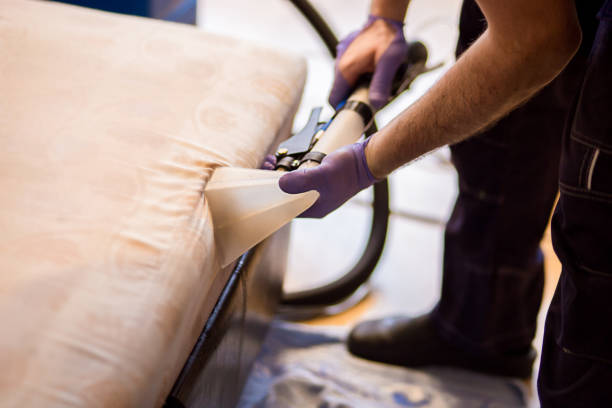
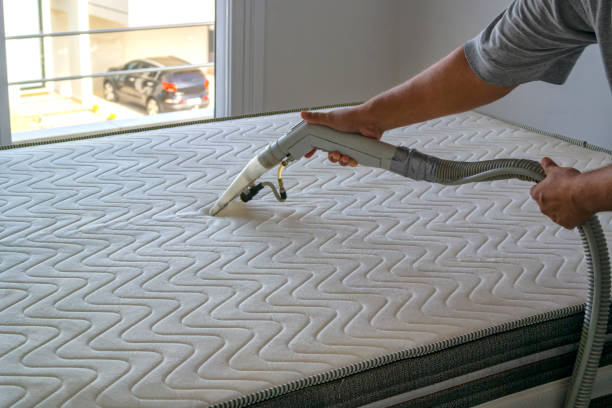
3) Damp cleaning of the mattress
You should also damp clean your mattress once a year. You will also need baking soda for this. Spread the powder on your mattress. Then rub it in with a damp, warm sponge. The combination of hot water and baking soda creates an alkaline solution. As a result, proteins and fats are broken down. After the paste has dried on the mattress, you can simply vacuum it up.
More tips for a clean mattress
In addition to cleaning your mattress regularly, there are a few things you should keep in mind. We give you tips on fighting dust mites, choosing the right mattress, and removing stains.
4) Control of mites
Regular cleaning of your mattress with baking soda helps against dust mites. In addition, the powder not only has a disinfecting effect but also removes mold. It also eliminates unpleasant odors. In addition, you can carry out the treatment with baking soda both dry and wet, as described above. Other tips against house dust mites or an anti-mite vacuum cleaner can also help you.
5) Fight mold
Stains caused by moisture, such as mold or stick, should be removed quickly. Therefore, it is best to place the mattress outdoors so that it can air out well. Then vacuum your mattress thoroughly with the vacuum cleaner. So that the mold spores do not spread elsewhere, dispose of the vacuum cleaner bag in the garbage can. You can also remove stubborn stains with rubbing alcohol, which you can get at the pharmacy. So put the alcohol on a sponge and rub away the mold and mildew stains with the solution. Mold is a serious issue. And don’t underestimate the dangers of mold. Therefore, also note our other tips for removing mold. If the mold infestation is too severe, it is better to replace your mattress, as the spores are harmful to your health.
6) Choose the right mattress
Some mattresses are more prone to certain stains than others. This means that sweat stains can develop more quickly on cold or thermal foam mattresses due to their material properties. These include, for example, the innerspring mattresses. Waterbeds and latex mattresses are more insensitive to liquids, as they do not absorb liquids due to their material properties.
But of course, this only applies to the mattresses themselves – there can still be a lot of stains on the covers. Unless they are provided with a liquid-repellent pad. Therefore, when buying a new mattress, pay attention not only to the inner values but also to the cover. Because if this is easily removable and washable at least 60°, you can confidently drink your coffee in bed. Also, note other tips for buying a mattress.
7) Avoid mattress protectors
A real mattress no-go: mattress protectors. Their use is already clear from the name – they should protect the mattresses. Unfortunately, this is only partially true. While such a protector does protect the mattress from moisture, it can also create more serious problems inside the mattress. Air circulation is impeded by mattress protectors so that mold can form inside. It is not advisable to use these supposed helpers. If you still want one, you will find a wide variety of mattress toppers, and when choosing one you should make sure that it is of good quality.
Remove stains, but how?
Who doesn’t know it: Sunday breakfast is often spent in bed. But at least once a year it happens that the coffee cup suddenly becomes independent. Result – a soiled mattress. or do you have children Then you can surely sing a little song about stains? No matter how careful you are, something always goes wrong. That’s why we’re giving you tips on how to get rid of the top 4 mattress stains. You will also receive further tips with regard to the correct cleaning and selection of your mattress.