Tag

cooking

Browsing

Cooked, baked or raw – you can prepare celery in many ways. We provide you with recipes and tips for celery and celeriac.

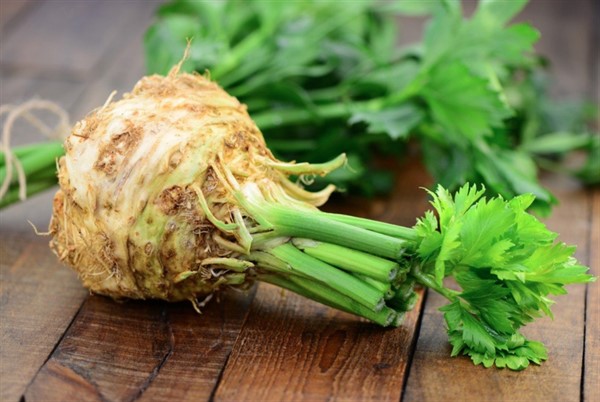
Celeriac and celery are two varieties of the same species – the “true celery”. While they look quite different, both have the distinctive celery aroma. However, celeriac tastes a little more intense than celery.

Both varieties are low in calories and contain many healthy nutrients:

vitamins B1, B2, B6 and C
various minerals, especially potassium
secondary plant substances
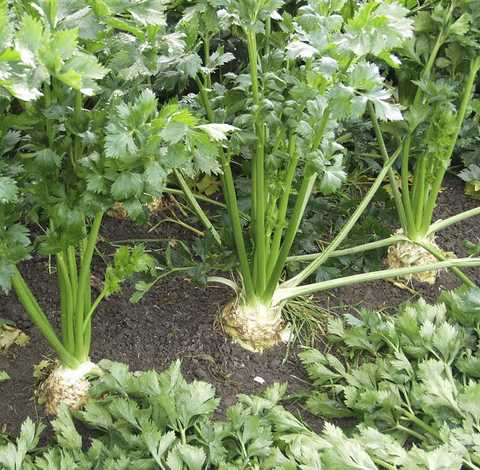
Celery is one of the vegetables that you can get from German cultivation for many months. Since celeriac can be stored very well, you can even get it all year round. The season of stalks and celeriac starts in May and July respectively and lasts until November.

If possible, buy celery from organic farms, as they do not use chemical-synthetic pesticides. You can tell freshness from celery by the fact that the stalks are crisp and cannot be bent. Otherwise, you should make sure that there are no rotten spots on either type of celery.

You can store celeriac in the vegetable compartment of your refrigerator or in the cellar for weeks. However, you should prepare celery early. It will keep in the vegetable drawer for a maximum of two weeks before it becomes soft.

Tip: In season, you can sometimes buy celeriac with the greens. The leaves have an intense celery flavor – you can freeze them chopped up and use them gradually to flavor dishes.

Cooking celery: You have these options

Before preparing it, it is advisable to peel and clean the celery. If you don’t mind the slightly fibrous texture of the peel, you can leave it on. It gets softer when you cook it anyway. You can also use the leaves of the celery.

You can eat celery raw. The easiest way is to eat the stalks whole with a dip. But the crunchy vegetables are also good for salads and smoothies.

You can also cook celery. In Italy, celery is even part of the soup greens, called sofrito. If you cook celery longer, it becomes milder and is suitable as an ingredient in many soups and stews.

Cook Celeriac: Raw and Cooked

Celeriac also tastes good raw – but since it is quite hard, it is best to grate it finely for salads. A classic salad with celeriac is the Waldorf salad. In addition to celeriac, it contains apples, onions, a mayonnaise dressing and walnuts.

Cooking celeriac is more common. In this country it is part of the soup greens and thus the basis of many soups, stews and broths. Before you prepare the celeriac, you usually peel it and cut it into small cubes. Celeriac only takes about 10 to 15 minutes to cook.

Tip: Prepare our celery soup or a potato and celery puree, for example.

For a celery schnitzel, on the other hand, cut the peeled celeriac into thick slices and cook them for about ten minutes until al dente. Then you drain them well, bread them and fry them.

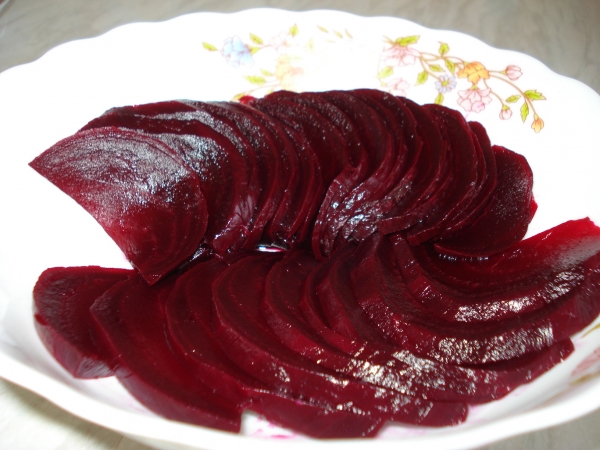
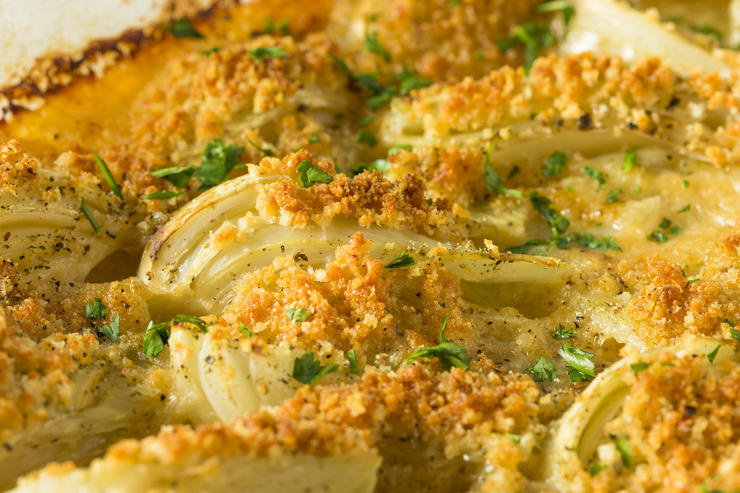
You can also cook celeriac whole in the oven with the skin on. This is not a typical preparation method – but one that is worthwhile: At some point the sugar under the skin of the celery begins to caramelize and provides delicious aromas. Below we show you a recipe for baked celeriac. It is quite time-consuming and uses a lot of energy and is therefore more suitable for rare occasions. Since the celery only tastes faintly of celery after the long baking time, you can also use it to convince some celery skeptics.

The baked celery is so aromatic that you can prepare it on its own or with some crème fraîche. But it also goes very well with Asian dishes.

Cook celeriac: recipe for baked celery

Ingredients:

1celery (approx. 1 kg)
4 tablespoons olive oil
1 tsp salt

Directions:

Remove the roots of the celery, then wash and trim it thoroughly.
Prick the celery evenly all over with a fork and place it on a baking sheet lined with baking paper or an ecological substitute for baking paper.
Mix the oil and salt together and rub all over the celery root.
Place the tray in the oven and bake the celery at 170 degrees for about two and a half hours. Celery juice leaks out when baking. Sprinkle the bulb with it about every 20 minutes. When the juice turns brownish, the sugar in the celery has started to caramelize.
Take the tuber out of the oven and let it rest for 10 to 15 minutes. Then cut them into slices (the bulb should be buttery soft) and spread the cut surfaces with the celery caramel. Now you can briefly grill the wedges in the oven if you want to brown the cut surfaces as well. Or you can enjoy the prepared celery directly.

If you want to cook asparagus, you should read this guide. You have to cook asparagus gently and over low heat. Here you can find out what else you need to know about white and green asparagus.

If you want to cook asparagus, you should know the following: White and green asparagus differ not only in appearance, but also in harvesting and cooking time. White asparagus grows underground, green asparagus above ground, and the latter therefore cooks much faster than white asparagus.

Cooking white asparagus: Cooking time and cooking test

Here’s what you need to cook white asparagus for two:

1 kg of white asparagus spears
2 tsp salt
1 tsp butter or vegan margarine
1 pinch of sugar
optional: 1 slice of organic lemon
How to cook white asparagus:

Peel the asparagus first. Because even if you cook the skin of the white asparagus longer, it will not become soft.
Place the asparagus spears in a large pot or pan of boiling water. It is important that the poles are completely covered with water.
Add salt, sugar and butter or margarine. The sugar softens possible bitter substances. You can also add a slice of organic lemon. This provides a slightly fresher taste and makes the white asparagus shine.
Briefly boil the asparagus and then let it cook over low heat. How long depends on the thickness of the asparagus spears. A rule of thumb:
Grade I: cook for 10 to 15 minutes
Grade II: cook for 8 to 10 minutes
Cooking test: If you lift the asparagus spears with a fork, they will bend downwards. Depending on whether you want the asparagus to be soft or al dente, they should bend more or less. If you want to be absolutely sure, you can pierce the ends of the asparagus spears with a knife – the asparagus tastes best when it is soft and yet has resistance.

Tip: Asparagus works particularly well in an asparagus pot. Place the asparagus spears upright so you can cook them standing up. However, this does not change the cooking time. You can prepare the white asparagus particularly gently in the steamer. At 100 degrees Celsius, the asparagus spears also need between ten and 15 minutes.

Boil or fry green asparagus

To peel green asparagus you only have to remove the outer layer in the lower third. The shell in the upper area is very soft.

How to cook green asparagus:

Add two teaspoons of salt, a pinch of sugar and a slice of organic lemon to the cooking water and let the asparagus spears cook over low heat.
Green asparagus is ready after just six to eight minutes. If you have very thin sticks, they can be cooked after five minutes.
Never cook green asparagus in water for too long. Otherwise the asparagus head will quickly become mushy.
You can also find out whether the asparagus are ready with the green asparagus with the fork test or by piercing them (see white asparagus).
Fry green asparagus:

Put some oil or butter in a pan.
Fry the asparagus spears or asparagus pieces over high heat for about five minutes.
Turn them regularly.
Then season them with salt and white pepper.

Recipe tip: Make a soup from asparagus broth

When the asparagus is done, the asparagus water remains. You can use this to cook a delicious asparagus soup instead of pouring the broth away. You need the following ingredients per liter of asparagus water:

200 ml organic cream or vegetable cream substitute,
2 tbsp butter or margarine
2 tablespoons organic flour,
some salt, pepper and fresh chives.
Preparation:

Put the butter or margarine in a saucepan and heat it up.
Put some flour in the saucepan and mix it with the melted butter to make a roux.
Mix the finished roux with the asparagus water and the cream.
Thicken the soup with some flour dissolved in water if it is too runny for you.
Then all you have to do is boil them up and season with salt and pepper.

Shopping tips for asparagus

Even if the first asparagus is often available in the supermarkets in March, the asparagus season in Germany does not start until mid-April. Bad weather can also delay the harvest time for asparagus cultivation by up to eight weeks.

The asparagus in March, on the other hand, comes from heated fields that are often covered with plastic sheeting. High energy consumption and unnecessary plastic make asparagus a small environmental sin. Imported asparagus is also not recommended, since the long transport routes lead to high CO2 emissions.

If you want to cook asparagus, it is best to buy it from the region and if possible in organic quality. This is how you can be sure that the asparagus is free of chemical-synthetic pesticides.

Cooked chickpeas are delicious, healthy and add variety to your diet. We show you how you can easily prepare them yourself and when you have to soak the chickpeas.

The chickpea, which originated in Asia, came to Europe in the Middle Ages and is very popular today. Whether in curries, salads, falafel or hummus – the buttery-nutty-tasting legume gives many dishes an oriental touch and is also very healthy.

Never eat chickpeas raw

Organic chickpeas are commercially available in two forms:

as a pre-cooked preserve in a jar or in a can
raw and dried
If you are in a hurry, you can use the pre-cooked chickpeas directly. Do not throw away the chickpea water from the jar or can, you can use the aquafaba as vegan egg whites.

Dried chickpeas, on the other hand, have to be soaked and cooked first. If you cook the raw chickpeas, the toxin phasin they contain is destroyed and makes the valuable legume safe for us to eat. Caution: You have to throw away the soaking water in which the raw chickpeas were, because the toxin phasin dissolves in the water during soaking. The chickpeas and the cooking water can only be eaten after cooking.

Soaking chickpeas – time-consuming, but useful

Soaking the chickpeas takes time. It is best to plan one night for this. However, the time investment pays off: If you have soaked the chickpeas, they will be easier to digest. In addition, it shortens the subsequent cooking time considerably and thus allows energy-saving preparation that is gentle on vital substances.

How to properly soak chickpeas:

In a saucepan, cover the chickpeas with twice the amount of water and let them soak for at least 12 hours.
During the swelling period, the chickpeas absorb a lot of water. You may have to add a little more water if necessary.
Discard the soaking water afterwards to remove any residue of the toxin phasin.
Rinse the chickpeas thoroughly with fresh water.

How to properly cook chickpeas

You can boil the chickpeas in water the classic way:

Place the soaked chickpeas in a pressure cooker.
Cover them with fresh water. Make sure that the top third of the pressure cooker remains free.
Close the pot and set steam pressure level 2.
If the lid starts to hiss, turn off the stove or reduce the heat significantly.
After 20 minutes, open the lid as instructed in the pressure cooker instructions.
The chickpeas are done when you can easily mash them with a fork.
Put the chickpeas in a colander and rinse them with fresh water.
Tip: If you don’t have a pressure cooker, the peas will need to cook longer—at least an hour. Basically, the longer the chickpeas were soaked beforehand, the faster they will cook. That saves energy. If you let them soak in water for 24 hours, the cooking time in the pressure cooker is reduced to just ten minutes.

The cooking time also depends on whether you need the chickpeas buttery soft for making hummus or still al dente for use in curry or salad.

Another rule: the fresher the chickpeas are, the shorter they need to cook.

Chickpeas – not only delicious, but also healthy!

Chickpeas not only taste delicious, but are also extremely healthy. Chickpeas have these nutritional values:

With their high fiber content, they promote healthy digestion.
They have a high protein content and are therefore a vegetable protein source.
The legumes contain notable amounts of iron, zinc and magnesium.
Chickpeas are low in calories and fill you up at the same time.

Here you will learn how to cook buckwheat and what delicious dishes you can prepare with it. Also: why it is healthy and suitable for a gluten-free diet.

Cooking buckwheat: how it works

Buckwheat is traditionally very common in Russian cuisine. It can be used in different ways and for different dishes. As a side dish, you can cook buckwheat like rice:

Pour 1 cup of buckwheat (whole grains) into a saucepan with twice the amount of water.
Let the buckwheat boil over high heat. Once the water is boiling, reduce the heat to low.
Now let the buckwheat simmer with the lid closed until it has absorbed all the water.
Finally, remove the pot from the stovetop and let it rest for a moment.

Recipes with buckwheat add variety to your menu

Buckwheat is an integral part of traditional Russian cuisine. There it is often used like rice as an accompaniment to many dishes. You can also cook many other dishes from buckwheat:

You can often find buckwheat groats in grocery stores, especially in Northern Germany. This is crushed buckwheat. Just boil it in milk to make a breakfast porridge. Also delicious: home-cooked buckwheat porridge
Or you prepare buckwheat as delicious buckwheat patties.
If you want to experiment even more, you can also sprout buckwheat. You can use the sprouts, for example, as part of muesli, in yoghurt or in salads.

Cooking buckwheat – healthy and gluten-free

Similar to quinoa or amaranth, buckwheat is not a grain. Rather, it is a knotweed plant. The pseudocereal is gluten-free and is used in a variety of ways in gluten-free nutrition – mainly as flour or in the form of flakes or grist. It is also suitable for basic nutrition.

Cooking buckwheat is very healthy. 100 grams of boiled buckwheat contains:

127 mg of potassium
33 mg magnesium
8 mg calcium
1.3 mg iron
0.32 mg vitamin E
0.09 mg of vitamins B1 and B2

Cook chestnuts however you like: Roast them in the oven, cook them in a pot or eat them raw. Depending on the method of preparation, you have to prepare the chestnuts differently. We show you how to prepare chestnuts.

Cook chestnuts correctly: Roast them in the oven

Chestnuts from the oven taste particularly delicious. Because here the edible chestnuts keep their typical taste. Roasted chestnuts from the oven are particularly good for snacking. How to prepare chestnuts in the oven:

First cut off the pointed brush of the chestnuts with scissors.
Use a sharp knife to slit a cross into the skin of the chestnuts. This is important so that the chestnuts do not burst open from the heat. Depending on the size of the sweet chestnut, the cross cut should be about one and a half centimeters long.
Now you can put the chestnuts in the oven at 175 degrees and circulating air.
Place a bowl of tap water next to the chestnuts so that the chestnuts don’t dry out while roasting.
Cut the chestnuts correctly: It doesn’t matter whether you make the cross on the flat side or on the lower end. It is only important that the shell is really severed and the cut is big enough. It doesn’t matter at all if you cut the flesh in the process.

Tip: You don’t have to preheat the oven to prepare the chestnuts. After about 20 minutes, check if the chestnuts are ready. You can tell by the fact that the indentations have clearly opened up and the shell is a bit darker (see picture). Then you can take them out of the oven and remove the shells. If your oven only heats up slowly to 175 degrees, the chestnuts can take up to 30 minutes in the oven.

Cook the chestnuts in the pot

You can also prepare chestnuts as a side dish. Because chestnuts contain a lot of starch and thus replace potatoes. The dish is particularly useful if you have your own tree in the garden – because bought chestnuts are quite expensive. How to prepare chestnuts in a pot:

First, slit the chestnuts crosswise. The incision should be about one and a half centimeters long and reach down to the flesh of the fruit.
Then boil the chestnuts in lightly salted water for about 20 minutes.
The chestnuts are done when the skin has split open at the indentations.
Then you can let them cool down a bit and remove the shell.

Alternatively: prepare chestnuts raw or fry them in a pan

You can also eat chestnuts raw. The taste is very reminiscent of walnuts. You have to remove the peel with a sharp knife beforehand, then the light-colored flesh is already in front of you.

Alternatively, you can roast chestnuts in a cast-iron pan with a lid. To do this, you have to slit open the chestnuts, otherwise they will burst. Keep the following in mind when preparing the chestnuts like this:

Don’t use oil, instead put the chestnuts directly into the hot pan.
Roast the chestnuts at low temperature until the shell opens.
To prevent the chestnuts from burning, you should keep tossing them in the pan.

How healthy are chestnuts really?

Chestnuts are available from the end of September/beginning of October. They are a real power food: chestnuts contain a lot of high-quality protein and much less fat than nuts. In addition, they are rich in potassium, calcium, iron, magnesium, as well as vitamin E, vitamin C and almost all B vitamins as well as beta carotene.

If you buy chestnuts at the market in autumn or at the Christmas market in winter, they are usually very expensive. But chestnuts also grow in many parks and deciduous forests. Although they are much rarer than the normal chestnuts (which are poisonous, by the way), once you have found a few trees, you can harvest many chestnuts there every year. Because there are up to three chestnuts in each shell. Walking carefully through parks and forests can therefore be worthwhile.

Roasted aromas ensure a particularly strong taste experience. In this article, we explain how they are made and how you can use them, especially in vegan cuisine.

Everyone knows roasted aromas – the scent of ground coffee beans, fried onions or crusty bread fresh from the oven. Behind these flavors is the so-called Maillard reaction, in which sugar and proteins react with each other under the influence of heat. Characteristic smells, tastes and browning develop on the surface of the treated food through baking, roasting and roasting.

Although the two processes are similar, there is a difference between the Maillard reaction and caramelization. Sugar and heat are all you need to caramelize food. In the Maillard reaction, the sugar also reacts with proteins. However, it is possible for the caramelization and the Maillard reaction to occur simultaneously. For example, it can happen that your onions caramelize when frying due to their own sugar and also produce roasted aromas due to the Maillard reaction.

Roasted aromas in vegan cuisine

As already mentioned, the development of roasted flavors requires both sugars and proteins. Many foods already contain both of the necessary components and can therefore be easily refined with roasted aromas. You can enhance the reaction even further by adding an additional sugary component, for example in the form of a marinade.

Basically, many products that contain roasted flavors can already be vegan. These include, for example, cocoa beans and their products, coffee, beer, bread, French fries and chips. Of course, you also have the option of creating roasted aromas yourself in your kitchen. For example, you can roast potatoes or sweet potatoes in the oven or fry marinated tofu in a pan. Other foods that go well with roasted flavors include:

Corn
tempeh
Mushrooms
paprika
aubergine
carrots
pumpkin
tomatoes
garlic
chestnuts

You can use it to prepare a simple oven-roasted pumpkin dish, a delicious tempeh pan or grilled corn ribs, for example. In the Utopia seasonal calendar you can see when which vegetables are in season in Germany. In another article you will find more tips for hearty vegan dishes with roasted flavors that you can prepare all year round.

You should pay attention to this when roasting

Under unfavorable conditions, the production of roasted aromas through the Maillard reaction can lead to increased formation of undesirable substances. This includes in particular the so-called acrylamide. You can read more detailed information about this substance in our guide: Acrylamide: Why the substance is problematic.

The development of roasted aromas is particularly dependent on temperature, time, pH value and water content. Pay attention to the following points to limit the formation of potentially harmful substances:

The color is a handy clue as to whether or not roasted foods contain unhealthy substances. Avoid deep black and charred spots by carefully observing your food as you prepare it. Black spots can form particularly at very high temperatures from 180 degrees Celsius and with long cooking times.
If possible, add herbs and spices afterwards – especially if the liquid content is low. In this way you avoid that they burn prematurely before the desired roasted aromas can even develop.
If it tastes right, use a little acid to reduce the risk of burning. Apple cider vinegar or lemon juice, for example, are suitable.

Cooking with unripe spelled opens up a wide range of possibilities in the kitchen. We will explain to you how to prepare the nutrient-rich ancient grain and whether you should soak unripe spelt beforehand.

Green spelt is the name for unripe spelled, which is then roasted and dried. Like other cereals (but also legumes and nuts), green spelled contains so-called antinutrients in addition to nutrients. Antinutrients can prevent the body from absorbing nutrients from food.

Cooking unripe spelt correctly: does the phytic acid have to be removed?

The antinutrients also include phytic acid, which is also contained in unripe spelled. It can bind minerals such as iron, zinc, calcium and magnesium, making them indigestible for us. According to Spektrum.de, phytic acid also makes it more difficult to absorb proteins by binding digestive enzymes.

However, there is also a positive side: phytic acid is associated with anti-cancer and antioxidant effects. According to Spektrum, scientists are also discussing whether the antinutrient could have a lowering effect on blood cholesterol and triglyceride levels.

Antinutrients such as phytic acid can be neutralized by soaking food before cooking. At the same time, this reduces the cooking time and you save energy. The meal should be prepared in a digestible and tasty way with few resources.
On the other hand, important nutrients are also dissolved in the soaking water.
So is it better to soak unripe spelt before cooking or should you avoid it?

Soak green spelled before cooking?

It is difficult to give a general answer as to the advantages and disadvantages of soaking unripe spelt before cooking. This is due to the many and variable factors on which the soaking process depends. For example, the time of harvest, the variety and the type of cultivation of the unripe spelled play a role, but also the quality of the soaking water and the duration.

You can soak unripe spelled for twelve to twenty-four hours before cooking and, if you like, continue to use the soaking water. It always depends a bit on the recipe you want to prepare. Using the soaking water as cooking water has the advantage that the nutrients dissolved in it are not lost. During soaking, the phytic acid is broken down by the enzyme phytase and therefore does not end up in the soaking water.

Whether it is unhealthy not to soak unripe spelled spelled before cooking cannot be said with certainty based on current knowledge. As part of a balanced diet, however, you do not need to worry about consuming unripe spelt and other foods containing phytic acid. In addition, soaking gives you the opportunity to make the meal even more nutritious.

When buying unripe spelled grain, also pay attention to organic quality. In this way you can avoid chemical-synthetic pesticides and artificial fertilizers, among other things.

Recipe: unripe spelled vegetable stew – classic and vegan

Ingredients:

100 g unripe spelt
250 g potatoes
150 g carrots
100 g leeks
100 g celeriac
700 ml vegetable broth
100 ml cream / vegan cream
1 piece bay leaf
1 tsp salt
0.5 tsp pepper
1 tsp smoked paprika powder
0.25 tsp nutmeg
0.25some fresh parsley

Directions:

Put the unripe spelt in a bowl with about 300 milliliters of warm water. Let it soak at room temperature for 12 to 24 hours.
Cut the potatoes, carrots, leek and celeriac to the size you want. Keep in mind that the smaller you cut the vegetables, the more cooked they will be.
Put the chopped vegetables, the soaked unripe spelt and the vegetable stock in a saucepan. Season with salt, pepper, nutmeg, a bay leaf and smoked paprika powder.
Put a lid on the pot and bring the food to a simmer. Then let it simmer on low heat for 15 minutes.
Now add the (vegan) cream and switch off the stove after one minute. Remove the bay leaf.
Now you can serve the unripe spelled vegetable stew and garnish with the freshly cut parsley.

Tip: You can also use the soaking water for this recipe and use a little less vegetable stock for cooking.

Beetroot is particularly tasty when you prepare it in the oven. We present a method how you can easily cook beets in the oven.

You can not only boil, roast or eat beetroot raw, you can also cook it in the oven. This cooking method softens the tuber’s earthy flavor and brings out its natural sweetness. Beetroot should also convince those who were previously skeptical about its intense aroma.

Beetroot is not only a versatile vegetable, but also a source of valuable micronutrients such as phytochemicals, iron, vitamin C and B vitamins. Just 200 grams cover around 50 percent of your daily folic acid requirement.

You can get the healthy tuber either fresh from the field or from storage almost all year round. The main harvest season lasts from October to March. Fresh beetroot can therefore provide you with important nutrients, especially in the winter months. If possible, make sure that you buy organic beetroot. In this way you support agriculture that does not use chemical-synthetic pesticides and thus protects the soil and the environment.

We’ll show you a way to cook beets into a delicious dish in the oven. This oven-roasted vegetable tastes great as a side dish or as part of delicious and nutritious Buddha bowls.

Cooking beetroot in the oven: As an aromatic oven vegetable

Idea: If you end up wanting to make a soup, puree or spread from the beetroot, you can save time and energy by first cutting the beetroot into very small pieces and then cooking them in the oven.

Ingredients:

500 g small beetroot
3 cloves garlic
2 tablespoons olive or frying oil
2 tbsp white wine vinegar
1 tablespoon molasses or other liquid sweetener
Salt and pepper to taste
3 sprigs of rosemary

Directions:

Wash and scrub the beets thoroughly and cut off the core. Then halve the tubers. You don’t have to peel them. Peel the garlic and press the cloves with the flat side of a knife until they pop open slightly.
Place the beets and garlic in a casserole dish. Mix the oil with the vinegar, liquid sweetener, salt and pepper. Pour the marinade over the vegetables and mix well. Place the rosemary sprigs on the beets.
Roast the beets in the oven at 200°C (top/bottom heat) for about 40 to 60 minutes until the tubers are soft. Turn the vegetables every 20 minutes.

Here’s how to use oven-cooked beets

You can process beetroot from the oven in many ways:

You can also cut the beetroot into thin slices and use them to cover a tarte flambée.
Instead of raw beetroot, you can also use oven-cooked tubers for a beetroot carpaccio.
If you fancy a special cake, you can use the beetroot in a chocolate cake. You won’t be able to taste the tuber, but it ensures that the cake is nice and moist.
The spiced beetroot tastes good in Buddha bowls, a millet bowl, in salads, for example a pearl barley salad, or together with a dip.

You can prepare fennel in many ways – whether fried, boiled or raw. It is suitable for much more than just a cup of tea. We’ll show you how to use this healthy and versatile vegetable.

To prepare fresh fennel, it is best to buy it during the season from June to October. You can recognize it by its typical shape, which is reminiscent of a human heart with its white bulb and green stems. Ideally, buy fennel from the region and in organic quality. In this way you can be sure that the fennel has not traveled long distances and was grown without chemical-synthetic pesticides.

Tip: The fennel is fresh when it has no brown spots and the green fennel is neither wilted nor dried out.

Fennel is rich in healthy nutrients

You can prepare and eat both the white and the green part as well as the seeds of the fennel. They all taste like anise because of the essential oils. In addition, fennel contains many other healthy ingredients, including magnesium, potassium, iron and vitamin A and vitamin C.

How to prepare the different parts of the fennel:

The white of the fennel can be eaten raw, boiled, roasted or baked in the oven. It goes well with many types of vegetables and fish.
You can use the fennel greens to season fennel dishes.
You can use fennel seeds to flavor baked goods or Mediterranean sauces. You can also use them to make a healthy fennel tea.
To prepare fennel, you must first wash it thoroughly, as there is often sand in the gaps. Then separate the green and cut out the stalk. You can do this by halving or quartering the tuber.

Eat fennel raw

Raw fennel tastes delicious as a fennel salad and can be combined with many types of vegetables. We recommend that you cut it into fine strips due to its strong flavor. An interesting combination is, for example, raw fennel with oranges and olives. For four people you need:

2 juicy oranges
1 small fennel bulb (about 150 g)
2 small white onions
1 tsp chopped rosemary
1 tsp white wine vinegar
4 tablespoons good olive oil
salt and pepper
a handful of olives
How to prepare the salad:

Peel the oranges and remove the white skin.
Cut the oranges into 0.5 cm thick slices and remove the stone. Arrange the slices on a platter. Catch the orange juice.
Clean the fennel bulb and remove the hard outer parts.
Set the fennel greens aside.
Cut the fennel heart into small cubes or fine strips.
Cut the onions into very fine rings.
Whisk together the reserved orange juice with the vinegar and olive oil, add the rosemary.
Season everything with salt and pepper.
Chop the fennel greens and spread them over the orange slices. Top with the onion rings and fennel and drizzle with the dressing.
Put the olives on the salad.

Cooking fennel – what to watch out for?

You can cook a fennel bulb whole or cut in half. Depending on the size, the fennel needs ten to 20 minutes to cook. You get a nice aroma if you add lemon juice to the cooking water. You can then season the fennel as you like, drizzle with olive oil or bake in the oven.

Frying fennel in the pan

The roasted aromas that develop when roasting go very well with the taste of the fennel. Here is an easy fried fennel recipe. For two servings you need:

1 fennel bulb with greens (about 500 g),
2 tbsp olive oil
a bit of margarine
a squeeze of lemon juice
a pinch of sugar
salt and pepper
How to prepare the fennel:

Clean the fennel and cut off the green.
Halve the fennel lengthways, cut out the stalk and cut the fennel into strips.
Heat the olive oil in a pan. Fry the fennel in it over high heat for about four minutes.
Add a pinch of sugar.
Add the margarine and some water and let the fennel simmer over medium heat for a few minutes until cooked.
Season the fennel with lemon juice, salt and pepper and sprinkle with the chopped fennel greens.

Cooking fennel in the oven

Fennel also tastes very good from the oven. Here are some suggestions on how to cook it in the oven:

Mix chopped fennel with other vegetables, place on a baking sheet, drizzle with olive oil and season. Then bake the veggies in the oven for about 30 to 40 minutes until tender and lightly browned.
Cook the halved fennel bulbs until done and then bake them in the oven for about 20 to 25 minutes. You can use (vegan) cheese of your choice for the gratin and add (plant-based) cream, spices and other vegetables if you like.

From March, wild garlic will sprout from the ground here. Many are familiar with wild garlic, but are wondering: what can you do with wild garlic? We show delicious wild garlic recipes and have tips on how best to prepare wild garlic.

Wild garlic is also called “wild garlic”, but you harvest the leaves and not the bulbs. As soon as the first rays of sunshine tickle the forest floor in March, the green, garlic-scented leaves sprout out of the ground. And with the start of the wild garlic season, it is also time for sophisticated wild garlic recipes.

5 simple wild garlic recipes

Three important tips first:

If you want to collect wild garlic yourself, you should be careful what you pick. Read this in advance: Recognizing wild garlic and not confusing it with poisonous plants.
Most of the aroma is in the leaves as long as the wild garlic is not in bloom. Depending on the region and the weather, wild garlic dishes only taste good until the end of April, or the end of May at the latest.
If you want to eat dishes with wild garlic outside of the wild garlic season, the wild vegetables can be preserved well, preferably frozen. Read more: Freezing wild garlic and preserving it – this is how it works.

Cook wild garlic – the basics

Wild garlic replaces garlic, onion greens or chives in the kitchen in spring. It contains the most flavor when it is not heated and eaten raw. That is why many wild garlic recipes use it cold or only lukewarm in herb butter, cream cheese or pesto.

If you want to use the wild vegetables for hot dishes, such as a soup, be careful not to heat them for too long in order to preserve as much of the aroma as possible.

Preservation tips:

With a long-lasting wild garlic paste as a basis, you can also enjoy the delicious wild garlic aroma in pesto, soups, sauces and for seasoning in other seasons. More on this in the basic recipe for wild garlic paste.
If you dry it, it loses a lot of its flavor and that would be a shame. Better to freeze then.
By the way: The garlic aroma is less persistent than that of “real” garlic, so you don’t have to worry about a “garlic flag”.

Basic recipe for wild garlic paste

Oil and salt preserve the wild garlic and its aroma for several months if you keep the paste tightly sealed and in a cool, dark place.

For a small jar you will need:

150 g wild garlic leaves
3 tablespoons olive oil
½ teaspoon salt
This wild garlic recipe is vegan and is ideal for preserving wild garlic for a long time.

Important: With all ingredients, we advise you to pay attention to organic quality if possible. The EU organic seal is a good guide, the cultivation associations Naturland, Bioland and Demeter have even stricter ecological criteria.

Wild garlic recipe with dumplings

You can do much more with wild garlic than preparing wild garlic soup or pesto. If you like, you can serve the dumplings with a sauce seasoned with wild garlic paste.

Wild garlic recipe for about 8 dumplings

100 g wild garlic
4 stale rolls
1 onion
2 eggs
150 ml organic milk (alternatively plant milk)
some butter (alternatively margarine) or oil
pepper and salt
Cut the stale rolls into small cubes, about 1×1 cm. Mix milk and eggs and season with pepper and salt. Finely chop the onion and fry in a little butter or oil until translucent. Mix the egg milk and onions into the bun cubes and set aside.

Wash and finely chop 100 g wild garlic leaves. Put on a large saucepan with salted water. Knead the roll mixture with your hands or a hand mixer until all the ingredients are well combined and you can form dumplings. Form eight dumplings, place in the boiling water and leave to simmer for about 15 minutes over a low heat.

You can serve the dumplings however you like, for example sprinkled with grated cheese or with a fruity tomato sauce; with fresh spinach vegetables; with wild garlic sauce; with a crisp salad or colorful vegetable dishes.

Tip: If the rolls were too fresh, it may be necessary to thicken the dumpling mass with a little extra flour or breadcrumbs.

Wild garlic recipe for filled muffins

These muffins are ideal as finger food or as a main course with a salad. If you don’t have muffin tins, you can also put two paper cups inside each other or bake the small cakes in other containers, such as well-greased coffee cups.

Wild garlic recipe for 12 muffins

170 grams of flour
1 teaspoon Baking powder
½ tsp baking soda
50g Parmesan
75g butter or margarine
2 eggs
250 ml buttermilk
80 grams of cream cheese
1 bunch of wild garlic
1 tsp oregano
1 tsp thyme
4 sun-dried tomatoes (in oil or soft tomatoes)
Cut the wild garlic and sun-dried tomatoes into small pieces for the filling. Set aside about half of the wild garlic, mix the other half with oregano, thyme and the dried tomato pieces.

For the dough, mix flour, baking powder, baking soda and parmesan. In a mixing bowl, cream together the butter and eggs, then gradually add the buttermilk and flour mixture. Finally, stir in the second half of wild garlic.

Fill the muffin tins with about a tablespoon of batter, covering the bottom. Using two teaspoons, place the wild garlic filling in the middle. Cover with about 2 tablespoons of dough so that the filling is completely covered.

Bake at 180 °C for about 30-35 minutes until golden and enjoy lukewarm.

Wild garlic recipe for feta cream

Make sure that the cheese used is made from sheep’s and/or goat’s milk and not cow’s milk. The protected designation of origin PDO has existed in the EU since 1997, after which only sheep and goat milk products from Greece are called “Feta”. Cheese made from cow’s milk that looks similar tastes and has a different name. The wild garlic cheese cream tastes wonderful on fresh toast, baguette or flatbread.

Wild garlic recipe for one portion that fills two people

150g feta
1 bunch wild garlic (approx. 100 g)
2 tablespoons cream cheese
1 tablespoon olive oil
chili flakes
Crumble the feta with your hands and place in a shallow soup plate. Using a fork, fold in the cream cheese and oil until you have a creamy, fine-grained mass. Then mix in the chopped wild garlic leaves and season with chili flakes.

Harvest wild garlic in nature

In some regions (e.g. Brandenburg or Hamburg), wild garlic is listed on the Red List as “endangered”. It is also endangered in Bremen and Schleswig-Holstein. In general, you should be careful not to harvest it in nature reserves, unless the local protection ordinance allows it.

Wild garlic also enjoys a certain degree of protection outside of nature reserves, which prohibits collecting it for more than your own personal use. The wild harvest of wild garlic outside of nature reserves is fine for the occasional wild garlic soup. However, if you want to build up a large supply, you should switch to cultivated wild garlic from the trade or grow wild garlic in the garden yourself.

Grow wild garlic in the garden

Of course, it is also possible to grow wild vegetables, also known as “garlic spinach”, in the garden. It needs a rather shady and moist location, because when it occurs wild in nature, it usually chooses alluvial forests, shady stream edges or moist ravines.

For the seed to germinate, it needs cold, so it needs to be sown in the fall to sprout in the spring. Sometimes the seed takes more than a year to germinate. So be patient and let yourself be surprised in which spring it makes you happy.

If you have already seen the “witch onion” in nature, then you know that it usually occurs there in large “carpets of wild garlic” – and so the wild vegetables will also spread in your garden! If you don’t want that, you should regularly put it in its place by plucking it out – or build a rhizome barrier that prevents it from spreading.