Tag

crispy

Browsing

Introduction: Discover the Perfect Recipe for Salt and Pepper Squid

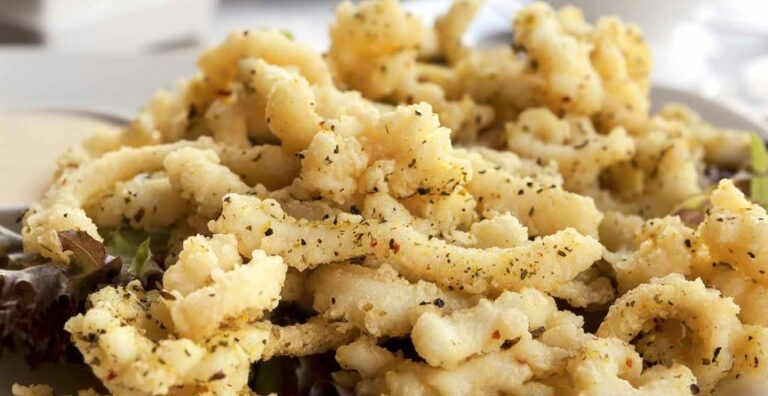
Succulent and tender, salt and pepper squid is a popular Chinese seafood dish that has made its way to restaurants all around the world. The dish is characterized by crispy, golden-brown squid rings seasoned with salt and pepper. This delectable treat is perfect as an appetizer or as a main dish with steamed rice.

Making salt and pepper squid is not as difficult as it may seem. With the right ingredients and a little bit of patience, you too can recreate this restaurant-style dish at home. In this article, we will take you through the steps to cook up a batch of crispy and flavorful salt and pepper squid.

Ingredients and Preparation: Coat Squid Rings in a Seasoned Flour Mixture for Best Results

The first step in making salt and pepper squid is to gather all the necessary ingredients. You will need 500 grams of cleaned squid rings, 1 cup of all-purpose flour, 1 tablespoon of salt, 1 tablespoon of black pepper, and 1 teaspoon of five-spice powder. You will also need vegetable oil for deep-frying.

To prepare the squid rings, first, rinse them under cold water and pat them dry with a paper towel. In a separate bowl, mix the flour, salt, black pepper, and five-spice powder. Coat the squid rings in the flour mixture, making sure each ring is evenly coated.

Cooking Instructions: Achieve Crispy and Golden Squid Rings with Deep-Frying Method

To cook the squid rings, heat up a pot of vegetable oil to 180°C (350°F). Carefully drop the squid rings into the hot oil, making sure not to overcrowd the pot. Fry the squid rings for 2-3 minutes until they are crispy and golden brown.

Using a slotted spoon, remove the squid rings from the pot and place them on a paper towel to drain excess oil. Season the squid rings with a little bit of extra salt and black pepper, and serve them hot with a side of sweet chili sauce.

In conclusion, salt and pepper squid is a delicious and easy-to-make recipe that is perfect for seafood lovers. By following these simple steps, you can achieve crispy and golden-brown squid rings every time. So, fire up that stove and get ready to impress your family and friends with your very own salt and pepper squid!

Introduction: The Sweet Delight of Pavlova

Pavlova is a popular dessert that has its origins in Australia. It is named after the famous ballerina, Anna Pavlova, who toured Australia and New Zealand in the 1920s. Pavlova is a crispy meringue base that is topped with whipped cream and fresh fruits. It is a light and refreshing dessert that is perfect for summer.

The meringue base is made from egg whites that are whipped until stiff peaks form. The addition of sugar and a little vinegar or lemon juice gives the meringue its crispy exterior. The whipped cream and fresh fruits provide a lovely contrast to the crispy meringue base. This dessert is not only delicious but also visually stunning, making it the perfect centrepiece for any occasion.

Ingredients and Preparation: Crafting a Crispy Meringue Base

The ingredients for a pavlova are simple: egg whites, sugar, vinegar or lemon juice, and cornflour. You can also add vanilla extract for flavour. The key to making a good meringue is to ensure that your bowl and whisk are completely clean and free from any grease or residue. Any impurities in the bowl or whisk can prevent the egg whites from whisking properly.

To make the meringue base, whisk the egg whites until they form stiff peaks. Gradually add the sugar, a tablespoon at a time, whisking well after each addition. Add the vinegar or lemon juice and cornflour and whisk until the mixture is smooth and glossy. Spoon the mixture onto a baking tray lined with baking paper and shape it into a nest shape. Bake in a low oven for about an hour until the meringue is crispy on the outside and soft on the inside.

Toppings and Variations: Whipped Cream and Fresh Fruits

The traditional topping for pavlova is whipped cream and fresh fruits such as strawberries, kiwi fruit, and passionfruit. However, there are many variations on this classic dessert. You can use any fruit that you like, such as mango, pineapple, blueberries, or raspberries. You can also add a drizzle of chocolate sauce or caramel sauce for a decadent touch.

To assemble the pavlova, simply spoon the whipped cream onto the meringue base and then arrange the fresh fruit on top. You can create a beautiful pattern by arranging the fruit in a circular or spiral pattern. Serve immediately, as the meringue will start to soften if left for too long. Pavlova is a delicious and versatile dessert that is perfect for any occasion.

Introduction to Sydney Rock Oysters Kilpatrick

Sydney Rock Oysters Kilpatrick is a delicious dish that combines the natural, briny flavor of Sydney Rock Oysters with the rich and savory flavors of Worcestershire sauce and bacon. This dish is perfect for seafood lovers who crave a dish that is both hearty and delicious.

Sydney Rock Oysters are a type of oyster that is native to the waters around Sydney, Australia. These oysters are known for their unique flavor profile, which is both salty and sweet. When paired with the right ingredients, such as Worcestershire sauce and bacon, Sydney Rock Oysters become the perfect dish for any seafood lover.

Ingredients for the Perfect Kilpatrick Sauce

To make the perfect Kilpatrick sauce for Sydney Rock Oysters, you will need the following ingredients:

  • Worcestershire sauce: This sauce is the key ingredient in Kilpatrick sauce, providing a rich and savory flavor that complements the natural taste of the oysters.
  • Bacon: The bacon adds a smoky and salty flavor to the dish and adds a crispy texture to the oysters.
  • Butter: The butter is used to cook the bacon and provides a rich and creamy flavor to the sauce.
  • Lemon juice: The lemon juice adds a tangy and acidic flavor to the dish, which helps to cut through the richness of the sauce.

Steps to Grill the Perfect Sydney Rock Oysters Kilpatrick

To grill the perfect Sydney Rock Oysters Kilpatrick, follow these simple steps:

  1. Preheat your grill to medium-high heat.
  2. In a small saucepan, melt the butter over medium heat. Add the bacon and cook until crispy.
  3. Add the Worcestershire sauce to the bacon and butter mixture and stir to combine.
  4. Place the oysters on the grill and cook for 2-3 minutes, until the edges begin to curl.
  5. Spoon the Kilpatrick sauce over the oysters and continue to cook for an additional 2-3 minutes, until the bacon is crispy and the sauce is bubbling.
  6. Remove the oysters from the grill and sprinkle with lemon juice before serving.

In conclusion, Sydney Rock Oysters Kilpatrick is a delicious and hearty dish that is perfect for seafood lovers. With the right ingredients and cooking techniques, you can create a dish that is both savory and satisfying. So why not give it a try and impress your family and friends with this delicious seafood dish?

Cookies only taste good when they are fresh and crispy. You should store shortcrust biscuits as airtight as possible. Otherwise, they will absorb moisture and taste sticky. Butter biscuits, black and white pastries, vanilla crescents, and other Christmas biscuits stay crispy and fresh in the tin for up to four weeks.

With the right tips for storage, you can ensure that your Christmas cookies last a long time and give your Christmas cookies a unique aroma. For example, it is important that the cookies are cool and the decorations are dry before wrapping, otherwise, the cookies will stick together.

Shelf life for Christmas cookies

Baking delicious Christmas cookies is part of Christmas. But with a large number of biscuits, the question arises as to how they stay fresh for a long time. Dry Christmas cookies will stay crisp and fresh in airtight metal or plastic jars at room temperature for four weeks or more. Cookies filled with cream only keep for a week.

You can neither freeze Christmas cookies with chocolate nor store them in the fridge, otherwise, the chocolate will turn gray and unsightly. These cookies should only be stored at room temperature in the cookie jar for a week or two.

Gingerbread, cinnamon stars, honey cake, Printen, and fruit bread taste best after 2-3 weeks of storage in a tin with a piece of apple, orange, or lemon peel. In this way, the pastries can be kept for several months. Our ideas for keeping the Advent wreath fresh longer are also interesting.

Store biscuits correctly in the tin can

Airtight tin or plastic containers are suitable for storing biscuits. You should place the greaseproof paper on the bottom of the tin so the cookies don’t rest directly on the metal. It is worth storing the biscuits separately according to type if they are seasoned differently. They will then better retain their aroma.

It is very important that you store crunchy and soft Christmas cookies separately. Between cinnamon stars, macaroons and gingerbread, a speculoos would quickly become soft and the soft biscuits in turn rock hard. You should put crispy biscuits in the cans immediately after they have cooled down. With soft biscuits such as gingerbread, you should only close the lid of the tin tightly when the Christmas biscuits have softened (after about 1 week). Also, note helpful tips on storing food correctly.

Make dry biscuits and hard gingerbread soft

Another good tip. Dried cinnamon stars or hard gingerbread become soft again if you put a piece of apple, lemon, or orange peel in the tin. The fruit bowl also gives the biscuits a fruity aroma. If you want it tasteless, you can also put a slice of fresh bread in the cookie jar. But be careful, change the fruit bowl or the bread every 2 days so that no mold forms.

Freeze Christmas cookies

If you want to start Christmas baking long before Christmas, you can also freeze your Christmas cookies so that you can give them away from fresh and crispy later. You can easily store gingerbread in the freezer. In addition, shortcrust pastry is particularly suitable for freezing. The shortcrust pastry category includes, for example:

  • butter cookies
  • Vanilla crescents
  • Hilda rolls
  • Linzer biscuits
  • Shortbread cookies without the chocolate icing
  • heath sand

Black and white cookies

Freeze the cookies in portions in freezer bags or freezer containers. After defrosting, bake them for 5 minutes at 180°C. In this way, you can keep large quantities of Christmas cookies crispy and fresh for longer. You can always decorate the cookies afterward. In addition, note our tips for freezing bread.

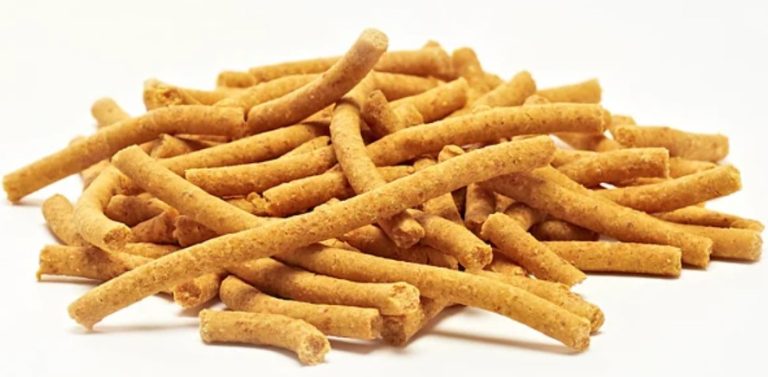
Extrudates can be found in many different forms. Examples are oat pops or peanut flips. Here you can find out how they are made and what properties they have.

An extrudate is a food that has been expanded by pressure and high temperatures. This heating and puffing makes it nice and crispy. Starchy foods are usually used to produce extrudates because they are particularly suitable. Examples of this are bran or grinding flour, also known as husks.

How are extrudates formed?

The production of an extrudate is also called extrusion. You can imagine them as follows.

The extruder (the conveying device that applies the pressure) breaks down the starchy raw material through a combination of pressure and high temperatures.
As soon as the raw material comes out of a nozzle, the temperature and pressure drop suddenly, so that water vapor escapes from the dough and air bubbles are trapped in it.
The result is the so-called extrudate. Sometimes the manufacturers roast or dry it afterwards.
The extrudate can then be cut into any desired pieces or post-treated in some other way. For example, it is fried, sweetened or flavored.
The production of extrudates is quite an involved process. You could theoretically make extrudates yourself, but you would need an extruder for that. The extruder is quite expensive and the raw materials required are usually not commercially available. That’s why we would advise against making your own extrudates at home.

This is how you find extrudates in stores – and that’s how healthy they are

You can find extrudates commercially in many different shapes. Some examples:

Cereals (e.g. oat pops)
Snacks (e.g. peanut chips, onion rings or cheese balls)
break bar
Confectionery (e.g. Nippon or Kinder Country)
crispbreads
But how healthy are the different extrudates now?

In general, you should know that the raw materials for making extrudates are mostly industrial waste products. This is the case, for example, with bran or grinding flour.

During the manufacture of the extrudates, the starch is then completely broken down from the raw materials. This process makes the extrudates easy to digest, but it also destroys important amino acids. In addition, the raw materials are highly heated, which leads to a loss of nutritional value. Vitamins contained in grain products are also lost by 50 to 80 percent during extrusion. Because of this, breakfast cereals, for example, are subsequently enriched with vitamins.

All in all, unfortunately, extrudates are often expensive finished products made from cheap raw materials and air. So if you include them in your diet, it is best to combine them with fresh fruit or vegetables.

In addition to the above examples of rather unhealthy extrudates, there are also some healthier extrudates that you can eat with a clearer conscience. These include pasta, which is one of our staple foods. In addition, textured soy, which you can find in the form of soy strips, for example, is also an extrudate. While these products are a bit more recommendable than peanut chips and other snacks, they’re still best enjoyed in moderation.

Durability of extrudates

The extrusion process removes certain enzymes from the products, making them more perishable. In addition, the extrudates hardly contain any moisture since they are dried foods. These two facts make extrudates last a long time. As a rule, they can be kept for at least a year, usually even longer. So you can keep them for a very long time without worrying about them spoiling or expiring.

If you want to bake pizza properly, you don’t need a stone oven. But there is a crucial trick how the pizza gets really crispy in the oven at home. We’ll tell you.

Baking pizza properly is an art in itself. A traditional Italian pizza has a crispy base and topped with fresh ingredients. The secret behind this is the preparation in the stone oven: a fire burns under the stone, which heats up its surface considerably. The pizza is then baked crispy brown directly on the hot stone.

But you can also imitate how a stone oven works at home. Most modern ovens have a setting where the pizza gets nice and crispy without burning. We’ll show you a simple trick to make pizza like it’s out of the stone oven.

Choose the right setting

In order to bake pizza properly, you should select the appropriate setting on your oven. So first familiarize yourself with the different oven symbols.

The setting, which mimics the brick oven, is convection with bottom heat. You can recognize this setting by the symbol of a fan with a line or a wave underneath it. This setting is perfect for properly baking pizza. It is baked crispy on the bottom, but only gently cooked on top.

Bake your pizza with this setting in the lower third of the oven at maximum temperature. Depending on the recipe, the pizza is ready in ten to twenty minutes.

If your oven does not have this setting, then alternatively bake the pizza at the maximum temperature on top/bottom heat. Place the pizza at the bottom of the oven. In this way, the heat comes directly to the dough and makes it crispy. The baking time also varies with this variant depending on the recipe.

By the way: This setting is also suitable for heating up pizza. The leftovers will still taste good the next day.

Pizza like from the stone oven: ideas for at home

With the right setting on your oven, you can also make a pizza with a crispy crust at home. It tastes especially good if you make the pizza yourself. Both the pizza dough and the pizza sauce are prepared quickly. Then choose your favorite ingredients and top the pizza with peppers, spinach, olives, cheese or fresh rocket, for example. Get inspired by these pizza recipes:

  • Cauliflower Pizza
  • Spinach pizza
  • Pizza Marinara
  • Arugula Pizza

Tip: Pizza as fast food does not have to be unhealthy. You can also bake a healthy pizza without yeast and white flour. We’ll show you how it’s done here: Fast and healthy pizza? It works with this ingredient.

With the hot air fryer you can prepare tofu particularly crispy and low in fat. We’ll show you a simple, delicious basic recipe for crispy tofu from the Airfryer.

Tofu tastes best when fried crispy or fried in plenty of oil. But even without oil, your tofu will be crispy if you prepare it in the air fryer.

It is important that you use tofu that is as firm as possible and that you press it out before baking. You can do this with a tofu press or a heavy pan. Soft tofu with a high water content does not become crisp in the Airfryer either. Whether you use firm natural or smoked tofu is up to you. The result is spicier and tastier with smoked tofu.

Tofu from the air fryer: the basic recipe

Buy the tofu and the other ingredients in organic quality if possible. This is how you support organic farming that doesn’t use chemical-synthetic pesticides that could end up in your food and the environment. Recommended organic seals are, for example, Demeter, Naturland and Bioland. With tofu, you should also pay attention to the country of origin, because soybeans for tofu are also available from German or Austrian cultivation and are therefore more climate-friendly than soybeans, which have been transported a long time.

Note: You can also prepare the recipe without fat, but you will get the best result with a small amount of oil.

Ingredients:

400 g firm tofu
2 tablespoons soy sauce or tamari
1 tablespoon vegetable oil (optional)
1 teaspoon garlic powder (or fresh garlic)
1 tsp paprika powder
1 tsp onion powder (optional)
0.5 tsp chilli powder (optional)
Salt
pepper
1 tablespoon starch

Directions:

First, you need to squeeze the tofu for at least 15 to 30 minutes. This can be done using a tofu press or a heavy cast iron skillet that you place on top of the tofu. Wrap the tofu in a clean kitchen towel beforehand to absorb the excess liquid.
Cut the tofu into bite-sized cubes and add soy sauce or tamari (a gluten-free soy sauce) as well as the vegetable oil (optional).

Mix in the spices. We use garlic, paprika, onion and chili powder, as well as salt and pepper. Mix well with the tofu. Then add the starch and mix thoroughly. Optionally, you can add more spices.
Preheat the Airfryer to 190 degrees Celsius and distribute the tofu evenly in one layer in the cooking basket. Make sure that no pieces of tofu are on top of each other. You may need to bake the tofu in two batches.
Bake the tofu for about 10 to 15 minutes until crispy. Shake the tofu once during the baking time so that all the pieces are evenly browned.

Crispy tofu from the Airfryer: tips for cooking

You can serve the tofu as a meat substitute with side dishes such as rice, vegetables or potato wedges (e.g. also from the hot air fryer) or as a soup ingredient or in flatbread. The crispy tofu also tastes very good with fresh salad and vegan dips.

Cooking tips:

Freeze the tofu beforehand: For an extra crispy result, you can freeze the tofu beforehand and let it thaw and pat dry before further processing. When thawing, the tofu loses water and becomes particularly crispy.
Use fresh garlic: You can also replace the garlic powder with freshly pressed garlic. This makes the aroma even more intense.
Add more spices: You can modify the basic recipe as you like and add more spices. Variants with cumin, dried Italian herbs or curry powder, and turmeric are particularly tasty. Sesame oil also gives a very fine taste.
Marinating the tofu: Marinating the tofu makes it particularly flavorful. Let it soak in the marinade for 30 minutes before frying. However, since most marinades are very runny, the tofu will be a little less crispy.

Optionally, you can serve the tofu with a sauce after baking. However, you should then adjust the salt content and the spices, because the sauce is already seasoned.

Papadam is a typical accompaniment to Indian dishes. And the crusty bread also tastes great as a snack between meals. We reveal a simple recipe and the best way to serve the bread.

Papadam is a light, crusty bread that is served with curry, dal and various dips in India. You can often find it under the spellings Poppadom or Poppadam. The dough for the thin flatbread is made from a few ingredients and then fried briefly in a pan. Traditionally, papadam is mixed with urd bean flour. However, you can only find this in a well-stocked specialist shop. Here we use chickpea flour as an alternative.

When choosing your ingredients, make sure they come from organic farming. In this way you avoid residues of chemical-synthetic pesticides on and in your food. This protects health, biodiversity and the environment. We can particularly recommend the organic seals from Demeter, Bioland and Naturland, as they follow stricter criteria than the EU organic seal.

Also, buy locally sourced products whenever possible. Indian dishes are usually cooked with exotic spices. Choose a locally grown version whenever possible, and only use imported spices occasionally.

Bake papadam yourself: This is how you succeed

Ingredients:

320 g chickpea flour
1 pinch(s) of salt
1 pinch(s) of pepper
1 pinch(s) cumin
1 clove(s) garlic
125 ml water
200 ml frying oil

Directions:

In a large bowl, combine the chickpea flour, salt, pepper, and cumin.
Peel the garlic and chop it very finely. Mix the garlic into the flour as well.
Gradually add the water. This forms an evenly firm dough.
Form small balls about an inch in diameter.
Roll out the balls into very flat cakes.
Heat the frying oil in a frying pan.
Add the papadams one by one to the hot oil and fry them for about a minute on each side.

Tip: spread out a cloth that can get greasy on the work surface. Place an oven rack or wire rack on the kitchen towel. Then, after frying, place the papadams on the rack to drain.

Serve papadam: That goes with the bread

Serve the papadams as an accompaniment to a main course or as a snack between meals. These recipe suggestions go particularly well with the crispy flatbread:

  • Cook a delicious vegetable curry with regional ingredients or the simple chickpea curry and serve with the papadam.
  • The Palak Paneer is classic Indian: a curry recipe with spinach and cream cheese.
  • Also try a dal as a main course. Tip: Alternatively, use chickpeas to create a Chana Dal.
  • If you want it quick and easy, opt for plain curry rice with the papadam.
  • Serve your papadam with dips as a snack between meals or as an appetizer. Dips with an exotic touch, such as the date dip, onion chutney or zucchini chutney, are particularly delicious.

You can store the fried papadams in an airtight box for a few days.