Tag

cut

Browsing

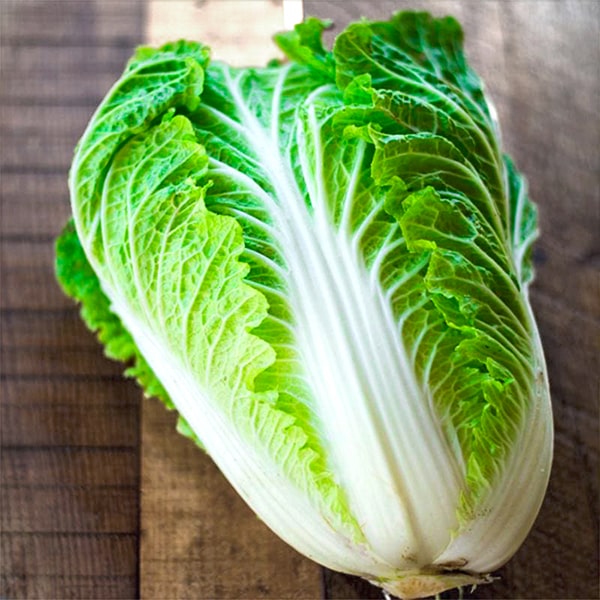
Chinese cabbage can be prepared in many ways – but how? Asian cabbage varieties are popular, but the preparation of Chinese cabbage is unknown to many. A little product information.

Preparing Chinese cabbage is also something for cabbage skeptics

Chinese cabbage is different from its native relatives – it is more subtle and easier to digest. If you are put off by digestive problems, the smell and taste of cabbage from the local varieties, then prepare Chinese cabbage instead.

Because it also has the vital substances typical of cabbage: Above all, it provides a lot of vitamin C, vitamins from the B group, folic acid, mustard oil glycosides and minerals such as potassium and iron. With around twelve calories per 100 grams and a water content of 94 percent, it is the ideal vegetable for losing weight.

Caution: Chinese cabbage has a high nitrate content. Adults can take it without hesitation. Babies and toddlers, on the other hand, should only consume small amounts occasionally – or they should avoid it altogether.

Before preparing: Buy good Chinese cabbage

When shopping, test to see if the cabbage is tightly closed and feels firm. The leaves should be crisp with no dark spots. Chinese cabbage from the supermarket often has small black spots. They are not harmful to health, but occur when storage is too warm. Damage to the outer layer of leaves isn’t a big deal, since you remove this layer anyway when you prepare the Chinese cabbage. The cabbage should not have mushy spots.

Now it’s time to prepare: Cut the Chinese cabbage

In contrast to the local types of headed cabbage, Chinese cabbage does not have a hard stalk and the leaf veins are so tender that you can use them. How to cut Chinese cabbage before cooking:

Remove the outer leaves. Also withered or damaged areas.
Then, at the bottom of the cabbage, cut a slice about an inch thick with a straight cut.
Now the leaves can be easily separated and you can cut them into the desired shape.
Wash the Chinese cabbage pieces in cold salted water.

Cooking Chinese cabbage is quick and easy

If you want to prepare a larger portion of Chinese cabbage, choose a wide pan or pot, because raw Chinese cabbage takes up a lot of space at first. Cooking time depends on how crispy you want it. Basically, the crunchier, the tastier. If you haven’t prepared Chinese cabbage often, try the al dente every now and then. These are the cooking times:

Roast and Cook: Five to seven minutes
Steam and simmer: Five to ten minutes
How to prepare Chinese cabbage:

as a raw food snack or salad
fried in a pan with oil
cooked in salted boiling water
as steamed vegetables in their own juice: first add the thick ribs and later the fine leaves to the pot.
steamed in a saucepan with a steamer insert or a suitable kitchen sieve with the lid closed. The cooking water should not come into contact with the Chinese cabbage.
fermented

Store Chinese cabbage properly

Chinese cabbage is tender, so you should get it as fresh as possible and use it immediately. Stored in the fridge, it keeps its crunchiness for up to four days. If you wrap it, you can still cook Chinese cabbage after a week.

Be sure to wrap the Chinese cabbage loosely, otherwise it will get bruises that can rot. It is better not to use cling film for this: a beeswax cloth is the plastic-free solution. Once added, you can use it over and over again.

The productive head of cabbage can be kept in the freezer for up to four months: Clean the Chinese cabbage, cut into small pieces and blanch briefly in boiling, lightly salted water. The professional would then quench the Chinese cabbage in ice water.

Our tip: If you freeze the Chinese cabbage in portions, it will be easier to prepare the amount intended for your recipe.

Simply chop finely diced onions

The best way to cut onions is with a sharp paring knife. A smaller knife is better for peeling and a larger vegetable knife for cutting. First, remove the thin peel of the onion, then cut the onion in half lengthwise, the root of the onion should not be removed.

Lay the onion cut-side down on a board and hold the narrow side – the base of the root – with your slightly bent fingertips. Cut the onion lengthwise into fine strips so that the root end remains whole and thus holds the onion layers together.

Cut the onion horizontally one to three times (depending on the size of the onion) until just before the root. The more often you cut here, the finer the cubes will be. Then cut thin slices vertically so that the onion falls into fine cubes by itself.

A slicer is best for slicing wafer-thin, whole onion rings, as you can never slice the rings so thinly and evenly with a knife.

Important: Onions should never be cut twice, which is why the chopping devices are not ideal for chopping onions. Cutting the onion several times can turn it gray and bitter.

Tip: If you have to cut a large number of onions, you can put a pot of water next to the work surface. The steam neutralizes the spiciness of the onion. A wet chopping board can also provide some relief from the pungent onion fumes.

Tulips should never be given fresh water during water changes. Why does this damage the cut flowers?

A colorful bouquet of tulips can make your heart happy and bring the fresh scent of spring into your home. Quickly fetch a vase from the cupboard, fill it at the tap and then drape it nicely on the windowsill: You can already feel the spring mood in the apartment.

After a certain time, however, there is less and less water in the vase because the tulips have drawn it. Should I drain the water and fill in new? This would be a mistake that would make the beautiful flowers look ugly sooner.

That way you can keep your tulips for longer

If you have the impulse to give your tulips new water, caution is advised: the water already in the vase should never be poured out, instead you should only refill the vase with fresh water. Because: Fresh water gives the cut flowers new energy, it allows them to grow or bloom much faster. But that also means that they age and wither faster. With the mixture of older and fresh water, the tulips will continue to grow, but more slowly.

However, it is important to refill in good time so that the nutrient content in the water does not become too high. So check regularly how much water your tulips have left. These cut flowers in particular draw water quickly, which is why repeated watering may be necessary.

So no fresh water for tulips! If you heed this tip, you can enjoy colorful flowers for longer.

Thanks to their finely mild spiciness, many use the vegetable as an all-round talent. Find out here how best to cut the spring onions.

Wash and cut spring onions properly – that’s how it works

With their mild, spicy taste, spring onions can be used in many ways in the kitchen. Before eating and slicing the spring onions, it is important to wash the vegetables carefully so that they do not grind uncomfortably between the teeth when eating. Both the green leaves and the white bulbs of the spring onion can be eaten. With the right cutting technique and the right steps, you can get the most out of the mild onion.

Before actually slicing, remove the outer leaves of the onion. These are often a bit dried out and therefore not quite as fresh. To do this, cut the sheet lengthways and then pull it off. Then you remove the root end, because this is the only part of the spring onion that is not used in the kitchen. In this step you can also remove the dried leaf tips. Depending on how wilted the upper end of the petioles is, you should generously cut off the dried, partly wilted areas.
In order to avoid a gritty, unpleasant feeling when eating the spring onions, we now have to wash them thoroughly. Rinse the scallions under cold water, removing any dirt or sand. The dirt is mainly on the lower tubers. Now all you have to do is shake the onions dry – and we’re ready to use them.
Now you can cut the scallions into thin rings or sticks, depending on your preference. This works particularly well with a sharp kitchen knife.
Good to know: If you notice a transparent slime when cutting the spring onion, there is no need to worry. The gelled plant juice is even a sign that the vegetables are particularly fresh. You can easily wash it off and process the onions further.

How healthy are spring onions?

The onion vegetable not only impresses with its fresh taste, but is also a true superfood. In particular, the essential and sulphurous oils contained in spring onions make them so healthy. Allicin has an anti-inflammatory effect and even promotes digestion – but this plant substance is the reason for the tears when chopping onions. The spring onion can also score points in terms of vitamin C, with 26 milligrams per 100 grams they already cover a quarter of our daily requirement. Spring onions also score points with their comparatively mild taste and, according to the Federal Center for Nutrition, are easier to digest than classic onions.

Tips and tricks for spring onions

When buying, you should make sure that the onions have light green, crisp and pointed leaves. The roots should also not be too long.
Spring onions have a significantly shorter shelf life than onions. They will keep in the fridge for about a week, but the cold will quickly make them damp and soft. Wrapping them in a damp cloth will keep them fresher for longer.
Did you know that spring onions are related to daffodils? The ultimate tip for keeping onion vegetables fresh for as long as possible is derived from this knowledge: place them in water like a bouquet of flowers. It is important to preserve the root, as the plant absorbs the liquid through it. If you change the water every two days, nothing stands in the way of optimal storage.
You can even freeze scallions. To do this, prepare the vegetables as described above, remove dry spots and root balls and store them in a freezer box. The onions can be kept in the freezer for up to a year and can be thawed and processed at any time.

Delicious recipes – spring onions are so versatile

Spring onions are not only healthy, but also a real all-round talent in the kitchen. They are used especially in Asian cuisine, such as in curries or woks. They are also excellent in salads or dips. So that it doesn’t lose its typical, fresh aroma, you should be careful not to heat it up too much and to keep the cooking time short

For a delicious sour cream you need 200g sour cream, 100g sour cream, 100g quark (40%), some sugar, salt, pepper and of course spring onions. Hopefully you now know how to prepare them perfectly with the help of our tips. For the sour cream, mix the ingredients in a bowl, add spices to taste and some garlic for an extra kick. Finally, the finely chopped spring onions and you’re done!

Those on a diet prefer to avoid pasta, bread and potatoes. Carbohydrates are not as bad as they are made out to be. We explain what happens to the body when we completely avoid carbohydrates.

1. Your performance decreases

In addition to fats, carbohydrates are among the most important sources of energy. If you do without carbohydrates, this will primarily be noticeable in your reduced performance. You tire more quickly, are less able to concentrate and generally feel weak and powerless.

2. You damage your digestion

Your digestion is going crazy and you are struggling with constipation? Avoiding carbohydrates may be to blame. Good carbohydrates help to strengthen your intestinal health and promote beneficial intestinal bacteria. The resistant starch in rice, wholemeal pasta or potatoes is particularly important for a good intestinal flora.

3. You lose muscle mass

Without carbohydrates on the menu, muscle mass is a long time coming or disappears again. If the body cannot fall back on carbohydrates, it uses the protein reserves. But these are exactly what you need to build muscle. The hard-earned training results? Completely free!

4. Your mood suffers

It’s not just your performance that suffers when you eat too few carbohydrates. You’re in a much worse mood too. It’s not for nothing that we get “hangry” when we haven’t eaten. Because carbohydrates not only satisfy hunger. It has been proven that they even make you happy. Food high in fat and carbohydrates activates the reward center. And that makes you happy.

Slicing pineapples is an art that I’m sure you’ve tried your hand at before. The fruit is delicious, but stripping it of its skin and woody interior can be exhausting. It’s very easy with this guide.

1. Cut the top and bottom of the pineapple

There are many different ways to cut pineapples. However, a lot of pulp is often lost if you cut off too much at the edge or at the stalk. With our instructions you will get the most out of your pineapple and it is also quick and easy!

That’s how it’s done:
First cut off the crown of the pineapple. Be careful not to cut off too much, cutting two finger widths from the roots is sufficient.
Do the same for the end of the pineapple.

2. Halve the pineapple

Then halve your pineapple by cutting the stalk in half as precisely as possible. This will make it easier to remove in the next few steps.

3. Divide the pineapple into four pieces

Then quarter the pineapple, again in the middle of the stalk.

4. Remove wooden stalk

You can now easily and sparingly remove the wooden stalk from the quarters by cutting into the flesh so that the cut piece forms a triangle.

5. Cut the flesh of the pineapple

Now you can remove the flesh from the skin.
To do this, start as close as possible to the peel so as not to waste any fruit pulp.
Now fillet your pineapple. You can also cut this piece in half lengthwise for convenience.

Ready cut pineapple

You have now successfully removed the skin and stalk from the pineapple.
If you want to use them for a juice, smoothie or similar, you’re done now.

Cut pineapple into small pieces

For snacking, you can cut the pineapple into bite-sized pieces.

Melon is as much a part of summer as sunscreen or bathing. But slicing melon can sometimes be a challenge.

Both muskmelons and watermelons hide their tasty flesh under a thick and hard rind. Watermelons in particular are also very large, which makes them even more difficult to cut.

With these tips you will succeed:
Use a sharp knife with a blade longer than the melon.
Place the melon on a slightly rough surface, such as a wooden board, so it doesn’t slip.
Caution: Always cut away from your hands.
Depending on whether you want to eat the melon right away or process it further, you can cut it differently. You can find out how to do this below.

Cut melon into sticks: Ideal as a child-friendly snack

This method is especially great for kids who can’t get enough of melon in the summer and prefer to nibble on it themselves. Unlike melon boats, these pens do not leave a mustache on your face and children’s small hands can easily hold the melon pens.

It’s that easy:
1. Halve the melon on the long side.
2. Cut the melon along the grain into strips about two thumbs wide.
3. Then repeat this process against the grain to create a checkerboard pattern. You may need to hold the melon to keep it from falling apart.
4. And your melon sticks are ready. You can eat them simply by holding them by the shell.

If you want to cut a pumpkin, it is often difficult because of the hard skin. We’ll show you a simple trick that will make cutting the pumpkin much easier.

Pumpkin is a versatile vegetable that you can buy locally grown between August and December, when pumpkins are in season. You can eat the skin of many types of squash and don’t have to throw it away. However, it is a bit hard, making the squash difficult to cut. The skin only softens when it is cooked. For most recipes, however, you will need to cut the squash into small pieces or slices before cooking. For example:

Cut pumpkin into pieces for: pumpkin soup, pumpkin spread and pumpkin pasta
Slice the pumpkin for: Tarte flambée with pumpkin
We’ll show you a trick on how to cut the peel more easily.

Cutting the pumpkin: The cooking pot trick

If the pumpkin skin is very robust or the knife is no longer very sharp, it will be difficult to cut a pumpkin. But a simple trick helps to make it easier:

First wash the pumpkin thoroughly.
Then place the squash in a pot filled with water. The water should come up a little to halfway up the squash.
Let the water simmer for about five minutes.
After that, the squash will be much softer and easier to cut.

Dice the pumpkin

You can then cut the pumpkin into cubes or slices. Both are possible with this guide:

1. Halve the pumpkin. To do this, place the knife on the stalk of the pumpkin and divide the pumpkin once.
2. Now the pumpkin with the pulp is open. For most recipes you will now have to hollow out the pumpkin. This is easy to do with a spoon. In addition, you should usually remove the cores. You don’t have to throw them away, you can roast the pumpkin seeds. They’re a tasty snack.
3. To cut the pumpkin into cubes or slices, place the pumpkin half with the open side on a wooden board. Then cut the pumpkin into slices one to two centimeters thick. If you are right-handed, start at the end of the pumpkin that is to the right of the stalk.

Note: If you want to use the pumpkin in slices (for example, to cover a tarte flambée or a pizza), cut the slices only a few millimeters thick.

4. Now place several pumpkin slices on top of each other and cut off individual cubes.

Note: Be sure to separate the stalk from the pumpkin piece as well.

5. Now you can carry out steps 3 and 4 for the other half of the pumpkin and then process the pumpkin further.