Tag

for

Browsing

Baked goods should be delicious and you don’t want to pay attention to the calories. Nevertheless, with some wholesome and natural substitutes, you can not only bake healthier but usually also much more delicious. The modern bakery cannot do without sugar and flour. Both are relatively inexpensive foods, but they are not necessarily healthy.

Many of the ingredients of the whole grain are usually removed from conventional flour. And the sugar also lacks any taste but provides all the more sweetness. The end product, therefore, contains hardly any nutrients, but all the more calories.

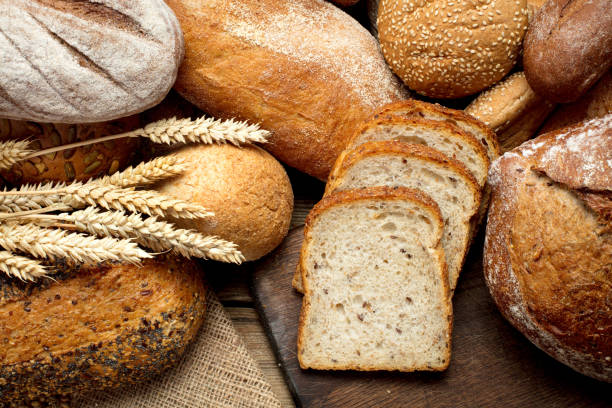
1) Use flour as coarse as possible

Flour is an example of how many products we now use that have almost completely lost their nutritional value. Especially the frequently used 405 flour is only an extract of the whole grain and tastes far inferior to it.

Here it is already advisable to use coarser flours. Although these are primarily suitable for baking bread, they can also be used for delicious wholemeal cookies. The 1050 and 1740 flour in particular still contain the nutrients and the taste of the ripe grain. Also, learn how to prevent the dough from collapsing.

2) Refined sugar should be avoided

Another frequently used substance in our bakery is sugar. It may be cheap, but it’s bad for your teeth, high in calories, and just plain sweet to taste. Another problem is that although foods with too much sugar are initially filling, the next food cravings appear very quickly after eating.

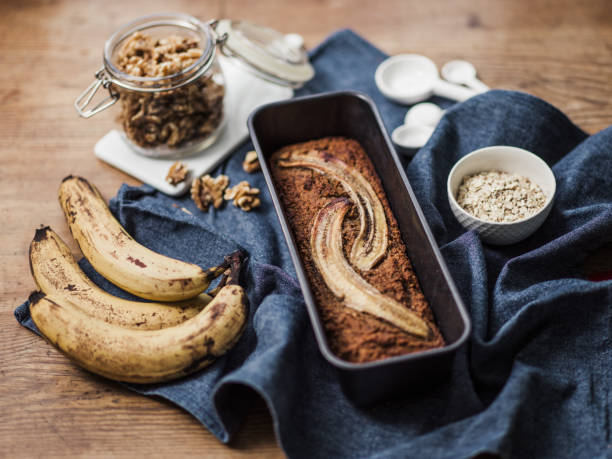
Instead of sugar, natural products should be used that are not only nutritious but also add flavor to the pastry. Honey should be mentioned here first. With him, the taste can also be creatively influenced by the different types of honey. However, it is also possible to add syrup. Raisins can also be used for coarser pastries.

3) Reconsider all the ingredients

Once you have started, you should reconsider all the ingredients in the recipes and look for full-fledged alternatives. Instead of flavorings, the originals can often be used, which have a much more intense taste. You can buy spices as coarse as possible to grind them up at home.

This alone gives you valuable ingredients and flavors that benefit the baked goods and ultimately you. You eat more consciously and healthier, and cravings in between are avoided. And ultimately, the home-baked food is simply tastier than with alternative ingredients. So you should bake your own bread more often.

The nutmeg is a large and impressive pumpkin. In this article you will learn more about the nutmeg pumpkin, valuable tips for the preparation as well as many different recipe ideas.

Nutmeg is also known as Muscade de Provence or Musk Squash. The artistically ribbed shell shines in the typical autumn colors from dark green to orange to light brown.

Nutmeg pumpkin contains many valuable ingredients:
potassium
calcium
zinc and
Vitamins of groups A, C, D and E.
The aromatic pulp of the nutmeg pumpkin gets its color from the high proportion of beta-carotene. Carotene is good for healthy skin, strong hair and eyesight.

Nutmeg pumpkin – you should know that

The nutmeg squash belongs to the musk squash family and is closely related to the butternut squash. The flesh is orange-red and smells pleasantly spicy.

Nutmeg pumpkins have a diameter of up to 50 centimeters and can weigh up to 40 kilograms. The round, ribbed shape is striking. The skin is initially green and gradually turns light brown until fully ripe.

The nutmeg pumpkin originally comes from Central and South America. In Europe, he prefers warmer growing areas such as Italy or France. In Central Europe, the cultivation of nutmeg is not so productive due to the comparatively lower temperatures.

In Germany, the nutmeg pumpkin season begins in September. Nutmeg pumpkin tastes best when it is not yet fully ripe. You can tell by the color of the shell – it should still be dark green. The skin of fully ripe nutmeg squash turns orange to beige.

Ripe nutmeg has a soft skin and fewer seeds than most other types of squash. This creates less waste and you can process more pulp into delicious dishes.

Tip: If you tap the skin of the nutmeg with your knuckle, you should hear a hollow sound. Then the degree of maturity is optimal. If the squash sounds dull when you tap it, it has already started to spoil.

Tips for storing nutmeg squash

Whole nutmeg squashes remain edible for more than half a year when stored in a cool and dry place – for example in the cellar or in the cool pantry.

However, since the nutmeg pumpkin is very large and heavy, you will often find wedges that have been cut open and wrapped in plastic in the supermarket. Once cut, the nutmeg squash, which otherwise stores well, only stays fresh for three to four days in the refrigerator.

You can find unpackaged, organic nutmeg squash at local farmers’ markets and direct sellers. Buy locally grown nutmeg squash. Regional products have shorter transport routes behind them and are therefore better for the climate.

Attention: When buying, make sure that the skin of the nutmeg pumpkin is undamaged. Only then can it be stored longer.

Tip: extend the shelf life of cut nutmeg squash in the freezer. Freeze the diced nutmeg in batches. This allows you to prepare the pumpkin particularly quickly in the kitchen if necessary.

Peel nutmeg pumpkin: This is how it works

The skin of nutmeg is significantly thinner than that of many other types of pumpkin. However, you should peel the nutmeg squash, as the peel requires a significantly longer cooking time than the pumpkin flesh.

How to peel nutmeg pumpkin:
Use the indentations in the nutmeg squash and use a large knife to cut out wedges from the squash.
Remove the pips and the fibrous pulp around the pips with a spoon.
Using a sharp knife, thinly slice the skin off the pumpkin wedge.
You can then simply grate, slice or dice the pumpkin wedges as instructed in the recipe.

Cleaning contact lenses is made easy. Many useful tips for cleaning contact lenses with instructions. Now cleverly clean contact lenses and care for contact lenses. Roughly summarized, all types of contact lenses need care products, because intensive and correct cleaning, disinfection, and storage not only maintain the general wearing comfort but ultimately of course also the health of the eyes!

By constantly wearing contact lenses, deposits can form on the surface of the lenses, and here all dirt and dust particles are an ideal breeding ground for germs. The consequences here can be reddened and dry eyes, as well as the general wearing comfort, can decrease. In order to be able to benefit from the advantages of contact lenses in the long term, you have to clean and care for them regularly – here are a few tips.

Clean contact lenses

The question often arises of whether glasses or contact lenses can be worn with sensitive eyes. You have to make a very individual decision. However, it is very important to use and clean the contact lenses properly. Basically, you should only touch contact lenses if you have washed your hands thoroughly beforehand.

If you prefer cleaning in the evening, it is advisable to carry out an additional manual pre-cleaning beforehand: To do this, simply rub the lens between your fingers with a few drops of table salt or a so-called all-in-one solution and rinse it then rinse off with clear water. In this way, any residual particles are removed. Then you should disinfect the lenses in a storage solution, in a lens case provided for this purpose, in which you can optimally store the contact lenses overnight.

Care for contact lenses

Caring for contact lenses and the choice of care product for contact lenses differs depending on the type of lens: Various care systems are available, which differ between all-in-one solutions and peroxide systems:

  • All-in-one solutions are easy to use and are considered to be extremely convenient because they are suitable for all care steps.
  • Peroxide systems use the cleaning power of hydrogen peroxide and are particularly suitable for sensitive eyes.

In addition, you should treat your contact lenses with extra care with protein removal tablets once a week, and the lens case should also be cleaned regularly, at least every three months. This is how you can combat and avoid burning eyes.

Tannins belong to the secondary plant substances. We get them from a variety of fruits and vegetables. Here we explain how they work and why they are important for a healthy diet.

What are tannins?

Tannins belong to the group of so-called polyphenols. In the chemical sense, these are compounds with a tanning effect. This means that they are used to “precipitate” proteins. This means that they break down proteins into their components – for example into the individual amino acids.

The textile industry, for example, makes use of this property: it uses tanning agents to change the consistency of leather, for example. Among other things, tanning makes the leather more durable and firmer, explains Spektrum magazine.

Vegetable tanning agents: They are found here

Vegetable tannins belong to the secondary plant substances. They are also called tannins and are found in many different plants and parts of plants. According to the spectrum, they are part of:
leaves (tea)
seeds (coffee)
fruits (berries)
Wooden
Tannins are acidic. They are therefore often referred to as tannic acids. They create, for example, the typical tart, sour taste of blueberries or sloes.

Tannins also have an astringent (tightening) effect on mucous membranes and cause a furry feeling on the tongue. You’ve probably noticed this effect before when you ate unripe berries.

This is how tanning agents work

Tannins in plants act as natural defenses against microbial pathogens and pests. For a long time, however, they were considered undesirable ingredients in human nutrition.

According to the knowledge magazine Spektrum, this is because they can form complexes with proteins in the digestive system. These complexes can interfere with the body’s processing of vitamins and minerals.
This can lead, for example, to the body no longer being able to absorb enough iron from food. This can lead to an iron deficiency.

Healthy diet: These foods contain tannins

If you eat a balanced and healthy diet, you often consume tannins. For this reason alone, they are of a certain importance for nutrition. The following foods contain relevant amounts of vegetable tanning agents:
Grain
legumes
Many types of fruit:
apples
bananas
blackberries
cranberries
Grapes
peaches
pears
plums
raspberries
strawberries
Green tea and black tea
red wine
Coffee

Instructions and tips for choosing the right baking pan for cakes. The cake is still one of the most popular delicacies: There are plenty of delicious recipes for the most diverse types of cake. What many people forget, however, is that it’s not just the recipe that counts, but also the right baking pan.

Choose the baking dish according to the recipe

When baking, it’s not just about the right recipe, but also the right cake pan. This is determined by the baking mold and there are many different ones: silicone baking molds and sheet metal molds made of various metals, with and without a special coating.

There are also ordinary standard forms, as well as very complex motif baking forms. And in a wide variety of sizes. Not only the material is fundamentally different, but actually also the later cake form. Therefore, think about which cake recipe is used to find the right shape. For an affordable canned fruit cake, you can use a baking sheet or round springform pan. These molds are also ideal for grandma’s simple plum apple cake. While other cakes cry out for more unusual shapes.

Know-how of the right baking pan

But which form of buck is the right one for the individual? Every baker and every hobby baker has its own preferences and requirements. This applies to the taste of the cake, but clearly also to the texture of the baking pan.

For example, I prefer silicone baking pans, but my sister-in-law has always sworn by metal baking pans with a high-quality enamel coating. So far we have tried both variants – always with good and less good results. In order to be able to make an individual choice, you should take a closer look at the properties, advantages, and disadvantages of each type of baking pan.

Silicone or metal? With or without coating?

As mentioned, my favorite is the silicone baking pan. Molds made of silicone are very flexible and heat-resistant and there is no need for annoying greasing beforehand and then attaching cardboard afterward. After baking, the finished cake can almost always be removed from the mold easily and without much effort – and above all without unsightly crumbling. In addition, silicone can be used not only in the oven but also in the refrigerator. Today, however, this also applies to many sheet metal shapes.

Metal baking molds, on the other hand, are a lot more robust than silicone baking molds. They wear out slower and last a lot longer than a silicone cake pan. Here, however, the quality of the individual mold is very important – the lifespan of the baking mold can therefore vary greatly. But that doesn’t have to mean that a cheap baking pan has to be a bad one. When buying, simply check the workmanship, the impression of the material, and possible seams or transitions. With the right care, you can conjure up delicious cakes and tarts even with a cheap baking pan and you will enjoy them for a long time.

By the way, if the dough sticks to the mold despite everything, it often helps to simply put the still lukewarm mold in the fridge or on the cool balcony for a few minutes. In my experience, a wet towel wrapped around the mold only helps to a limited extent and only with a metal mold.

Which baking pan and which cake go together?

Finally, the question arises as to which baking pan is the right one for which cake. Here, too, there are numerous variants, motifs, and types of sheet metal. My children love playful shapes for their birthday cakes, but these are really only suitable for very simple and dry types of cake: for example marble, chocolate, or sand cakes. Unfortunately, sensitive and rather sticky types of dough quickly stick to the “details” of a motif mold – even if it is very well greased or made of high-quality silicone.

The commercially available standard forms are somewhat less complicated: springform tins, baking trays, and loaf tins. Incidentally, cool and fresh fruit tarts are best baked in springform pans, warm fruit cakes on a baking tray or also in a springform pan, and sand or bundt cakes in a Gugelhupf or loaf pan.

All car wash tips and tricks for better car cleaning. Regular cleaning makes the car look nicer. However, it increases the life of the paint. Tree sap, bird droppings, and insect residue can leave dull spots if left on the vehicle for too long.

Regular cleaning also protects against the formation of rust, since rust tends to form where dirt binds moisture to the body like a sponge. On the other hand, the water can run off quickly on clean and well-kept paintwork. In the following, various options are presented to get your own vehicle thoroughly clean again, depending on your budget.

Car wash with the car wash

You can easily wash your car with a car wash in the car wash. These are available at almost every gas station. Usually, such a washing process lasts only a few minutes and your own physical effort is limited to retracting the radio antenna unless it works automatically or your car even has a real antenna.

  • You should also critically check again whether all windows are raised as far as they will go and whether the sunroof – if available – has been closed. Otherwise, simply follow the instructions that the automatic car wash gives you.
  • Important: Do not drive into the car wash until you are prompted to do so by a signal!
  • Incidentally, a convertible with a fabric top should not be sent through the car wash, even if some manufacturers do not object.

Disadvantages of the car wash

As effortless as the car wash option is, it also has a number of disadvantages:

  • Firstly, it costs money, and usually quite a bit. You will usually have to shell out 5 to 10 euros for a wash, sometimes even more for premium washes.
  • Secondly, car washes are never as thorough as washing by hand. The car is tolerably clean afterward, but the brushes cannot get into many nooks and crannies.
  • Thirdly: car washes are not exactly gentle on the paint over the long term. There are better and worse systems here, but after years of visiting the car wash, sensitive paintwork in particular usually looks as if someone had scrubbed it with a scouring pad. Fourth: Even if it sounds banal, the interior of the car is still not clean afterward.

Wash car with hand wash

This is both the gentlest and most cost-effective way to wash your car. Plus, you don’t even have to leave your property, provided you don’t live in a community where washing cars on private property is prohibited. This is sometimes the case for reasons of water protection. In any case, washing vehicles in public places and streets is not permitted. If you do not have your own property or are not allowed to wash your vehicle there, you can visit a washing box at a gas station that is intended for hand washing.

Step by step instructions for washing the car

First of all, stubborn dirt needs to be removed from the vehicle. The best way to do this is to use a garden hose; gas stations also have a high-pressure cleaner for this purpose. With high-pressure cleaners, however, pay attention to the distance, otherwise, the car paint will be damaged. The tires in particular quickly resent the hard jet of water when washing the car. It is best to keep a distance of about one meter and walk over the vehicle with stroking movements. The vehicle should then be washed off with a clean cloth, starting from the roof.

  1. Bumpers, rims, and side skirts come last. Washcloths, as used in the kitchen, are ideal.
  2. Also, keep a clean bucket of water handy and rinse the rag in it periodically. Incidentally, the washing-up liquid is not suitable for washing the car, as it dries out the paintwork.
  3. It’s better to get a car wash at the hardware store. Although these cost a few euros, one bottle of concentrate is easily enough for one to two dozen washes.
  4. Don’t press too hard on the paintwork, just enough pressure to remove the dirt.
  5. Don’t forget to clean the car windows. You should also end up opening the doors and the trunk and wiping away the dirt that has accumulated here.
  6. Once the vehicle has been cleaned, use the garden hose to remove the foam from the vehicle. If you don’t have a hose at hand, simply fill the bucket again with clear water and run it over the car again.
  7. Then wring out the cloth well and dab excess water off the paintwork to prevent limescale stains.

Wax protects the paint

Once the car has been thoroughly cleaned, you can wax it straight away. The wax layer preserves the paintwork and slows down its aging. In addition, water and dirt roll off more easily, making it much easier for you to do the next wash. You should therefore give your car a coat of wax once or twice a year. Polishing wax is available from hardware stores and car accessory shops.

It is best to apply the wax sparingly with a clean cotton cloth. An old shirt works great here. Incidentally, the wax only belongs on the paint and should not be applied to unpainted plastic parts. On these, the wax dries to a stubborn gray veil.

It is best to proceed in stages. Wax the roof first, then wait a few minutes. Then polish the dried wax with a soft cotton cloth or polishing floss until the paint shines. Then repeat this procedure for the hood, fenders, doors, and so on, one at a time. However, the paint must be meticulously clean and dry. Otherwise, grains of sand will cause scratches, and drops of water will cause streaks in the wax layer.

Nice side dishes for grilling at a glance. Because when the sun invites you to grill, nice side dishes are delicious for everyone at the grill. As soon as the first rays of sunshine let the temperatures rise, everyone feels like throwing on the grill, sitting comfortably with loved ones on the terrace or balcony, and being surrounded by the delicious smell of roasting. In order to be able to enjoy the grilled food perfectly, the side dishes must of course be right. We have collected a few ideas that will make the meal complete.

Grill alternatives without meat

For many, the most important ingredient on the grill plate is meat. Sausages, steak, and marinated chicken breast play the leading role when grilling. But without an attractive supporting actor, the whole thing only tastes half as good. So the question arises: What is there? There are many answers to that. In addition to the classic potato salad, here are a few simple but extremely tasty alternatives that make the meal perfect:

Vegetable skewers

The best tip for your barbecue party is to grill vegetables. Because many types of vegetables are ideal for simply being grilled and also provide a few necessary vitamins. They also conjure up a bit of color on the plate. Depending on your taste, you can cut mushrooms, onions, peppers in all colors, and zucchini into bite-sized pieces, thread them onto skewers and simply place them on the grill with the meat. Carrots, leeks, broccoli, and cauliflower also do well on the skewer. The imagination knows no limits.

Baked potatoes

In this country, the potato is an indispensable part of the classic side dish with meat. And it can be easily prepared with very little effort when the grill is already burning.

To do this, small unpeeled potatoes are first pricked all over with a fork and wrapped tightly in aluminum foil. Then the potatoes can simply be placed between the glowing coals at the very beginning. After about twenty minutes, the potatoes are carefully removed from the embers with grill tongs and a cooking test can be made. The foil potato also goes well with grilling fish.

Vegetable packet

Vegetables can be prepared as packets on the grill in a particularly aromatic way. Again, the ingredients are a matter of taste and creativity. Mushrooms, peppers, zucchini, and aubergines, for example, look great together. To cook them in the packet, they are cut into bite-sized pieces and placed in portions in the middle of an A4 piece of aluminum foil. Now they are drizzled with a little olive oil and seasoned with salt and herbs. If you like, you can also put a small sprig of rosemary between the vegetables. Then the corners of the film are folded up and folded at the top. Now the package can go on the grill for about ten minutes.

Pesto mozzarella ciabatta

Bread is almost as much a part of grilling as grilled meat. But it doesn’t always have to be boring toast. A more sophisticated but superbly simple way of serving bread, and so delicious it could be eaten on its own, is the pesto and mozzarella ciabatta.

For this purpose, a ciabatta is cut crosswise from above to be baked. The slices are placed about an inch apart and shouldn’t go all the way to the bottom of the bread. Depending on your taste, green or red pesto is then spread into the resulting slices and a slice of mozzarella is inserted. The whole thing is now either baked in the oven according to the instructions or wrapped in aluminum foil and placed on the grill for about 15 minutes.
Of course, other bread or baguette can also be prepared in this way and the mozzarella can be replaced with other cheese, depending on taste.

Quick Mediterranean salad

A fresh salad always tastes good with grilled meat. Salads for grilling are therefore the best side dish. A quick, delicious option is a Mediterranean salad made from the rocket, cherry tomatoes, and herder’s cheese. Drizzle with dark balsamic vinegar and grate a little parmesan over it. A delicious salad is ready, which will perfectly underline the grilled food.

Tips and instructions for making popcorn yourself at home. The best tricks and popcorn recipes for making popcorn yourself in a pot on the stovetop.

Popcorn is popular and delicious when a long evening of TV is imminent or a snack is missing for the party. And without much effort and fuss, this delicious treat can be prepared very quickly at home.

Tips for making popcorn yourself

Below are the best tips and tricks on how to quickly and inexpensively prepare popcorn that is tasty and fresh. Great cooking skills and complicated ingredients are not required for this. You need dried corn kernels, some cooking oil, and, depending on your taste, sweet or savory ingredients. No special machine or device is required other than a regular saucepan with a matching lid and a stovetop. And if you don’t have a cooking pot at hand, you can also prepare the popcorn in a pan with a lid.

How is popcorn actually made?

Popcorn is made from corn kernels. The corn kernels contain water and also some oil. If the corn kernels are now heated in the pot, these components change. From the liquid water and oil version in the grain, the components suddenly become gaseous. The corn husk breaks open due to the heat input. And with this small popping up, each individual kernel of corn automatically expands and the popcorn is ready.

In order to get a good result quickly, a pot temperature of around 180 degrees Celsius is required. Then the corn kernel shell tears open and water vapor escapes from the corn kernel. The corn starch gets out of the grain and offers a well-known popcorn shape.

Easy popcorn recipe for everyone

For the basic popcorn recipe, put some cooking oil in a saucepan. A small amount of cooking oil that wets the bottom of the pot is sufficient. Then put the corn kernels in the oil. Then you should definitely put a suitable lid on the pot. This is necessary so that the finished popcorn does not pop out of the pot when it pops up.

Then turn on the stove and heat the pot until a little over half the corn kernels have popped up. Most of the time, the grains pop up very quickly. For this reason, it is better to stay at the stove. After popping up, you should immediately turn off the heat supply. You must immediately remove the finished popcorn from the stovetop so that it does not burn in the hot pot.

Make sweet or savory popcorn yourself

Depending on your taste, the finished popcorn can now be seasoned. Mostly sweet variants with sugar are chosen. But hearty seasoning, for example with paprika, chili, tomato, or curry, is also possible and popular. It is important that the popcorn is still warm when it is seasoned. This way, the selected ingredients stick better to the popcorn.

A little tip for the slimline

The popcorn can be prepared very low in calories. If, for example, a coated pot is selected for the preparation, then no cooking oil needs to be added. The corn kernels pop up even without the addition of fat. However, the popcorn should also be seasoned heartily. Because all sweet variants with sugar or caramel contain a lot of calories.

Learn how to remove mold stains safely and easily. Receive valuable tips and tricks.
Mold stains can be removed from laundry, clothing, walls, mattresses, or the shower curtain. There are various remedies against mildew stains. Mildew stains are often caused by poor insulation or insufficient ventilation.

Many stain removers are based on chlorine bleach. Care should be taken to combat mold stains. A useful tip: reduce humidity to prevent mildew stains.

Remove mold stains from clothing, textiles, and laundry

If you want to remove mold stains from your clothes, you can soak the garment with the stains in buttermilk. The clothes are then washed as usual. In many cases, this method could prove to be helpful.

Removing Mold and mildew stains from the laundry is also important from a health perspective.

Javel water (bleach) is also suitable for removing mildew stains from textiles. Disinfectants are also included here. But you should be careful with it here – it is best to only use it on light-colored and hard-wearing textiles. UV light from the sun can also help to remove mild mold stains.

Remove mold stains from the mattress

Poor ventilation can cause mold stains on mattresses. Because at night, people sweat into the mattress. If the air cannot circulate, the result is mold stains on the mattress.

In order to be able to successfully remove the mildew stains, the mattress should be aired out in fresh, dry air for a long time if possible. It is best to stand it upright and align the mattress to the sun.

If instead of mildew stains there are already full-blown mold stains, then it is advisable to dispose of the mattress. To prevent mold stains you should have a slatted frame. It is also important to remove the bed linen from the mattress in the morning so that it can air out.

Remove mold stains from wallpaper or walls

Spirit and water can also help against mildew stains. When using a retail cleaning product, it is important to note that it often contains chlorine bleach.

Remove mildew stains

A solution of spirits and vinegar essence can be used to treat mold stains and spots. In the case of very severe stains, it is advisable to consult a professional. Mold spores can pose serious health risks.

Remove mold stains on parquet or wood

Mold stains on parquet or wood can usually only be sanded down. Immediately reseal after sanding. Removing mold stains from wood is no easy task. This is because the wood has absorbed the moisture. If there are only slight mold stains in the wood, you can dry them. You can then try to remove them with Schimmel.

Removing mold stains from leather

A mixture of water and spirit can also be used to remove mildew stains on leather. In this case, the mold stains can best be removed with this. Because you can simply wipe the material and the stains are gone.

Remove mold stains from the tent

Mold stains often appear in the tent if you pack the tent up while it is still damp. There are special mold removers for stubborn mold stains on tents. However, these methods do not always lead to a good result. For example, mold stains on a white tent are better removed with hydrogen peroxide. To do this, the material is placed in a 3 to 6 percent solution.

Remove mold stains from paper

In order to remove mold stains from paper, all moisture must be removed from the stains. To do this, you can sprinkle starch or talcum powder on the stain. After a certain time, this is then usually completely removed.

Remove mold stains from the shower curtain

In the case of mildew stains in the shower curtain, special stain removers are usually not used. You can easily wash the shower curtain at the maximum temperature. In this way, the mold stain disappears.

Remove mold stains from upholstery

How to remove mold stains from furniture and upholstery? A combination of vinegar essence and alcohol is considered an effective stain remover. Simply rub the mildew stain with the solution. Then you should rinse the upholstery thoroughly with water. Do not get a new one immediately afterward. To prevent new mold stains from forming, the upholstery must first air out and dry.

How to avoid mold stains?

To avoid mildew stains, you should air the rooms in your apartment or house regularly. You should also make sure that you ventilate sufficiently after showering and bathing. In this way, the probability of getting mold stains in the apartment decreases. In addition, regular ventilation of the rooms also reduces the risk of mold forming. If you have a problem with mold stains caused by moisture, an ergometer is helpful. This allows you to measure the humidity and get to the bottom of the cause of the moisture.

Caring for parquet well is uncomplicated, but takes some time. Only if you clean your wooden floor properly and care for it with the right products will you be able to maintain its attractive appearance. Parquet floors made of wood always look particularly elegant and are therefore very popular. But they only stay that special if you take good care of them.

The basic cleaning works very easily with a broom or vacuum cleaner, for larger dirt with a slightly damp wiper. Since parquet tends to be damaged by too much water, everything should be dried well afterward. Special parquet care products help to preserve the look and shine of the parquet.

Removing stains when caring for parquet

If you walk across the parquet floor in shoes, there are sometimes unsightly contaminations caused by rubber abrasion. These can be easily removed with lukewarm water to which a dash of ordinary dishwashing liquid is added. Vinegar cleaner can also be used.

These agents can also be used to rub off other dirt such as grease stains or sticky substances. Very stubborn stains of all kinds can be counteracted with a mixture of water and alcohol in equal parts. So you can also remove wax stains and even chewing gum. Also, note tricks for removing wax stains from wood and how to remove grease stains from wood.

The biggest mistakes when caring for parquet

It would be fundamentally wrong to use scouring agents for stubborn dirt because the parquet can be scratched so easily. You should also avoid cleaners that contain too many aggressive ingredients, as they attack the parquet. Ammonia should also not appear on the detergent label.

Auxiliary devices such as steam cleaners are also taboo, as they cause the parquet to swell due to the high level of moisture. In general, the following applies to care: Always dry well. See also what you should consider when cleaning marble floors. Here, too, certain cleaning agents can cause damage.

The correct cleaning agent for every type of parquet

In addition to proper cleaning to care for the parquet, it should also be thoroughly cleaned with special parquet care products. If the parquet is sealed, this does not have to happen more than twice a year. It is important to apply the cleaner sparingly because this is the best way to achieve the desired effect. In addition to the sealed floors, there is also a waxed parquet, where it is sufficient to apply fresh wax once a year.

Like solid furniture, oiled floors can be treated with the right oil at irregular intervals, as desired. For each type of parquet floor, there are special means to buy. Always using the right maintenance product for the right floor is important. Here you should also use a higher quality product and not save at the wrong end. Also, note the informative guide to laying vinyl floors.

Oiled or sealed?

Oiled and sealed parquet floors have about the same importance in terms of quality and care. Both can be cleaned normally with special cleaning agents. Depending on the wear and tear, it can take years for oiled parquet floors to require further oiling. This is not easy and most people who are not technically gifted prefer to leave it to a professional. If you do not want to have oiled floors oiled by a specialist, you should make sure that you use a high-quality oil, preferably without solvents.

Ventilation is still essential when oiling, not only because of possible pollutants in the air from the contents of the oil but also because a good, constant room climate helps to achieve the desired result. The easiest way to apply the oil is with a brush or paint roller.

Excess oil is removed again after a short period of exposure. If there is too much oil on the floor, there may be stains. A normal rubber wiper is suitable for removing. Then work the oil into the soil with circular movements using a cloth. In addition, read useful tips for wiping the floor and note useful tips for cleaning the fireplace.