Tag

for

Browsing

Wild apple is a small tree that attracts attention in summer with its lush flowers and provides you with numerous fruits in autumn. Here you can find out what you should consider when planting, caring for and eating.

The winter apple (also known as the crab apple) is a native plant: it has been cultivated regionally and its fruits eaten for centuries. Today, however, the winter apple is rarely found in Germany. It is also a popular refuge for birds and mammals and an important food source for various insects.

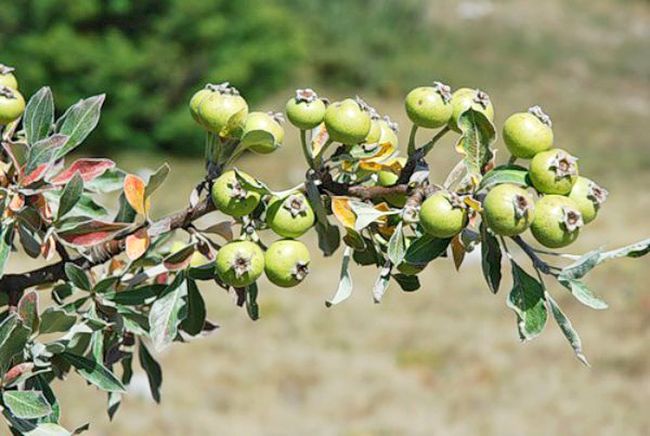
Characteristic is the thin trunk, which only reaches a diameter of two to four centimeters, and the slightly woody consistency. Some branches have thorns. Some varieties also have slightly wrinkled skin. However, this does not affect the health of the tree or the taste of the apples.

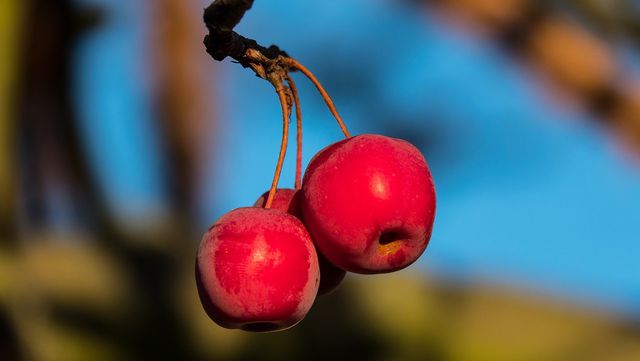
The flowering period of the tree extends from April to May and lets it shine in a white to light pink splendour. The apples ripen in early autumn and are yellowish to reddish in color, depending on the variety. Be sure to choose local varieties for planting.

Plant wild apple: The basic conditions

Before you plant wild apples, you should think about the time and place of planting. Please note the following:

Timing: Autumn is the best time to plant. In principle, however, it is possible all year round.
Location: Choose a sunny to partially shaded spot. The tree likes sun and warmth and should not be overshadowed by other plants. Otherwise it is quite robust, so that wind and rain cannot harm it. Note that the apple tree can grow between 3 and 6 meters tall. However, this varies depending on the variety. At the same time, the roots grow quite extensively and close below the surface of the earth. There are also varieties that are suitable for hedge planting.
Soil: Since the wild apple tree is a wild tree, it can get along with almost any soil. He just doesn’t particularly like extremely wet soil like moor. Nevertheless, you can enrich the particularly nutrient-poor soil with nutrients and sand.

This is how you plant the wild apple

Planting a wild apple is not difficult. To do this, follow the steps below:

Place the young tree in a bucket of water so the roots can soak.
Dig a planting hole. This should be at least twice as large as the plant ball of the wild apple tree.
Enrich the soil with some compost or other organic fertilizer.
Place the small tree in the hole and refill the soil. Squeeze them tight.
Water the freshly planted wild apple tree properly.
Depending on the location, it may make sense to initially secure the young tree with a stake.
If you sprinkle bark mulch around the tree, you prevent weeds and at the same time protect the tree from unwanted competing plants.

Caring for a tree: tips and hints

The wild apple tree is robust and quite undemanding. For care, it is sufficient if you observe the following tips:

The most important thing is that you protect the wild apple from drought. Especially when young, you should water the tree regularly during long periods of drought. We recommend collecting rainwater and using it to feed your plants.
If you want to do something good for your wild apple, you can fertilize it in the first half of the year (spring to June), preferably with compost.
Basically, it is not necessary to trim the wild apple tree. However, if it is not developing in the way that is best for your garden and other plants, or if you want to shape it, you should cut it from time to time. You can read here how to best make the cut: Cutting an apple tree: The right tree cut in spring and autumn
Wild apple is hardy. So you don’t have to take any special precautions for the cold season.
If you want to propagate the apple, the best way to do this is by sowing: Scatter the seeds of the fruit in a pot outside in autumn and keep it moist. Cutting a cutting and cultivating it is often not successful.
Diseases and pests do not worry the wild apple tree for the most part. However, typical apple tree diseases such as apple scab or fire blight can sometimes occur.

Here’s how you can use the wild apple

Wild apples are edible. However, young apples of the tree are rather sour and tart because they contain a lot of tannin. You can cook them to tone down the flavor. In addition, the kernels of wild apples, like other apples, contain the substance amygdalin, which is converted to toxic hydrocyanic acid in the body. Even if you bite into the seeds, they are harmless in small amounts.

Wild apples contain a comparatively large amount of pectin. You may know the substance as a vegan gelling agent. They also have a firmer consistency than cultivated apples. You can take advantage of these two properties by using the fruit for homemade applesauce or apple jelly. You can also make tea, juice or syrup from wild apples.

The fruits are also often used as a decorative element in arrangements or wreaths.

As a pasture for insects, the wild pear is an important food source for bees and the like. The wild form of the pear, which grows in sparse forests, also thrives in domestic gardens. We will show you how to properly plant and care for the rare pear tree.

Plant wild pears in your own garden

The wild pear is the original form of the pear tree and originally grows mainly on the edges of forests and in clearings. Unlike cultivated pears, the wild fruits can only be eaten in processed form, but the gnarled wild pear should not be missing in any natural garden simply because of its ecological benefits. The white umbelliferous flowers provide food for bees and other insects, while the fruits that are stuck are eaten by native birds.

You can buy the wild pear as a young tree in well-stocked garden shops. Before you plant the fruit tree, however, you should pay attention to a few points:

Location: You can plant the wild pear almost anywhere. The only important thing is that it gets a sunny and warm place in your garden. Even on slopes, the wild pear thrives thanks to its deep roots. The blazing sun doesn’t bother her either. On the contrary, in order for the leaves to turn fully colored in autumn, the tree even has to be in full sun.
Soil: Since the wild pear is very adaptable, it grows well on all permeable soils. The only thing you should not plant the tree in is very wet or acidic soil. You can recognize acidic soils, for example, by means of special indicator plants.
When to plant: As with most fruit trees, spring or autumn is the best time to plant the wild pear.
Plant neighbors: In order to reproduce, the wild pear needs nearby pollinators. Apple trees or other types of pears are well suited for this.
Plant wild pear:

First dig a planting hole at the site. Make sure it’s at least twice the size of the wild pear’s root ball.
Slightly loosen the soil at the bottom of the hole and lay a drainage layer of gravel or sand.
Now place the wild pear with the root ball in the hole and fill it up again with the excavation from the plant.
Put a support stick in the ground and tie the young wild pear to it.
Finally, lightly press down the top layer of soil and water the pear tree generously.

The right care for the wild pear

Even if the wild pear is very easy to care for and robust overall, it is worth taking the following care instructions into account:

Watering: The wild pear’s water requirements are usually covered by the occasional rainwater that falls. In particularly long periods of drought, however, you should water them so that the soil does not dry out completely. You should definitely avoid watering too often, as the pear species is very sensitive to waterlogging.
Fertilizer: The frugal wild pear does not depend on additional nutrients.
Pruning: The wild pear is very tolerant of pruning. Once a year, in spring, you can safely remove dead and laterally growing branches. In addition, you should leave the naturally growing fruit tree unpruned.
Harvesting: In autumn, the real wild pear develops round fruits that are about three centimeters in size. At first glance, they don’t look like typical pears at all. The pears only lose their bitter taste when they are overripe or after the first frost. Then you can harvest and process them. The fruits of the Chinese wild pear, on the other hand, are inedible and remain on the branches until they are softened by the frost and serve as food for birds.
Overwintering: In order to protect the wild pear from frost in winter, you should mulch its treetop in autumn with a thick layer of bark mulch or autumn leaves.
Diseases and pests: You no longer need to worry about pests with the robust wild pear. Even the dreaded pear rust rarely occurs with her.

You can use the wild pear in so many different ways

The fruits of the wild pear contain many tannins and fruit acids. In the raw state, they are therefore hardly edible due to the bitter taste. Nevertheless, there are a few ways in which you can still use the wild pear in the kitchen:

Using wild pears in the kitchen: After the first frost, wild pears lose their bitter taste. If you want to speed up this process and process the fruit faster, you can dry and bake the pears. In combination with cultivated pears or apples, you can then process the wild pear into pear syrup or pear puree.
Use wild pear blossoms: Wild pear blossoms can also be useful in the kitchen. As a side dish, the flower buds taste good in a wild herb salad. You can also process the mild-tasting flowers into tea or lemonade. If you sprinkle the buds with sugar water, you can candy them in the oven over low heat and use them to decorate desserts.

Beetroot is healthy and versatile, and therefore a very popular vegetable in Germany. But can beetroot also be eaten raw? We explain what you should consider.

Raw beetroot: A superfood full of vital substances

Beetroot is full of important micronutrients such as phytochemicals, iron, vitamin C and B vitamins. Just 200 grams cover around 50 percent of your daily folic acid requirement.

However, this only applies to raw beetroot. When you boil or fry them, many important nutrients are lost. Most adults should therefore eat the power vegetable raw from time to time. For example, you can enjoy the beet in a salad, as a beetroot carpaccio or in a smoothie. But not everyone should eat raw beetroot – because unfortunately the vegetable also has a few disadvantages.

Eating beetroot raw: the disadvantages

In addition to many positive ingredients, beetroot also contains oxalic acid. If you eat too much of it, kidney stones can form. The acid also makes it harder for your body to absorb calcium. Cooking the beets lowers their oxalic acid content.

Beetroot also contains nitrate. The salt is initially completely harmless to health. However, if it is stored unfavorably or has to be transported long distances, it converts to nitrite. This substance is very dangerous, especially for infants. Therefore, children should only eat nitrate-rich vegetables in moderation.

Conclusion: The dose makes the poison!

Beetroot is a very healthy food that provides your body with many important nutrients. The beetroot is particularly rich in nutrients when it is raw. Therefore, there is nothing wrong with eating the vegetables raw from time to time.

To keep your food low in oxalic acid and nitrate, you should buy fresh, local produce and not store it for too long. You can get beetroot from German cultivation between June and March. If you only cook or blanch the vegetables for a short time, the oxalic acid content will already drop significantly. However, be careful not to cook it for too long – otherwise valuable ingredients will be lost.

Note: Raw beetroot is less suitable for people with kidney problems and small children. In this case, seek medical advice beforehand.

Vitamin B6 is one of the vitamins of the B complex and is involved in many metabolic processes. Utopia explains what happens in the event of an overdose and which foods contain the vitamin.
As with many other vitamins, there is no such thing as “the one” vitamin B6. Rather, vitamin B6 is a collective term for various, very similar chemical compounds with the same biological effect on metabolism: These substances include, for example, pyridoxine, pyridoxal and pyridoxamine. Our body cannot produce these substances itself – which means we have to absorb them through food.

What are the functions of vitamin B6?

Like all vitamins of the vitamin B complex, vitamin B6 is also involved in a number of metabolic processes. As the most important coenzyme in amino acid metabolism, it is particularly important for protein metabolism. Together with folate, riboflavin and vitamin B12, vitamin B6 regulates homocysteine metabolism. Other functions of the vitamin are:

carbohydrate metabolism
fat metabolism
Formation of messenger substances and niacin
Effects on the immune system
Influencing hormone activity

What happens with vitamin B6 deficiency?

A vitamin B6 deficiency is very rare in healthy people and usually does not occur in isolation, but is usually accompanied by other vitamin deficiencies. The main reasons for a vitamin B6 deficiency are alcohol dependence, chronic diseases of the digestive system, side effects of certain medications or insufficient food intake (e.g. in older people). The symptoms of a vitamin B6 deficiency are diffuse:

anemia
neurological disorders
Diarrhea
Vomit
cramps
rashes
inflammation of the mouth

Overdose side effects

With a normal diet, it is not possible to absorb too much vitamin B6. Only those who overdose on vitamin B6-containing dietary supplements, medicines or fortified foods must expect serious side effects. Long-term intake of more than 500 mg of vitamin B6 per day can lead to neurological disorders, skin changes and muscle weakness. And even with a lower dosage of over 100 mg per day, slight neurological impairments can occur.

In an American study (2017), male participants who overdosed on vitamin B6 and vitamin B12 for years had a 30 to 40 percent increased risk of lung cancer. In addition, drugs can interact with vitamin preparations and impair their effectiveness.

Other side effects of overdosing on vitamin B6 include:

sensitivity to sunlight
skin rashes
Uncomfortable tingling in hands or feet
Painful discomfort or numbness
Due to these risks, the Federal Institute for Risk Assessment (BfR) has set a maximum amount of 3.5 mg vitamin B6 per day for food supplements. Nevertheless, it happens that vitamin preparations are overdosed and athletes in particular should be careful with special sports products: As the Bavarian State Office for Health and Food Safety determined in 2015, these dietary supplements sometimes provide more than 3000 percent of the daily requirement.

Daily requirement of vitamin B6

Because of the importance of vitamin B6 for the amino acid metabolism, it was previously assumed that the daily vitamin B6 requirement is related to the amount of protein that one ingests daily: the more protein one eats, the more vitamin B6 is needed to make it available in the body use the body for energy.

However, recent findings indicate that there is no connection between the intake of protein and the need for vitamin B6. For this reason, the German Society for Nutrition (DGE) revised the recommendations in 2019: The recommended intake of vitamin B6 for adults is now between 1.4 and 1.6 mg per day.

Which foods contain vitamin B6?

Vitamin B6 is very sensitive and also water-soluble. Heat and UV light damage it, so it is best to prepare foods rich in vitamin B6 gently or eat them raw and store them in the dark. If you cook food that contains vitamin B6, you should make sure that you use as little water as possible so that the vitamin is not released from the food.

Foods high in vitamin B6 include:

whole grain products
fatty sea fish (mackerel, salmon, sardines, kippers)
Soybeans and other legumes
meat (especially liver)
bananas
Nuts and seeds (walnuts, hazelnuts, sunflower seeds)
potatoes
Red pepper
carrots
Cauliflower
A large portion of potato or carrot salad (300 g), refined with a handful of walnuts, covers an adult’s daily vitamin B6 requirement. Although potatoes and carrots are not in season all year round, they are also available outside of the times indicated in the seasonal calendar from regional cultivation.

Emmer flour is an ancient grain flour with a strong, nutty taste. Not only can you use it to bake bread and rolls, you can also use it in other areas. We present you with various ideas.

Emmer is one of the oldest ancient grains and is considered the forerunner of today’s wheat. After higher-yield types of grain had long supplanted the emmer, today it is once again being appreciated. On the one hand, this is due to its aromatic taste, on the other hand, emmer flour contains numerous healthy nutrients. In particular, it is very rich in protein and provides important minerals such as zinc, iron and magnesium.

In the kitchen you can use the flavor characteristics of emmer in many ways – not only for baking bread, but also for cakes or pasta, for example. We give you an overview of the possible uses of emmer flour and present a simple recipe for emmer spelled bread.

Whether wheat, spelt or emmer: Flour is best bought in organic quality and from regional suppliers. Organic flour comes from ecologically sustainable agriculture and is therefore not treated with chemical-synthetic pesticides. If you use regionally produced products for cooking and baking, you also save on unnecessary transport routes and know exactly where your food comes from.

Incidentally, because emmer is less productive than other varieties when cultivated, conventional emmer flour is rare. That’s why most of the flour comes from organic farming anyway. To be on the safe side, look out for an organic seal.

Emmer Flour: Nutty basis for breads

Emmer flour provides a good basis for bread or rolls with a hearty, spicy taste. You can either use pure emmer flour for baking bread or combine it with other types of flour to form a mixed dough. In terms of taste, emmer flour and spelled flour go particularly well together.

Mixtures have the advantage that the ingredients bind better to form a dough – pure emmer flour does not stick as well as, for example, wheat flour. Doughs made from pure emmer flour therefore have a slightly softer consistency, but can still be processed.

In most wheat or spelled-based bread recipes, you can simply substitute the same amount of emmer flour for the amount of wheat or spelled flour. In this case, however, it is best to add water or milk carefully and gradually: If you change the type of flour, you may need a little more or less liquid than in the original recipe. Depending on the consistency of the resulting dough.

Recipe: mixed bread with spelled and emmer flour

Ingredients:

300 g emmer flour
250 g spelled flour (type 630)
1 tsp sugar
2 tsp salt
2 teaspoons bread spice
20 g fresh yeast
200 ml lukewarm water
130 ml cow’s milk or plant milk
flour for sprinkling

Directions:

In a large bowl, mix the emmer and spelled flour with the sugar, salt, and bread spices.
Make a well in the middle of the mixture and crumble in the yeast. Then add the water and milk to the well and stir in the yeast until dissolved.
Knead all ingredients with the dough hook of the hand mixer to a smooth dough. Cover the bowl with a kitchen towel and let the dough rise for an hour.
Sprinkle a work surface with some flour and knead the dough well again with your hands. Then shape it into a ball.
Line a baking sheet with baking paper (or a sustainable baking paper substitute). Place the ball of dough on the baking sheet and cover with a kitchen towel. Let the dough rise again for an hour.
Cut the emmer spelled bread in a diamond shape and brush generously with water. Then bake it at 200 degrees for about 45 minutes.

Emmer flour: not only suitable for bread

You can not only use emmer flour for baking bread. Its nutty taste also lends an interesting note to sweet baked goods and goes well with spices such as cinnamon, anise or fennel seeds. This means that emmer flour is also suitable, for example, as a basis for Christmas cakes.

The strong emmer aroma goes particularly well with apples. In apple pie recipes, it is therefore worth replacing part of the flour with emmer flour. As with baking bread, you can usually do this in a 1:1 ratio. For example, try the following recipes with emmer flour for a change:

Apple pie with shortcrust pastry
Covered apple pie from the tin
Vegan apple pie

You can also make pasta dough partially or completely with emmer flour. Because emmer grains are a bit firmer than wheat grains, the pasta gets not only a strong wholemeal flavor but also an additional bite when you prepare it al dente.

Peas are not only delicious, but also very healthy. You can read here what nutritional values they contain, whether you can eat them raw and what you can prepare from them.

The pea belongs to the legume family and is one of the oldest cultivated plants. It probably originally comes from the Orient and was consumed there long before the beginning of our era. In the following you will find out what makes the pea so healthy and nutritious and what you can prepare from it.

Peas: Healthy legumes with valuable nutrients

When looking at the nutrients of the small green legume, it performs extremely well. 100 grams of peas contain only 81 calories and only traces of fat, making them very suitable for healthy weight loss. Furthermore, there are seven grams of protein, four grams of fiber and eleven grams of carbohydrates in 100 grams of peas.

Peas also contain many vitamins and minerals. These include, for example, vitamin E, B and beta-carotene as well as magnesium, iron, phosphorus, calcium and zinc. Legumes also contain a number of important amino acids.

By the way: The pea not only provides very good macro and micronutrients, but is also easy to digest and has a positive effect on the blood sugar level. It is therefore well suited for diabetes or high blood sugar levels.

Peas: fresh, dried, frozen or canned?

Although peas are basically very healthy, they differ in their nutritional values ​​depending on their condition. You can buy them fresh, dried, frozen, or canned.

Peas are in season from June to September. During this time you can buy them fresh. If you decide to use fresh peas, you should use them as soon as possible, as they will keep in the refrigerator for a maximum of two to three days. When shopping, also keep in mind that from a kilogram of fresh peas in pods, only about 350 grams of peas are left. Tip: If you have bought too many peas, fresh peas are ideal for freezing. These have a shelf life of about a year.

When it comes to shelf life, dried peas are unbeatable. These have a shelf life of one year or longer and are also available all year round. They also contain almost twice as much protein as fresh peas.

Canned peas have a shelf life of three to five years. Compared to fresh, dried and frozen peas, however, they are the least recommended, as they are heated before filling and thereby lose many valuable ingredients. In addition, manufacturers often add salt, sugar and flavorings to the canned peas.

Frozen peas are shock-frozen before they are packed, which means they retain a large part of their nutrients. They also have a long shelf life, are easy to store and are therefore a good alternative to fresh peas if you also want to use them out of season.

By the way: You can also eat peas raw without any problems. They contain no toxins and can be eaten practically straight from the bush.

Are you looking for the right beans for your fully automatic coffee machine? We explain to you what you should pay attention to when buying coffee beans.

Choosing the right coffee beans: you have to pay attention to this

In principle, you can use any bean for your fully automatic coffee machine, provided it is suitable for fully automatic coffee machines. However, this does not always make sense, since, for example, different beans are usually used for a black coffee than for an espresso. But one after anonther.

In order to find the right coffee for your fully automatic coffee machine, three points are particularly important:

quality of the coffee beans
Roasting of the coffee beans
Settings of the coffee machine
Ultimately, however, it also depends on your own taste, which you will probably only find out over time. Let’s take a closer look at each point.

Two types of coffee dominate world trade

There are around 40 different types of coffee worldwide, but only two dominate the market. The Arabica bean makes up around 70 percent of world trade, the Robusta bean just over 30 percent. The two beans differ in appearance and taste. The Arabica bean is longer, flatter and oval in shape. The caffeine content is lower compared to the Robusta bean, but it is said to have a finer, slightly sweet taste. The Robusta bean is slightly smaller and has fewer fats and lipids. Therefore, their crema is a bit firmer and is therefore often used for espresso.

Coffee bean or espresso bean?

Fully automatic coffee machines work fundamentally differently than filter machines. Instead of slowly filtering the coffee, the fully automatic coffee machine works with a pressure process. This pressure is what creates an espresso.

The espresso beans that you can buy in stores are usually a blend of different types of beans that contain a higher proportion of robusta. These ensure a strong, intense taste. With a mixture of Arabica and Robusta, you can benefit from the positive properties of both beans. This makes espresso beans ideal for use in your fully automatic coffee machine.

Don’t let the term “espresso bean” fool you. The term is somewhat misleading, because the so-called espresso bean is basically a coffee bean. However, beans used for espresso are roasted darker, have more caffeine and are stronger in taste. So it can be an orientation.

This can also be the case for medium roasted coffee beans. The use for coffee crema is often noted on the packaging.

Which beans are unsuitable?

Avoid caramelized beans for the fully automatic machine. The sugar can clog the grinder in the machine and in most coffee machines this is very difficult to reach and clean. Flavored beans such as amaretto or Irish cream are also not recommended for this reason.

Caution is also required with very oily coffee beans. If the bean is very shiny, essential oils are already escaping. This is a clear sign that they shouldn’t be using these beans. The lipids come out when the coffee has been roasted past the second crack. This is often the case with dark Italian roasts.

But that doesn’t mean that you have to do without the variety altogether. Essential oils can also leak out if you have stored the coffee beans for a long time. After buying, you should use the beans relatively quickly and only store them in airtight packaging.

Roasting: Which degree of roasting for use in the fully automatic machine?

In addition to good bean quality and the bean mix, the roasting of the coffee beans is of crucial importance. In principle, a distinction is made between light, medium and dark roasting. Some roasting masters even subdivide into five degrees of roasting and indicate their roasting as medium-light or medium-dark. The different colors are caused by different roasting times. A coffee bean has over 900 different aromas that are released at different roasting temperatures. Filter coffee beans are usually roasted lighter, while espresso beans tend to be roasted darker.

Note the drum roasting process, if specified. Because drum roasting is much gentler on the bean than industrial hot air roasting, where many flavors are lost.

Zavtrák is the name of the traditional Russian breakfast. If you like it hearty, this is the right place for you in this country, because things get really rich here early in the morning.

Milk porridge (kascha), sausages, fried potatoes, scrambled eggs, pancakes (blini), quark pancakes (syrniki), bread, butter, jam, kefir and much more are what Russians love to eat with their morning meal. In this way, despite the harsh climate, they are already equipped with enough energy for the day in the morning.

These Russian specialties are very popular at breakfast: a national dish called kasha, a porridge made with milk, mostly made from buckwheat, but also made from oats, barley or rye, and blini – also affectionately called blinchiki – the traditional Russian pancakes.

For all lovers of hearty, hearty cuisine, this delicious breakfast offers a really tasty and energetic start to the day.

Food culture in Russia

In general, Russian cuisine is very diverse: this is because in this large country different ethnic groups live together and mix their traditions. In addition, the food culture in the city differs greatly from that in rural areas: Most people in the country eat richer and heartier food, while people in the city are also influenced by international eating habits and eat a little more “globalized”.

How do you prepare a Russian breakfast?

get hungry and want to prepare a breakfast like in Russia? Then let’s see together how to do it and what ingredients you need for it.

The first thing you should do is open your fridge and see what’s left over from yesterday, because Russians often have leftovers from the day before for breakfast, such as rice, noodles or fried potatoes.

Now set up a hearty sausage and cheese platter, warm up a few sausages and prepare the eggs – either scrambled or fried, just as you like. Don’t forget the bread: white bread is fine, although the Russians themselves prefer black bread. Just like in Russia, your morning meal should not be without various dairy products such as cottage cheese, kefir and sour cream.

That was the easiest part, now comes the preparation of the Russian kasha (milk porridge) and the blini (Russian pancakes). For this we give you the following breakfast recipes:

1. Recipe kasha – Russian milk porridge:

Ingredients (2 people)
75 grams of buckwheat
250 ml milk (1.5% fat)
1 pinch of salt
2 tbsp poppy seeds
As you like: some sugar, butter, jam, fruit or meat preparation

preparation

Briefly toast the buckwheat in a saucepan and add the cold milk, salt and poppy seeds. Let the porridge cook on low heat for about 10 minutes. Stir the kasha from time to time.
Russians usually serve their kasha with sugar and melted butter, more often with fruit, or sometimes with meat dishes for a savory version.

2. Recipe Blini- Russian pancakes:

Ingredients (2 people)
150 grams of wheat flour
12 grams of yeast
250ml milk
12 grams of butter
1 egg
50 ml cream
1 tsp sugar
½ tsp salt
some oil
At will: jam, sour cream

preparation

Dissolve the yeast in the milk and add half the flour and the melted butter. Leave the mixture to rest for about 30 minutes. Now separate the egg and mix the yolk with the sugar in a bowl. Now whip the cream and then the egg white until stiff. Then fold it into the whipped cream. Stir the dough and add the remaining flour, salt, egg yolks with sugar while continuing to mix. Finally, add the cream and egg white mixture and let the dough rest for a few hours. Now heat some oil in the pan, add some batter and fry your Russian blinis on both sides.
In Russia, blinis are either filled with jam or served folded, then dipped in sour cream.

Who of you has never tried a traditional English breakfast?

Bacon, scrambled eggs, pork sausages, beans, toast, jam and much more are part of the “Full English Breakfast”, the traditional breakfast that the British love to eat in the morning. And “Full” really is. In contrast to the small, often quick bites that we eat in Germany in the morning, the English breakfast always counts as a complete meal.

When it comes to this hearty highlight of English cuisine, non-British people usually have different opinions: either you love it or you find it far too sumptuous and take some getting used to.

Especially on cold winter days, the English breakfast offers a really energetic start to the day.

Why is the English breakfast so rich?

The reasons for such a hearty breakfast have a historical background. In the past, such a high-calorie start was very good preparation for a long day’s work in the factory or in the field. The rich breakfast provided the necessary energy for this. Nowadays, so many reserves of strength are no longer absolutely necessary, since many jobs are less physically demanding. That’s why there are also lighter breakfast options in England for everyone who prefers to stay in shape and start the day carefree.

How do you prepare an English breakfast?

As previously mentioned, the Full English Breakfast consists of both sweet and savory foods. Although there are now various healthier breakfast options, this traditional morning meal remains popular and is a nice ritual for the whole family, especially at the weekend.

Now let’s take a look at how to prepare a traditional Full English Breakfast and what ingredients you need to make it.

Ingredients (2 servings)

– 6 sausages
– 4 slices of smoked bacon
– 2 medium-sized eggs
– ½ can of beans in tomato sauce (baked beans)
– 2 medium tomatoes cut in half
– 12 cleaned mushrooms
– 4 slices of toast
– some butter
– some jam
– 8 oranges
– Coffee or Ceylon tea

preparation

Fry the sausages in the pan on all sides, do the same with the bacon until it is crispy. Keep everything warm in the preheated oven (to 80°C). Warm the beans over medium heat for about 5 minutes. Now fry the tomatoes and mushrooms in the same oil as the sausages and bacon and keep them warm in the oven as well. Toast the bread slices until golden, cut each in half diagonally and brush with butter and jam if desired. Now fry the eggs in another pan: depending on your taste, you can either prepare fried or scrambled eggs.
Arrange the plates as shown in the picture above.

Coffee or tea: what do you drink with an English breakfast?

At a full English breakfast, Brits usually drink a freshly squeezed orange juice and a cup of tea. However, over the years, traditional English tea has been increasingly replaced by breakfast coffee, which is best drunk thin in a large cup.

Summer recipes should be easy to digest and quick to prepare. We’ll give you a few inspirations and tips for dishes that taste great even when it’s hot.

As beautiful as summer and sunshine are, heat can also put a strain on the body: Our circulation and metabolism suffer as a result. For summer recipes, we intuitively use foods and dishes that are easily digestible and do not weigh us down. So the body does not have to do heavy digestion work as well.

Fruits and vegetables that contain a lot of water, such as cucumbers, tomatoes, radishes, lettuce and watermelon, are well suited for a hot diet. They have a refreshing effect, quench thirst and do not burden the circulation and metabolism.

Even if we often lose our appetite when it is hot, it is still advisable to eat regularly, but in smaller portions. If you fast at lunchtime due to the heat and help yourself to a lot at the barbecue buffet in the evening, you have to expect the food to hit your stomach: You may quickly feel unwell, heavy and tired. To avoid this, we have put together some easy summer recipes for all times of the day.

Tip: We recommend that you use organic ingredients and, if possible, seasonal and regional products for all recipes. They are not contaminated with pesticides and cause fewer CO2 emissions thanks to shorter transport routes.

Summer recipes: tips for a light breakfast in the heat

Even on a summer morning, breakfast shouldn’t be skipped. It provides you with the necessary energy for a day that can be particularly exhausting and sweaty due to the heat.

Inspiration for a quick summer breakfast:

Organic yoghurt (or plant-based yoghurt alternative) with homemade muesli and fresh fruit. Here you will find a recipe for homemade vegan yoghurt.
Homemade smoothie bowls with nutrient-rich and filling toppings like hemp seeds, roasted buckwheat, nuts and seeds.

Coconut overnight oats: Summer recipe for a fresh breakfast

Overnight oats are cereal flakes soaked in milk (or plant-based milk alternatives) overnight, which you can top with fresh fruit and granola in the morning. You can also easily prepare and transport them in sealable jars. So you can enjoy your breakfast outside when the temperatures are still cool – for example in a park.

For one portion of coconut overnight oats you need the following ingredients:

60 g oat flakes (or a mixture of oat, spelled and millet flakes)
2 tbsp ground flaxseeds
250 g coconut yoghurt
100 ml coconut milk (or other creamy plant-based “milk”, e.g. homemade almond milk)
20 g grated coconut
2 tsp maple syrup, honey or fruit juice of your choice (optional)
Also: a lockable jar

How to prepare overnight oats:

The night before, mix the rolled oats with the flaxseed, yoghurt, milk, grated coconut and, if necessary, the maple syrup, honey or juice.
Put everything in a sealable jar and put it in the fridge overnight.
The next morning you can refine the overnight oats with other ingredients as you like.
For topping you can use anything you like:

Seasonal fruits, such as berries
nuts, seeds and kernels
muesli and granola

Summer light lunch recipes

When the heat is at its peak at midday and in the afternoon, you may want to take siestas rather than complaining about hearty food. Nevertheless, it is important that you also eat a small meal at lunchtime to give your body new energy. You can prepare these dishes, for example, and take them to work. So you can better endure the heat in the office.

Here are some inspirations for quick and light lunch dishes:

How about a cold, refreshing Spanish-style soup? Then try the tomato gazpacho soup – a classic summer recipe.
A salad is also quick to make – you can also vary it as you like. Nutrient-rich and yet easily digestible salads are, for example, millet salad, quinoa salad or lentil salad. You can cook the basis of millet, quinoa or lentils for several servings. So you don’t have to spend time at the stove every day when it’s hot.
Maybe just a vegetable salad is enough for you? Some farmer’s bread or potato bread goes well with it.

Easy lunch when it’s hot: summer rolls with tofu and peanut dip

Another quick and easy summer recipe: Asian summer rolls are made from wafer-thin round sheets of rice paper and are filled with lots of vegetables. Other suitable fillings include tofu, tempeh or glass noodles. There is also a peanut dip.

You need these ingredients for six summer rolls:

200 g dry glass noodles
50 g tofu (tip: make your own tofu)
1 tbsp oil
salt and pepper
1 tbsp soy sauce
1 carrot
40 grams of cucumber
a handful of lettuce, e.g. baby spinach
some (Thai) basil and coriander
6 rice paper sheets
For the peanut dip:

1 thumb-sized piece of ginger
1 clove of garlic
2 tbsp soy sauce
2 tbsp maple syrup
the juice of a lime
85 g peanut butter
30ml of water
How to prepare the summer rolls:

Prepare the dip: peel the ginger and garlic. Chop the garlic and ginger in a blender. Add the remaining ingredients and mix everything together. If you like your dip more liquid, you can add more water. Alternatively, you can chop the garlic and ginger with a knife and mix the dip with a whisk.
Cook the glass noodles according to package instructions and drain.
Prepare the tofu: Cut 50 grams of tofu from the long side of a piece of tofu. Cut the small 50 gram piece into six long tofu strips. Fry the tofu in oil until all sides are golden brown. Now season the tofu with salt and pepper. Optionally, you can also use chilli, curry powder or other spices. Finally, deglaze the tofu with the soy sauce. Turn the tofu in the pan until all sides have gotten some of the soy sauce.
Prepare the vegetables: peel the carrot and cut it into thin strips. Wash the cucumber well and cut it, including the skin, into thin strips. Wash the lettuce and pat dry. Wash and roughly chop the basil and cilantro.
Now take a large pan and fill it with warm water (about an inch high). Prepare a large cutting board or plate to fill the rolls on.
Soak the rice paper: Take a sheet of rice paper and put it in the warm water for a maximum of one minute. Take it out and put it on your pad.
Now you can fill the rice paper. First put some lettuce in the middle of the rice paper. This is followed by the vegetables, tofu, glass noodles and herbs (in whatever order you like). Finally, you can put a dollop of the sauce on top of the filling.
Fold the summer rolls: Fold in the side edges of the paper slightly above the filling. Then, gently but firmly, roll the paper up from the bottom up. It might take a bit of practice to avoid tearing the paper. If you want to be on the safe side, you can just use two sheets of rice paper.
You can now sprinkle the finished rolls with sesame seeds.

Summer Light Dinner Recipe: Tomato Basil Hummus

What’s better than a long, warm summer evening sharing food with friends? A large bowl of hummus in which to dip veggie sticks and dip fresh flatbread is perfect for the occasion. There are also olives and other antipasti.

Tomato basil hummus recipe

For 15 servings of hummus you will need:

125 grams of sun-dried tomatoes
425 g canned chickpeas
2 1/2 tbsp olive oil
5 tbsp tahini
2 1/2 tbsp lemon juice
2 1/2 tsp cumin
salt to taste
20 grams of basil
Tip: Alternatively, dried chickpeas are also available in stores. First, let them soak in water overnight. Then you have to cook the chickpeas before you can make hummus out of them.

How to prepare the hummus:

Pour hot water over the tomatoes and let them soak for ten minutes. Then drain and let them drain. (You can keep the drained water in the fridge and use it to cook pasta the next day, for example).
Cut the tomatoes into small pieces.
Rinse the chickpeas.
Add the chickpeas to the blender along with the tomatoes, olive oil, tahini, 120 milliliters of water (more if the mixture is too thick), lemon juice, cumin and salt and puree until smooth.
Wash the basil, shake dry and finely chop. Mix it in with the hummus.
Serve the hummus in a bowl. You can garnish it beforehand with olive oil, olives and roasted seeds.
Add the hummus:

You can of course spoon the hummus pure. But this summer recipe tastes even better if you add side dishes. For example:

Flatbread or Arabic bread. Just add a few spoonfuls of hummus and add any other ingredients you like.
Pickled olives, pickled vegetables or homemade antipasti
Balsamic Onions
Vegetable sticks, for example carrots, celery, peppers or cucumbers
Lettuce leaves: You can fill these with the hummus and other toppings.