Tag

Freeze

Browsing

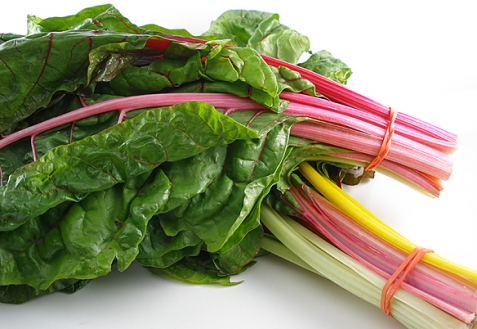
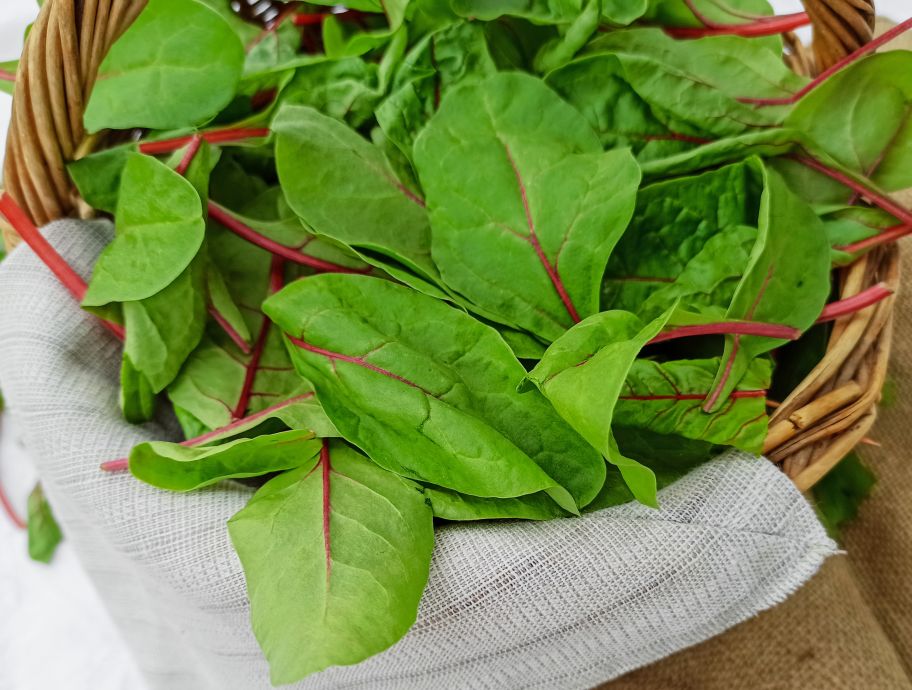
Freezing chard is the best way to preserve the leafy greens. But how does one do it? We’ll explain how to do it best.

Chard is a seasonal vegetable. If you grow it in the garden, you often have more at once than you can use. In this case, you can give away excess harvest or freeze for self-sufficiency. That is how it goes.

Freezing chard: the preparation

Before you can freeze the chard, you need to prepare it well:

Cut off dried stem ends.
Wash the chard thoroughly, preferably several times, as there are often a lot of earth residues attached.
For varieties with thick stems, you should remove them and cut them into pieces.
Cut the chard into small pieces. You can cut it a little coarser or finer according to your taste.

Blanch chard before freezing

Before freezing, you should blanch your chard. This means it keeps its color and can also be frozen to save space. Leaves and thicker stems should be blanched separately:

Put a large pot of water on and bring it to a boil. Lightly salt the cooking water.
While the water is getting hot, prepare a large bowl of ice water.
As soon as the water boils, first blanch the chopped chard stalks for one to three minutes.
Remove the stems from the water with a slotted spoon and shock them in ice water.
Blanch the leaves as well, but only for a minute.

Freeze chard

You can now freeze the prepared chard:

Drain the blanched chard thoroughly. You can also pat it dry with a cloth. It is important that it is completely dry.
Put the chard in portions in freezer containers, preferably made of glass or stainless steel. How to avoid plastic when freezing.
Place the containers in the freezer or freezer.
The chard can be frozen for around eight to twelve months.

You can easily freeze strawberries without losing much of their flavor. Not only whole fruits are suitable for freezing, you can also preserve strawberry puree in this way. You can find out more about the various options here.

You can freeze strawberries after the strawberry season and thus preserve them. Depending on the weather, the strawberry season varies slightly from year to year. However, the bright red fruits can usually be harvested between May and July. Then they also have high season in supermarkets and organic shops. In order to have delicious strawberries for the rest of the summer and even in winter, we show you different ways to freeze them.

Freeze strawberries: instructions for whole fruits

You can easily freeze fresh strawberries – whether from the organic market or harvested yourself – as whole fruits:

It is important that you wash the strawberries thoroughly before freezing. It is best to clean them in cold, standing water, for example in a large bowl or in the sink, so that you do not damage the fruit.
Now remove all stems and remaining foliage.
Then pat the berries dry with some kitchen paper or a towel. They must not be wet when freezing, so that a layer of ice does not form.
To prevent the fruit from sticking together later when defrosting, freeze them first: place berry by berry next to each other on a flat plate or tray. The berries should not touch each other. Then place everything in the freezer for an hour or two.
To make room again, you can then fill the strawberries into their final freezer container. Place the pre-frozen berries in a stainless steel freezer box and store in the freezer. Frozen fresh strawberries will keep for about eight months.

Tip: Only use freshly harvested soil without dents or holes for freezing. Damaged fruit spoils faster even in the freezer – better eat it now.

Freeze strawberries as a puree

You can also puree the strawberries before freezing them. After defrosting, you have fresh strawberry puree at hand that is perfect for pancakes, with homemade Bircher muesli or to be enjoyed on its own. You can also cook strawberry jam or combine it with rhubarb to make strawberry rhubarb jam.

Wash the undamaged, fresh fruit in standing, cold water (as described above).
Remove the stems and foliage, then gently pat the strawberries dry with a towel.
Place the strawberries in a tall container and puree them into a smooth cream.
If you want the puree to be even creamier and finer, spoon it through a fine sieve before freezing. So you can easily catch the small seeds.
Pour the strawberry puree into a freezer bowl or glass.
Tip: You can also pour your pureed strawberry puree into ice cube molds. Frozen strawberry ice cubes taste wonderful in sparkling wine, mineral water or homemade cocktails.

If you freeze leftover cooked rice, you don’t have to throw anything away. So that it still tastes delicious after surfacing, we explain how to freeze rice properly.

With rice, it can quickly happen that you misjudge the amount and there is a lot left over. You can keep cooked rice in the fridge for a few days for the next meal. Or you can freeze it and thaw it later when needed.

Rice freezes easily. We’ll show you what you should pay attention to so that the grains still taste good after surfacing and don’t become soft and mushy.

Freezing rice: These varieties are suitable

Perfectly cooked rice grains still have a slight bite. When you thaw frozen rice, the texture changes and the grains become a little too soft. Some types of rice are better for freezing than others because they retain their texture better. These varieties include:

jasmine rice
basmati rice
Patnareis
If you want to cook rice ahead of time, you can intentionally undercook it a little. When reheated, it reaches its perfect consistency.

How to properly freeze and thaw rice

Freeze rice properly

Do not cook the rice too soft, but so that it is still al dente.
Let the rice cool down.
When portioning the rice you have two options:
You freeze everything together. If your rice was still grainy enough after cooking, it will create a frozen clump that you can always break off pieces and thaw.
You’re already freezing it in portions equal to one meal. This is useful if your rice is not quite as grainy and would not be as easy to portion when frozen.
Freezer containers made of glass or stainless steel are suitable for freezing.

Properly defrost rice

It is best to let the rice thaw at room temperature.
Then heat it up with steam. If you boiled it again, possibly with additional water, it would quickly become too soft and gooey.
Instead, place it in a fine-mesh strainer that you hang over a saucepan of boiling water. The rice is heated by the rising steam. Stir the rice once during this time so that it warms up evenly.
You can also just add it directly to the sauce you made for your dish to thaw and let it simmer over low heat.

You can easily freeze zucchini and use it for cooking when it is not in season. You can do without plastic freezer bags – we will show you suitable alternatives.

Freeze zucchini: 12 months shelf life

Since zucchini is a seasonal vegetable, you should buy and freeze it from regional cultivation and organic quality during the season (June to October in Germany). So you can enjoy the summer squash all year round.

The courgettes will keep in the freezer the longest if you don’t cook them first:

Wash the courgettes and cut them into cubes or slices.
To keep your zucchini crunchy when defrosting, sprinkle them with a little salt. The salt draws moisture from the zucchini, making it easier to freeze.
After a few minutes, some water will form on the zucchini pieces. You can dab this off after five to ten minutes.
Then put the zucchini pieces in a screw-top jar and freeze them.
Frozen zucchini will keep for at least 12 months and retain their flavor.

Freezing zucchini cooked: what do you have to pay attention to?

Freezing cooked zucchini is especially worthwhile if you overcooked it. Then you don’t have to throw away the leftover zucchini. Again, you can put the zucchini in a screw-top jar to freeze them.

To prevent the zucchini from getting mushy when defrosting, you should defrost them very slowly at room temperature. Then heat them up briefly in a saucepan or pan.

You can easily freeze parsley. So you don’t have to throw anything away after a lush harvest, because fresh parsley cannot be stored for long.

Parsley is at its most fragrant just before flowering. In May or June you can cut them just above the ground. Unfortunately, fresh parsley does not keep very long. To use parsley outside of harvest time, you can preserve it. In the event of a harvest surplus, you also avoid throwing away food.

In principle, you have the option of drying or freezing herbs. Since the parsley loses a lot of its aromatic substances when it dries, we recommend that you freeze the herb.

Freeze parsley: how it works

Wash the parsley with water.
Dry them gently with a kitchen towel.
Place the parsley in a sealable, frost-proof container. We recommend, for example, containers made of glass, stainless steel or cotton bags. For the sake of the environment, you should avoid using plastic fresh storage bags. (More information: Freezing food without plastic)
Another alternative are ice cube molds. Simply fill them with chopped parsley and some water.
Finally, place the parsley in the freezer.


As long as the cold chain is not broken, the frozen herbs will keep for several months. You can take them out of the freezer when needed and simply crumble them with your fingers.

Carrots freeze very well. In these instructions, we will show you how easy it is to do and what you need to consider before and after freezing.

Here are some tips to keep in mind when freezing carrots:

Only use carrots that are in good condition. They shouldn’t have any bad spots and should still be crisp. Freshly harvested carrots are best.
You can also freeze baby carrots. However, their taste could be softened.
Bunched carrots are best, especially medium-sized ones. These preserve the flavor best and you can freeze them with relatively little effort.

Freezing carrots: this is how it works

Prepare the carrots for freezing:

Thoroughly wash and peel the carrots, or scrape them with a knife. Then cut off the two end pieces. Tip: In principle, you can also freeze unpeeled carrots. But if you peel them beforehand, you will save yourself work later.
If you want, you can also cut the carrots into small slices. So you can process them directly when you take them out of the freezer.
Blanch the carrots before freezing them. Add the carrots to unsalted, boiling water for about 2 to 3 minutes. Of course you can also freeze raw or cooked carrots, but they won’t last as long.
Meanwhile, fill a bowl with cold water and some ice cubes. Place the carrots in the ice water for about 2 minutes. As a result, the carrots do not continue to cook and remain nice and crunchy.
If you have cut the carrots, place the pieces next to each other on a flat surface (e.g. on a baking sheet) and put it in the freezer for about an hour. This will prevent the pieces from freezing together.
It is often recommended to use cling film or freezer bags as containers for frozen vegetables. In order to avoid unnecessary plastic waste, however, we recommend that you do without it. Instead, you can use sealable stainless steel cans.


Alternatively, you can use thick-walled jars or cotton bags for plastic-free freezing. Don’t overfill the jars or they may burst.
Frozen carrots will keep in the freezer for at least six months, blanched carrots for around nine months.

Freezing pasta is a good solution if you misjudged your cooking. Here you can find out what you should keep in mind so that they still taste good after defrosting.

If you ever have pasta left over after cooking and eating, you don’t have to throw them away. They don’t last long in the fridge either. All the better that you can also simply freeze pasta.

Freezing pasta: This is how you prepare the pasta

Before you freeze pasta, there are a few things you should do to prepare.

Let the leftover pasta cool completely.
Pour into a container suitable for freezing. In order to protect the environment, you should not use single-use plastic utensils. You can easily freeze pasta without plastic using mason jars or stainless steel cans.
A cotton bag is best for freezing noodles: Fill it up and lay it flat in the freezer – this is how you get a noodle sheet. From this you can easily break out the required portions later.
Tip: To prevent the noodles from freezing into a large, indivisible lump, you can toss them in a little oil beforehand. Wet them well and then pour them into the jar.

Freeze and thaw pasta

Then store your pasta in your freezer or freezer.

By the way: If you are still looking for an energy-efficient appliance, take a look at our best list of freezers.

You then have a number of options for defrosting the frozen pasta:

Moisten the noodles with a little water and briefly heat them in the microwave.
Put the frozen noodles in lukewarm water and slowly thaw them.
To keep them tasting freshly cooked, simply place the frozen noodles in a pot of boiling water for 2-3 minutes.
Tip: You can also freeze leftover sauce in a separate container.

Fruit dumplings are simply delicious! We would love to have plum, apricot, or strawberry dumplings all year round. The good news: Sweet dumplings made from potato or curd dough can also be frozen wonderfully. We’ll tell you the best way to do it.

Freeze and finish dumplings properly

Place the dumplings at a distance from each other on a baking sheet and pre-freeze them so that they don’t stick together, then simply place in portions in cans or freezer bags and freeze.

To finish, place the dumplings, not thawed, in the boiling, lightly sugared water, allow them to rise, and allow them to steep for 15-18 minutes.

Meanwhile, prepare the butter crumbs.
Lift the dumplings out of the water, drain, roll in the buttered crumbs, and serve sprinkled with icing sugar.

If you freeze broccoli, you can still enjoy the summer vegetable in the fall and winter. We’ll show you how it’s done – and tell you the best way to defrost the florets again.

Broccoli is a relative of cauliflower, grown in Europe mainly in Italy. From June to October he is also in season in Germany. The vegetable with the dark green florets is very healthy: broccoli is rich in minerals such as potassium, iron and zinc. It also contains various B vitamins and lots of vitamin C.

Freezing broccoli: How to cook it

It is best to buy the broccoli at the market during the season, where you can get it unpackaged. The florets should look fresh and green and still be connected. Avoid broccoli that is already bruised or discolored.
At home, wash the broccoli thoroughly, removing the leaves and the woody end of the stalk. Cut the florets into 1-1/2 inch pieces and the stem into 1/4 inch slices.
If you like, you can now put the broccoli pieces in a bowl with water and some lemon juice for five minutes. This is how the broccoli keeps its green color.
Tip: If you buy organic broccoli, you avoid chemical-synthetic pesticides.

Also: If you want to eat the broccoli right away, don’t worry about bruises when you go shopping – they are quickly removed and the vegetables taste just as good.

Blanch the broccoli before freezing

Before freezing, you should blanch the broccoli briefly. Otherwise it will get mushy later when defrosting. Boil a few liters of water in a large saucepan. Place the chopped broccoli in the boiling water for about 2 minutes, then scoop out the pieces with a slotted spoon. Now let the broccoli cool in a colander.

How to freeze broccoli

To freeze the broccoli, fill a freezer container, such as a glass one, and place it in the freezer. The broccoli can be kept for up to a year.

If you later want to thaw the broccoli pieces individually, you should prefreeze them before freezing. Place the broccoli florets a little apart on a board or tray and place in the freezer for half an hour. This will prevent the broccoli pieces from sticking together when you freeze them. You can then freeze them as described above.

Thaw frozen broccoli

There are several ways you can defrost the broccoli:

You can thaw the broccoli at room temperature or in the refrigerator. Depending on the ambient temperature, this can take a few hours.
Broccoli can be thawed much faster in a large pot: Bring water to a boil and blanch the frozen broccoli in it for a maximum of 90 seconds. This also keeps the vegetables nice and crunchy. Attention: For this method you need a large pot with a lot of water so that the liquid does not cool down too much due to the cold broccoli. Caution: Consider whether you can still use the broccoli water after cooking. If not, another method might be more water-efficient.
In the oven, you can defrost and roast the broccoli at the same time. To do this, place the broccoli pieces in a mold, drizzle them with a little olive oil and season with salt and pepper. Then place the mold in the 200 degree oven for 15 minutes.

Freezing gooseberries is a good solution if you’ve harvested too many to eat them all fresh. Here you can find out what you should pay attention to.

Freezing gooseberries works very well if you pay attention to a few things. The green, smooth gooseberries are particularly suitable for freezing. The berries don’t have to be quite ripe yet, because that way you reduce the risk of them bursting later.

Unlike other fruits, you don’t have to freeze gooseberries immediately after picking them – you can store them for a few days beforehand.

Freezing gooseberries: the preparation

Wash and trim gooseberries

Wash the gooseberries in the sink or a bucket, then remove their flowers and stems. The water should only be lukewarm or even cold.

Blanch gooseberries

To prepare, you should also blanch the gooseberries. To do this, put them in a pot of boiling water for about two minutes and then take them out again. Then pour cold water over them.

Sugar or not?

Optionally, you can sugar the gooseberries before freezing. This is not a must, but sugar makes the berries even more durable. Simply sprinkle the berries with a little sugar or boil it in some water and then pour the liquid over the berries.

Recommendation: shock-freeze gooseberries

Fruit often freezes together in the freezer and you can no longer remove it in portions. To prevent this, you should flash freeze the gooseberries before freezing:

Place them individually next to each other on a baking sheet or large plate.
Then store them in the freezer for two hours.
Important: The gooseberries should not touch each other and the freezer compartment should be set to the highest level for a short time.

The actual freezing

The last step follows: Freezing.

Take the shock-frozen gooseberries out of your freezer after two hours and store them in containers.
Make sure not to use plastic bags, but rather more environmentally friendly variants. Old jam jars or stainless steel cans, for example, are well suited. You can find out what other options are available here: Freezing food without plastic: 5 tips.
Store the jars in the freezer or freezer compartment.
The berries can now be kept for eight months. You can even store them in the freezer for up to a year.