Tag

grow

Browsing

Simply grow spring onions, garlic, and herbs yourself? What sounds like a beautiful dream can actually be implemented, because some herbs or types of fruit and vegetables can continue to thrive indefinitely – even on your windowsill.

Spring onions, leeks, lemongrass, and fennel (cabbage)

These foods are particularly easy to follow. To do this, place the bottom two to three centimeters of the respective vegetable with the root residue in a glass of water and change it every few days. After about seven days, the green part of the plant grows back at the top, creating a new plant. If you want, you can also plant them in a pot with soil. With fennel, however, only the herb thrives, not the tuber. When buying, you should make sure that onions, leeks, lemongrass, or fennel are fresh.

Garlic

As soon as garlic is left a little longer, small green shoots will sprout from the bulb. If this happens, you can put the toes in a bowl with some water. The shoots, which are very similar to the green of spring onions, thrive quickly. When the shoots are about 10 centimeters long, they can be easily harvested with kitchen scissors.

Alternatively, the clove of garlic can be planted in the ground with the shoot upward. After just a few weeks and regular watering, a new tuber will grow back.

Ginger

Perhaps you have already observed that new shoots grow from ginger bulbs. With a little skill, you can grow a new plant from a piece of ginger that has been expelled.

To do this, fill a pot three-quarters full with soil, place the ginger root on top and cover it loosely with soil. For ginger to thrive, it needs a warm and humid climate. You simply build a small “greenhouse” by covering the pot with foil or a plastic lid. Poke a few holes in the foil to allow air to get in.

After a few weeks, tender shoots break out of the ground. Now you can remove the cover, but watering enough moisture is still important. In a warm and sheltered place, ginger grows into a slender plant with reed-like leaves.

In autumn, when the ginger plant sheds its leaves, it is harvest time: you can simply dig up the ginger tubers that have grown back. The plant thrives ideally if you put the tuber in the ground in spring.

Romaine lettuce, cabbage, and bok choy

An undamaged stalk is enough for romaine lettuce and co. to grow back.

To do this, place the stalk without leaves in a glass of water and place the whole thing in a sunny spot, for example on the windowsill. The water should be changed every few days; In addition, it is advisable to wet the stalk with water from a spray bottle from time to time.
After about two weeks, the first leaves will grow back, and after three to four weeks you will have a complete head of lettuce, cabbage, or pak choi. The latter two can also be planted in the ground and grown there.

Herbs like mint, rosemary, basil, coriander

It is very easy to grow herbs. For this, you need a stalk of the desired herb, which is cut off just below a leaf. To avoid crushing the delicate stalk, use a sharp knife instead of scissors.

Now remove the lower leaves and put the stalk in a glass with water. Here, too, the water should be changed regularly. Roots will form quickly; as soon as these are about five centimeters long, the plantlet can be potted. Plenty of suns and sufficient water accelerate growth. Use stems from good quality plants for your planting experiment, as unfortunately supermarket stock is often grown in such a way that the plant will die when the leaves are removed.

Potatoes

From mid-April, the tuber can be grown wonderfully by burying a potato that has already germinated in a pot or bucket with soil. The shoots must also be completely covered with soil. During the summer, the potato plant blooms very nicely. When the flowering season is over and the potato tops are turning brown, you can dig up your home-grown potatoes.

Tip: If none of your potatoes have germinated yet, you can alternatively quarter them and place them in water for a few days. That’s how they cast out.

Pineapple

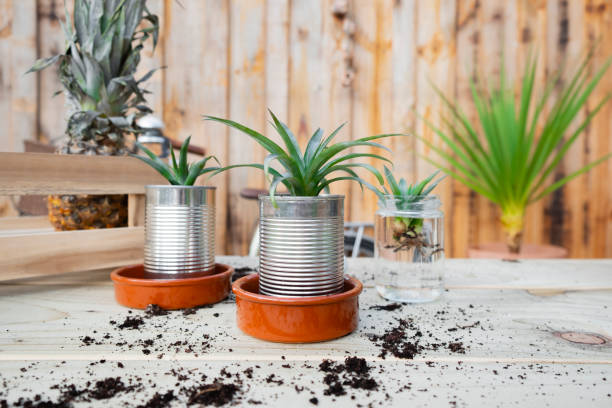
You need a little patience when breeding pineapples because the process takes about two years. Be sure to buy a ripe but not overripe fruit that has golden brown skin and unblemished leaves.

Twist off the stalk with the leaves, removing the lower leaves until the stalk is exposed about an inch. Place the stalk in a glass half-filled with water and place it in a warm place.

Once roots have formed, you can pot the seedling. Regular watering is important so that the soil always stays moist. After about two months, a real small pineapple plant has already grown, which you should report after a year. Your patience will be rewarded after about 20 months: the pineapple flowers for the first time! With a bit of luck, you may soon be able to harvest your first pineapple.

In many cases, cancer is linked to an unhealthy diet. Luckily, you can influence them yourself. By avoiding the following 5 foods, you prevent cancer.

Tasty but carcinogenic: These foods “feed” cancer cells

Research on the subject of nutrition and health is constantly coming up with new findings. Due to the large number of studies, it is sometimes difficult to keep track. In addition, there are sometimes contradictory results.

Stiftung Warentest categorizes five popular types of food that are suspected of promoting cancer. However, not all of them are clear to what extent they actually promote cancer. For example, the effect of milk is controversial (see below). Nevertheless worrying: All five end up on the plate or in the glass of many people every day.
Processed meat (sausage)
(Red meat
milk
alcohol
sugar

1. Processed meat: highest cancer risk level

The results on processed meat are particularly alarming: The “WHO” even classifies sausage, ham, cured, smoked and salted meat products as having the highest cancer risk level 1 – and thus on a level with tobacco smoking. Although the risk of dying from the effects of smoking is 175 times higher, processed meat is said to be responsible for 34,000 deaths worldwide every year.

2. Milk: causes and prevents cancer

The results on milk are particularly interesting: While small amounts, i.e. 0.2 to 0.8 liters, can protect against colon cancer, consumption in large quantities is said to increase the risk of cancer. According to the German Society for Nutrition, calcium from dairy products can increase the risk of prostate cancer in men.

3. Alcohol and sugar: directly and indirectly carcinogenic

According to the WHO, the influence of alcohol is clearer: “Alcohol increases the risk of cancer in any quantity.” The IARC assigns alcohol to Category 1. This means that just complete abstinence eliminates the negative effects of alcohol. However, the more you drink, the higher the risk. It also doesn’t matter which type of alcohol: each is considered a risk factor for various types of cancer in the oral cavity, esophagus, throat, liver, colon and breast.

Conclusion: A healthy diet has a major impact on the development of cancer

It is advisable to follow the recommendations of Stiftung Warentest and WHO and only consume small amounts of the foods mentioned or even remove them completely from the menu. A balanced and healthy diet with lots of fruit, vegetables and legumes makes more sense.

However, the risk of developing cancer can never be completely eliminated. Even if you completely avoid the foods mentioned, do a lot of sport and eat healthily, you can still get a malignant tumor.

In many cases, cancer is linked to an unhealthy diet. Luckily, you can influence them yourself. By avoiding the following 5 foods, you prevent cancer.

Tasty but carcinogenic: These foods “feed” cancer cells

Research on the subject of nutrition and health is constantly coming up with new findings. Due to the large number of studies, it is sometimes difficult to keep track. In addition, there are sometimes contradictory results.

Stiftung Warentest categorizes five popular types of food that are suspected of promoting cancer. However, not all of them are clear to what extent they actually promote cancer. For example, the effect of milk is controversial (see below). Nevertheless worrying: All five end up on the plate or in the glass of many people every day.
Processed meat (sausage)
(Red meat
milk
alcohol
sugar

1. Processed meat: highest cancer risk level

The results on processed meat are particularly alarming: The “WHO” even classifies sausage, ham, cured, smoked and salted meat products as having the highest cancer risk level 1 – and thus on a level with tobacco smoking. Although the risk of dying from the effects of smoking is 175 times higher, processed meat is said to be responsible for 34,000 deaths worldwide every year.

The WHO therefore recommends eating as little sausage as possible, as it promotes cancer formation. According to test.de, “frequent daily consumption of more than 50 grams can increase the risk of colon cancer by 18 percent”. The recommendation for red meat is as little as possible up to a maximum of 500 grams per week. So steak and ground beef are also carcinogenic?

The findings of the “International Agency for Research on Cancer” are not quite as clear here, which is why red meat is classified as “probably carcinogenic” (category 2A). However, a connection with colon, pancreas and prostate cancer is also possible here. According to current assessments, poultry, game and offal are not of concern.

2. Milk: causes and prevents cancer

The results on milk are particularly interesting: While small amounts, i.e. 0.2 to 0.8 liters, can protect against colon cancer, consumption in large quantities is said to increase the risk of cancer. According to the German Society for Nutrition, calcium from dairy products can increase the risk of prostate cancer in men.

In women, on the other hand, small amounts of milk may protect against breast cancer.

One looks in vain for milk on the list of the WHO or the IARC. This does not mean that milk cannot be carcinogenic in certain cases. However, the current research situation does not allow milk to be clearly classified as carcinogenic.

3. Alcohol and sugar: directly and indirectly carcinogenic

According to the WHO, the influence of alcohol is clearer: “Alcohol increases the risk of cancer in any quantity.” The IARC assigns alcohol to Category 1. This means that just complete abstinence eliminates the negative effects of alcohol. However, the more you drink, the higher the risk. It also doesn’t matter which type of alcohol: each is considered a risk factor for various types of cancer in the oral cavity, esophagus, throat, liver, colon and breast.

If you don’t want to do without, you should follow this rule of thumb: women should only have one drink a day and men should have a maximum of two drinks a day, experts advise. A drink is already 0.1 liters of wine or 0.3 liters of beer.

Conclusion: A healthy diet has a major impact on the development of cancer

A balanced and healthy diet with lots of fruit, vegetables and legumes makes more sense.
However, the risk of developing cancer can never be completely eliminated. Even if you completely avoid the foods mentioned, do a lot of sport and eat healthily, you can still get a malignant tumor.

With these home remedies, your hair will grow faster and get a nice shine. If your hair is brittle, you don’t always have to go straight to the hairdresser. With these natural home remedies, which you also have in your kitchen, your hair will grow faster.

Hair can suffer, especially in summer: A lot of sunlight, frequent showers, and sweating can make your hair strawy and brittle. Don’t let that discourage you. Your hair can grow back shiny and strong. The following home remedies can boost your hair growth.

1. Healthy eating

Actually, this is not a home remedy just for your hair, but a must for a healthy life. Your hair and nails are made up of amino acids. A nutritional deficiency leads to hair loss. In addition, you should consume the following vitamins and minerals throughout your diet:

Zinc

Zinc is responsible for cell division and can accelerate hair growth. In the diet, it is found in nuts and meat.

Amino acids

They are also colloquially called proteins. They accelerate growth and are the building blocks of your hair. So it doesn’t work without it. All 9 amino acids must be absorbed for perfect hair growth. They are found in tofu, legumes, meat, and fish. If you like, you can also use a protein shake for optimal care.

Biotin

Biotin is crucial for blood flow to your scalp. This is how your hair roots get their nourishment. Biotin is found in oatmeal, nuts, and spinach. For those who are lazy, biotin is also available as a tablet for supplementation.

Vitamin A

Vitamin A promotes hair growth. It is found in tomatoes, apricots, and dairy products.

iron

Iron not only promotes blood formation but also accelerates hair growth. It is found in spinach, parsley, and mussels.

2. Brush properly

Proper hair care is important for healthy growth. The hair roots are sensitive and should not be damaged by vigorous brushing. Metal or plastic brushes should not be used. It is better to use brushes made of natural materials such as wood and natural bristles.

3. Regular haircuts

Haircutting has a positive effect on your hair health. If not trimmed regularly, split ends will form. In the worst case, it can later affect the entire hair. Regular cutting promotes your hair growth and the regeneration of your hair.

4. Hair grows faster with the proper shampoo

Silicones and other additives should be avoided in care products. They weigh down the hair and can hinder growth. Better to use natural care and styling products.

5. Hairstyle

Especially in summer, a ponytail or an updo cools you down. But be careful: If the hair is tied together too tightly, it can break and fall out. A ponytail that is too tight can be a reason for your hair loss. The hair root is damaged by the pressure and the hair breaks off. Instead, go for loose braids or wear your hair loose. Give your hair and hair roots a break from time to time.

6. Hair Masks

A hair mask helps to regenerate your hair, give it a new shine and accelerate hair growth.

Olive oil with rosemary

The mixture is heated in a cup. After that, the mask needs to steep for 3 days before being gently applied to the hair and scalp. After half an hour, the mask can be washed out again. The olive oil and rosemary support growth and ensure shiny hair.

Soybean mask

For this mask, soybeans are mashed with water in a blender. After that, the milk-like mask is applied to the hair. Soy contains all the important amino acids. Better than any conditioner, these absorb into your hair. Your hair will look healthier and feel softer after use.

Avocado mask for fast hair growth

For this mask, a ripe avocado is mixed with a little olive oil in a bowl. The mask is then applied to the hair and scalp. Avocado contains a lot of vitamin E and stimulates hair growth. The hair is cared for and shines after use.

Edamame are unripe green soybeans and originally come from Japan. We reveal what you should pay attention to when buying, growing and preparing.

Edamame means “bean on a branch”. The soybean, also known under the name “lucky bean”, is often referred to as a superfood in this country because of its high protein and fiber content. However, the eco-balance is not good due to the long transport routes, among other things.

Nutritional Values ​​of Edamame: Lots of proteins and amino acids

Edamame not only contains many proteins, but also nine important amino acids: histidine, isoleucine, leucine, lysine, methionine, phenylalanine, threonine, tryptophan and valine.

Nutritional values ​​of 100 g edamame:
125 calories
12 grams of protein
13 grams of carbohydrates
4 grams of fat
This makes edamame particularly suitable as a filling supplement and for a low-carb diet.

Growing Edamame: Also possible in your own garden

Even if the soybean is mainly cultivated in Asia, it also grows in the Central European climate. That’s exactly what the Taifun project “1,000 Gardens” found out. As soon as it is above 10 degrees overnight (from around April) and the weather forecast predicts this for at least another week, you can start sowing your soybeans.

According to the project description, you should consider the following when growing:
Make a furrow about 3-4 cm deep.
Put a soybean every 2 cm.
Cover the beans with soil and gently press down.
Water the beans when it doesn’t rain.
It is also recommended to install a protection against birds and rabbits.
Soybeans can be sown until June. You can usually harvest about two months after sowing. Since edamame are immature soybeans, you should take care to harvest them when they are still green and have fine hairs.

Prepare Edamame: As a snack recipe or side dish

Edamame is traditionally eaten as a starter, snack or as a side dish. The preparation is very simple:
The unripe green beans, including the pod, are boiled in salted water for five minutes so that they are still nice and crunchy.
The still moist pods are then sprinkled with coarse sea salt. The pod should still be wet so the salt can stick and form a salt crust.
You can refine edamame by drizzling it with chili and lime juice or with sesame oil and Tabasco. A combination of sesame oil, lime juice and soy sauce also tastes delicious.
The pods are not eaten. Although the whole pod is cooked, only the beans in the pod are edible. At this point, manual work is required and you have to free the beans from the pod by puffing them up. Many also “suck” them out of the pod – one more reason to pay attention to organic quality.

Growing mushrooms – is that possible? In fact, it is not that difficult to grow your own mushrooms. We will explain to you which varieties and methods are best suited.

Growing mushrooms at home: why it’s a good idea

Mushrooms – which are not plants, by the way – are low in calories, but provide important nutrients. Most mushrooms are a relatively good source of protein and can also contain important ingredients such as the important nerve cell component potassium, B vitamins or iron and phosphorus. Mushrooms, for example, contain 91 percent water, potassium, phosphorus and vitamins B1 and B2.

In contrast to wild-collected mushrooms, you don’t have to worry about the fact that home-grown mushrooms are contaminated with heavy metals or radioactive. If you grow mushrooms yourself, you can harvest all year round.

When it comes to where they grow, mushrooms are undemanding. However, they prefer shady places to sunny ones. Many varieties, such as mushrooms, can even do without light, which is why you can even grow mushrooms in the basement. They don’t like direct sun that much because they dry out too quickly there. Some mushrooms depend on sufficient humidity, more about that in the next sections.

This is what you need to grow mushrooms

You don’t need much to start your mushroom cultivation. Essentially, there are two things: the fungus and a substrate.

You have two options when choosing the mushroom: Either you only buy the mushroom culture, the so-called mushroom mycelium. Or you buy a mushroom culture kit, where everything you need is already prepared. Making a mushroom culture yourself is quite difficult for you as a hobby mushroom grower, so you will probably have to buy it. Ready-made sets also have an advantage: the substrate is usually already penetrated by the fungal tissue, so that the fungus very quickly begins to form its fruiting body, i.e. the part that we eat. That’s why you already have the first harvest successes after three to five weeks.

Choosing the substrate is easier. Ordinary residual products are used here. For example, you can use the following as a substrate for growing mushrooms:
coffee grounds
straw
sawdust
wood (untreated and unvarnished)
tree stumps

Make sure the substrate is as clean as possible. Because mushroom cultivation needs a lot of moisture, which in turn promotes the growth of germs or mold. If in doubt, you can treat your substrate with steam over 60 degrees Celsius. This kills germs and unwanted fungal spores.

You can fill the substrate in a bucket, pot or box, for example. Depending on the location you choose, a mushroom grow bag may also come in handy. It prevents the mushrooms from drying out. Mushroom growing bags are used in particular when your chosen location is very dry. You can buy together with the mushroom cultures.

Grow mushrooms yourself: This is how you start your mushroom cultivation

Once you have the mushroom culture and substrate together, you can get started. With these tips you will succeed in growing mushrooms:

Before you put the mushroom culture in the substrate, water the substrate and then let it drain. It should be damp but not soaking wet.
Also make sure that the humidity in the area is high. 80 to 95 percent relative humidity is ideal. The basement, bathroom or kitchen are probably best suited here. If you don’t have a room with high humidity, you can support the growth of your mushrooms with a mushroom grow bag or indoor greenhouse.
Make sure the temperature is right: Mushrooms like a warm, humid climate, so the temperature should be between ten and 25 degrees Celsius. But it is worth taking a look at the packaging of your mushroom culture. This often indicates a temperature window.
Mix the mushroom culture under the substrate and fill it in a bucket or box. The layer should be a few centimeters thick.
Now it’s time to keep wet and wait. Check daily that your substrate is still damp. It is best to moisten it with a spray bottle. Be careful not to let the water stand in it and always use fresh tap water – otherwise mold can form here too.
If you only work with a mushroom culture, it will take a few weeks for the mycelium, i.e. the subterranean networks of your mushroom, to develop. Only then does the fruiting body form.
When the mushrooms are the size you want, you can harvest them. The best way to do this is to cut them off with a clean knife.
As a rule, a mushroom culture will sprout three to four times after you have harvested it. In between, she always needs a few days off.

Porcini mushrooms are one of the most popular mushrooms on our menu. Year after year, their full aroma attracts many mushroom pickers to the neighboring forests. Even if such a walk in the forest offers not only full baskets but also relaxation, it would be great if we could also grow the popular porcini mushrooms at home.

Grow porcini mushrooms

The bad news first: while button mushrooms, oyster mushrooms, king oyster mushrooms and many other mushrooms can be grown easily at home or in your own garden, this is unfortunately not yet the case with porcini mushrooms.

Porcini mushrooms belong to the so-called mycorrhiza fungi, i.e. they absolutely need the community of living plants for the development of their fruiting bodies. Without this community, the underground mycelium will grow, but no fruit with the distinctive brown hat will be visible.

Mushroom mycelium and fruiting bodies

What we commonly refer to as a fungus is actually just the aboveground fruiting body of a huge underground network, the mycelium. These cells of the fungal mycelium, which can hardly be seen with the naked eye, extend over long distances like a net in the soil or, in the case of tree fungi, penetrate entire trunks of wood.

In breeding, mushrooms are provided with a suitable growth substrate. This can be soil, wood shavings or even coffee grounds. In mushroom growing kits, this substrate is already inoculated with the appropriate mushroom mycelium.

Mushroom growing in the garden

For mushroom cultivation in the garden, holes are often drilled into old trunks or blocks of wood into which wooden dowels inoculated with mycelium are inserted. Alternatively, in addition to the dowels, a suitable substrate is also supplied in mushroom growing sets, which enables cultivation on or in the ground. For ideal growth you should choose a shady and slightly damp location and then be patient. It can take three to six months for the mycelium to spread.

It’s faster with the mushroom growing sets for the home. Here the first mushrooms can sometimes be harvested after less than two weeks. However, since the breeding ground in the mushroom boxes is limited, this is the end after two to three harvests, while forest mushroom cultures can be expected to produce delicious mushrooms in the following year as well.

Growing porcini mushrooms in the garden

Even if there are no growing kits for porcini mushrooms, it is not ruled out to grow porcini mushrooms in your own garden. However, your garden should be more of a small oak or spruce forest so that there is even a chance of colonizing a porcini mycelium. As with truffle cultivation, you can try to inoculate the soil around living oaks and spruces with unwashed mushroom pieces that still contain enough spores. With a bit of luck and a lot of patience and the right weather conditions, there may be success in the years to come. If you don’t want to wait that long, you can at least console yourself with little namesakes – the stone mushrooms.

Growing and eating sunflower greens as microgreens? This healthy alternative to enjoying the small seeds of the flower brings you a lot of valuable nutrients and vital substances at any time of the year.

Growing sunflower greens yourself: you need that

You can easily grow fresh sunflower greens yourself. However, you should take a look at them every day and give them a little nurturing. The nice thing is that you can grow the vitamin-rich mini greens in a bright place in your apartment at any time of the year and you don’t need a balcony or garden.

For your sunflower microgreen cultivation you need the following material:

For pre-germination: A germination jar and a dark cloth to cover. Possibly a bowl and colander for rinsing.
For growing: A shallow dish, ideally with drainage holes, and a dense dish or tray to stand on. You can also upcycle used plastic packaging from salads, fruit or vegetables.
The best way to get seed soil is from a garden center. Look for an organic seal and that the soil does not contain peat. As a result, the CO2 balance is better and you protect the moors.
Sunflower seeds: You can use both peeled and unpeeled seeds for sunflower greens. In both cases you should have at least a handful ready and pay attention to organic quality.

Sow and harvest: This is how you get fresh greenery from the windowsill

Whether spring, summer, autumn or winter – you can grow your sunflower greens all year round just like other healthy offspring. For this you do the following:

Soak the sunflower seeds in plenty of water in a saucepan or similar. Cores with shells need about 12 hours, without shells about 6-8 hours soaking time.
After this pre-swelling, which acts like an initial spark for the seeds, you pour off the water and rinse the seeds two or three times with fresh water.
Now fill the seed in your germination jar and let it germinate at room temperature. Because sunflowers germinate in the dark, it is better to protect the seeds from light and cover them with a cloth if necessary. It takes about two to three days for the first sprouts to appear.
Hygiene is important during these first three days: Rinse the germinating seed thoroughly with water every day. At the same time, the kernels receive sufficient moisture for further germination. If you use peeled sunflower seeds, you can now easily detach and skim off the loosening fine seed membrane.
If the white sprouts on the kernels have broken through the shell or are visible on the peeled kernels, you can plant the sprouts to grow. Fill the bowls with about two centimeters of soil and distribute the seed so that there is still some space between the individual plants. Then sprinkle some more soil over it.
Now all you have to do is practice the right feeling for the water supply: Just pour a little at the beginning. There should be no waterlogging, otherwise the seed can become moldy. Always add a little water in the following days.
Place the plant bowls with your “sunflower field” in a room-warm place that offers sufficient sunlight. After about eight to 12 days, the plantlets develop juicy, green cotyledons and begin to develop the next set of leaves.
Now it’s time for the harvest: most of the black shell caps have fallen off. If not, brush them off with your hand. Then cut off the fresh sunflower greens above the ground. You don’t actually have to wash it before you eat it. Unless there is obviously dust or dirt on it.

Germinate sunflower seeds – why?

Sunflower seeds are small packets of fuel. When they germinate, they develop additional qualities. You can harvest the sprouts, which grow into green seedlings, like cress and then process them further.

The tender little plants taste sweet and nutty and are even a little crunchy when they are freshly harvested.
This makes the fresh greens the perfect partner for soups, sandwiches, pan-fried vegetables and anything else that calls for an upbeat topping.
If you want to use a lot of the sunflower bambinis, you can use them to prepare a salad or mix a smoothie. In any case, you should make sure that you eat the sunflower seedlings fresh.
You can process sunflower green better in larger portions than some other microgreens (e.g. from radishes, broccoli, mint), which have a more intense taste and spiciness.
The main advantage: the young plants have a very high nutrient density. In other words, measured in terms of total weight, they contain more vitamins, minerals and trace elements than ordinary vegetables. In addition, there is fresh chlorophyll and antioxidant substances (e.g. flavonoids).

The sowing of a coffee plant is possible all year round. Cultivation works best with fresh seeds, which ideally can be taken from the ripe coffee berries. After they have been separated from their somewhat harder shell and the silver skin that encloses them, they can then be planted about a centimeter deep in the ground. It makes sense to plant each bean in its own pot. Head cuttings can be obtained from a coffee bush and planted directly in soil. A sufficiently warm location is important in both cases. If the plant is large enough and has adequate root development, it can be transplanted into a larger pot.

Now a mixture of soil and substrate is good for you, as constant moisture should be guaranteed. Further repotting is usually required at most every two to three years. Soft rainwater is best for watering. A slightly acidic soil, which favors growth, can be achieved by occasionally adding lemon juice. Tropical and subtropical plants such as the coffee plant from Ethiopia should also be sprayed with water every day if possible, as this allows them to absorb moisture through their leaves. Warm summer rains are good care for the shrub, which otherwise cannot tolerate outdoor temperatures. In the colder months, you should water your Coffea less, but keep the humidity as high as possible.

The coffee plant likes temperatures between 20 and 25 degrees, making it the ideal houseplant. In winter, it also tolerates slightly cooler temperatures of around 12 to 15 degrees. A significantly colder environment or drafts should be avoided. It does well in a light location, not exposed to direct or blazing sun or cramped by other plants. You can prune your coffee plant irregularly if a bushier growth is desired.

It can take a few years for the plant to flower for the first time. A brush can be used to help pollinate the flowers so that pollination occurs evenly. But then coffee cherries, the fruits of the coffee plant, also grow. The green berries turn red within 8 to 12 months and can finally be harvested. If you do not want to roast the coffee beans obtained in this way or if the yield is too low, you can of course use them as new seeds and thus increase your local plantation.

Did you know that you can plant the avocado seed and grow your own avocado? All you need is water, toothpicks and some potting soil – and of course the stone from which you want to pull the avocado.

The guacamole is ready and you still have an avocado seed left? The avocado stone is also the seed for an avocado tree – so you can easily grow a tree for your home from a leftover avocado seed by planting it. However, you cannot harvest an avocado from such a tree, since the male and female flowers are not open at the same time, which means that self-pollination and thus ripening into an avocado are ruled out.

Plant avocado seeds and grow avocados

To get fruit, you would need two different types of avocado trees, each with their flowers opening in opposite directions. Nevertheless, the evergreen tree from the planted avocado seed is a pretty sight, for example in the conservatory, as a houseplant or in a greenhouse. Also read: Grow your own vegetables: 8 foods that keep growing back.

Grow avocado as a houseplant – that’s how it works!

Use the following trick to grow avocados:

Remove the avocado pit from the avocado, wash it well and let it dry.
Before you can plant it, the avocado seed needs to form roots. To do this, poke three toothpicks about halfway down the side of the avocado stone.
Then hang the avocado stone with the pointed side up in a glass container with water so that the lower end of the avocado is in the water.
The toothpicks serve as a holder and lie on the edge of the glass jar.

Off into the ground: plant avocado seeds

After about three to ten weeks, several roots will have formed and you can plant the avocado seeds in normal potting soil. It is important that the pointed part that was above the toothpick is not covered with soil. The pot with the planted avocado seed is then covered with a clear plastic bag or glass bell jar to create enough humidity.

Watered regularly and placed in a bright place at over 20 degrees, the avocado seed will soon begin to sprout. As soon as the plant has a few green leaves, you can remove the cover and place the avocado tree in its final location. It’s that easy to grow your own avocado!