Tag

guide

Browsing

To make marzipan yourself, you only need two ingredients: almonds and sugar. With this recipe you can easily make your own marzipan.

What is marzipan made of?

Traditionally, marzipan consists of ground almonds, sugar and rose water. The proportions of the ingredients are decisive for the quality. According to the legal requirements, a maximum of 17% liquid, 35% sugar and 48% almonds may be used for the marzipan paste. However, manufacturers usually add more sugar for commercial marzipan. Only with very high-quality products, such as certain fine marzipan brands, is no additional sugar mixed in.

Make marzipan yourself: The basic recipe

For the homemade marzipan you need these ingredients:

200 g almond kernels with skin (alternatively walnuts)
150g powdered sugar
1 to 2 tablespoons of liquid (classic here is homemade rose water or from the pharmacy or health food store)
Preparation:

Boil the almonds in about a liter of water for a minute or two.
Pour the almonds into a colander.
Let them cool down a bit.
Peel them by squeezing them out of the skin with your fingers.
Crush the almonds in a good blender. Depending on the moisture content of the almonds, you will get a mealy to mushy mass.
Place the ground almonds in a bowl.
Sift in the powdered sugar.
Add a tablespoon of rose water.
Now knead all the ingredients by hand into a smooth dough. You may need to add some more liquid. (This also depends on whether you dried your almonds after cooking).
When the marzipan is ready, store it airtight in the fridge – e.g. in a screw-top jar.
Then the homemade marzipan is ready for further processing!

Depending on your taste, you can use other liquids instead of rose water. Orange liqueur or amaretto, for example, are suitable, but also a few drops of bitter almond oil. This makes the mass a bit bitter and more intense in taste.

Which almonds are best for marzipan?

Almonds belong to the rose family and probably originally come from Southeast Asia. Today the kernels are also cultivated in Pakistan, Iran or in the Mediterranean region. However, more than 80 percent of the almonds grown worldwide come from the USA, more precisely from California.

However, there has been a drought for several years. Almond cultivation plays its part: to harvest one kilo of almonds in California, about 10,000 liters of water are used. The high water requirements of the almond orchards are also critical in European growing areas.

So when you buy almonds, make sure they’re not from California. The long transport route halfway around the world also worsens the ecological balance. At best, buy almonds from Europe and from controlled organic cultivation.

Instead of almonds, you can also use regionally grown, organic walnuts for the marzipan. The process is the same and the taste is very similar to almond marzipan.

Owning a food truck business can be both an enjoyable and rewarding experience for entrepreneurs who are willing to give it a shot. It provides a flexible model of doing business, low starting costs, ability to reach the customers easily and possibility of steady profits.

The beauty is, you do not need to be a food lover, or own a truck for that matter, for you to begin a  food truck business. All you need is an entrepreneurial itch, a solid plan, and head out to Food Truck Headquarters USA to get your food truck.

We at Food Truck Headquarters U.S.A believe that starting your own food truck business should not involve too much hassle. So, put together this simple guide to help you get your food truck company off the ground and on to the road.

What Are The Costs And Finance Options For Food Trucks

1080px.net

When starting your food truck business, one of the most significant challenges you will experience involves finances.

The cost of purchasing a food truck will vary due to factors such as the number of trucks you want to buy, insurance, plus permits and license.

However, the good news is that you can get funding from Food Truck Headquarters USA with a good business plan.

This funding will be of help to your business in the following ways:

  • Enable you to acquire new equipment for your business, start generating more money and pay it back later in tiny manageable portions.
  • It has a reliable financing program with several options to fit your specific needs. Your business can easily access them irrespective of your credit score or time in the industry. Meaning your credit score or the fact that you are just starting will not affect your eligibility.
  • A simple application process that will not waste much of your time. Even better, the application process does not include too much paperwork. All you need to do is make the decision, sign the finance documents electronically and wait for your shipping.
  • Food Truck Business
    1080px.net

What Are The Benefits Of A Food Truck Business

Apart from providing you with a large spacious kitchen where you can easily prepare, serve your food, and move wherever the other benefits of owning a food truck are:

Source Of Income

Owning any business comes with various financial benefits. Similarly, your food truck business will earn you extra income with discipline and dedication to providing the best for your customers. For example, write a menu of all the food items you cook and target areas with high traffic. In no time, you will be attracting new customers and retaining the old ones at the same time.

Mobility

Unlike a restaurant, which is stationary at the same point all year round, a food truck provides you with the opportunity to station in any event. This is legal, provided you have a license and permit. The mobility of food trucks is a big advantage because you can always change your stations to match demands during various seasons.

Freedom

With your food truck, you have the freedom to change and update your menu constantly. Ideally, you can execute these changes depending on your preferences or those of your clients at a given time.


Defrosting meals can be one of the trickiest things of the time. Failure to remove the meal from the freezer in time to properly thaw before cooking can result in failure. So you’re dying to remember to take the bowls out of the freezer and put them in the fridge on time, but how long does it take?

Defrosting meals

There are three ways you can adequately defrost meals – in the fridge, it’s just one of several options. Here are the three recommended food-safe methods, so if you’re in a bind and forgot to get the meal out of the freezer – don’t worry. There are three methods you can use to defrost the meal. Also, note how to freeze food properly.

The problem of defrosting meals

Individual dishes will most likely defrost overnight, e.g. frozen bread can be defrosted in this way. Casseroles, bags of food, and roasts will not. They will probably thaw in the fridge for 24-48 hours. One of the biggest mistakes is thinking that a casserole dish will thaw overnight in the fridge. That’s not true. To effectively plan the week’s meals, I usually decide on Sunday what I’m going to do for the week and jot it down on a calendar. I also include in my notes the time it takes me to get the dish out of the freezer and put it in the fridge for proper defrosting. This helps me not to get caught in a quandary during the week and have the food on the table half frozen.

1. Defrost in the refrigerator

This method takes the longest but is the best for the quality and shelf life of the food. If you decide you don’t want to eat the meal or are going to a friend’s place for dinner instead, you can still refreeze the meal without worrying about its safety of the meal.

2. Thawing in cold water

You can wrap a casserole or freezer bag in an extra plastic bag and place it in the sink submerged in cold water. The additional bag is designed to protect the food from getting wet. This method is faster and usually only takes a few hours, but you should change the water every 30 minutes. You also risk water penetrating the product. I only recommend this method for thawing meat, marinated meat, soups, or items in plastic containers. It is not recommended to refreeze objects that you have unfrozen using this method.

3. Defrost in the microwave

This is by far the quickest method of defrosting food, but you must prepare the dish promptly. It also won’t work for you if you use foil baking pans (they aren’t microwavable). And you can’t refreeze the meals that have been thawed this way unless you cook them first.

Cook frozen food

Plus, you can cook these even when frozen. You just need to add about 50% more time to the listed cooking time. That means if it says cook for 1 hour, you should plan to cook it for at least 1.5 hours, maybe even longer. However, this does not apply to all foods. Because defrosting the spinach is usually quick. Also, note tips for warming up the spinach.

The instructions above for adding 50% are for stovetop and oven cooking. When it comes to the best time to get your meals out of the freezer in order to defrost them at the right time.

General guidelines for thawing

Here are some general guidelines for thawing.

  • Single servings – overnight or in the microwave
  • Casserole dishes, freezer bags, and medium-sized plastic containers – 24 to 48 hours
  • Meat (including marinated meat and roasts) – 5 hours per kilo
  • Ready Bread (already baked) – 24 hours (on the countertop)
  • Bread, uncooked – Overnight (in the fridge)

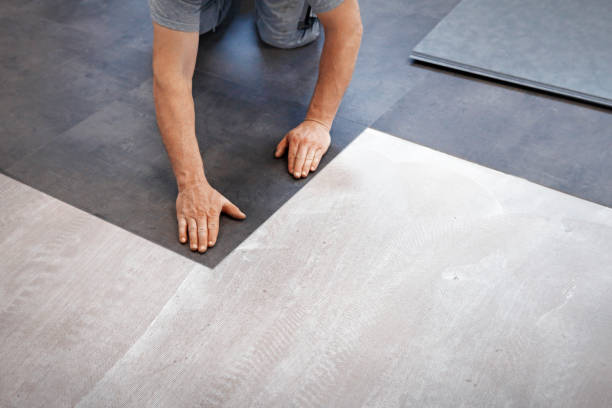
Finding the perfect floor covering is a fundamental decision and the variety of materials is huge. In addition to classic floor coverings such as wooden floors, parquet, or tiles, high-quality vinyl floors are particularly popular. And there are countless sales arguments that even convince “vinyl skeptics”. Therefore use our tips for laying vinyl floors.

What are vinyl floors anyway?

With the many names of synthetic floors, consumers can quickly lose perspective. Today’s vinyl floor is a further development of the legendary PVC covering and is made on the basis of polyvinyl chloride. The certified vinyl products do not contain any harmful substances. They are therefore harmless from a health and ecological point of view. It is also flexible, waterproof, and pleasantly warm.

Furthermore, the invisible surface sealing ensures high durability. Consequently, you don’t have to worry about scratching the floor when vacuuming, for example. But vinyl flooring is also unbeatable in terms of design, functionality, feel hygiene, comfort, durability, and price. Living rooms, bedrooms, bathrooms, kitchens, hallways, and children’s rooms are possible areas of application. In addition, the modern floor characterizes the interior design of commercial and public spaces.

What is the difference between vinyl floors?

There is a suitable product for every requirement and every interior design! There are different vinyl floors to choose from in hardware stores such as Toom. These differed from each other in size, color, thickness, and appearance. There are also three types of laying: full-surface bonding, loose laying, and floating laying. Before renovating or relocating, seek advice from specialist staff. Because, for example, there are products that are ideal for damp rooms, living rooms, or underfloor heating.

What tools do you need to lay vinyl flooring?

What you need to successfully lay vinyl flooring is the following accessories:

  • vinyl flooring
  • vinyl glue
  • sticky roll
  • cutter knife
  • folding rule

How do you lay a vinyl floor correctly?

Laying the vinyl floor is quite simple and easy to do even for laypeople. In addition, it saves costs. And with a little preparation, renovating is a lot of fun. The laying work can be carried out alone or ideally in pairs.

Let’s start with the preparations

  • First, determine the exact amount of material. To do this, calculate the length of the room times the width of the room plus 10 percent waste. Take into account niches, radiators, window fronts, door frames, heating pipes, or similar. Calculation example: 5 m long x 4 m wide = 20 m2 + 10% waste = 22 m2
  • Then clean the floor thoroughly. If necessary, remove the old covering completely. Repair any damage or unevenness with repair mortar or leveling compound. To ensure that the floor is smooth and level, and the sub-floor if necessary. Finally clean again.
  • Roll out or deposit the covering in a warm place. This allows it to acclimatize and then be easy to process.
  • Tip: Use a spirit level to determine unevenness!

1st step

After the obligatory preparation, complete the layout and align the floor with new plastic covering. Cut the protruding covering in the corners at an angle with the knife, this allows the vinyl to be better adjusted. If necessary, shorten the overhangs on the walls to five centimeters with the cutter knife. Then let the topping rest for a day.

2nd step

Then carefully fold one half of the covering back to the middle of the room. Make sure that the covering does not shift. Next, apply the finished adhesive evenly to the clean floor using the adhesive roller. Then let the glue set for about 15 minutes. Then fold back the floor covering and smooth the glued surface with the metal roller. But be careful: avoid bubbles and wrinkles!

3rd step

Now do the same with the other half of the topping.

4th step

Now the trimming and trimming with the craft knife begins. A distance of about five millimeters to the wall is planned here. The reason for the addition is that depending on the temperature, vinyl can expand or contract.

5th step

Attach baseboards and transition profiles that match the finish. The living room or bathroom renovation project is ready!

The current vinyl flooring trends

Statement instead of standard! In addition to classic vinyl flooring, LVT design floors are very popular for interior design. The name LVT stands for luxury vinyl tiles. The exclusive “Bodenschatz” imitates concrete, tiles, parquet, carpet, or wooden floors in a deceptively real way. Furthermore, the original colors or structures of the imitated objects can be clearly seen and felt on the surfaces. The chic designer floors are currently very trendy as wall coverings. Thanks to the seamless installation, kitchens, and bathrooms get a super-modern style – and unsightly mold and limescale deposits will never appear again. The new “super floor” corresponds to the zeitgeist and fulfills all wishes!

Informing yourself in advance protects dogs and humans from surprises when choosing puppies or new dogs. Very often it happens that people buy a dog that is as cute as a puppy. Over time, people are amazed that their four-legged friends are so completely different from what they had imagined. You notice that the dog has needs that you didn’t know about before. The main problems here are the time factor and the unknown character of the dog. The story of the suffering of the dog and thus also of the people begins with the reason for the purchase. It is not uncommon for it to be a Christmas present, occupational therapy, or, at worst, a substitute for brains and self-confidence.

10 questions to avoid suffering and tears in new puppies

In general, you get the necessary information and answers for the following points:

  1. Are people ready to take responsibility?
  2. Does the dog fit into the lifestyle of the people? Every race has basic characteristics. This also applies to the space available and the amount of time that a dog definitely causes.
  3. Do you expect a cuddle dog or a guard dog?
  4. Do you take the time to train? (starts with puppy lessons)
  5. Where and how much are costs incurred? (tax, liability, vet)
  6. Do all(!) members of the household agree and participate in education and cleanliness?
  7. Do you adapt to life with a dog? He won’t be allowed to go everywhere. And if you are ready to pick up certain legacies and dispose of them in some other way?
  8. Is a pedigree dog desired by the breeder or is a mixed breed from the animal shelter sufficient?
  9. Prefer the advantages of males or females.
  10. Do you buy a puppy or an adult dog? What is different?

When all these aspects have been clarified, you can start looking for a breeder, an animal shelter, or a private person where you can buy your dog. Traps lurk here too! Therefore: more information and, above all, discussions with the sellers. Go see everything. Also, note tips on getting puppies housebroken and our article on dog training.

Defrosting meals can be one of the trickiest things of the time. Failure to remove the meal from the freezer in time to properly thaw before cooking can result in failure. So you’re dying to remember to take the bowls out of the freezer and put them in the fridge on time, but how long does it take?

Defrosting meals

There are three ways you can adequately defrost meals – in the fridge, it’s just one of several options. Here are the three recommended food-safe methods, so if you’re in a bind and forgot to get the meal out of the freezer – don’t worry. There are three methods you can use to defrost the meal. Also, note how to freeze food properly.

The problem of defrosting meals

Individual dishes will most likely defrost overnight, e.g. frozen bread can be defrosted in this way. Casseroles, bags of food, and roasts will not. They will probably thaw in the fridge for 24-48 hours. One of the biggest mistakes is thinking that a casserole dish will thaw overnight in the fridge. That’s not true. To effectively plan the week’s meals, I usually decide on Sunday what I’m going to do for the week and jot it down on a calendar. I also include in my notes the time it takes me to get the dish out of the freezer and put it in the fridge for proper defrosting. This helps me not to get caught in a quandary during the week and have the food on the table half frozen.

1. Defrost in the refrigerator

This method takes the longest but is the best for the quality and shelf life of the food. If you decide you don’t want to eat the meal or are going to a friend’s place for dinner instead, you can still refreeze the meal without worrying about its safety of the meal.

2. Thawing in cold water

You can wrap a casserole or freezer bag in an extra plastic bag and place it in the sink submerged in cold water. The additional bag is designed to protect the food from getting wet. This method is faster and usually only takes a few hours, but you should change the water every 30 minutes. You also risk water penetrating the product. I only recommend this method for thawing meat, marinated meat, soups, or items in plastic containers. It is not recommended to refreeze objects that you have unfrozen using this method.

3. Defrost in the microwave

This is by far the quickest method of defrosting food, but you must prepare the dish promptly. It also won’t work for you if you use foil baking pans (they aren’t microwavable). And you can’t refreeze the meals that have been thawed this way unless you cook them first.

Cook frozen food

You can also cook them while frozen. You just need to add about 50% more time to the listed cooking time. That means if it says cook for 1 hour, you should plan to cook it for at least 1.5 hours, maybe even longer. However, this does not apply to all foods. Because defrosting the spinach is usually quick. Also, note tips for warming up the spinach.

The instructions above for adding 50% are for stovetop and oven cooking. When it comes to the best time to get your meals out of the freezer in order to defrost them at the right time.

General guidelines for thawing

Here are some general guidelines for thawing.

  • Single servings – overnight or in the microwave
  • Casserole dishes, freezer bags, and medium-sized plastic containers – 24 to 48 hours
  • Meat (including marinated meat and roasts) – 5 hours per kilo
  • Ready slices of bread (already baked) – 24 hours (on the countertop)
  • Loaves of bread, uncooked – Overnight (in the fridge)