Tag

harvesting

Browsing

Exotic pineapple sage is a fruity spice for summery dishes and drinks. Here you can find out everything about the use, cultivation and harvest of the South American herb.

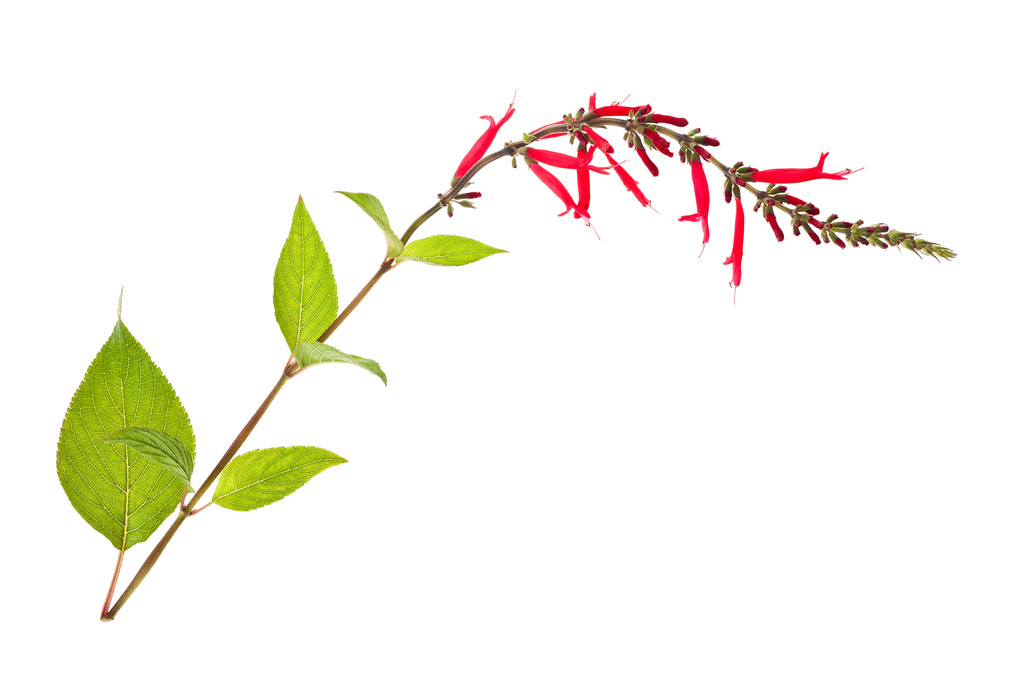
Pineapple sage (Salvia elegans) is a plant from the mint family. The plant, which belongs to the sage family, owes its colloquial name to the scent of its leaves, which is reminiscent of pineapple. However, the herb is not related to the tropical fruit.

As with all types of sage, both the leaves and flowers of pineapple sage can be used for seasoning and cooking. With its bright red flowers, the exotic kitchen herb is also a pretty ornamental plant for the balcony and garden. As a late bloomer, it brings color to your garden well into autumn.

Use: pineapple sage in summer salads

Pineapple sage originally comes from the highlands of Mexico and Guatemala. Today it enjoys worldwide popularity as an exotic culinary herb.

Thanks to its sweet note, pineapple sage is ideal for refining desserts, such as fruit salads or cold dishes.
You can also add an exotic touch to fruity salads with the herb. The bright red flowers are also ideal as an edible decoration.
Pineapple sage goes well with other fresh herbs – mint or lemon balm, for example, are ideal partners: decorate and spice up fresh summer salads with a combination of pineapple sage and mint.
Refine homemade lemonades or iced tea with leaves and flowers of the sage plant.
On cooler days, you can also make tea from the leaves of pineapple sage: Put a few leaves in a tea strainer and let them steep in boiling water for about five minutes. Tea made from pineapple sage tastes a little tarter than the fresh herb.
The leaves can also be used dried for any use.

Grow pineapple sage

Pretty pineapple sage is an uncomplicated and hardy herb. You can cultivate it both in the garden and in a bucket on the balcony. It should be noted that the perennial plant is not winter-proof and has to go inside during the cold season. With good care, you can enjoy a richly branched shrub that can reach a height of up to half a meter.
Location
Pineapple sage prefers a sunny to half-shady and warm location. A wind-protected place along a house wall or in a sunny corner of your balcony is suitable for this.
The mild morning and evening sun is good for your sage. However, the herb should not be exposed to the midday sun.
floor

The exotic herb thrives best in soil rich in nutrients and humus, which may be enriched with a little sand.
The soil around the root ball should not dry out and should be watered regularly. However, the plant does not tolerate waterlogging either. To prevent this, you can provide natural drainage with a generous layer of sand or gravel at the bottom of the planting hole or the bottom of your tub.
If you plant your pineapple sage in a pot, make sure that the water can drain out of the pot through the drainage.
In the growing season from spring to late autumn, your sage plant will be happy about regular fertilizer application. Use homemade compost or organic fertilizer.
hibernate

Pineapple sage is not hardy.
If your pineapple sage is growing in a pot, put it in a cool, unheated spot in the house where the plant gets enough daylight before the first frost. A bright conservatory, a greenhouse or even a stairwell are perfect for this.
In winter you can reduce the watering and stop fertilizing completely. The plant now gathers strength until the next shoot.
Pineapple sage growing in the garden must be cut back completely in winter and its roots well protected from frost. Lay a thick layer of brushwood or leaves around the root ball. In colder regions or in very cold winters, the plant cannot always be overwintered successfully. If you are unsure, plant them in the bucket.

Harvest pineapple sage

Pineapple sage can be harvested all year round. The green leaves taste particularly aromatic before the first flowering period, but can also be harvested later. You should harvest the flowers just before they fade. Use sharp scissors or a knife to cut off both flowers and leaves at the end of the stem.

Lupine seeds are a valuable and at the same time regional source of protein. You can plant the plants yourself and harvest the lupine seeds annually – we will explain to you which nutrients they contain.

The lupine is a native plant and has recently become popular as a high-protein alternative to soy. You can easily cultivate the protein-rich legumes in your garden, because they thrive in this country. They do not make any great demands on their location: they only need a little sun and not too much lime in the soil. Then nothing stands in the way of a bountiful harvest.

Harvesting lupine seeds: timing and procedure

Lupine seeds contain up to 40 percent protein, which is about the same as soybeans. But that’s not the only thing they have to offer: They also contain a lot of amino acids, vitamins, calcium, magnesium, iron and phosphorus.

You can also harvest the seeds yourself, but you have to be a little careful. Because you should only eat the seeds of certain breeds – the sweet lupine. Other varieties have a very high content of special bitter substances that are toxic to humans and animals. Under no circumstances should you harvest and eat unknown, wildly growing lupins in the forest or on meadows.

If you want to harvest lupine seeds yourself, you must not cut off the inflorescences of the plants after flowering. The pods, which contain the valuable seeds, are formed from these. As soon as these are dried and dark, you can start harvesting. This is usually the case in late summer. You do this as follows:

When the pods are ripe, you can simply cut them off and collect them.
You get the seeds out of them by simply squeezing them out.
Then you should clean them with water and dry them.

Sow lupine seeds yourself

You can sow the dried lupine seeds yourself. If you store them properly, i.e. in an airtight and dark place, they will remain viable for up to three years. How to sow them:

The best time to sow seeds is between March and May if you want to sow the seeds directly into the bed. Alternatively, you can grow them indoors in a pot. In this case, January is recommended.
Before sowing, you should roughen the seeds slightly with sandpaper and then let them soak in water for a day.
Then you press the seeds about two to three centimeters deep into the soil. You should leave about 15 centimeters of space between the rows.

Utilize lupine seeds

You can use lupine seeds in many ways in the kitchen. For example, you can process them into lupine flour or grist, use them as a basis for vegetarian or vegan burger patties and vegetable patties, or snack on them whole. You can also bake them, make them into spreads or use them in salads.

You can harvest walnuts in autumn and stock them up for the whole winter. But harvesting alone is not enough. We’ll tell you what to look out for.

Harvesting walnuts – when does that work?

Walnuts are healthy and delicious. In addition, they can be stored well and for a long time. What could be more obvious than stocking up for the winter in autumn? If you have the opportunity, you should use it.

Walnuts ripen in the fall. They can be harvested from mid-September to the end of October. Strictly speaking, the term “harvest walnuts” is not so apt. Because you shouldn’t harvest walnuts from the tree. Rather, you wait until they fall from the tree on their own and collect them. This way you can be sure that they are really ripe.

Harvesting walnuts – this is the best way to do it

When walnuts grow on the tree, they have another, softer shell in addition to the hard, woody shell. This shell is initially green. When the walnuts are ripe and fall from the tree, the green shell bursts open. Later it turns black.

Especially in damp grass, the outer shell can quickly start to mold. Therefore, you should collect the nuts as regularly as possible. Preferably daily. It is best to sort out walnuts that are moldy or infested by caterpillars immediately.

Clean and dry walnuts

After collecting, you need to clean and dry the healthy walnuts. Remove the green outer shell by hand. You can also use a brush to remove any residue that gets stuck.

Drying the cleaned walnuts is not difficult. To do this, place them in boxes or baskets in a single layer if possible. It is best to turn them once a day or mix them vigorously. It is important that the walnuts dry as quickly as possible. Otherwise you run the risk of the walnuts starting to get moldy. An airy place with 20 to 25 degrees is best. If you dry the nuts outside, you should put them inside in the evening. Otherwise they will get wet again during the night.

The walnuts are dried enough when they lose about 50 percent of their weight. This is of course a bit difficult to control. The drying time is about three to six weeks.

Storing walnuts

After the walnuts have dried, you can store them for several months. Make sure that they are stored as dry and airy as possible. High humidity can lead to mold. It is best to hang the nuts in bags or nets.