Tag

here’s

Browsing

A study has now determined why you should never eat raw dough and how dangerous it can be.

Raw dough causes nausea and stomach ache? – The flour may be the culprit

The risk of salmonella infection is well known, but this is not the case with E. coli from raw dough. According to an American study, flour can trigger a life-threatening intestinal infection. E. coli can cause severe diarrhea, vomiting and stomach cramps. These bacteria get into grain, for example, via fertilizer or animal excrement.
The so-called E. coli bacteria (Escherichia coli)
According to the Federal Institute for Risk Assessment (BfR), if floury dough and other dishes are baked at these high temperatures for at least two minutes, consumption is already safe.

With these tips, you can snack on dough without hesitation

Our tips:
If you bake with children, you cannot prevent one or two snacks. Therefore, it is best to bake a dough
If you use nut flour
Make sure your ingredients are organic
However, if you are pregnant or generally have a sensitive stomach, you should stick to the baked cookies.
If you want to snack on the dough without hesitation, then the “Cookie Dough” food trend is also suitable. This dough is without eggs and often also without flour. In addition, it does not contain any leavening agents. This cookie dough is deliberately intended for raw consumption and tastes just as good.

Different codes on the phone can unlock features you didn’t know before. The codes are usually very simple.

USSD and GSM codes: you need to know that

The abbreviation GSM stands for “Global System for Mobile Communications”, USSD for “Unstructured Supplementary Service Data”. These GMS and USSD codes have existed since the first mobile phone developments, but can also be used on mobile smartphones. Each code has an individual function and can release practical features; this includes, for example, functions relating to call forwarding, the mailbox or the SIM card.

Important codes you should know

First, we have summarized some general codes for you:
*#06# Call up the phone’s serial number or IMEI
*135# Query your own phone number
**04*old PIN*new PIN*new PIN# Change PIN
**05*old PUK*new PIN*new PIN# Unlock blocked PIN with PUK
**042*old PIN2*new PIN2*new PIN2# Change PIN2
**052*old PUK2*new PIN2*new PIN2# Unlock blocked PIN2 with PUK2
*31#<phone number> Your own phone number is transmitted when you call, <phone number> must be replaced by the dialing number
#31#<Number> Own number is not transmitted when calling
*30# Activate caller ID for incoming calls (CLIP on)
#30# Switch off call number display for incoming calls (CLIP off)
*43# Call waiting on
#43# Call waiting off
**21*<number># Activate call diversion for calls to <number>
##21# Deactivate call forwarding automatically
*#21# Call forwarding status query for calls
*21# Activate call diversion automatically
**62*<number># Activate call diversion if not available on specified <number>
##62# Switch off call diversion if unavailable
*62# Switch on call diversion if unavailable
*#62# Status query of call forwarding when unavailable
**61*<number># Activate call diversion after the 5th ring to the specified number
**61*<number>*<time># Switch on call forwarding to the specified number after the specified time
##61# Deactivate call forwarding after a certain time (after ringing 5 times)
*61# Activate call diversion after a certain time
*#61# Call forwarding status query
**67*<Number># Switch on call forwarding to the specified number if the line is busy
##67# Switch off call forwarding when busy
*67# Switch on call forwarding when busy
*#67# Status query of call forwarding when busy
##002# Automatically switch off all call forwarding
*002# Activate all call forwarding automatically
##004# Deactivate all conditional call forwarding (busy, after 5 rings, unavailability)
*004# Enable all conditional call forwarding

Codes by device

Here are some codes that can be used on Samsung smartphones:
*#0*# comprehensive test menu
*#1111# software version
*#1234# firmware version
*#2222# hardware version
*#0228# Battery status and temperature
*#8999*8376263# Details about camera, product code, etc.
#*5376# delete all SMS
*#9090# Service mode UART/USB (service diagnosis configuration)
*#0808# USB settings
*#34971539# Check and view camera firmware
These work ideally with Huawei smartphones:
*#*#0000#*#* View model number, hardware version and IMEI number
*#*#6130#*#* Test menu (usage statistics, phone information)
*#*#2846579#*#* Service menu (e.g. manual upgrades and downgrades)
*#*#1357946#*#* Product code and serial number
Try these codes if you have an iPhone:
*3001#12345#* Field test mode
*#5005*7672# Show SMSC number
*#746025625# SIM Clock Stop (Power is only consumed when you actually use the SIM card)
*3370# Activate EFR mode (Enhanced Full Rate), improves voice quality during calls, battery power decreases
#3370# Disable EFR mode
*4720# Activate HFR mode (Half Full Rate), reduces voice quality, battery power increases
#4720# Disable HFR mode
*#5005*86# Show mailbox settings
*646# Query current call volume

What to do with old pills and opened bottles of cough syrup? Just in the toilet and flush? Not a good idea: Medicines find their way into the wastewater and thus into the water cycle in many ways – with negative consequences for the environment.

Medicines in waste water: causes and problems

Drugs get into the wastewater in a number of ways. People take medicines and may excrete some of them in their faeces or urine. Medicines that are administered as a cream enter the sewage system when you shower and bathe. On the other hand, disposal via the toilet and sink is completely avoidable and also wrong, explains Philip Heldt, graduate human biologist and ecotoxicologist from the NRW consumer advice center. Not inconsiderable amounts of medical waste products also come from livestock farming. Especially in farms with conventional intensive animal husbandry, the animals receive medication that gets into the groundwater via excretions.

However, how difficult it is to filter the substances out of the wastewater varies widely. Many medicinal active ingredients are quickly and easily degradable. However, this is not the case with others because they cannot be defeated by bacteria. Bacterial degradation is the common process in water treatment. In some places, sewage treatment plants are therefore retrofitted with activated carbon filters or ozonation systems in order to also destroy substances that cannot be eliminated by bacterial degradation. “It’s successful, but it’s not happening across the board,” criticizes Philip Heldt.

The further course of the substances is problematic. Water that has passed through the treatment plant then flows into rivers and thus back into the natural water cycle. “This means that people and animals drink from it and thus absorb the substances,” explains expert Heldt.

Effects on people, wildlife and flora

In a period of 30 years, substances such as diclofenac cause environmental cleaning costs of up to 1.5 billion euros, according to a new study by Prof. Mark Oelmann from the Ruhr West University. In 2019, 40 watercourses in Austria were examined and the painkiller diclofenac was detected in all of them. In studies for certain fish species, harmful effects on the liver and kidneys could be demonstrated. In trout, for example, half a microgram of diclofenac per liter of water already leads to kidney damage.

But: People do not ingest any drug residues through their drinking water. “You can drink the water from the tap without hesitation,” assures the resource conservation expert Heldt. On the one hand, most substances in the sewage treatment plants are degraded to well below the limit values. On the other hand, the water works only take water from very pure sources for drinking water. “To ensure that this continues to be possible in the future, careful handling of the wastewater is important.” You should not waste water and, above all, give it back as clean as possible.

Because the sewage treatment plants do not manage to filter out all the substances from the wastewater. Careful, sustainable use of water therefore means not only saving on the quantity, but above all loading it with as few things as possible that do not belong in it. “The toilet is not a dump,” warns Astrid Hackenesch-Rump

Conclusion

You too can make a contribution by using medication correctly. The most important thing is not to throw medication down the toilet or sink. You can hand in medicines that have expired or are no longer needed in most pharmacies, and disposal with the residual waste is also possible in almost all cities. The medicines are then burned with the other residual waste in the waste incineration plant. Medicines should only be taken to the recycling center in municipalities with mechanical-biological waste treatment. You can find out more on the homepage of your local waste disposal company. “Last but not least, moderate meat consumption contributes to water protection. Buying meat from organic farms is also an alternative, since less medication is used,” says von Heldt.

Cheese can be healthy? Yes! Many foods contain excessive amounts of salt, which is why many people exceed the daily recommended amount of salt. This can lead to kidney damage in the long term and damage the heart and blood vessels. According to a new study, cheese is the answer.

Too much salt excreted by the kidneys – significant water loss is associated

Too much salt in the body is primarily eliminated through the kidneys. There is a significant loss of water in the body. Over a long period of time, this puts a strain on the kidneys. Furthermore, the lack of water can lead to vasoconstriction and thus affect blood pressure and the heart. PennState University from Pennsylvania takes a closer look at this phenomenon.

Cheese is said to protect blood vessels from damage caused by excessive salt consumption

Accordingly, it is difficult to find a balance between delicious food and the right amount of salt, since a lot of food is characterized by a high salt content. Antioxidants in cheese have been found to help protect blood vessels from damage caused by high levels of salt in the body, in a new study from PennState University. Billie Alba, who led the study, confirms that the new findings could strike a balance between minimizing the risk of eating too much salt and eating tasty food.

Eleven adults follow four different diets for eight days

To support the theory that a diet containing cheese is good for blood pressure and heart health, 11 adults were included in the study. Each subject followed four different diets for eight days each: a low-sodium diet without cheese products, a low-sodium diet high in cheese, a diet high in cheese and sodium, and a high-sodium diet without cheese.

On the high-sodium diets, participants consumed 5,500 mg of salt per day, while those on the low-sodium diets only consumed 1,500 mg of salt. The cheese content in the high-cheese diets was about 170 grams, which translates to about four servings of different types of cheese per day. After each week-long diet, subjects returned to the lab for testing.

Drug acetylcholine helps with examinations

In order to obtain meaningful results, tiny fibers were placed under the skin of all test subjects and soaked with the drug acetylcholine. This ensures that the blood vessels relax. The blood vessels of each test person reacted differently to the drug – this allowed the function of the blood vessels to be measured. The subjects also had their blood pressure measured and urine tested to make sure they were consuming the right amount of salt.

Antioxidants in cheese have a positive effect on blood vessels

After the week-long high-salt, low-cheese diet, it was observed that the participants’ blood vessels did not respond as well to the acetylcholine and had more difficulty relaxing. This was not observed after the high-salt, high-cheese diet.

“While the participants ate the high-sodium chloride, no-cheese diet, you could see that blood vessel function dropped to levels seen in people at advanced cardiovascular risk,” said Lacy Alexander, professor of the cardiovascular system Exercise Science at PennState. “But when they consumed the same amount of salt and cheese was one of those sources of salt, those effects were completely avoided.”
While the test results cannot indicate that specific nutrients in cheese cause the effect, the antioxidants in cheese are considered contributing factors. According to Billie Alba, there is scientific evidence that milk-based nutrients, particularly peptides formed during the digestion of milk proteins, have beneficial antioxidant properties. This means they can scavenge these oxidant molecules, protecting them from their harmful physiological effects.

In the future, it is important to examine these effects in larger studies, as possible new mechanisms could help dairy products to maintain vascular health.

Freezing bread dumplings is a great way to avoid food waste or to stock up. In this article we will show you step by step how to freeze bread dumplings and then use them.

Bread dumplings are very easy and uncomplicated to freeze. Not only do you avoid waste if you have cooked too much, you also have a tasty and home-cooked side dish at hand when you need something quick.

Freeze bread dumplings: This is how it works

If you want to freeze bread dumplings, you should cook them first. If you cook the dumplings before freezing them, they will have a nicer shape and be easier to prepare and use.

Proceed as follows so that you can use the bread dumplings individually:

Place the cooked bread dumplings loosely on a tray or in a casserole dish and let them cool completely. Attention: The dumplings must not touch each other, otherwise they will freeze to each other.
Place the tray with the completely cooled bread dumplings in the freezer for at least an hour.
Then, remove the dumplings from the freezer and place them in a reusable glass or plastic freezer container.
Deep-frozen bread dumplings can be kept for up to four months in an airtight deep-freeze container.
Pre-freezing the dumplings on a tray will prevent them from freezing together. This allows you to remove them individually from the freezer and use them.

How to use frozen bread dumplings

You don’t need to thaw frozen bread dumplings before using them. They are therefore an uncomplicated side dish when time is of the essence.

Tip: Freezing bread dumplings is particularly advantageous for single households because you can remove the dumplings individually. In this way you can cook a larger quantity as meal prepping and then have bread dumplings in stock for many weeks.

How to prepare frozen bread dumplings:

Bring a pot of salted water to a boil.
Remove the desired amount of bread dumplings from the freezer.
Add the still frozen dumplings to the boiling water.
Let the bread dumplings simmer in hot water at the lowest temperature for about 20 minutes. Attention: The water should only boil and not boil, otherwise the dumplings will fall apart.
Serve the dumplings as usual.
Alternative preparation options:

Frozen dumplings can also be prepared very well over steam with a sieve insert in the pot or with a steam cooker.

As a pasture for insects, the wild pear is an important food source for bees and the like. The wild form of the pear, which grows in sparse forests, also thrives in domestic gardens. We will show you how to properly plant and care for the rare pear tree.

Plant wild pears in your own garden

The wild pear is the original form of the pear tree and originally grows mainly on the edges of forests and in clearings. Unlike cultivated pears, the wild fruits can only be eaten in processed form, but the gnarled wild pear should not be missing in any natural garden simply because of its ecological benefits. The white umbelliferous flowers provide food for bees and other insects, while the fruits that are stuck are eaten by native birds.

You can buy the wild pear as a young tree in well-stocked garden shops. Before you plant the fruit tree, however, you should pay attention to a few points:

Location: You can plant the wild pear almost anywhere. The only important thing is that it gets a sunny and warm place in your garden. Even on slopes, the wild pear thrives thanks to its deep roots. The blazing sun doesn’t bother her either. On the contrary, in order for the leaves to turn fully colored in autumn, the tree even has to be in full sun.
Soil: Since the wild pear is very adaptable, it grows well on all permeable soils. The only thing you should not plant the tree in is very wet or acidic soil. You can recognize acidic soils, for example, by means of special indicator plants.
When to plant: As with most fruit trees, spring or autumn is the best time to plant the wild pear.
Plant neighbors: In order to reproduce, the wild pear needs nearby pollinators. Apple trees or other types of pears are well suited for this.
Plant wild pear:

First dig a planting hole at the site. Make sure it’s at least twice the size of the wild pear’s root ball.
Slightly loosen the soil at the bottom of the hole and lay a drainage layer of gravel or sand.
Now place the wild pear with the root ball in the hole and fill it up again with the excavation from the plant.
Put a support stick in the ground and tie the young wild pear to it.
Finally, lightly press down the top layer of soil and water the pear tree generously.

The right care for the wild pear

Even if the wild pear is very easy to care for and robust overall, it is worth taking the following care instructions into account:

Watering: The wild pear’s water requirements are usually covered by the occasional rainwater that falls. In particularly long periods of drought, however, you should water them so that the soil does not dry out completely. You should definitely avoid watering too often, as the pear species is very sensitive to waterlogging.
Fertilizer: The frugal wild pear does not depend on additional nutrients.
Pruning: The wild pear is very tolerant of pruning. Once a year, in spring, you can safely remove dead and laterally growing branches. In addition, you should leave the naturally growing fruit tree unpruned.
Harvesting: In autumn, the real wild pear develops round fruits that are about three centimeters in size. At first glance, they don’t look like typical pears at all. The pears only lose their bitter taste when they are overripe or after the first frost. Then you can harvest and process them. The fruits of the Chinese wild pear, on the other hand, are inedible and remain on the branches until they are softened by the frost and serve as food for birds.
Overwintering: In order to protect the wild pear from frost in winter, you should mulch its treetop in autumn with a thick layer of bark mulch or autumn leaves.
Diseases and pests: You no longer need to worry about pests with the robust wild pear. Even the dreaded pear rust rarely occurs with her.

You can use the wild pear in so many different ways

The fruits of the wild pear contain many tannins and fruit acids. In the raw state, they are therefore hardly edible due to the bitter taste. Nevertheless, there are a few ways in which you can still use the wild pear in the kitchen:

Using wild pears in the kitchen: After the first frost, wild pears lose their bitter taste. If you want to speed up this process and process the fruit faster, you can dry and bake the pears. In combination with cultivated pears or apples, you can then process the wild pear into pear syrup or pear puree.
Use wild pear blossoms: Wild pear blossoms can also be useful in the kitchen. As a side dish, the flower buds taste good in a wild herb salad. You can also process the mild-tasting flowers into tea or lemonade. If you sprinkle the buds with sugar water, you can candy them in the oven over low heat and use them to decorate desserts.

Baking malt is a leavening agent that improves the texture and flavor of homemade bread. If you have a little time, you can easily make baking malt yourself – we’ll explain how it works.

Baked malt is made from sprouted grains that you dry in the oven, roast, and then finely grind. Baking malt fulfills two main tasks when baking bread: On the one hand, it refines the taste of the bread and also gives it a stronger colour. On the other hand, it can ensure that the dough rises better. This works especially well with wheat dough.

This is because the enzymes in the sprouted grains remain active when you dry them at low temperatures. Together with the yeast, they ensure that the bread rises particularly well. However, baking malt is not the only leavening agent – it only supports the function of the yeast. Recipes with baking malt therefore usually also contain yeast. You don’t have to change the amount of yeast if you also use baking malt.

Baking malt can be bought ready-made, but you can also easily make it yourself. All you need is grains, water and a few days of patience – because depending on the type of grain, it takes a while for the grains to germinate.

Important: Always use untreated organic grain if you make baking malt yourself. On the one hand, you support sustainable agriculture that works without synthetic pesticides. On the other hand, conventionally processed cereal grains are often not germinable because they are usually dried at high temperatures. Your enzymes can then no longer be activated.

Make baking malt yourself: This is how it works

Ingredients:

200 gorganic cereal grains (e.g. wheat or spelt)
water

Directions:

Place the grains in a sieve. Place the sieve in a bowl and fill it with enough water to cover the grains by about an inch or two. Leave them like that for twelve hours.
Remove the strainer from the bowl and drain the water. Dry the bowl. Rinse the grains in the sieve well under fresh cold water and then put the sieve back into the dry bowl. Important: The bowl should get light during this step, but if possible not stand directly in a sunny place.
Let the grains sit, this time for about two to three days. Rinse again under cold water every 12 hours.
After some time, the grains will begin to germinate. You can tell by the fact that thin white shoots sprout at the ends, which gradually intertwine. Wait for them to grow long enough to branch and form a braid. Then you can move on to drying the kernels. How long the grains need to germinate varies depending on the type of grain. With spelled, for example, it usually takes longer than with wheat. Important: If the shoots turn green, the grains are no longer edible. It is therefore important to wait for the right moment.
Line a baking tray with baking paper (or an ecological baking paper substitute). Spread the grains out on the baking tray and let them dry in the oven at 70 degrees top/bottom heat for about an hour. It is best to clamp a wooden spoon in the oven door so that it remains open a crack and the moisture can escape better.
After the drying process, you can roast the grains. Increase the temperature to 170 degrees top/bottom heat and leave the grains in the oven for another 40 minutes. You can then do a taste test: if the grain already tastes slightly malty, it’s ready. Otherwise, roast the grains again for 10 minutes.
When the kernels are done, remove the tray from the oven and let them cool completely. Then check if the grains are really completely dried. They must no longer contain any moisture.
Once they have cooled, you can grind the grains. It is best to use a grain mill or coffee grinder for this. Alternatively, you can also put them in the blender.
Fill the ground baking malt into a clean screw-top jar and close it tightly.

Baking malt: tips for use

The baking malt will keep for several months in a screw-top jar. It is important that the glass is sterile. You can find tips for this here: Sterilizing glasses: The best methods with step-by-step instructions.

When baking bread, it is sufficient to use about 30 grams of baking malt per kilogram of flour, unless the recipe specifies otherwise. Simply mix the baking malt into the remaining ingredients before kneading them into a dough and follow the further instructions.

Tip: If you don’t have baking malt at hand, you can replace it with malt coffee if necessary. It is then sufficient to use about a fifth of the recommended amount of baking malt – for example six grams instead of 30 grams.

Do you like to order cappuccino in the café and would you like to prepare this coffee variation at home? No problem: we will show you step by step how to prepare a cappuccino.

Chocolate cake with a cup of hot cappuccino on the table with Shell.

Where does the cappuccino come from?

Anyone who thinks that cappuccino is a purely Italian coffee specialty is wrong. The origins of the drink are in Austria. The cappuccino as we know it today came from a Viennese coffee speciality, the so-called “Kapuziner”. This consists of mocha and liquid whipped cream. The “Capuchin” owes its name to the typical light brown colour, which is reminiscent of the habit of the Capuchin monks. In German, the related word “cappuccio” means hood or haupe, which can be associated with the monk’s habit. During World War I, Austrian soldiers brought their specialty to Italy. Here the “Capuchin” was further developed and refined into the “Cappuccino”. The name “Cappuccino” is derived from the name of the original drink “Kapuziner”. Today, the Italian version of the cappuccino is usually served in cafés around the world.

When is cappuccino drunk?

In Italy, cappuccino is usually drunk at breakfast. Italians like to dip hard pastries such as rusks or cantuccini into their drink. In this country, the coffee specialty is drunk throughout the day. For example, at the start of the day, but also in the afternoon with coffee and cake.

How is a cappuccino prepared?

Like a latte macchiato, cappuccino only needs two ingredients, but in comparison it is a little more skilful when it comes to the figures in the foam. But read more here.

Ingredients needed for a cappuccino:

An espresso
150 ml milk (alternative)

Step 1:

Prepare an espresso and pour it into a thick-walled cup with a capacity of around 200 ml. You will get the best result if the cup is preheated.

Step 2:

Froth about 150ml of milk with a milk frother and warm it up. Be careful with the temperature: it must not exceed 60 degrees. Otherwise the foam falls apart and the creamy consistency is lost. The milk froth is ready when the volume has roughly doubled. The number of calories in a cappuccino depends on the fat content of the milk used. Therefore, a cappuccino can have anywhere from 70 to 150 calories.

Step 3:

Pour the milk into the cup with the espresso shortly after frothing. With the right speed and technique when pouring, artistic images can be conjured up in the rising crema of the espresso. Find out more about this in the text.

In our guide you will find helpful tips for preparing your espresso with the portafilter machine. We show you how it works.

What is a portafilter machine?

The portafilter machine was developed in Italy to simplify the preparation of an espresso. No wonder it is often referred to as an espresso machine. The first portafilter machine came onto the market as early as the beginning of the 19th century. The aim of such a machine was to better extract the aromatic substances from the coffee beans. When preparing an espresso manually, the contact time between water and coffee powder was too long, so the coffee often tasted bitter. The right pressure with which the water is pressed through the coffee powder is decisive for a short contact time. In the beginning, portafilter machines worked with a lever. Then semi-automatic machines followed, and there are now modern devices with many parameters that can be set individually.

How a portafilter machine works

The portafilter machine is named after the removable portafilter. This is the holder for the sieve. The sieve is filled with freshly ground coffee powder and fixed in the machine. For perfect coffee enjoyment, water is pressed through the coffee powder in the sieve at high pressure. In addition to the portafilter, the machine consists of the following elements:
Electric pump for optimal pressure
Heating element and boiler to achieve the right brewing temperature
Steam lance for frothing the milk
water tank
brew group

This is how the perfect espresso succeeds

Use our eight-step guide for an espresso from the portafilter machine. This shows you all the important basics:

Preheat the espresso cup and machine
To ensure that the espresso does not cool down too quickly and that the drink is not exposed to severe temperature changes that negatively affect the coffee aroma, you should fill the cup with hot water in advance and set it aside. Most portafilter machines have an integrated hot water dispenser for this purpose. The portafilter machine itself must also be warm. Therefore, turn on the machine at least 25 minutes before preparation and let it warm up.
Clean portafilter machine
As with any coffee maker, you should first remove old coffee grounds from the portafilter and then carefully wipe off oils, fats and other residues. These can then no longer influence the taste of the espresso. Make sure the portafilter is dry before filling.
grind the coffee finely
A coffee grinder with a disc grinder grinds the beans extremely evenly and thus delivers a perfect grinding result. Be sure to grind the coffee beans finely. Beans that are ground too coarsely can quickly taste bitter. In addition, finely ground beans have more surface area and therefore require less contact time to release the aromas.
Dose the coffee powder correctly
The portafilter should ideally be filled to the base for dosing. The dose is crucial – the powder should therefore only be slightly heaped. In most cases, a portafilter contains around 7 – 9 grams of coffee powder for 25 ml of espresso.
Smooth the surface
As soon as you have filled the portafilter to the brim, you can gently tap the espresso powder and smooth it out with your index finger. With an optimal surface you do the preparatory work for the subsequent tamping.
Tamp espresso powder
When it comes to the tamper, one usually speaks of the so-called “coffee tamper”. This is used to compress the powder and compact it enough to withstand the incoming water pressure, allowing the flavors to unfold slowly. For an optimal result, a pressure of 10 – 15 kilograms is recommended.
Pre-rinse group head
Like almost all parts of the portafilter machine, the brewing head must be cleaned before use. To do this, you can simply run hot water through the group head. This is called making an empty reference. Any coffee residues from the last extraction are loosened and the water that is too hot is drained.
Clamp in the portafilter
Now all the precautions for a perfect espresso have been taken. Finally, clamp the portafilter into the machine and press the lever to brew. After about eight seconds, the first espresso flows into the preheated cup. For 25 ml of espresso, wait around 25 seconds before you pull the lever up again. Stir in the crema before drinking so that the aromas can unfold in the espresso.

Espresso without portafilter

In order for the perfect espresso to be successful even for beginners, the right equipment must of course be used. In the home, the user usually does not have professional catering equipment. Even a small portafilter machine is not cheap. Part of the investment is in accessories such as the espresso grinder. This does a crucial part of the work and helps you to find the perfect degree of grinding. If you want something a little less artisanal, but still just as tasteful, then rely on a fully automatic coffee machine. At the push of a button, this not only brews espresso, but also all coffee specialties with espresso, such as cappuccino or latte macchiato. Good to know: The espresso maker cannot make an espresso at all because there is not enough pressure. Nevertheless, the coffee can be espresso-like.

Grilling healthy is not difficult at all: If you are creative and open to new things, you will have many great options – even without meat.

When it comes to grilling, most people think of sausages and steaks first. But it doesn’t always have to be (just) meat: There are also many other options for the barbecue party that are not only delicious, but also healthy. In the following you will find recipes for tasty grilled food and other tips on how to grill as healthily as possible in your own garden.

Grilling healthy: vegetarian and vegan grilled food

Grilling vegetarian or even vegan: For many meat lovers, that doesn’t sound appetizing at all. Meatless grilling is too often associated with dry corn on the cob or boring baked potatoes. There are now countless delicious options if you want to grill sustainably and healthily:

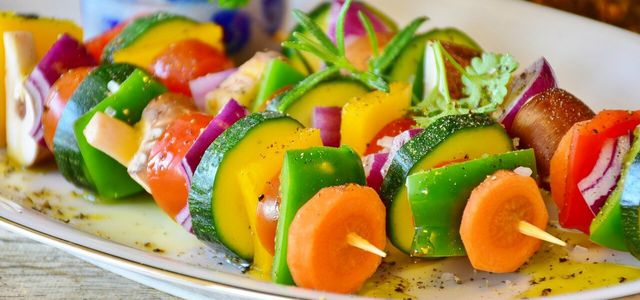
Try the classic: vegetable skewers! The colorful skewers are well known and popular. You can equip them according to your wishes. Just test yourself through your favorite vegetables, from mushrooms to peppers to zucchini. You can find four variants here: Grilling vegetable skewers: 4 vegetarian variants.
Peppers, courgettes and aubergines are not the only things that are suitable for healthy grilling. You can also throw some more unusual vegetables on your grid and grill them healthy. For example, try grilled fennel, grilled asparagus or grilled stuffed mushrooms.
A very important tip for vegetarian or vegan grilled food is the marinade. Because this is not only crucial for steaks, but also for vegetables. You can find a recipe here: Marinate grilled vegetables: This recipe is really tasty.

If you are a fan of potatoes in any form, you should not forget them at your healthy barbecue. By the way, you can not only grill conventional potatoes, but also grill sweet potatoes, for example.
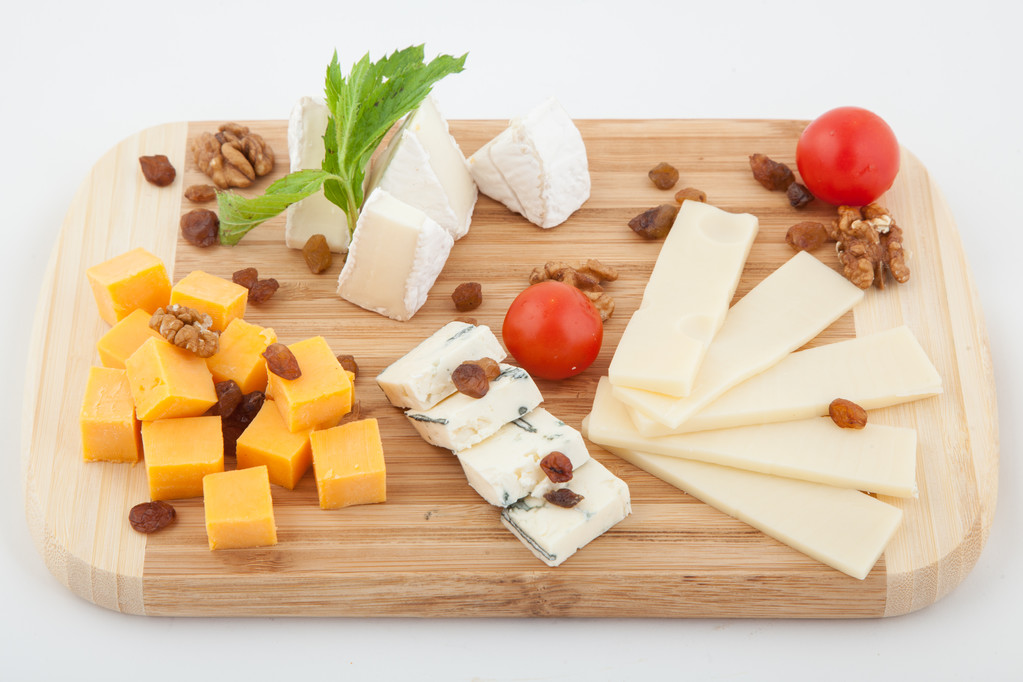
Grilled cheese is also great for vegetarian barbecues. When buying dairy products, make sure that they are organic if possible. In this way you not only support more species-appropriate animal husbandry, but also do something for your own health by avoiding chemical-synthetic pesticides. Also read: Grilling feta: 2 delicious recipes.
Fancy a sweet dessert? No problem! You can grill not only vegetables, but also healthy fruit.

Side dishes for a healthy barbecue evening

Matching side dishes for the barbecue should not be missing at the barbecue evening. These include delicious dips and homemade salads. You can find links to the best recipes for healthy grilling here:

Recipes for salads:

Vegan Potato Salad
Vegan pasta salad
Vegetarian Layered Salad Recipe
Couscous Salad
lentil salad
Party Salad

Tip: Of course, enough bread for grilling is also included. For example, you can bake a fresh baguette yourself. Herb baguette or spelled baguette are also great side dishes.

Healthy grilling with meat

If you don’t want to completely do without fish and meat when grilling, you should consider a few points to grill more healthily:

Buy meat with an organic seal. Avoid the cheap meat from the supermarket.
Support butchers in your region.
Try to reduce your meat consumption and if possible not eat meat every day.
You should also be picky about fish. You can find important tips here: Eating fish: You should definitely keep this in mind.
Tip: Meat substitutes are controversial because of the many additives, but if you like meat and really don’t want to eat it anymore because of animals and the environment, you can consider trying meat-free alternatives instead.

Grilling healthy and sustainable: important tips

Healthy grilling isn’t just about the right food. You should also keep a few general tips in mind:

For healthy grilling, be careful not to drip marinade or other liquids onto the hot charcoal: this can create potentially carcinogenic smoke. You should therefore use metal skewers for vegetables – this way no whole pieces fall through the grate.
Grilling without aluminum foil is more sustainable and poses fewer health risks.
Protect yourself from the heat emitted by the grill. Do not touch the grilled food with your bare hands to avoid burning yourself. Use grill tongs and preferably a grill apron to keep you healthy.
Be careful when using a gas grill. Make sure the surface is stable and only use it outdoors.
If you want to buy a new grill, you should think about an electric grill. This not only saves you time, but also avoids the formation of toxic smoke.

In the best case, you not only grill healthy, but also sustainably. For example, use local charcoal, natural grill lighters and avoid disposable crockery and cutlery.