Tag

mint

Browsing

Introduction: The Famous Moroccan Mint Tea

Morocco is famous all over the world for its refreshing mint tea, also known as “Moroccan whiskey.” In Moroccan culture, mint tea is a symbol of hospitality and is served to family, friends, and guests alike. This tea is characterized by its sweet and minty flavor and is traditionally served in small glasses with a lot of sugar.

Moroccan mint tea is not just a popular beverage, but also a significant part of the country’s culture and heritage. It is often served during special occasions, such as weddings and religious celebrations, and is a staple in Moroccan households. The tea is not just a drink but also a way of life, and there are several variations of it that you can try.

The Basics: How is Moroccan Mint Tea Made?

Moroccan mint tea is made by brewing green tea leaves with fresh mint leaves and boiling water. The tea is then sweetened with sugar and served hot, often with a side of nuts, pastries, or other Moroccan sweets. The tea can be made in large or small quantities, depending on the occasion, and is often served in a teapot or kettle.

To make a perfect cup of Moroccan mint tea, it is important to use fresh ingredients, such as fresh mint leaves and good quality green tea. The tea should be brewed for at least five minutes to allow the flavors to infuse properly. Moroccan mint tea is a simple yet delicious drink that can be enjoyed any time of the day.

Classic Flavors: Mint Tea with Sugar and Mint Tea with Pine Nuts

The traditional way of serving Moroccan mint tea is with sugar, which adds sweetness to the minty flavor of the tea. This classic flavor is loved by everyone, from the young to the old. The sugar is added to the tea while it is still brewing and is stirred until dissolved.

Another classic flavor of Moroccan mint tea is with pine nuts. Pine nuts are a popular ingredient in Moroccan cuisine and are often used in savory dishes. In mint tea, they add a nutty flavor and give the tea a unique texture. The nuts are added to the tea after it has been brewed and are then stirred before serving.

Spice It Up: Mint Tea with Ginger and Mint Tea with Orange Blossom

If you are looking to spice up your traditional Moroccan mint tea, try adding ginger or orange blossom. Ginger adds a subtle spiciness to the tea and is often used in Moroccan cuisine for its health benefits. Orange blossom, on the other hand, adds a floral note to the tea and is often used in desserts and pastries.

To make mint tea with ginger, add freshly grated ginger to the tea while it is brewing. You can adjust the amount of ginger to your liking. To make mint tea with orange blossom, add a few drops of orange blossom water to the tea after it has been brewed. This will give the tea a light and refreshing flavor.

Health Boosters: Mint Tea with Sage and Mint Tea with Thyme

Moroccan mint tea is not just a delicious beverage, but it is also known for its health benefits. To make the tea even healthier, try adding sage or thyme. Sage is known for its anti-inflammatory properties and can help with digestion. Thyme, on the other hand, is known for its antibacterial properties and can help boost the immune system.

To make mint tea with sage or thyme, add a few leaves of the herb to the tea while it is brewing. You can adjust the amount of herbs to your liking. These variations of mint tea are not just healthy but also delicious.

Final Thoughts: Try These Moroccan Mint Tea Variations Today

Moroccan mint tea is a delicious and refreshing drink that is loved by people all over the world. Whether you like it classic or with a twist, there is a variation of mint tea that you can try. From ginger to pine nuts to sage, there are many ways to make your mint tea even more enjoyable.

So next time you want to have a cup of tea, why not try making Moroccan mint tea with a variation? It is easy to make and is sure to impress your guests. Whether you are looking for a sweet or spicy flavor, there is a Moroccan mint tea variation that will suit your taste buds.

Summer, sun, sunshine – and ice cream! This vegan ice cream simply tastes like summer: fresh mint, crunchy chocolate, and creamy fine ice cream. We can’t get enough of this green avocado ice cream. And you don’t even need an ice cream maker. It’s so easy to make your own avocado ice cream.

Make your own avocado mint ice cream

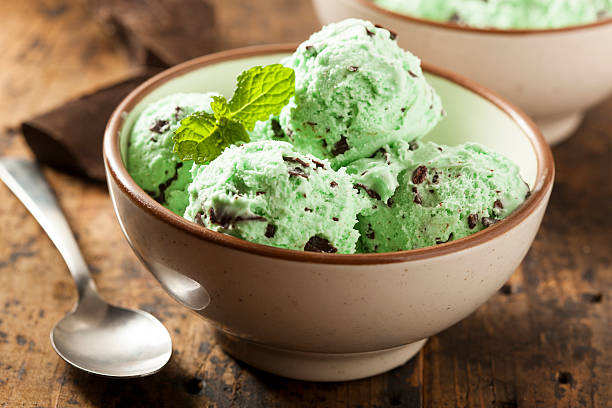
You’ve certainly never eaten ice cream like this: fresh mint gives the creamy-green avocado ice cream a particularly refreshing note – and really helps to cool off on hot days. The crunchy pieces of chocolate give a certain crunch effect. And on top of that, it’s also vegan ice cream!

To make the avocado ice cream yourself, you only need a few ingredients: coconut milk, avocados, mint, chocolate, and possibly some agave syrup. Although avocados have a relatively high number of calories and a high-fat content, healthy polyunsaturated fatty acids predominate.

Mint and lemon provide vitamin C and at the same time provide a fresh kick. The whole thing is also done in no time at all: you only need 15 minutes until the ice is in the cooler – but then you have to wait. But anticipation is often the best joy!

We fell in love with the creamy avocado ice cream – just try it out and enjoy the fresh licking fun on hot days.

The recipe for the avocado mint ice cream with chocolate

For 6 servings

  • 1 can of coconut milk
  • 3 ripe avocados
  • 2 tbsp lemon juice
  • Agave syrup (optional)
  • fresh mint (or mint extract)
  • 100 g chocolate drop (or to taste)
  • Besides that
  • cling film

Preparation steps

  1. Open the coconut milk and scoop out the solid part at the top – don’t shake the can first – and pour it into a large bowl! Using a hand mixer, beat the solid coconut milk until fluffy, and then pour into a cake or casserole dish.
  2. Split the avocados, pit and scoop out the flesh, and place in a food processor. Blend together with the lemon juice, agave syrup, and mint leaves until smooth and creamy.
  3. Put the avocado mixture on the fluffy coconut cream, sprinkle the chocolate chips over it, and mix the mixture carefully but evenly.
  4. The surface of the mass should be relatively smooth. Now place cling film on top and press lightly so that there is no air between the film and the ice cream mass. Place the ice cream in the freezer for at least two hours.
  5. Let it thaw and enjoy.