Tag

preparation

Browsing

Mallow tea is an ancient natural remedy. Wild mallow relieves dry coughs and inflammation of the mucous membranes… with its slimy effect!

Mallow tea: Wild mallow versus hibiscus

Mallow tea – what are we talking about exactly? Mallow tea consists of the wild mallow – the Malva Sylvestris. Both the wild mallow and hibiscus belong to the mallow family. Charlemagne already had them cultivated in monasteries because of their medicinal benefits – and this is how they conquered all of Europe. Because their blossoms and leaves are rich in mucilage: mallow tea relieves symptoms in the mucous membranes because this active ingredient forms an enveloping and soothing protective film when it comes into contact with moisture.

Mallow tea: Effect and areas of application

Mallow tea is known as a remedy for irritation and inflammation in the mouth and throat and in the digestive tract. More precisely: for dry coughs, sore throats, gingivitis, stomatitis, gastrointestinal infections and bladder problems. Mallow is also found in skin and hair care products. Mallow tea has no known side effects.

But be careful if you are taking medication: the mucilage can impede the absorption of medication through your intestines. There should therefore be at least two to three hours between drinking mallow tea and taking medication.

Mallow tea from flowers or leaves: the preparation

Instructions for a cup of mallow tea:
Pour a cup of cold water over a teaspoon of mallow tea. A cup is about 150 milliliters.
Bring the mixture to a boil and then remove it from the stove.
Now the mallow tea should rest for ten minutes.
Finally, you pour it off through a tea strainer.

Pu-erh tea is one of the most precious and oldest types of tea in the world. It must be matured and prepared in a special way. Here you will find all the background information about the world-famous tea from China.

Pu-erh tea is probably one of the oldest types of tea in the world. The precious tea comes from the province of Pu-Erh, from which the name of the tea variety comes. Pu-Erh is a highland region in southwest China where tea has been cultivated for over 1,700 years. Traditionally, Pu-Erh tea is made from the leaves of the Qingmao tree. This relative of the tea plant can grow up to 30 meters tall and over 800 years old.

But not only the history and the origin of the tea are extraordinary. Its special maturing processes and preparation methods also make Pu-Erh tea a myth-enshrouded treasure among tea lovers.

Pu-erh tea: origin and traditional production

Traditionally, pu-erh tea, like good cheese or fine wine, needs a long maturing process. There are particularly valuable varieties that have matured for more than 70 years. It is hardly surprising that lucrative business is being done with tea in China.

The background to the long maturation process is fermentation. Because Pu-Erh is the only tea in the world that is actually fermented:

Traditionally, the leaves of the tree are lightly steamed after harvesting and then pressed into small cuboids or round cakes before they are stored.
After some time, small microorganisms form at the breakage points of the leaves under the influence of oxygen, which start the ripening process. Years of work by numerous bacteria and fungi ensure this
The microorganisms metabolize the tea leaves, including the bitter substances they contain. The tea tastes pleasantly mild and slightly sweet.
The time from the harvest to the tea that is ready to be enjoyed lasts on average between five and ten years. But even then, the maturation process is never quite complete and theoretically continues to take place. Particularly expensive teas mature over several decades. The finished tea is packed in round tea cakes (see picture) or sold loose in a bag.

Artificial maturation of pu-erh tea

Today, teas are often artificially matured to shorten storage times. This practice dates back to the 1070s. At that time, the traditional maturing process of pu-erh tea was changed for the first time in a Chinese tea factory:
The employees added the same microorganisms, which colonize themselves years later during dry ripening, to the harvested leaves much earlier. Also, they stored the tea in a humid environment.
Under these changed conditions, the tea only needed 42 days to ripen instead of five years.
Another advantage: the ripening process can be better controlled.

You can buy pu-erh tea in loose and pressed form. The same brewing times apply to both, with the pressed variant only a little preparatory work (step 1) is added.

First, carefully remove a few leaves from the pressed tea block. If possible, do not scratch or break them out: the more cracks there are, the more bitter the tea can taste later.
Then you have to rinse the dissolved tea. To do this, pour boiling hot water over the leaves in a tea strainer or pot and let the brew steep for just a few seconds. This first infusion is then completely tipped away.
Only now does the actual preparation begin. Since you rinsed your tea with hot water beforehand, the leaves now open all the more easily: Pour boiling water over the tea again. Then let it steep for about 15 seconds. Note: Every tea is slightly different. Take the recommended brewing times from the pack or ask them directly in the store.
Thanks to the intense aromas of Pu-Erh tea, it can be re-brewed almost as often as you like. But the first infusions are always the strongest. Therefore, increase the length of the brewing time from a few seconds to two to four minutes.
It is best to store your pu-erh tea in a dark, air-permeable container. Since the fermentation continues in the packaging, you should never seal it airtight.

Assam tea is a popular type of tea of ​​Indian origin. Here you can find out how it works and how to prepare it correctly.

India – The home of Assam tea

Assam tea is characterized by its heavily oxidized and therefore black leaves. Compared to white or green tea, it tastes more aromatic and contains more caffeine

The tea gets its name from the region in which it is grown. The largest tea-growing region in the world is located in the Indian state of Assam.

The right preparation

Tea lovers around the world are discussing how Assam tea is properly prepared. For loose tea, the following procedure is recommended:
Pour one gram of Assam tea into a cup. To get the full aroma, you should add the leaves loosely. You can also use a tea infuser.
Pour about 8 ounces of boiling water over the tea. For best results, you should use soft water. However, Assam tea is not as susceptible to hard water as other types of tea.
Now let the tea steep for three minutes. Make sure you don’t wait any longer or the tea will quickly become bitter. Cover it during the brewing time so that the full aroma is preserved.
Depending on your taste, you can now sweeten your tea. Some also like a squeeze of lemon or some honey in their tea.

How does Assam tea affect our body?

High caffeine content: As a typical black tea, Assam tea contains a particularly large amount of caffeine. Therefore, you should see it as a stimulant and only drink it in moderation. Caffeine has a stimulating effect and can help with concentration difficulties for a short time. But never drink more than five cups a day to avoid negative effects such as nervousness or sweating.
Promotes digestion: Assam tea is often used as a digestif – i.e. drunk after a meal to boost digestion.
Vitamin B1: Black tea contains a particularly large amount of vitamin B1, which is important for the nervous system.
Antioxidants: Just like green tea, black tea is high in antioxidants. It is therefore often said that it can reduce the risk of cancer. However, this assumption has not yet been scientifically confirmed.
Attention: Due to the high caffeine content, black tea is not suitable for children!

Tip: Loose tea instead of tea bags

Black Assam tea is often sold in tea bags. But their packaging has a much greater impact on the environment than the packaging of loose tea. If you want to produce less waste, you should rather buy loose tea.

The ecological balance of Assam tea is rather bad. The tea has to be imported from India, the long transport route results in climate-damaging emissions. The conditions on the tea plantations are often problematic. Therefore, make sure that your tea was produced under fair working conditions.

The nutmeg is a large and impressive pumpkin. In this article you will learn more about the nutmeg pumpkin, valuable tips for the preparation as well as many different recipe ideas.

Nutmeg is also known as Muscade de Provence or Musk Squash. The artistically ribbed shell shines in the typical autumn colors from dark green to orange to light brown.

Nutmeg pumpkin contains many valuable ingredients:
potassium
calcium
zinc and
Vitamins of groups A, C, D and E.
The aromatic pulp of the nutmeg pumpkin gets its color from the high proportion of beta-carotene. Carotene is good for healthy skin, strong hair and eyesight.

Nutmeg pumpkin – you should know that

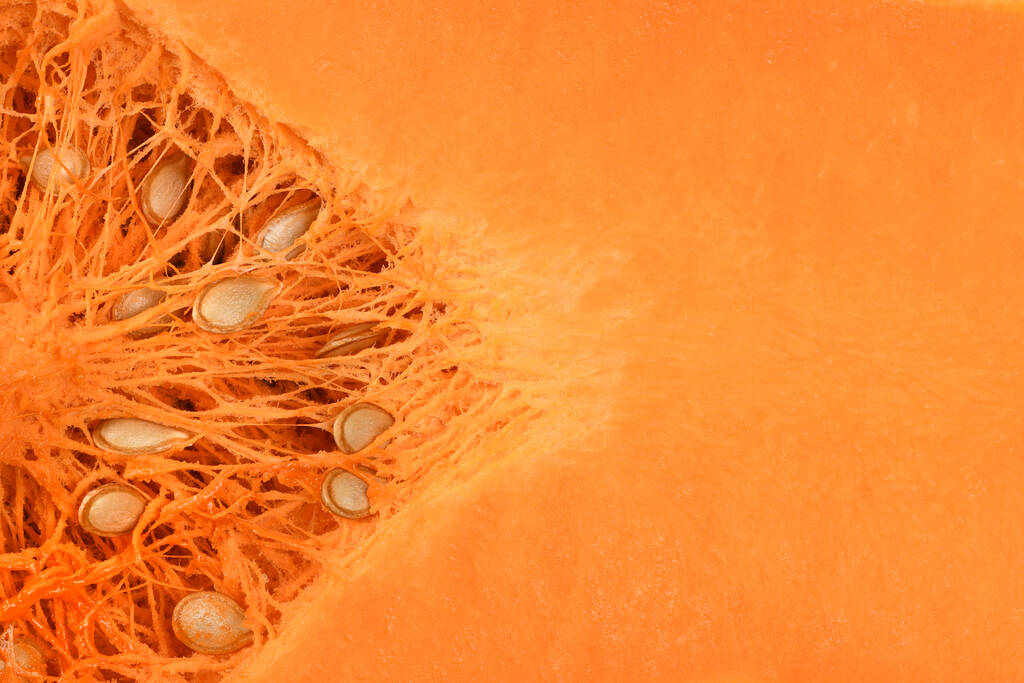
The nutmeg squash belongs to the musk squash family and is closely related to the butternut squash. The flesh is orange-red and smells pleasantly spicy.

Nutmeg pumpkins have a diameter of up to 50 centimeters and can weigh up to 40 kilograms. The round, ribbed shape is striking. The skin is initially green and gradually turns light brown until fully ripe.

The nutmeg pumpkin originally comes from Central and South America. In Europe, he prefers warmer growing areas such as Italy or France. In Central Europe, the cultivation of nutmeg is not so productive due to the comparatively lower temperatures.

In Germany, the nutmeg pumpkin season begins in September. Nutmeg pumpkin tastes best when it is not yet fully ripe. You can tell by the color of the shell – it should still be dark green. The skin of fully ripe nutmeg squash turns orange to beige.

Ripe nutmeg has a soft skin and fewer seeds than most other types of squash. This creates less waste and you can process more pulp into delicious dishes.

Tip: If you tap the skin of the nutmeg with your knuckle, you should hear a hollow sound. Then the degree of maturity is optimal. If the squash sounds dull when you tap it, it has already started to spoil.

Tips for storing nutmeg squash

Whole nutmeg squashes remain edible for more than half a year when stored in a cool and dry place – for example in the cellar or in the cool pantry.

However, since the nutmeg pumpkin is very large and heavy, you will often find wedges that have been cut open and wrapped in plastic in the supermarket. Once cut, the nutmeg squash, which otherwise stores well, only stays fresh for three to four days in the refrigerator.

You can find unpackaged, organic nutmeg squash at local farmers’ markets and direct sellers. Buy locally grown nutmeg squash. Regional products have shorter transport routes behind them and are therefore better for the climate.

Attention: When buying, make sure that the skin of the nutmeg pumpkin is undamaged. Only then can it be stored longer.

Tip: extend the shelf life of cut nutmeg squash in the freezer. Freeze the diced nutmeg in batches. This allows you to prepare the pumpkin particularly quickly in the kitchen if necessary.

Peel nutmeg pumpkin: This is how it works

The skin of nutmeg is significantly thinner than that of many other types of pumpkin. However, you should peel the nutmeg squash, as the peel requires a significantly longer cooking time than the pumpkin flesh.

How to peel nutmeg pumpkin:
Use the indentations in the nutmeg squash and use a large knife to cut out wedges from the squash.
Remove the pips and the fibrous pulp around the pips with a spoon.
Using a sharp knife, thinly slice the skin off the pumpkin wedge.
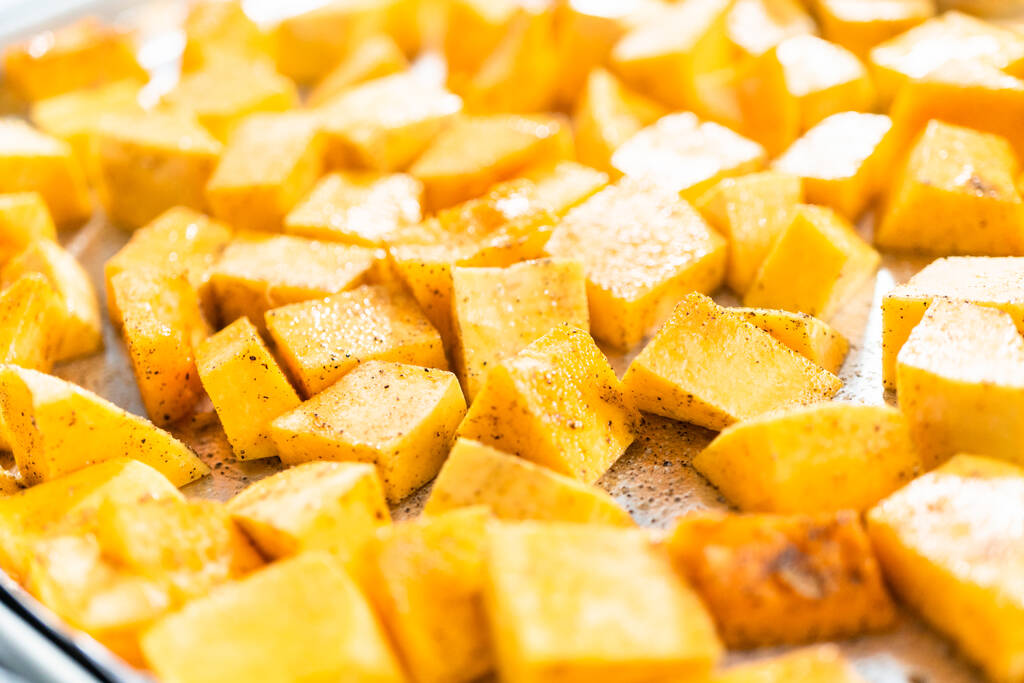
You can then simply grate, slice or dice the pumpkin wedges as instructed in the recipe.

It is one of our most popular edible mushrooms. Here we show you how to recognize it, how to prepare it and what risks it entails.

Anyone who likes to hunt mushrooms should have seen the butter mushroom (Suillus luteus) before. Because the butter mushroom is very common in German forests. It grows especially often near pine trees.

Its buttery yellow flesh is responsible for its name. This is surrounded by a slimy shiny cap that doesn’t make the mushroom look particularly appetizing at first glance. In Bavaria, the butter mushroom is therefore also colloquially known as “Rotzer”. The American naming is also based on the slimy appearance of the mushroom. Here the butter mushroom is called ‘Slippery Jack’.

Recognizing and distinguishing butter mushrooms

The main collecting time for the butter mushroom is between July and October. In contrast to many other mushrooms, it is relatively easy to identify the butter mushroom:

The butter mushroom has a slimy and chocolate brown cap.
The diameter of the hat is six to twelve centimeters.
The cap peels off easily to reveal the buttery yellow flesh underneath.
When you collect butter mushrooms, you should always cut them off about an inch above the ground so they can grow back. You should blot the slime layer around the mushroom with a cloth immediately after picking the mushroom. This will prevent bacteria and mold from settling on your mushroom. At home you can then wash your mushrooms thoroughly and remove the slime layer completely with a knife.

Why not everyone can tolerate butter mushrooms

The butter mushroom is not poisonous, but can cause intolerance reactions in allergy sufferers. If you suffer from a mushroom allergy, gastrointestinal problems with vomiting, diarrhea and stomach pain can be the result. Some of the proteins contained in the butter mushroom are to blame for this. These are actually harmless to our body, but are sometimes mistakenly identified as pathogens by the immune system. The subsequent immune reaction of our body are then the mentioned disease symptoms.

Even if you are not allergic to the butter mushroom, you should not consume it excessively. The butter mushroom (like many other types of mushrooms) stores mercury from the environment. Even if the soil only has a low mercury content, there are increased mercury concentrations in the mushroom cap in particular. You should therefore not consume more than 300 grams of butter mushrooms per week.

Prepare butter mushrooms: Fry and serve with bread dumplings

The butter mushroom has a mild taste and a slightly bitter acid note. It tastes delicious if you sear it in hot olive oil with a little salt and pepper. You can also bread it with egg and flour and then fry it in hot oil. This gives you a nice contrast between the crispy crust and tender mushroom flesh. Herbs such as parsley, tarragon and coriander go particularly well with the mushroom.

A mushroom ragout made from various forest mushrooms, which is typically served with bread dumplings, is popular in Bavaria:
Fry the mushrooms in some oil.
Just before the mushrooms are done, add shallots and garlic.
Deglaze the mushrooms with some white wine and let the alcohol evaporate.
Now add a good dash of cream and let the sauce cook until it has a thick consistency.
Season your mushroom ragout with sugar, pepper, salt and parsley to taste.

Sesame often hides in baked goods. The small grains have no reason to hide: they are full of healthy ingredients. Here you can find more background on the ingredients of sesame.

Sesame originally comes from South Asia. Today, the oil plant is grown in many tropical and subtropical countries around the world. With us, the white sesame seeds are certainly the best known – but there are also brown and black sesame seeds. The different varieties taste different and the nutrient composition also varies slightly.

Sesame: nutritional values ​​and ingredients

The name oil plant already gives it away: sesame seeds contain a lot of fat. Here are the nutritional values ​​per 100 grams of sesame:
Calories: 567 kcal
Fat: 48g
Proteins: 17 g
Carbohydrates: 26 g
Fiber: 17 g
The fat in sesame seeds consists mostly of monounsaturated and polyunsaturated fatty acids. These in turn are composed primarily of oleic acid and linoleic acid, an omega-6 fatty acid.

Sesame also contains many vitamins and minerals. Sesame seeds are particularly interesting for vegetarians and vegans because they contain a lot of iron and calcium. In addition, sesame provides us with various amino acids, the B vitamins B1, B2 and B6, vitamin E and magnesium, phosphorus and potassium. Black sesame contains a little more of most of the nutrients than white sesame.

Sesame in nutrition: how it affects health

Sesame provides vegetarians and vegans with important iron and calcium, but also has other positive properties:
Sesame contains antioxidants, including vitamin E. These substances protect our cells and are said to prevent numerous diseases.
Linoleic acid is an essential fatty acid that your body cannot produce itself and must be obtained from food. Among other things, it is important for the skin and animal experiments have shown that it has an antioxidant and anti-cancer effect. However, it is important for the positive effect that omega-6 fatty acids such as linoleic acid in your body are always in the right ratio to omega-3 fatty acids. So make sure you’re getting enough omega-3 fatty acids. They are found, for example, in linseed oil and linseed oil seeds and in walnut oil.
Because sesame is high in fiber and protein, it is very filling.
Caution: Sesame is a strong allergen. If you are allergic to sesame, you should definitely avoid it.

Cooking with sesame: use in the kitchen

In the kitchen, you can use either sesame seeds or sesame oil. You can get the latter cold-pressed or refined. Cold-pressed sesame oil tastes nutty and contains many healthy nutrients. Refined sesame oil, on the other hand, can be heated up and stored for a long time. Since it tastes neutral, you can combine it with many foods.

You can roast sesame seeds very well, which makes them taste stronger. Sesame oil also tastes particularly spicy when it is made from roasted seeds.

How to use sesame seeds or sesame oil in the kitchen:
Cold-pressed sesame oil tastes delicious in a salad dressing. It goes particularly well with Asian food.
You can use refined sesame oil for frying.
If you’re baking bread or rolls, you can add sesame seeds to the dough or sprinkle them over the dough pieces before baking. A mixture of light and dark sesame is particularly nice.
You can also garnish salads and Asian wok dishes with sesame seeds.
When you blend sesame seeds and oil together, you get a creamy paste called tahini. Tahini is a great ingredient for oriental creams like hummus.
You can make delicious, filling sweets from sesame seeds. In the Arab world, people like to eat halva or bars made from sesame and honey.

Wild asparagus grows in the Mediterranean region and is the spicier version of green cultivated asparagus. Where it often occurs, how to prepare it and more information can be found here.

Wild asparagus, also known as forest asparagus, is a delicacy for asparagus lovers. The wild asparagus is mainly found in the Mediterranean region, for example in Croatia, southern Italy or Greece. You can collect it there between March and May. Wild asparagus looks similar to green cultivated asparagus, but tastes much more aromatic and spicier. Not everyone likes the intense, slightly bitter taste, but you should definitely try the healthy vegetable at least once.

Wild asparagus: Attention, risk of confusion!

Wild asparagus is not always “real” wild asparagus. It is often a question of other plants that are incorrectly named as such – for example wild hops or the Pyrenees milk star. As the name suggests, the latter comes from the Pyrenees and is often imported from France. Although both belong to the asparagus family, the milk star is only distantly related to the true forest asparagus.

Collect wild asparagus

On the other hand, it grows lush in parts of southern Europe, for example Apulia, and on Istria, a Croatian peninsula. The annual forest asparagus harvest takes place there from March to May: thousands of Croatians then collect the wild asparagus. But even there you need a practiced eye and patience, because the thin rungs are not always easy to spot.

So if you ever want to prick wild asparagus yourself, you could combine the whole thing with a trip. Alternatively, you can get hold of the asparagus at the weekly markets there.

Warning: there are many snakes in Croatia. If you go looking for wild asparagus, you should have a stick with you to scare them away. Also wear long clothes.

Wild asparagus: How to prepare it

If you are lucky enough to get your hands on wild asparagus, the preparation is very easy. First check if it has woody ends and cut them off if necessary. Simply blanch the rest in salted water for five minutes. You can serve it with olive oil and some lemon juice, for example.

You can also prepare wild asparagus in a frittata. Or you puree the cooked asparagus spears and add them to a risotto.

Stir-Fry is a method of preparation that you can use to prepare a variety of dishes.

Stir Fry: The Basics

Translated, stir-fry means something like “stir-fry”. It is a Chinese preparation method in which vegetables are briefly fried while stirring. The vegetables should remain crisp and retain most of their micronutrients. It is often served with tofu, egg or meat afterwards.

You are free to choose the vegetables. However, make sure to use vegetables that don’t need to cook for a long time. Potatoes, sweet potatoes or parsnips, for example, are not suitable. The following types of vegetables are particularly recommended:

carrots
broccoli
mushrooms
sugar snap
paprika
zucchini
spring onions
Red cabbage
Kale
Chinese cabbage

In addition to the main ingredients, stir-fry lives mainly from the spices. It is best to use garlic, ginger and soy sauce for this. Optionally, you can add chilli or some chili or curry paste. Traditionally, the ingredients are fried in sesame oil. You can also use rapeseed oil or sunflower oil.

Cafe Americano – that can be nothing other than an American coffee, or not?! Not quite, because the Cafe Americano originally comes from beautiful Italy. In all likelihood, the history of the somewhat weaker espresso started in World War II. In the course of the war, many American soldiers, the so -called G.I.S, came to Europe. A large number of soldiers were stationed in southern European Italy at the time.

The Cafe Americano and its story

The military was enthusiastic about the Italian dining and coffee culture right from the start. Only with the strong espresso could and did the American guests not really make friends – he was simply too strong for them. But of course the soldiers knew how to help themselves and simply stretched the strong, dark coffee drink with hot water. The fun -loving Italians took the modification of their favorite hot drink with humor and, according to his creation, put him on their drinks cards as “Caffè Americano” (according to Italian spelling).

Curiously, William Somerset Maugham had an Americano ordered an Americano in Naples Italian in Italy in the First World War in his spy novel, which was published in 1928. It is not known whether this Americano is actually the Cafe Americano known today. But let’s be honest, myths are much more fun.

The preparation of a Cafe Americano: Come Si Fa?

First of all, first of all, a classic espresso is prepared, preferably with a fully automatic machine or a portafilter machine. The bean mix, the right grind and the right amount of espresso powder are also important for the production of the perfect espresso. We explain here how to make an espresso best prepared.

How much espresso you use for the Cafe Americano is ultimately up to you. Traditionally, however, the mixing ratio of espresso and water is 1: 1 – if you prepare a double espresso for the Cafe Americano, you use around 55 – 60 ml of hot water accordingly. The secret of the Italian-American coffee is that the espresso finds its way into the cup in front of the water.

Then the hot water is poured – as slowly and carefully as possible so that the crema of the espresso is preserved. The Cafe Americano is ready! Ideally, it tastes as aromatic and full -bodied as an espresso, but is also easy to compatible and edible for less hard -boiled coffee drinkers.

Cafe Americano and his supposed doppelgangers

With so many different types of coffee preparation, it is often difficult to keep an overview. The diverse offers in different cafes quickly create the impression that normal filter coffee, Cafe Lungo, Long Black and Cafe Americano are all one and the same. But whoever believes that has been missing. Because the preparations of these coffee drinks differ very well – if only in subtleties.

Cafe Americano and filter coffee

Filter coffee is prepared with weaker roasted and finely ground beans and less pressure when brewing than the classic espresso. So normal filter coffee is milder and less strong than the Americano.

Conclusion on the Caffè Americano

If the normal espresso is too strong, you will find the right alternative in the Cafe Americano. The siblings such as Long Black or Cafe Lungo presented by us are further variations with which you can experiment uninhibitedly. At some point you are guaranteed to find the perfect espresso and maybe we have given you the crucial information! How do you prefer your espresso? Let us know!

The history of coffee goes back a long way. From Ethiopia to Europe, coffee has made a long journey, during which the way it is prepared has also developed.

The long coffee journey to Europe

Coffee enjoyment is said to have its origin in Ethiopia. Europe learned about coffee in the 16th century and the first coffee houses in Constantinople, Venice, Hamburg and other major European cities opened in the 17th century. The coffee was traditionally prepared in different ways. We present the history of coffee preparation to you in more detail.

From Ethiopia to Europe

The coffee is said to have its origins in the Kaffa region in south-west Ethiopia. Coffee was drunk here as early as the 9th century. In the 14th century, coffee made its way to Arabia and from there to Europe via the Ottoman Empire in the 16th century. The seeds of the coffee cherries were roasted, ground and boiled in water to make the coffee. The early coffee preparation in Europe was also similar to the traditional Ethiopian one, in which the beans are roasted in an iron pan and then pounded with a mortar. The ground beans are then filled with water and some sugar in a jabana, a bulbous clay jar, and boiled. This method of infusion is used in many countries to prepare coffee, such as in Italy with the Italian mocha pot.

The coffee grinder

In order for the coffee to be enjoyed in the coffee houses established throughout Europe in the 17th century, the beans had to be ground. Since reducing the size with a mortar was too strenuous and not very efficient, the coffee grinder found its way into Europe in the 16th century. The design of the mills varies depending on the degree of grinding that is to be achieved. Before electrification, the beans were still ground by hand. Cone mills were used for this. These had a truncated cone-shaped grinder and, due to their low speed, did not heat up much and were therefore gentler on the aroma during grinding.

Making coffee today

The basic principle of coffee preparation has not changed much since coffee was created. Even today, the beans have to be ground up. The type of preparation determines the degree of fineness. The coffee bean becomes a drink by pouring hot water on it. As a rule, the coffee is prepared using two different methods:

Maceration: Maceration means leaching or dodging. The ground coffee is placed in boiling water and allowed to steep for at least five minutes. This is how Turkish mocha is prepared, for example.
Percolation: Percolation means straining. (Almost) boiling water runs through the ground coffee. The percolation process is always used when preparing coffee in fully automatic coffee machines.