Tag

properly

Browsing

Spreading is a must on icy roads. But you can do more damage than prevent it. In particular, road salt should be avoided, which damages the environment and can pose a traffic hazard. Alternatives in the form of sand or sawdust are far more suitable and harmless.

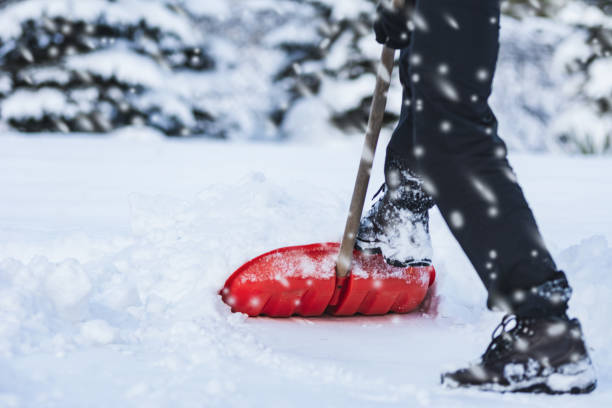
When wintertime snow and ice cover the paths and roads again, it is up to local residents to keep their part of the path as safe as possible. But usually, it is not enough to simply sweep away the snow cover. Rather, the layer of ice must at least be secured. The choice of means is varied, but not all of them are right.

Avoid road salt

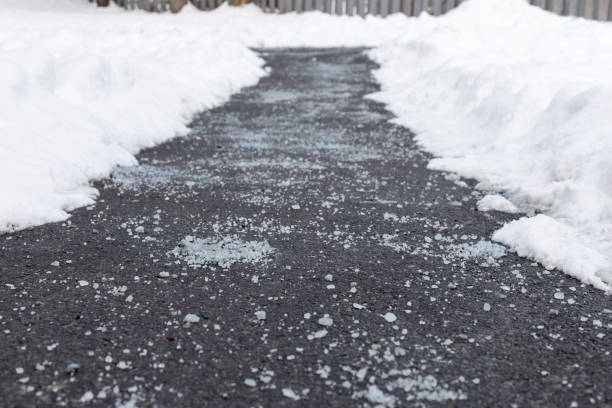
Road salt is a frequently used tool to remove slippery pavements. As granular granules, it ensures that passers-by are less likely to slip away on the dull surface. On the other hand, it gradually thaws the ice and thus eliminates the source of danger itself. However, it is not advisable to use road salt for the following reasons.

On the one hand, salts damage the environment. They move into the soil, where they deprive plants and trees of nutrients and make it difficult for them to absorb water. If the salt gets into the paw pads of animals, it can lead to painful inflammation. It is also conceivable that animals drink thawed saltwater and catch stomach diseases.

In addition, the saltwater can also get onto the streets and leave a greasy film there. This increases the braking distance of cars. In addition, the saltwater can lie directly on the brakes and have a damaging effect there. Apart from a few exceptions (e.g. on stairs, steep slopes, or on black ice), road salt should therefore be avoided. But there are some alternatives that you can use to better protect the environment.

There are enough alternatives to road salt

The best way to sprinkle is with agents that are natural, environmentally friendly, and easy to dispose of. These are, for example, fine sand, grit, or sawdust. The first two mentioned can easily be swept away after the winter or even collected again (the split can be reused). The sawdust, on the other hand, usually rots by itself after a few weeks.

If such litter is out of stock in heavy winters (you should start looking for them in the fall), be creative. You can also clean your chimney and reduce the slippery surface with ashes from the stove, potting soil, or cat litter. Even a thin layer of snow can prevent the risk of slipping. That’s why you shouldn’t sweep up every little snowflake immediately. In addition, please note other important tasks in gardening in winter.

Lots of tips and tricks for cooking eggs properly with instructions for cooking perfect eggs. All household tips for Boiling eggs with tricks for hard and soft eggs. With fresh eggs test.

Household tips for boiling eggs

So you have perfect breakfast eggs and know the tricks for optimal cooking times for an ideal boiled egg. Also, note the tips for storing eggs and preserving eggs.

  • Marking with a pen helps to distinguish between boiled eggs and fresh eggs in the refrigerator. All boiled eggs get a black dot on the egg.
  • Quenching the eggs in cold water immediately after cooking will prevent the yolk from turning green.
  • Use up and boil older eggs first. The older the eggs, the more important it is to quench them in cold water.
  • Don’t boil eggs for too long and don’t boil over 90°C, otherwise, the iron in the yolk and sulfur in the egg white will start to dissolve, and then this greenish edge will appear on the hard yolk.
  • You can also reuse the eggshells very well as organic fertilizer for the flowers and plants in the household.

Instructions for cooking eggs

For the perfectly boiled breakfast egg, we have collected the most important points in instructions for boiling eggs: Ideally, use room temperature eggs for cooking. If you get the eggs fresh from the fridge you have to add that to the cooking time. The boiling water in the pot should be high enough to completely cover each egg. Alternatively, you can also cook the eggs in steam, but then you need a lid on the top. you have to be careful that not too much water evaporates before the eggs are ready according to the cooking time.

Optimal cooking times for eggs

For an ideal boiled egg, a distinction is made between soft, waxy, and hard eggs. Do not cook the eggs too long or too hot, as the eggs usually continue to cook. The following cooking times apply to eggs in already boiling water. If you boil an egg in cold water, just add 2 minutes.

Always carefully put the eggs in the pot

When the water boils, carefully place the egg in the saucepan with a spoon. After boiling, use the same spoon to fish the eggs out of the water again. Then rinse under the tap with cold water until you feel a cool peel. Quenching prevents further cooking, especially with soft eggs. If you leave soft eggs alone, the yolk will continue to set.

What to do if eggs burst

When eggs burst, the temperature difference between egg and water is too high. In these cases, take the eggs out of the fridge early so that they can warm up to room temperature. Or preheat under lukewarm water beforehand. Vinegar and salt in the cooking water will help coagulate. Then at least burst eggs will not appear. So just add vinegar or salt to the water.

The fresh egg test

You can test whether eggs are fresh by looking at the raw egg from the outside or by breaking it open and analyzing the egg contents. With broken eggs, you can test and identify fresh eggs as follows:

  • Fresh eggs have the yolk in the middle of the albumen. The thick egg white forms a kind of ring around the bulging yolk. In old eggs, the albumen liquefies, and the yolk shifts to the edge or becomes flatter or wider.
  • If the chicken feed contains a lot of corn, the egg loses its tension and becomes runny. On hot days, the animals drink a lot of water. As a result, the eggs lose their consistency and also become thinner.

Test fresh eggs with the egg closed

  • The swim test involves placing the whole egg in cold water. If the egg is fresh, it stays on the ground.
  • In the shake test, you hear a gurgling noise when you shake the egg. Then the egg is no longer fresh.

Yeast dough is a classic that many people love. However, you absolutely have to let the yeast dough rise properly! For a fluffy yeast dough, both the pre-dough and the main dough or the topped sheet cake must rise in a warm environment. You can also use your oven for this.

The dough should be nice and fluffy but is often compact and firm. One reason for this is that the yeast dough cannot rest and “grow” long enough. In addition, the wrong temperature is often decisive. We’ll show you the right tips to make your dough rise safely!

Properly “feeding” the yeast for the yeast dough

With fresh baking yeast, you must first make a pre-dough. This step is usually omitted with dry yeast. Whether you prefer to use fresh or dry yeast for your dough is up to you. A cube of fresh yeast (42g) corresponds to 2 sachets of dry yeast (each 7g). For the pre-dough, put the amount of flour required according to the recipe in a bowl and make a well in the middle.

In this well, mix the crumbled fresh yeast with a few tablespoons of water or milk and some flour from the edge of the well. The liquid used should always be lukewarm (30-35° Celsius), as the yeast can “work” better that way. Yeast consists of unicellular fungi that feed on sugars. Therefore, “feed” your yeast with a pinch of sugar to make the pre-dough succeed. Salt as an ingredient in a recipe should not be added to the pre-dough as it inhibits the action of the yeast.

The pre-dough forms bubbles in the warm oven

Yeast develops its fermenting effect best at temperatures of 32°C. In summer it is a good idea to leave the pre-dough covered in the sun. In cooler seasons you can simply use the oven as a helper by letting the pre-dough rest in the oven at 32°, covered with a damp cloth. The oven light that is on should produce approximately this temperature.

In addition, you can set this low temperature in a steam oven. Otherwise, any place with a constant temperature of 32°C without drafts would do, such as a sunny window sill or under the covers. If the yeast has bubbled after about 20 minutes and the volume of the pre-dough has increased significantly, you can take the bowl out of the oven again.

Knead the ingredients and let the yeast dough rise

Finally add the remaining ingredients such as fat, eggs, the remaining liquid, and salt to the dough and knead everything for at least 10 minutes. If possible, the ingredients should be taken out of the fridge one hour before baking so that they are hand-warm when preparing the dough and the yeast can do its job better. Now knead the dough well with your hands or the food processor for 10 minutes.

If it’s sticky, add a little more flour and knead again. Depending on the recipe, the yeast dough must now usually be covered for at least one hour in the 32 °C ovens or in another 32 °C warm and draught-free place. When the dough has doubled in volume, you can remove the bowl from the oven. Otherwise, you have to be patient and give the dough enough time.

Let the filled yeast dough rise a third time

After kneading again, shape, braid, and cover the dough until you hold the desired end product in your hands. For a fluffy yeast dough, it is once again important to cover the dough in the finished form with a damp cloth and let it rise with the topping for about 15 minutes, for example on a warm windowsill.

Finally, heat the oven to the desired baking temperature to bake the yeast dough, which will hopefully have risen nicely. Before baking, brush your yeast pastry with egg yolk, but milk is also suitable so that it does not dry out during baking. Finish baking your pastry and enjoy your fluffy yeast cake with a good breakfast or brunch with friends.

Correct cleaning and preparation is very important, especially with self-collected porcini mushrooms. We show you what you should consider.

Clean porcini mushrooms: This is how it works

Before you can process and prepare porcini mushrooms, you should first clean them. To do this, first wash them carefully under running water. It is best to use your hands and not a vegetable brush, as this will damage the mushroom too much.

Then cut off the wooden end. It doesn’t taste particularly good and is also uncomfortable to chew. If you are using very large porcini mushrooms, you should also remove the spongy tissue under the mushroom head as a precaution, as bugs and dirt can collect in it.

Tips and tricks for washing bras and lingerie correctly and for caring for lingerie and underwear. So that the attractive lingerie looks beautiful and tidy for as long as possible, there are a few things to consider when caring for it.

Bras in particular are sensitive to incorrect washing, drying, and wearing procedures. With a few simple tips, you can keep your bras supple and well-groomed over the long term. Does hand wash lingerie or a delicate wash program? What to consider when washing underwear and lingerie? What care does the laundry need?

Lingerie and bras make a significant contribution to well-being if you choose the right bra size and fit. Shapewear also conjures up a great figure. Provided that the laundry is of high quality, keeps its shape, and is made of comfortable materials. Models with cups or underwires offer the best wearing comfort and support. Basically, the maintenance of quality depends crucially on the respective care.

Wash your underwear properly

In order to maintain the positive properties, hand washing is generally recommended. Because cleaning in the washing machine takes a lot out of the materials. Delicate individual parts can be damaged in the washing machine. Upholstery tends to deform, which is not only uncomfortable when worn but also looks ugly. See also our article “Use the washing machine or hand wash?”.

You should keep this in mind when washing underwear in the machine. However, since there is not always time to wash underwear, lingerie, and lingerie by hand, machine cycles can be used from time to time. A delicate wash program should be selected. Bras and machines are protected with a laundry net. Finally, bra straps can come loose and damage the inner workings of the washing machine. Close hooks when washing to prevent bending and snagging. The temperature should never be above 40 °C. However, one should not be surprised at the faster wear and tear of the laundry that goes hand in hand with regular machine cleaning.

Always follow the instructions for the detergent

If bras are washed in the machine, a mild detergent should always be used. This detergent is also suitable for low temperatures and effectively cleans your laundry at 30 and 40 degrees. Fabric softeners are taboo for most bras because they make the elastane fibers brittle. As a result, bras would lose their elasticity and their shape would suffer over time.

Always sort by color when washing

Even if bras are hand-washed, they should be sorted by color. This protects the color intensity and reduces the risk of discoloration. To fix colors intensively, it is worth soaking new bras in water with a little vinegar. Then rinse thoroughly and soak in cold water with detergent. You should generally pay attention to this when washing and caring for laundry.

No dryer for bras and lingerie

The longevity of bras can be significantly affected by air drying. This type of drying after washing the underwear is particularly gentle on the material. Drying in the dryer, on the other hand, is not advisable. Hanging it up in the sun or placing it on the heater is also not recommended, because the materials will be damaged and the colors will fade more quickly.

Tips for storing delicate underwear

It is best to place bras in a row for storage and avoid kinks. They negatively affect the shape. You should never turn the shells inwards, otherwise, they will curve unattractively and will no longer be invisible under close-fitting tops. Noticeable waves and dents are the results of improper storage. Also, you shouldn’t put heavy items of laundry on top of it. If the shape of the bra padding remains upright when stored, you benefit from the best wearing comfort and can enjoy it for longer.

Material protection of the lingerie

Bras should not be worn for more than two days. This means that sweat and dirt cannot attack and soil the fibers. It also avoids wearing out because the strained rubber bands can relax again after a day of wearing. Wash and dry bras as quickly as possible.

Mangoes taste fruity and sweet. You can read in this article how to store mangoes correctly and how they are in terms of sustainability.

Mangoes are a popular southern fruit. Not only do they taste good, but mangoes are also healthy. It’s important to store mangoes properly so they stay fresh for as long as possible before you eat them. Throwing away mangoes would be a particularly bad thing, as they mainly grow in the tropics and subtropics and are exported from there to Germany. Mangoes therefore cause quite a bit of CO2 emissions. Especially mangoes that are imported by plane pollute the environment. Many supermarkets label fruit that has been transported in this way.

Because of its tropical origin, you should try not to eat mangoes too often. If you’re looking for a local alternative to mangoes, you can use peaches or nectarines. These do not taste identical, but the taste and appearance of the pulp are similar. Take a look at our seasonal calendar for more regional alternatives. You can plant a leftover mango seed, but in our latitudes it is difficult for fruit to grow on the tree and if so, only after several years.

Basically, we recommend buying organic food. Then they are free of chemical-synthetic pesticides. With the exotic mangoes, a fair trade seal indicates fair trade.

Factors affecting how mangoes are stored

The best way to preserve and store a mango depends on several factors:

Ripeness: Above all, the fact whether your mango is already ripe or not yet has an effect on storage and storage. You can recognize a ripe mango by the fact that it smells intensely and gives slightly when you (lightly) press the peel. Note that color is not an indicator of ripeness, as there are varieties that remain completely green. If the skin has brown speckles, the fruit is usually ripe.
Bruises: If the mango has bruises, you should cut them away immediately. Bruises promote the formation of mold, which can quickly spread to the whole fruit.
Whole fruit or (partly) cut: The storage also changes whether your mango is still whole or whether you have already cut it.

You should keep this in mind when storing a mango

Basically, it can take a few days to a week for a purchased, unripe mango to be ripe. Ripe mangoes only last a few days.

Store loosely: You can store a mango in a fruit bowl or similar. It should lie loosely so that there are no pressure points. Therefore, do not put heavy fruit on top of the mango or even jam it in the peel or bowl.
Neighboring fruits: To speed up the ripening process, you can put the mango in the sun or keep it with apples, tomatoes or bananas. These give off ripening gases that can affect neighboring fruit and vegetables. You can read more about this in the article Store fruit and vegetables together – or separately? read. If your mango is already ripe, it is better to keep it away from direct sunlight and the fruits and vegetables mentioned.
Temperature: Store mangoes at room temperature. Neither unripe nor ripe mangoes should be kept in the refrigerator. On the one hand, the cool temperature slows down the ripening process. There is a risk that the unripe mango will spoil rather than ripen. On the other hand, because it can lose its taste there. You should only put a (partly) cut mango in the fridge. But then consume or process them promptly.

This way you can keep mangoes longer

Freeze a mango by slicing it into chunks and placing in a sealable freezer-safe container. This makes sense if you realize your mango is already ripe and you can’t process or eat it in time, or if you have some of your mango left over. It keeps frozen for a few months.

You can also enjoy a mango as dried fruit. To do this, cut them into pieces and dry them in the sun, in the oven or in a dehydrator. Dried mango can be kept for up to a year.

Cooked mangoes in the form of mango chutney or as jam or marmalade will keep for about a year if unopened. This is also suitable as a gift or souvenir.

Of course, it’s best if you only buy as much mango as you can use in time. Mangoes go well with many dishes. For example, you can give your salad or curry an exotic touch. It is a sweet highlight in fruit salad, smoothie or yoghurt. Add them to desserts like cake or ice cream.

Clean windows properly with simple home remedies without streaks. To ensure that you can clean your windows effectively and quickly in the future, use our instructions and tips for window polishing. Then you avoid streaks and they become sparkling clean.

Cleaning windows seems to be a science in itself. You invest a lot of time and effort in cleaning the windows, but as soon as the sun shines on the panes, you see unsightly streaks on the freshly cleaned and clean windows.

Window cleaning made easy

Are you also tired of having to constantly and laboriously clean windows? And before you know it, are there new stains on the disc? This is often unavoidable, especially in bad weather. Despite expensive means and special devices for cleaning windows, there are still streaks on the glass. When the sun shines, you will see it even more! It is usually not dirt at all that is responsible for these streaks or streaks on the windows, but the lime contained in the cleaning water. Therefore, we have simple tips on how to get the problem with the calcareous cleaning water under control. All you need are natural home remedies. Or you use a window vacuum to clean windows.

Home remedies for cleaning windows

Window cleaning is always a new challenge. How do I clean my windows without streaks or other residues later being visible on the window? There is a myriad of different cleaning agents on the market and, of course, microfiber cloths for streak-free cleaning. But this not only means a lot of effort but also considerable costs. Therefore, it is better to use the following home remedies to clean your windows. Also, note natural home remedies for cleaning the kitchen.

1) Vinegar for cleaning the window panes

To clean the window without leaving streaks, use the home remedy vinegar essence. To do this, add about 1 cup of essence per liter of water and clean the window panes with this solution as usual. Then wipe the window dry. You can also ensure a clear view of windows that appear unclear by wiping them with a cloth and a few drops of table vinegar. And if a few splatters of wall paint get on the window panes during renovation work, then simply remove them with table vinegar.

2) Use of Lemon Essence

You can also use lemon essence to avoid calcareous cleaning water and thus prevent streaks. Accordingly, add about 1 cup of lemon essence per liter of water. Then clean the window panes according to the instructions. As a result, you save yourself a long time cleaning and polishing the windows.

3) Tea to clean the window

Black tea is well suited for window cleaning. This is because it contains tannins that can dissolve dirt and grease. So take two bags of black tea, boil them in a cup and let it steep for 10 minutes. Then add it to the cleaning water and use it to clean the windows as usual and wipe everything dry. Also, read our tips for cleaning according to plan.

4) Dishwashing liquid as an environmentally friendly cleaner

Dish soap is also suitable for cleaning your windows without leaving streaks. To do this, use normal detergent with a neutral pH value in the cleaning water. Because this is a very environmentally friendly solution and you can protect the environment in the household. In addition, you always have washing-up liquid at hand and it is cheap. A soft cloth and a few drops of vegetable oil will also ensure cleanliness. In both cases, repolishing is necessary.

5) Clean windows with ammonia

The window panes will stay cleaner longer if you wipe them with a mixture of 30 ml water, 70 ml glycerine, and 3-4 drops of ammonia solution after cleaning. Liquid ammonia is also known as ammonia water and is considered a tried and tested cleaning agent. It helps against calcification and is often used to clean discolored joints. Its use for effective toilet cleaning is also recommended.

6) Clean windows without streaks with spirit

Add a dash of spirits to lukewarm water. Then moisten and clean the panes as normal with a cloth and then wipe the pane dry again. This method is quick and thorough. The alcohol in the water saves you the hassle of polishing and expensive additives. To give the window panes a nice shine, they are finally wiped again with spirit water (3-5 drops per 1 liter of water). Alcohol can also be replaced with fruit water or vodka. In addition, note other tips on using alcohol as a home remedy.

Dusting is annoying and takes a lot of time. In addition, the dust is back faster than you can see. Therefore wipe with a system in the future and heed clever tips for avoiding dust. We’ll show you how and how often you should dust.

Dusting is one of the most annoying household chores. Because as soon as you’ve eliminated him, he’s back. Everyone agrees. However, there is disagreement as to how best to remove the dust. That’s why we have an overview of all the options.

Dust with what?

Regular dusting is a must. Because dust accumulates in the apartment far too quickly. And a dusty home quickly looks dirty and uncomfortable. In addition, house dust can be particularly problematic for people with a house dust allergy and cause health problems. So sooner or later it will be time to devote yourself to this unpleasant housework. But what is the best way to wipe dust? Here, too, opinions differ as to whether dry or wet dusting is better. Or whether microfiber cloths are suitable or not? We present all the options so that you can decide for yourself what will help you fight the dust best.

1) Damp cotton cloth against dust

One method of dusting is using a damp cotton cloth. To do this, moisten the cloth with a little lukewarm water and wring it out well. Then use it to wipe dusty surfaces and corners. The damp cloth absorbs the dust and the moisture holds it. But some critical voices say that this method only spreads the dust. Also, note tips for removing dust stains from walls.

2) Microfiber cloth to wipe the dust

The critics of damp cotton cloths prefer using microfiber cloths for dusting. Because these absorb and hold dust and dirt particles in both dry and wet conditions. Comparatively, little dust is whirled up. But microfiber towels can scratch sensitive surfaces, which is why some experts advise against using them. Some also criticize that the wipes contain microplastics, which then get into the environment. So if you want to protect the environment in the household, use a different method.

3) Use of special disposable dust cloths

The use of special disposable dust cloths is also convenient. Because they are made of synthetic fibers and have a dust-attracting effect. As a result, a lot of dust gets caught when dusting. However, microscopically small plastic particles can also be contained here and released. In addition, they are thrown away after a single use and thus create a lot of waste.

4) The classic duster for cleaning

A very traditional way of dusting is to use a feather duster. And when used correctly, the feather duster is an effective help against dust. To do this, you must charge the electrostatic duster before use by rubbing it several times. The charge then magically attracts dust and dirt. You can also reach hard-to-reach corners with the feather duster. The classic ostrich feather duster is just as effective.

5) Paintbrush for dusting books

To remove dust from books or angled objects or furniture, do not use a damp cloth. Because books should not be wiped with a damp cloth, as this is not good for the paper. Instead, use a brush to remove dust and brush everything with it. The paintbrush can also do a good job of dusting cracks and uneven surfaces on objects such as candlesticks or furniture. If your vacuum cleaner has an attachable dusting brush or a fine nozzle, you can also use this to effectively remove the dust. In addition, read how you can remove cobwebs with simple means.

6) Dust the heater regularly

Even heaters are real dust catchers. In addition, dusty heaters can consume a lot of energy and electricity. To save electricity, you should therefore regularly dust off the heating. It is necessary before the heating season at the latest. Then take a damp cloth and clean the radiator and the space behind it.

7) Use antistatic cleaning spray

If you want to delay dusting a bit, use anti-static spray. Because you can spray that on the most important surfaces. The anti-static cleaner then prevents or significantly reduces the re-deposition of dust. You can get the spray in drugstores or online.

There are many different types of jewelry that we use as beautiful accessories every day. But how do they stay beautiful and shiny? With our tips, you can easily clean and store jewelry. So ivory, enamel, gold bronze, gold frames, garnet jewelry, or silver remain worth seeing for a long time.

With a large number of types of jewelry, one often does not know which cleaning strategy is the right one without damaging the piece of jewelry. But when the silver starts to tarnish or your gold chain loses its shine, it’s time to clean the jewelry. Simple home remedies can help you with this.

Jewelry cleaning made easy

The history of jewelry is a centuries-old story. Because long before our time, people made jewelry from natural materials such as shells, animal teeth, or stones. And even today there are a variety of types of jewelry. There are no limits to the creativity of the designers. So there are many different shapes and colors with which we can beautify our outfits. In addition, many people use these accessories to express their individuality or even to strengthen their self-confidence. But after a while, the beloved silver jewelry or other fashion jewelry can lose its shine and tarnish. Then it’s high time to clean your favorite items.

Cleaning jewelry with home remedies

You can clean different types of jewelry using natural home remedies. During this time you should refrain from using aggressive chemical cleaners. Because these can attack and damage the material. But which home remedies are the right ones? In general, you can use home remedies such as baking powder or baking soda. Various types of jewelry can also be cleaned with vinegar or soap.

1) Clean gold jewelry

Gold has been used to make jewelry for centuries. Because it is a very soft metal, it is often alloyed with other materials such as silver or copper. This mixing of the metals means that the jewelry can tarnish faster. Then you can clean your jewelry as follows. Also, read our other tips on cleaning gold jewelry and gold jewelry as a gift.

2) Clean the gold frame

You can clean gold frames with a mixture of 2 tablespoons of ammonia solution and a quarter of a liter of water. Then use the mixture to wipe down the frame. And to be able to restore the original shine, polish the frame again after treatment with a mixture of salt and egg white.

3) Clean silver jewelry

Nowadays silver jewelry is very popular and available in many forms. But silver can also be affected by discoloration after a while. You don’t need expensive cleaning products to clean your silver jewelry.

4) Clean bronze jewelry

The best way to clean your bronze jewelry is with jewelry cleaning cloths. You can get these at jewelers or drugstores. You can also clean bronze with a mild soapy solution. To do this, mix warm water with mild soap and use the water for cleaning. In addition, soapy water is great for a quick house cleaning.

5) Clean pearl jewelry properly

Although one sees less pearl jewelry these days, many still have one or the other heirloom at home. In order to be able to remove dirt from your pearl jewelry, you should avoid using aggressive and hard cleaning agents. To clean this jewelry, use pH-neutral baby soap. Then put them on a cloth and gently rub the beads clean.

6) Cleaning gemstone jewelry

The type of cleaning depends on the degree of hardness of the gemstones. For soft gemstones, you can use lukewarm water, a mild detergent, and a soft cloth to clean the jewelry. For slightly harder gems, soak the jewelry in a water bath for five minutes. You can clean dirty areas with a soft brush. Finally, rinse the jewelry and dry everything well. The harder gemstones include sapphires, diamonds, or rubies. If you have valuable jewelry at home, read our article on effective burglary protection.

7) Clean enamel effectively

To clean enamel jewelry, use a silver cleaning cloth regularly. This prevents the enamel from getting heavily soiled. You should also avoid ultrasonic devices for cleaning the jewelry. Also, note our tips for cleaning glasses properly.

8) Clean garnet jewelry

Great garnet jewelry will get clean again if left in a soapy water bath. For this use lukewarm water, soap, and some ammoniac. Then leave it on for two hours. Then rinse it off with cold water and rub it dry with a soft cloth.

9) Clean ivory properly

Dirty ivory can be cleaned with lukewarm water, some soap, and a brush. You can also clean your ivory jewelry by placing it in soapy water for about 5 minutes and then rubbing it clean. Or wash it with lukewarm milk and polish it with a soft cloth. Also, note how you can keep your valuables safe.

How often should I clean the bathroom? We have tips and instructions for cleaning the bathroom properly. Because in order to stop germs and bacteria in the bathroom, you should clean the bathroom regularly. Some hygiene measures and cleaning rules can make your work much easier and ensure that a bathroom stays clean for a long time.

Bathroom cleaning tricks

Simple hygiene measures help you to keep your bathroom clean for longer. Even in the bathroom at home, germs and bacteria can quickly collect. Regular cleaning of the bathroom is therefore essential in order to avoid germs in the household. But with a guide and cleaning tips, cleaning becomes an easy routine. In addition, see our article on a bathroom renovation.

1) Clean from top to bottom

This rule is not only helpful in the bathroom but in all rooms. So it is best to start by cleaning the surfaces of hanging shelves and removing dust. You can also clean the mirror without leaving streaks as one of the first steps. In contrast, wiping the floor should be done at the very end.

2) Put away bathroom and hygiene items

Before you start cleaning, you should definitely put hygiene items such as creams, make-up, and other cosmetics out of the way. Because this is how the bathroom can be really cleaned. You can also use this opportunity to put other things aside or put them in the washing machine, such as bath mats, towels, scales, and trash cans.

3) Ventilate regularly and avoid mold

You should also air your bathroom regularly. Increased humidity in the bathroom causes mold to form. Therefore, air the room for several minutes every day, preferably after showering. In windowless bathrooms, you should open the bathroom door and the nearest window. This way you can avoid mold. If mold has already formed, read our home remedies for mold removal.

4) Change towels frequently

Germs particularly like to collect in damp towels. It is therefore advisable to replace them regularly and wash them at a wash cycle of 60 degrees. This ensures that all germs and bacteria are killed during the hot wash. You should also wash the bath mats regularly so that all dirt disappears. Because here, too, germs can form very quickly which is not healthy for humans themselves.

5) Clean the sink

The sink is super easy to clean with vinegar. To do this, mix the vinegar with water in a ratio of 1 to 1. This will also remove stubborn limescale stains. As a result, your bathroom is really clean. You also save on chemical cleaning agents. If you would like to do without these, you can also use washing soda as an environmentally friendly alternative.

6) Clean the shower and bathtub

Probably the worst task when cleaning the bathroom properly is the large shower and bathtub. But here, too, thorough cleaning is required. The use of baking soda or other common home remedies such as effective lemon juice can help you with this. So start by cleaning the tiles and joints, for example with the help of baking soda, which you mix with a little water to a paste. You can then clean the tub properly with lemon juice or diluted vinegar.

7) Tips to avoid lime

If the water in your region is particularly hard, it is advisable to dry the wet surfaces after every wash or shower. Use a microfiber cloth for the sink. And for the shower stalls, it is advisable to use a special squeegee. It is also advisable to use a microfiber cloth when cleaning and to dry everything with it. You should definitely use a small sieve for the shower drain so that hair and fluff don’t get into the drains and clog the pipe. Also, note our tips for cleaning chrome and chrome parts.

8) Remove lime with home remedies

If limescale deposits are difficult to remove, you can remove them with various home remedies. As a result, you can use it to remove limescale from washbasins and shower basins as well as from taps and shower heads. This means that unsightly deposits are a thing of the past.