Tag

recipe

Browsing

While the quinoa was relatively unknown some time ago, the pseudocereal is now enjoying increasing popularity. And quinoa can do more than just replace rice as a side dish. We have put together ten great recipes for you that focus on Inca rice – so you can always enjoy quinoa in a different and varied way.

1. For seafood fans

Crunchy prawns, pithy quinoa, and a creamy mixture of ricotta and quark – that’s all you need for a delicious, healthy, and quick meal. The pleasantly spicy note of chili rounds off the dish perfectly.

2. Crisp and fresh

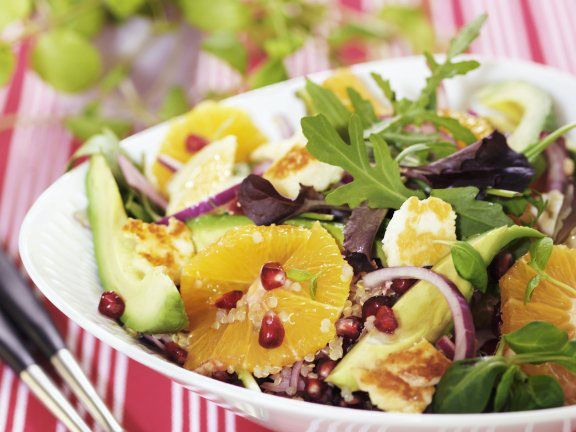
Quinoa also cuts a fine figure as part of a colorful salad. Try our creation with avocado, oranges, pomegranate seeds, onions, rocket, and halloumi – a real power mix!

3. Cabbage rolls with a difference

Who says savoy leaves always have to be stuffed with meat? Even! Because even with quinoa, parmesan, almonds, and parsley, the green wraps simply taste great and are also particularly healthy. Enjoy your meal!

4. It’s what’s on the inside that counts

With this dish, too, no one is guaranteed to miss the minced meat in the filling – because quinoa simply goes perfectly with the crunchy peppers from the oven. Fresh coriander and an Indian-inspired spiced butter round off the taste.

5. Fixed

Would you like to treat yourself to a vegan meal from time to time? Then we recommend our delicious quinoa and vegetable pan. Best of all, the dish is ready in just 30 minutes.

6. Sweet and fruity

Anyone who only knows the savory version of quinoa should definitely try this sweet quark casserole with the pseudocereal! The oven feast is accompanied by a colorful fruit salad. For those who like it sweet in the morning, the gratin is an ideal breakfast.

7. From the pan

Everyone has probably eaten normal pancakes at some point. But do you already know the little cakes with quinoa in the batter? If not, you should change that quickly! The creamy vegetable and mushroom ragout makes the enjoyment perfect.

8. Colorful and healthy

Whether as a vegan main meal at home or as lunch for the office: This quinoa and pepper salad is not only particularly tasty but also very healthy – thanks to lots of vegetables, fresh herbs, and pithy quinoa.

9. Mexican mix

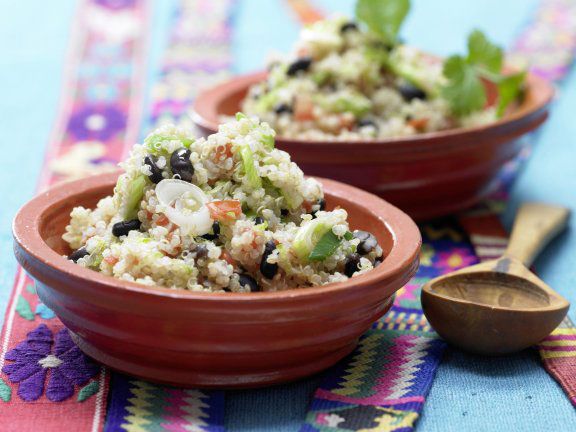
Black beans, tomatoes, and spring onions go perfectly with the superfood quinoa. A delicious vinaigrette with lime juice and zest, chili powder, and coriander perfectly complements the taste of the dish.

10. Well filled

The zucchini halves baked in the oven with a creamy, pithy filling made of cream cheese, almonds, and quinoa and the fruity mango sauce with fresh mint form a successful taste contrast here.

In the fight against obesity, the beverage giant Coca-Cola is now giving in: The company wants to significantly reduce the sugar content of its famous drink.

Less sugar in Coca-Cola

The sugar content in Coca-Cola is to be significantly reduced in the future: by 2020, around ten percent less sugar is to be used in the preparation of the popular soft drinks. “That requires a lot of effort. We’re changing recipes, increasingly relying on smaller packages, and, last but not least, clear product information for consumers,” explains CEO James Quincey to “Welt am Sonntag”.

Due to the changed consumption behavior of consumers, sugar has become a new challenge for many societies around the world. The white sweetener is often consumed in excess – in beverages and other foods – which increases the risk of obesity and type 2 diabetes, says Quincey.

Soft drinks promote obesity

There are almost eleven grams of sugar in 100 milliliters of Coca-Cola. Converted to one liter, this would be a total of about 35 sugar cubes – a considerable amount. Especially when you consider that Coca-Cola is drunk in large quantities every day as a thirst quencher for many.

A nasty sugar trap if you look at the recommendation of the World Health Organization (WHO): It recommends no more than 25 grams of sugar per day – that’s about ten sugar cubes.

Now the sugar content in one liter of cola is to be reduced to 31 sugar cubes. The beverage giant wants to support the WHO in its goal that people consume no more than ten percent of their calories from added sugar. Currently, this would correspond to 250 milliliters of cola.

You wouldn’t want to be without this basic gluten-free bread recipe on your daily menu: Now you can make your own fresh, crispy white bread, dark bread, mixed bread, sunflower bread, rolls, and other delicious baked goods at any time. The recipe is enough for 2 loaves of bread (24 servings)

Are you constantly on the lookout for new, unusual yet light recipes for a healthy diet? Recipes that are easy to replicate, recipes that don’t require overly unusual ingredients? Then you should definitely try this recipe for gluten-free bread so that you always have homemade, crusty bread and other baked goods fresh on the table.

Ingredients for gluten-free bread

  • 50-60 g fresh yeast (alternatively 2 P dry yeast)
  • 1 tablespoon of sugar
  • 1 cup (150-200 ml) non-fat milk (or whole milk if desired)
  • 100 grams of butter
  • 2 eggs
  • 500g boiled, mashed potatoes
  • salt (to taste)
  • 650 g potato starch
  • 2 loaf tins (about 25 cm x 10 cm x 8 cm)
  • Some butter or fat for brushing the mold

Preparation of gluten-free bread (basic recipe)

In a large bowl, mix the yeast and sugar until liquified. Now add milk, butter, eggs, mashed potatoes, and salt and mix well. Then gradually add the potato starch and mix well until the mixture is smooth and sticks to your hands. Now cover the bowl with plastic wrap (or plastic film) and let the dough rest for about 30 minutes.

The mass is then divided into two equal parts and each is placed in a buttered (or fat) loaf tin and smoothed out with a wet spatula. Let the dough rise in the mold for another 30 minutes. The slices of bread are baked in a preheated oven at about 200° C for about 30 minutes until golden brown. Leave to cool on a wire rack so the bread stays crispy.

Information and tips

Gluten-free bread brings a healthy change to your diet, not only for those suffering from celiac disease or sprue but also for athletes, and athletes and as a daily, tasty treat. Rice flour, corn flour, starch, buckwheat flour, soy, quinoa, and tapioca are gluten-free, whole wheat, barley, oats, and rye contain gluten. You can get gluten-free baking ferment in organic shops or health food stores; Sourdough works too.

Of course, this stomach-friendly bread can also be processed with mixed flour to make multigrain bread or with rye flour to make dark breakfast bread. Fresh rolls and other baked goods can also be produced very well with this basic mixture. Vary it with sprinkled sunflower seeds, pumpkin seeds, sesame, or linseed; add whole or chopped nuts to the batter.

Here’s a special insider tip: brush your bread with a little oil 10 minutes before the end of baking, it will then become uniquely crispy.

This recipe makes about 10 thin French sweet crepes, also known as wafer-thin pancakes.

Ingredients

– 250 g flour
– 2 spoons of sugar
– 3 eggs
– 1 bag of vanilla sugar
– 2 spoons of butter
– 1/2 l milk
For the garnish: cherries, cream, powdered sugar, sugar, Nutella, bananas

Accessories

– mixing bowl
– whisk
– if possible special crêpes pan (light, thin pan)

— Preparation time: 20 minutes
— Difficulty level: very easy
— Preparation time: about 15 minutes

Preparation

  1. First of all, but the 250 grams of flour in a mixing bowl. Make a small well in the center of the bowl with the flour.
  2. Then place the 3 eggs one after the other in this hollow. The eggs do not need to be separated. Then mix the eggs and flour vigorously with a whisk.
  3. Add the 2 tablespoons of sugar and the sachet of vanilla sugar to the mixture. Mix well again.
  4. Now add the warmed butter to the mixture and stir well.
  5. Finally, gradually add half a liter of milk. It should now be a very liquid, even mass. If there are still lumps in the batter, continue stirring. If you like, you can add some sugar, grated lemon peel, cinnamon, or salt.
  6. In the next step, a pan is preheated to the highest level and butter is melted in it. After the butter has spread throughout the pan, gently wipe the pan with a kitchen towel so that the butter is no longer visible. Then turn the heat down to medium-high.
  7. Now the batter can be poured into the pan. However, the very little batter should be put into the pan so that the crepes are light. After about 2 to 3 minutes, the crêpes can be carefully turned. Of course, the duration depends on the heat. If you prefer browned crêpes, you can of course leave the crêpe in the pan longer. After flipping the crepe, brown it on the other side for about 2 minutes.
  8. Finally, before you take the crêpes out of the pan, you can already spread them with Nutella. Because if you opt for a chocolate filling, the crêpes will taste better if the Nutella melts in the pan on top of the crêpes. Then the crepes can be rolled or folded in the pan.
  9. Other ways to flavor the crepes are cinnamon and sugar, cream and church filling, chocolate and banana filling, powdered sugar, or even regular sugar.

The cold season is ideal for drinking mulled wine. The health-promoting effect of mulled wine was discovered thousands of years ago. However, the rule here is that one or two cups have this health-promoting effect.

The hot wine tastes best and is healthiest when it is made by yourself. The wonderful scent of the spices warms you from the inside as soon as you smell it. Here is a delicious recipe for a homemade mulled wine.

Ingredients for six people

  • 1 liter of red or white wine
  • 1/2 liter of water
  • 10 cloves
  • 2 cinnamon sticks
  • 5 cardamom pods
  • brown cane sugar or honey
  • 3 unwaxed orange slices

Preparation of mulled wine

Bring all the ingredients to the boil very briefly and then leave them covered for about 30 minutes. Then strain the spices and the orange slices. The longer the ingredients are cooked, the more bitter the mulled wine becomes. Sugar or honey can also be varied individually, depending on how sweet the mulled wine should be.

Variation of mulled wine with a shot

A dash of fruit brandy or rum can be added to the basic mulled wine recipe, depending on taste. As a result, the mulled wine has a higher alcohol content and should therefore be drunk in moderation.

Variation with amaretto

30 ml Amaretto is added to the basic mulled wine recipe. This makes the mulled wine a special taste experience.

Glowing wine with a Caribbean flair

The ingredients of the basic mulled wine recipe are 30 ml coconut juice and 30 ml pineapple juice. This mulled wine is reminiscent of lonely beaches in the Caribbean. Due to the sweet taste, the alcohol content can often not be tasted and should therefore not be overlooked.

You can decorate the mulled wine in beautiful ceramic mugs with a handle. The mulled wine can be served with cinnamon sticks or unwaxed orange slices can be placed on the rim of the cup.

  • Type of preparation: light
  • Preparation time: 15 to 30 minutes

Many are already using the small black granules. But what properties do chia seeds actually have and are they rightly worthy of being called a superfood?

Origin and Origin of Chia Seeds

The granules already existed in the times of the Aztecs and Mayas and were already incorporated into the diet more than 5000 years ago as so-called pseudo-cereals. Chia seeds, which belong to the sage family, have been used for centuries because of their filling properties. The Spaniards brought these seeds to Europe in the 15th century, but by then they were not used as often and were quickly forgotten.

Top reasons to include chia seeds in your diet

  1. The granules contain many good nutrients, including iron, copper, zinc, calcium, and magnesium. From other sources, it is said that the seeds have hormone-regulating, muscle-healing, or immune-building effects.
  2. Due to their satiating effect, they can be taken in combination with other foods due to their neutral taste. This makes you feel full faster and can help you lose weight as well.
  3. There are 8 essential amino acids in the black grains. They also contain about twice as much protein as you think of other grains or seeds.
  4. They can be kept airtight for several years, great to keep. The antioxidants contained in them allow the seeds to stay fresh without losing the flavor in any way.
  5. The superfood can cleanse the intestines and thus support the entire digestion process. Heartburn can also be prevented by swelling the seeds.
  6. When you eat chia seeds, you absorb a lot of water if you soak them first. The body can store this water efficiently and even after consumption, the swelling process of the seeds means that there is nothing heavy in the stomach.
  7. People with gluten intolerance can also use chia seeds. As a gluten-free alternative, it offers a lot of protein, which is also essential for athletes or other people who value a high protein intake.

Recommended consumption of Chia seeds

A maximum intake of 15 g per day is recommended. All the essential nutrients are absorbed just by consuming this amount. The seeds can be used in jams, mixed into muesli, in smoothies, bread, pancakes, ice cream, or yogurt. There are no limits to creativity here. Also as an egg substitute with the addition of almond, rice, or another milk or milk alternative, the seeds can be exchanged for the regular egg in recipes. How do I use the seeds correctly?

The chia pudding

This superfood recipe is probably the most well-known to date.
For 2 servings you need: 4 tbsp chia seeds, 250 ml milk/alternative, any spices and sweeteners

  1. In a bowl, the seeds are mixed with the milk
  2. Place in the fridge for about 2 hours, stirring every now and then
  3. If necessary, refine the chia pudding with the spices and the sweetener before eating and enjoy

The power avocado smoothie

For 2 servings you need: 2 bananas, 500 ml milk/alternative, ½ avocado, 2 tablespoons chia seeds, 2 teaspoons matcha powder, and possibly a pinch of cinnamon

  1. Remove the peel from the avocado and the bananas and cut into small pieces
  2. Now everything can be put in a blender and et voilá you have a fresh and fruity power smoothie

Chia seeds in chocolate pudding

For 2 servings you need: 2 tbsp chia seeds, 4 chopped dates, 2 tbsp cocoa powder, ¾ cup milk/alternative, possibly some vanilla

  1. Soak the dates in a little water for a few minutes
  2. Now you can mix all the ingredients together and the result is a creamy, chocolatey, healthy pudding

The black chia seed granules are popular and can be used individually. They are healthy, provide many good, essential nutrients, and are also great for losing weight. Try it out on the little seeds too. you will love it!

Are you looking for the perfect summer drink? Then you should try this ginger elderflower lemon ice tea with honey. The alcohol-free refreshment tastes delicious and is really healthy. Here is the recipe.

Recipe: Ginger-lemon iced tea with honey and elderflower

You need this for one liter of iced tea
A thumb-sized piece of ginger
Three to four tablespoons of elderflower syrup*
A tablespoon of honey
juice of a lemon
It’s that easy
Wash ginger and cut into thin slices
Pour a liter of boiling water over it and let it steep for at least 10 minutes
Add elderflower syrup, honey and lemon juice
Remove pieces of ginger, stir, allow to cool, add ice cubes and enjoy
A few more tips
You can peel the ginger, but you don’t have to – just wash it
The longer you let the ginger steep, the more intense or spicier the tea will be
If the iced tea tastes too sweet according to the recipe, simply reduce the amount of syrup and honey accordingly

By the way: You can easily grow ginger in a pot or in the garden yourself. Cut a thumb-sized piece with a “bud” off a ginger root, soak it in water overnight, and plant it the next day, about an inch deep. Water regularly and after just a few months you will have your own ginger plant at home, whose bulb you can harvest and eat as soon as the leaves turn brown. I’ve tried it myself, it works – even if the tuber harvested was admittedly not very large.

Tips and instructions for making popcorn yourself at home. The best tricks and popcorn recipes for making popcorn yourself in a pot on the stovetop.

Popcorn is popular and delicious when a long evening of TV is imminent or a snack is missing for the party. And this delicious snack can be prepared very quickly and without much effort or fuss.

Tips for making popcorn yourself

Below are the best tips and tricks on how to quickly and cheaply prepare popcorn that is tasty and fresh. Great cooking skills and complicated ingredients are not required for this. You need dried corn kernels, some cooking oil, and, depending on your taste, sweet or savory ingredients. No special machine or device is required other than a regular saucepan with a matching lid and a stovetop. And if you don’t have a cooking pot at hand, you can also prepare the popcorn in a pan with a lid.

How is popcorn actually made?

Popcorn is made from corn kernels. The corn kernels contain water and also some oil. If the corn kernels are now heated in the pot, these components change. From the liquid water and oil version in the grain, the components suddenly become gaseous. The corn husk breaks open due to the heat input. And with this small popping up, each individual kernel of corn automatically expands and the popcorn is ready.

In order to get a good result quickly, a pot temperature of around 180 degrees Celsius is required. Then the corn kernel shell tears open and water vapor escapes from the corn kernel. The corn starch gets out of the grain and offers a well-known popcorn shape.

Easy popcorn recipe for everyone

For the basic popcorn recipe, put some cooking oil in a saucepan. A small amount of cooking oil that wets the bottom of the pot is sufficient. Then put the corn kernels in the oil. Then you should definitely put a suitable lid on the pot. This is necessary so that the finished popcorn does not pop out of the pot when it pops up.

Then turn on the stove and heat the pot until a little over half the corn kernels have popped up. Most of the time, the grains pop up very quickly. For this reason, it is better to stay at the stove. After popping up, you should immediately turn off the heat supply. You must immediately remove the finished popcorn from the stovetop so that it does not burn in the hot pot.

Make sweet or savory popcorn yourself

Depending on your taste, the finished popcorn can now be seasoned. Mostly sweet variants with sugar are chosen. But hearty seasoning, for example with paprika, chili, tomato, or curry, is also possible and popular. It is important that the popcorn is still warm when it is seasoned. This way, the selected ingredients stick better to the popcorn.

A little tip for the slimline

The popcorn can be prepared very low in calories. If, for example, a coated pot is selected for the preparation, then no cooking oil needs to be added. The corn kernels pop up even without the addition of fat. However, the popcorn should also be seasoned heartily. Because all sweet variants with sugar or caramel contain a lot of calories.

Anyone who thought they were a true coffee connoisseur should definitely try Bulletproof Coffee in the morning. Coffee replaces breakfast and makes you fit. Here you can find out more about the effect and the exact recipe.

Trend drink “Bulletproof Coffee”

Opinions differ when it comes to enjoying coffee – everyone drinks their coffee differently and coffee lovers and baristas all over the world are still developing new creations of the stimulating beverage to this day.

In the USA, there has been a real hype about the new coffee drink in recent years. It is said to have numerous positive properties, such as the fact that Bulletproof Coffee provides a lot of energy and helps with weight loss. The self-proclaimed inventor of the recipe is Dave Asprey, a Silicon Valley entrepreneur. According to his own reports, he came up with the idea for his Bulletproof Coffee while hiking in a mountain in Tibet, when he drank the usual tea with butter, as the Süddeutsche Zeitung reports.

The effect of Bulletproof Coffee

The principle of “bulletproof coffee” is to combine caffeine and healthy fats to keep you fit and full for a long time. It works by dissolving a good knob of butter and high-quality oil in the Bulletproof Coffee instead of milk and sugar. Bulletproof Coffee is usually drunk in the morning and replaces a carbohydrate-rich breakfast as part of a diet plan. Fans of coffee creation swear that coffee alone keeps them fit and full for several hours in the morning.

Effect of Bulletproof Coffee:
Avoiding carbohydrates at breakfast stimulates the body to burn fat.
The high-quality fats serve as a source of energy.
The high caffeine and fat content keeps you full and fit for a long time.
However, there are still no scientific studies on Bulletproof Coffee.

Bulletproof Coffee: the recipe

To try the Bulletproof Coffee you only need a few ingredients and a good coffee blender or milk frother:
250ml high-quality organic coffee,
1-2 tablespoons organic butter,
1-2 tablespoons high-quality organic oil, such as coconut oil.
possibly sugar, stevia or agave syrup for sweetening.
Only use organic ingredients for the coffee to avoid pesticides and other pollutants. In addition, organic dairy products have a healthier ratio of omega-3 and omega-6 fatty acids.

Make your own bulletproof coffee

First, put the butter and coconut oil in a cup.
Then pour the freshly brewed hot coffee over it.
Froth the coffee until a homogeneous liquid forms. The fat needs some time to spread.
Note: The Bulletproof Coffee tastes really good when fat and coffee are mixed together until creamy.

Prepare vegan bulletproof coffee

You can also enjoy Bulletproof Coffee vegan: When preparing it, simply replace the butter with one or two tablespoons of coconut milk or coconut butter from the organic market.

Tip: Try leaving out the sweetener in your Bulletproof Coffee. Like agave syrup and honey, sugar contains a lot of carbohydrates. Without the sweetener, your bulletproof coffee makes a good low-carb breakfast.

Are your bananas too brown to eat again? Don’t throw them away, freeze the bananas. This way you avoid food waste and always have bananas ready when you need them.

How to freeze bananas

You don’t need much prior knowledge to freeze bananas. But they should not be unripe, because frozen they can no longer ripen. It’s even a good idea to freeze overripe bananas so you get the best use out of them.

You now have several options for freezing bananas:
slice
puree
freeze whole
Which variant you choose depends on how you want to process it after defrosting.

Step by step to freeze bananas:
peel bananas
Slice or mash bananas
To prevent the banana slices from sticking together, you can first freeze them spread out on a plate and then decant them.
Add a dash of lemon juice to the mashed bananas. then the puree will keep its color.
Pour bananas into a jar and freeze.

Freeze bananas and then?

Frozen bananas are versatile:
Use thawed mashed bananas as an egg substitute for baking
or for a banana bread (but beware: the banana bread will be moister than usual with frozen bananas).
Frozen banana makes itself super fast and super tasty as nice cream. Frozen banana slices are ideal here.
Half-thawed banana slices as a crunchy ingredient in muesli.
Whole bananas, puree or slices work well in smoothies.