Tag

recipe

Browsing

A chickpea and avocado salad goes well with springtime. It provides you with vegetable proteins, healthy fats and a large portion of fresh seasonal vegetables. We present you a vegan recipe.

Spring brings an abundance of fresh local vegetables. These include radishes, spring onions and spinach. They look particularly good in a nutritious and quick-to-make chickpea and avocado salad.

Chickpeas provide you with an extra portion of vegetable protein and the avocado contains many valuable unsaturated fatty acids in addition to vitamins and minerals. The avocado is considered a superfood – just one avocado a week can reduce the risk of heart attack.

However, you should not eat avocados in large quantities. The drupe is associated with a poor ecological balance, which is partly due to the high water consumption in cultivation and the long transport routes.

Recipe: This is how you prepare the chickpea and avocado salad

It is therefore best to only buy avocados as an exception and for special dishes – such as this chickpea and avocado salad. We also recommend that the avocado and other ingredients are organic if possible. Organic farming does not use synthetic chemical pesticides that can be harmful to the environment and health.

Ingredients:

265 g cooked chickpeas
200 g fresh spinach
3spring onions
200 g radishes
1avocado
4 tablespoons soy yoghurt
1 tbsp lemon juice
0.5 tsp garlic powder
salt and pepper
sweetener to taste (optional)

Directions:

If you are using jarred chickpeas, give them a quick wash in a colander. Wash the spinach, spring onions and radishes. If necessary, remove the hard stems from the spinach.
Cut the spring onions into rolls and the radishes into slices. Peel and cut the avocado into chunks.
Place the chickpeas, greens, and avocado in a bowl. For the dressing, whisk together the yogurt, lemon juice, garlic powder, salt, and pepper. Pour the dressing over the chickpea and avocado salad and mix well.
Season the chickpea and avocado salad with salt, pepper and, if necessary, a little sweetener. Let the salad sit for half an hour before serving.

Chickpea and Avocado Salad: This makes it even tastier

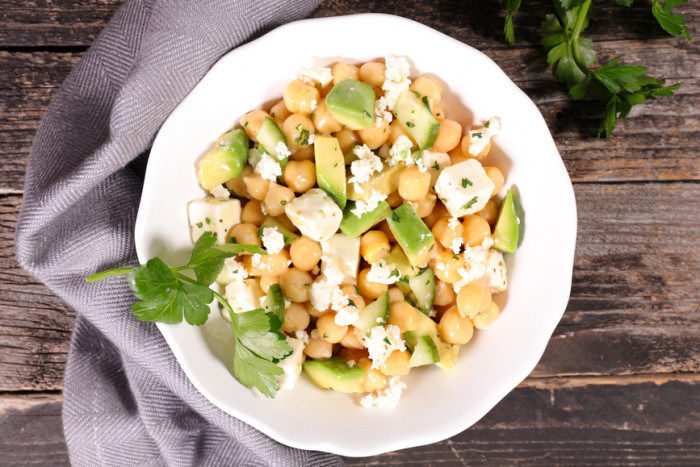
The chickpea and avocado salad taste particularly good if you add vegan feta and a homemade baguette. You can also vary the salad as you like:

  • Fresh herbs such as mint and chives add variety to the taste.
  • You can also choose other vegan yogurt alternatives for the dressing, such as coconut yogurt.
  • Or you try a completely different salad dressing for the chickpea and avocado salad.
  • You can also use lamb’s lettuce instead of spinach.

The wild garlic spread tastes spicy and fresh. It fits well into spring and brings variety to your bread. Here we present you a recipe with only five ingredients.

The wild garlic spread is a recipe for spring – because then the wild garlic season begins. Wild garlic tastes similar to garlic: spicy and slightly hot. The wild herb goes well in light dishes, you can combine it with other spring vegetables. For example, wild garlic pesto tastes particularly good with green asparagus. You can discover more spring vegetables in our seasonal calendar.

When buying your products for the wild garlic spread, pay attention to organic quality. When it comes to dairy products in particular, it is important to ensure species-appropriate husbandry. A good point of reference are the seals of the organic associations Demeter, Naturland and Bioland. If possible, choose your groceries from regional retailers to avoid long transport routes and the associated high CO2 emissions. If you want to harvest the wild herbs right in your garden, then simply plant wild garlic yourself.

Make wild garlic spread yourself

Ingredients:

100 g fresh wild garlic
1 clove(s) garlic (optional)
300 g cream cheese
1 tbsp lemon juice
1 tbsp olive oil
1 pinch(s) salt (optional)
1 pinch(s) pepper (optional)

Directions:

Wash the wild garlic and pat dry. Set aside some leaves for the garnish at the end.
Peel the garlic clove. If the wild garlic is already spicy enough for you, you can also omit the garlic.
Put all the ingredients in a mixing bowl and mix them with the immersion blender or hand mixer to an even cream.
Season the spread with salt and pepper as needed.

Chop the remaining wild garlic leaves and sprinkle over the spread before serving.

The vegan variant for the wild garlic spread

Make the wild garlic spread without any animal products and use a vegan alternative instead of cream cheese:

  • Cashew cream cheese
  • Vegan cream cheese
  • Vegan cottage cheese
  • Vegan yogurt

Tip: Serve the spread with fresh wild garlic bread, for example.

Papadam is a typical accompaniment to Indian dishes. And the crusty bread also tastes great as a snack between meals. We reveal a simple recipe and the best way to serve the bread.

Papadam is a light, crusty bread that is served with curry, dal and various dips in India. You can often find it under the spellings Poppadom or Poppadam. The dough for the thin flatbread is made from a few ingredients and then fried briefly in a pan. Traditionally, papadam is mixed with urd bean flour. However, you can only find this in a well-stocked specialist shop. Here we use chickpea flour as an alternative.

When choosing your ingredients, make sure they come from organic farming. In this way you avoid residues of chemical-synthetic pesticides on and in your food. This protects health, biodiversity and the environment. We can particularly recommend the organic seals from Demeter, Bioland and Naturland, as they follow stricter criteria than the EU organic seal.

Also, buy locally sourced products whenever possible. Indian dishes are usually cooked with exotic spices. Choose a locally grown version whenever possible, and only use imported spices occasionally.

Bake papadam yourself: This is how you succeed

Ingredients:

320 g chickpea flour
1 pinch(s) of salt
1 pinch(s) of pepper
1 pinch(s) cumin
1 clove(s) garlic
125 ml water
200 ml frying oil

Directions:

In a large bowl, combine the chickpea flour, salt, pepper, and cumin.
Peel the garlic and chop it very finely. Mix the garlic into the flour as well.
Gradually add the water. This forms an evenly firm dough.
Form small balls about an inch in diameter.
Roll out the balls into very flat cakes.
Heat the frying oil in a frying pan.
Add the papadams one by one to the hot oil and fry them for about a minute on each side.

Tip: spread out a cloth that can get greasy on the work surface. Place an oven rack or wire rack on the kitchen towel. Then, after frying, place the papadams on the rack to drain.

Serve papadam: That goes with the bread

Serve the papadams as an accompaniment to a main course or as a snack between meals. These recipe suggestions go particularly well with the crispy flatbread:

  • Cook a delicious vegetable curry with regional ingredients or the simple chickpea curry and serve with the papadam.
  • The Palak Paneer is classic Indian: a curry recipe with spinach and cream cheese.
  • Also try a dal as a main course. Tip: Alternatively, use chickpeas to create a Chana Dal.
  • If you want it quick and easy, opt for plain curry rice with the papadam.
  • Serve your papadam with dips as a snack between meals or as an appetizer. Dips with an exotic touch, such as the date dip, onion chutney or zucchini chutney, are particularly delicious.

You can store the fried papadams in an airtight box for a few days.

Garlic confit is a method that significantly extends the shelf life of garlic. Here you will find a simple recipe for the aromatic oil bulbs.

Confit is a good way to preserve garlic and prepare it for further processing. Making garlic confit yourself is also very easy and only takes a few minutes.

When buying garlic, look for organic quality if possible. You are supporting ecologically more sustainable agriculture that treats the earth’s natural resources with care. We particularly recommend the organic seals from Demeter, Bioland, and Naturland, as they set stricter criteria than the EU organic seal.

By the way: Even without processing it into confit, you can significantly extend the shelf life of garlic by storing it well. In another article, we show you how to store garlic properly.

Make garlic confit yourself: Here’s how

Ingredients:

3 bulbs of garlic
300 ml rapeseed oil

Directions:

Peel the garlic cloves. This is particularly easy with our tips for peeling garlic.
Place the garlic cloves in a small saucepan. Add the canola oil so that all the cloves are completely covered.
Heat the oil at low temperature. Let the garlic simmer in the warm to hot oil for 45 minutes or until the cloves are soft and lightly browned.
Then put the garlic cloves in a sufficiently large and sterilized screw-top jar and pour in enough oil to completely cover them. Complete!

Garlic confit: shelf life and further processing

Covered with enough rapeseed oil, the garlic confit will keep in the fridge for up to six months.

You can use both the preserved garlic and the oil for a variety of recipes:

Toum: Vegan Garlic Sauce Recipe
Aubergine Soup with Garlic and Herbs: A plant-based recipe
Skordalia: Greek Potato Garlic Cream Recipe
Garlic Potatoes: A recipe for the hearty side dish

You can simply process the cloves like fresh garlic. They taste a little milder than the fresh version. Garlic confit oil is good for adding a savory flavor to dishes.

Mushroom salt is versatile. It goes well with warm dishes, refines salads, or seasons your bread. We’ll tell you how to make it yourself with just three ingredients.

Mushroom salt is an interesting alternative to conventional table salt. The mushrooms give the salt an earthy, nutty note. It goes particularly well with vegetable dishes or salads, and the salt also tastes good on bread and butter.

Herb salt or chili salt are already known in many kitchens. With this mushroom salt you bring variety to your dishes. It is also a great gift for family and friends.

If you buy the ingredients, then pay attention to organic quality. Organic seals such as Demeter, Naturland, or Bioland are good indicators of ecologically sustainable cultivation. Choose the products from regional trade. This saves long transport routes and thus reduces the ecological footprint of your food.

Make mushroom salt yourself

WHO recommends eating salt in moderation. Therefore, use the mushroom salt carefully and use a salt substitute if necessary. Gomasio, Japanese sesame salt, is also suitable for this.

Ingredients:

  • 60 coarse salt
  • 60 g dried mushrooms of your choice
  • 1 teaspoon of colored peppercorns

Directions:

  • Place the mushrooms, salt, and peppercorns in a mortar or high-powered blender.
  • Grind the ingredients very finely.
  • Pour the finished mushroom salt into clean screw-top jars.

Tip: Store the mushroom salt airtight and protected from moisture. Then it can be kept practically indefinitely.

The mushroom salt consists of two main ingredients: mushrooms and salt. There are many different types of salt. In this recipe, we recommend using a fairly coarse one. Simply choose your favorite varieties for the mushrooms in this recipe. Dried porcini, oyster mushrooms or chanterelles taste particularly good.

You must dry the mushrooms before preparing the mushroom salt. You can find dried mushrooms in an organic supermarket or gourmet specialty store.

You can also collect or grow your own mushrooms. You should note a few things:

Wild mushrooms are in season in autumn. Then they grow in the forest and garden.
Choose local edible mushrooms for your recipe. In this way, you avoid high CO2 emissions due to long transport routes.
If you are collecting edible mushrooms, use mushroom identification tools.
Grow mushrooms yourself to be absolutely sure it’s the right kind.
Air or oven-dry the mushrooms. Then they have a long shelf life and you can use them for the mushroom salt.

Zucchini bread is juicy and aromatic and adds variety to your diet. We’ll show you how to make the healthy bread yourself at home.

Zucchini bread is a tasty change from traditional bread recipes. With just a few ingredients you can make a juicy bread that you can serve with snacks, soups or as a snack in between.

Incidentally, you can get zucchini from German cultivation between June and October. For all other ingredients, too, we recommend using regional products wherever possible. This saves long transport routes and thus CO2 emissions.

When buying the ingredients, also pay attention to organic quality. In this way you support sustainable agriculture that does not use chemical-synthetic pesticides.

Zucchini Bread: This is how you make it yourself

Ingredients:

0.5 package(s) dry yeast (for 500g flour)
1 tsp sugar
40 ml lukewarm water
200 g flour
200 gzucchini
150 g almonds, ground
20 gflaxseed (crushed)
1 tbsp olive oil
1 pinch(s) of salt
2 teaspoons bread spice
1 tbsp flour for the mold

Directions:

Mix the dry yeast with the sugar, the water and half of the flour. Mix everything together until there are no more lumps in the batter. Now let the mixture rise in a warm place for 15 minutes.
Meanwhile: Wash the zucchini. Cut off the two ends and grate them roughly with a kitchen grater. Squeeze them lightly with your hands and drain off the excess liquid.
Now mix the remaining flour, the almonds, flaxseed, and the olive oil into the dough. Knead the dough thoroughly.
Now mix the dough with the grated zucchini, the bread spice, and a pinch of salt. If the dough is too wet or too dry, add a little more flour or water.

Let the dough rise again in a warm place for 20 minutes.
Sprinkle a loaf tin (length 26 cm) with some flour so that the bread can be removed more easily later. Bake the bread with top/bottom heat for 40 minutes at 180 degrees Celsius.
Tip: To ensure that the zucchini bread lasts as long as possible, you should follow a few tips when storing it. You can find out more about this here: Storing bread – you should pay attention to this.

Serve zucchini bread: This goes well with it

Zucchini bread tastes especially good fresh out of the oven with a little margarine or butter. And the bread is also a good side dish for soups and dips:

  • You can serve zucchini bread with zucchini soup, butternut squash soup, pea soup, or wild garlic soup, for example.
  • On warm days, the bread is suitable as an accompaniment to a cold gazpacho.
  • You can make vegetable dips from fresh vegetables and herbs such as beetroot, wild garlic, or tomatoes and serve them with the bread.
  • The bread tastes particularly delicious with a light salad.

If you can’t finish the zucchini bread, freeze the bread. This way you avoid food waste and always have some homemade bread in the freezer.

Injera is a traditional flatbread from Ethiopia. It is characterized by a soft, sponge-like texture. Making injera at home is not difficult. All you need is a little time and patience.

In Ethiopian cuisine, injera is a common accompaniment to vegetable or meat dishes. The flatbread consists of a simple dough prepared with teff flour. Teff is an ancient Ethiopian pseudocereal also known as dwarf millet. It is naturally gluten free. In Germany, for example, you can get teff flour in well-stocked organic supermarkets or in shops that specialize in African foods.

Due to its sponge-like structure, Injera can absorb a lot of liquid. The flatbread can be rolled up or torn into smaller pieces, for example to dip in sauces and soups. In the traditional cuisine of Ethiopia, it also serves as an edible substitute for a plate.

If you want to make injera yourself, you only need three simple basic ingredients. However, the dough has to rise for a few hours before you can process it further. So you need a little patience for this recipe.

Injera: Basic Ethiopian flatbread recipe

Ingredients:

42 g fresh yeast (one cube)
700 ml lukewarm water
500 g teff flour
1 pinch(s) of salt

Directions:

Crumble the yeast cube into the lukewarm water. Stir the mixture until the yeast chunks are completely dissolved.
Put the teff flour in a bowl and add the yeast water.
Mix flour and water well to get an even batter. Then let the dough rest for at least 6 to 8 hours. It is best to cover the bowl with a kitchen towel.
Now you bake the flatbreads in the pan. To do this, heat a coated pan without fat and sprinkle some salt in it. Then add a ladleful of batter to the pan and toss it back and forth until the batter is evenly distributed and small bubbles form.
Put a lid on the pan and bake the flatbread in it until golden brown. Then repeat the process until the dough is used up.

Injera: tips and hints

It is best to buy the ingredients for Injera in organic quality. So you can be sure that they are not contaminated with harmful pesticides or fertilizers. Teff flour is also occasionally available from German cultivation. Because teff is a very resilient crop, it could also be of greater importance in Germany in the future due to the climate crisis.

Injera can be combined with many dishes. For example, it is often served as an accompaniment to the typical Ethiopian lentil stew Wot. But it also goes well with other stews or vegetable curries. You can also serve injera with various (vegan) dips.

By the way: Injera is traditionally prepared with sourdough and not with yeast. If you are not in a hurry, you can also use sourdough for the flatbread. Then simply replace the yeast in the recipe with seven times the amount of sourdough.