Tag

recipe

Browsing

Yellow lentils are a good source of vegetable protein. They also contain valuable vitamins and minerals. Because the yellow lentils are sold shelled, you can prepare them faster than other lentils.

Yellow lentils belong to the legumes. Since they are sold already peeled, you don’t need to soak them. As a result, their cooking time is significantly shorter than that of other types of lentils.

Due to their pulpy consistency and their spicy aroma, they are suitable for soups, curries, salads or spreads.

In this article, you’ll learn what’s in yellow lentils and how to use them.

Nutritional values ​​of yellow lentils

Legumes such as yellow lentils are a valuable source of vegetable protein, especially if you eat mostly plant-based foods. We took a closer look at Alnatura’s yellow lentils and summarized the most important nutrients for you (per 100 grams):
Calories: 349 kcal – Like most legumes, yellow lentils are highly nutrient dense. This is mainly due to their high protein content.
Carbohydrates: 52g (2.10g of which sugars) – The shelled lentils are high in complex carbohydrates. Your body takes a long time to process them, so you stay full for a long time.
Protein: 27 g – The high protein content of the lentils is particularly remarkable. As a result, they can help you build muscle and are in no way inferior to animal foods.
Fat: 2.20 g – The fat content of yellow lentils is very low, so the lentils can also help you lose weight.
Dietary fibers: 6.70 g – The dietary fibers contained support your digestion and keep you full for a long time.

Yellow lentils are so healthy

In addition to energy-giving macronutrients, yellow lentils are also full of valuable vitamins. Lenses include:
provitamin A
B group vitamins
vitamin E
The body converts provitamin A into vitamin A. This is important for your eyes and vision, as well as for your immune system. The contained vitamin E has a protective effect on your cells.

Lentils also contain valuable minerals such as:
potassium
calcium
magnesium
zinc
phosphorus

Yellow lentils in your kitchen

The following applies to many types of lentils: Soak the lentils before preparation. Not so with yellow lentils—since they’re already peeled, you don’t need to soak them. As a result, the cooking time for yellow lentils is significantly shorter at twelve to fifteen minutes than for other varieties. They are therefore ideal for a quick dinner.

Blue poppy seeds are a popular ingredient in various baked goods. Here you can find out more about the characteristics, ingredients and use of the opium poppy.

Blue poppy: nutritional values ​​and uses

Blue poppies are the small, dark blue to greyish, ripe seeds from the capsules of the poppy plant. This type of poppy is also known as opium poppy. This is because all parts of the plant contain so-called alkaloids. These substances are the basis for the production of narcotics and intoxicants, such as opium in particular. The best-known opium alkaloid is morphine.

Due to its nutty taste, blue poppy seeds are used in the kitchen especially as a baking ingredient. It serves as a topping for poppy seed rolls and as a main ingredient in various cakes, such as:
Poppy seed crumble cake
poppy seed strudel
poppy braid
Poppy seed cake
Poppy Cheesecake
The nutritional values ​​of blue poppy are relatively similar to nuts and other seeds. For example, Rapunzel’s organic blue poppy seeds have around 533 kilocalories per 100 grams. It consists of about 42 percent fat. Unsaturated fatty acids make up the majority. It contains about 4.2 grams of carbohydrates, 20.5 grams of fiber and 23.8 grams of protein per 100 grams.

Is blue poppy harmful to health?

Blue poppy seeds usually do not contain morphine. However, when harvested, the alkaloid-rich milky sap can contaminate the seeds. According to the Federal Institute for Risk Assessment (BfR), the morphine content of poppy seeds can vary greatly depending on the harvest and origin.

According to the European Food Safety Authority (EFSA), you can lower the morphine content in blue poppy seeds through proper processing in the kitchen. Morphine levels decrease due to:
Grind
Heat
Wash
Morphine is an important painkiller in medicine. For example, farmers grow opium poppies for medicinal purposes, especially in the Balkan region. However, if you take excessive amounts without medical indication, side effects such as vomiting, nausea, breathing problems, drowsiness and cardiovascular problems can result.

The BfR therefore recommends not consuming more than 6.3 micrograms of morphine per kilogram of body weight per day. For manufacturers, this means that one gram of poppy seeds should not contain more than four micrograms of morphine per gram. If these guidelines are observed, a person weighing 60 kilograms should consume a maximum of 94.5 grams of poppy seeds per day.

However, since there is no guarantee that poppy seed products actually meet the guidelines, you should stay well below this value. In general, the BfR advises against consuming foods with a high poppy seed content; especially in pregnancy.

Blue poppy: purchase and storage

You can get blue poppies either as whole seeds or in ground form. In the baking department you will also find ready-made poppy seed fillings. You should keep the seeds in a closed container in a cool place. It is best to store ground poppy seeds in the refrigerator. In addition, you should use it as quickly as possible, as it quickly becomes rancid due to the high oil content. Whole seeds usually keep for several months.

Cafe Americano – that can be nothing other than an American coffee, or not?! Not quite, because the Cafe Americano originally comes from beautiful Italy. In all likelihood, the history of the somewhat weaker espresso started in World War II. In the course of the war, many American soldiers, the so -called G.I.S, came to Europe. A large number of soldiers were stationed in southern European Italy at the time.

The Cafe Americano and its story

The military was enthusiastic about the Italian dining and coffee culture right from the start. Only with the strong espresso could and did the American guests not really make friends – he was simply too strong for them. But of course the soldiers knew how to help themselves and simply stretched the strong, dark coffee drink with hot water. The fun -loving Italians took the modification of their favorite hot drink with humor and, according to his creation, put him on their drinks cards as “Caffè Americano” (according to Italian spelling).

Curiously, William Somerset Maugham had an Americano ordered an Americano in Naples Italian in Italy in the First World War in his spy novel, which was published in 1928. It is not known whether this Americano is actually the Cafe Americano known today. But let’s be honest, myths are much more fun.

The preparation of a Cafe Americano: Come Si Fa?

First of all, first of all, a classic espresso is prepared, preferably with a fully automatic machine or a portafilter machine. The bean mix, the right grind and the right amount of espresso powder are also important for the production of the perfect espresso. We explain here how to make an espresso best prepared.

How much espresso you use for the Cafe Americano is ultimately up to you. Traditionally, however, the mixing ratio of espresso and water is 1: 1 – if you prepare a double espresso for the Cafe Americano, you use around 55 – 60 ml of hot water accordingly. The secret of the Italian-American coffee is that the espresso finds its way into the cup in front of the water.

Then the hot water is poured – as slowly and carefully as possible so that the crema of the espresso is preserved. The Cafe Americano is ready! Ideally, it tastes as aromatic and full -bodied as an espresso, but is also easy to compatible and edible for less hard -boiled coffee drinkers.

Cafe Americano and his supposed doppelgangers

With so many different types of coffee preparation, it is often difficult to keep an overview. The diverse offers in different cafes quickly create the impression that normal filter coffee, Cafe Lungo, Long Black and Cafe Americano are all one and the same. But whoever believes that has been missing. Because the preparations of these coffee drinks differ very well – if only in subtleties.

Cafe Americano and filter coffee

Filter coffee is prepared with weaker roasted and finely ground beans and less pressure when brewing than the classic espresso. So normal filter coffee is milder and less strong than the Americano.

Conclusion on the Caffè Americano

If the normal espresso is too strong, you will find the right alternative in the Cafe Americano. The siblings such as Long Black or Cafe Lungo presented by us are further variations with which you can experiment uninhibitedly. At some point you are guaranteed to find the perfect espresso and maybe we have given you the crucial information! How do you prefer your espresso? Let us know!

Soon it’s time again. On June 21, the official beginning of summer is, which means that not only clothing becomes easier, but also that the desire for a cold drink increases. Our ultimate coffee tip for the hot days: the irresistible and delicious Caramel Frappuccino à la Starbucks. In the meantime, however, you get it, for the sake of completeness, in every larger café chain, mostly under the name Frappé. And so that you can enjoy the Caramel Frappucino at home, we will show you a simple recipe today.

Ingredients for 2 glasses

approx. 20 ice cubes
1 double espresso
150 ml milk
2 tablespoons of Caramel syrup
1 tablespoon of cocoa powder (unsweetened)
Topping cream for topping

preparation

Put the coffee and milk in a blender and mix briefly.
Now add the Caramel syrup and the cocoa powder and mix again for about 15 seconds.
Finally, the ice cubes are added. Mix 40-60 seconds again with a high performance level.
Now just decorate with cream and – voilà – the delicious Caramel Frappuccino is ready.

Of course, this recipe can still be changed. There is no limit to the imagination and the taste. If you want to enjoy a “normal” frappuccino, you can simply do without the syrup. If you like delicious chocolate, you can of course add a chocolate syrup or cocoa powder – a so -called mochacino. For the gourmets under us, we recommend the addition of oreo cookies (see picture) and a few small pieces of chocolate. This is particularly tasty.

Another little tip: This Caramel Frappuccino recipe is of course also suitable for vegans. Simply prepare the frappuccino with soy milk and instead of the cream as topping, fruits such as blueberries or raspberries can be used. Just try it out, you will certainly taste it. We wish you a nice start to the summer season!

Coffee Panna Cotta – Panna Cotta is a traditional Italian dessert. They have been around since the 10th century and it was invented in northern Italy. However, not by an Italian, but by a Hungarian lady.

By the way, “Panna Cotta” is Italian for “cooked cream” – hence the name of the dessert.

Ingredients: For the coffee Panna Cotta you need:

1 vanilla pod
400 g of whipped cream
20 g of coffee beans
100 ml milk
120 g of sugar
4 sheet gelatin
2 TL soluble espresso powder
1 TL cocoa powder
1 tablespoon of coffee liqueur

Preparation: This is how the delicious coffee Panna Cotta is made:

First you halve the vanilla pod and scratch the mark with the back of the knife.
The gelatin must then be soaked in cold water.
Now you destroy the coffee beans with the mortar and cook them with the cream, milk, vanilla bean and mark and with 60 g of sugar.
Then simmer the whole thing for about 10 minutes on low heat.
Now you take the cream from the stove, pour it through a sieve and let it cool down. The expressed gelatin is added with stirring.
Provide 4 glasses with approx. 100 ml each and fill the Panna Cotta mass in there.
Leave the coffee Panna Cotta glasses cold for about 4 hours.
Finally, 100 times water and 60 g of sugar are cooked in a saucepan for 5-7 minutes. And the espresso, liqueur and the cocoa powder is stirred up.
Finally, give some syrup over the coffee Panna Cotta.

Tips for refining the Panna Cotta coffee:

It is best to only use small portion glasses for the Panna Cotta coffee. It is very substantial.
The best thing to do is cool the Panna Cotta coffee overnight.
Perfect for Christmas-coffee Panna Cotta is the ideal Christmas dessert.

Sticky rice, also known as sticky rice, is a Thai specialty. In the national cuisine, it is used either as a side dish or as the basis for more elaborate dishes. We will introduce you to the type of rice and show you a simple basic recipe.

Sticky rice is a type of rice that is mainly found in Thailand, but also in other Asian countries. It has thick, bulbous grains that resemble jasmine rice. While uncooked jasmine rice appears slightly translucent, glutinous rice – or sticky rice – is white. This is due to its high starch content.

Another difference lies in the way it is prepared: sticky rice is not boiled but steamed. As a result, the individual rice grains stick together and the sticky rice gets the typical consistency for which it is named. According to Thai tradition, a special bamboo basket (for example via** Avocadostore) is used for steaming. A steamer or a large saucepan serves the same purpose.

You can get sticky rice in Asian shops or in well-stocked supermarkets. Some manufacturers also offer sticky rice in organic quality. If you have the choice, you should opt for the organic version – this way you support sustainable cultivation conditions and avoid rice that is contaminated with chemical-synthetic pesticides. Ideally, the sticky rice should also have a Fairtrade seal: Then you can be sure that it comes from fair trade.

The nutritional values of sticky rice

Cooked sticky rice contains about 150 calories per 100 grams. Uncooked, it usually contains between 330 and 350 kilocalories per 100 grams. Uncooked sticky rice has the following additional nutritional values:

Protein: 7 g
Carbohydrates: 77 g
Fat: 0.8g
Sugar: 0 grams.

Like all types of rice, sticky rice is low in fat and cholesterol and rich in minerals. On the other hand, it contains less fiber than, for example, whole grain rice.

Sticky Rice: Simple basic recipe

Because glutinous rice needs to be steamed, the best way to cook it is in a special steamer. If you don’t have one, a simple saucepan and sieve will suffice. Make sure that the sieve can be hung in the saucepan.

Ingredients:

250 g sticky rice
water

Directions:

Wash the glutinous rice in lukewarm water until the water runs clear. Then put it in a bowl of cold water and stir well. Let the sticky rice sit in the water for at least three hours. If you want, you can put it in the night before and leave it overnight.
Pour the glutinous rice into a colander and rinse thoroughly.
If you are using a steamer for the preparation, line the steamer insert with a damp kitchen towel and put the sticky rice in it. Fill the pot with one liter of water and insert the insert. Then fold the kitchen towel over the rice and put the lid on. Let the rice steam over medium heat for 30 minutes. Alternatively, you can use a large saucepan. Fill it with about a liter of water and place the sieve on the edge of the pot. Line the sieve with a kitchen towel, add the glutinous rice and fold the towel over the rice. Then put the lid on the pot. Make sure to keep the gap between the sieve and the lid as small as possible so that not too much steam can escape.
Steam the glutinous rice with the lid on and over medium heat for about half an hour. Then remove the pot from the stove. Caution: If some steam escapes despite the lid being on, be careful not to burn yourself.
Let the finished glutinous rice cool down a bit before you serve it as a side dish or process it further.

This is how you can process sticky rice

You can either serve the finished sticky rice as an accompaniment to other dishes or process it further. A classic Thai recipe is sticky rice with coconut milk and mango. To do this, boil 400 milliliters of coconut milk together with 50 grams of sugar and some salt and mix them with the finished rice. The dish is garnished with fresh mango slices.

However, both mangoes and coconut milk have a bad ecological balance because they cannot be cultivated regionally and have to be imported over long distances. You should therefore only use both occasionally when cooking. If you want to do without coconut milk, you can use regional organic cream or oat cream instead – this also makes the sticky rice nice and creamy. As an alternative to mangoes, you can try peaches or apricots, for example. You can get both from German cultivation during the season. You can find out which types of fruit are in season at what time of year in the Utopia seasonal calendar.

Chai tea originally comes from India and is called Chai Masala there. Due to its unmistakably spicy aroma, it is now also very popular with us. We’ll show you how to make your own spiced tea blend.

Chai is derived from the North Chinese language and the word “Cha”, which simply means tea. Tea, like the word, found its way to the rest of the world via the Silk Road. To this day, tea is referred to as cay or chai in many places around the world. Strictly speaking, chai tea means nothing more than tea tea.

Today, chai tea is a popular spice tea from India. There the spiced tea is called Chai Masala. The delicious tea originated from Ayurvedic nutrition.

Chai tea: The spices have this effect

There is no single recipe for chai masala. Often, family recipes have been passed down through generations. That’s why chai tea always tastes a little different. The spicy tea is said to have a digestive effect. In addition, the caffeine and spices it contains should be stimulating instead of exciting.

Chai masala is always brewed with fresh spices, while chai latte, a Western invention, is often made with syrup. The following ingredients are found in most chai tea blends:

Ginger: The root gives the tea a certain spiciness. It has an antibacterial effect and stimulates the production of digestive juices. Ginger is also said to help with nausea.
Cloves: Cloves also have an antibacterial effect and are rich in antioxidants. In addition to cinnamon, they provide the tea with a Christmassy taste.
Cardamom: Cardamom gives an unmistakably sweet note. The capsule is also said to have a digestive and calming effect on the stomach.
Black pepper: The piperine it contains has numerous positive effects on our health. It has an anti-inflammatory and expectorant effect. In terms of taste, pepper intensifies the spiciness of the tea.
Cinnamon: In addition to the uniquely sweet taste, cinnamon is also very healthy. The spice stimulates intestinal activity and prevents flatulence. It is also said to help lower cholesterol levels.
Fennel seeds: Fennel also has a positive effect on digestion. The seeds stimulate the appetite and stimulate bowel movements while preventing flatulence.
Anise: The seeds are said to have an expectorant and antispasmodic effect. In terms of taste, anise rounds off the spiced tea well with its sweetish-tart note.
Black Tea: Adding black tea leaves to chai tea is optional. Chai is often prepared with Assam tea. The tea leaves contain caffeine and are responsible for the stimulating effect.

Ingredients for your chai tea

Chai Masala is a perfect drink for cold days as the spiciness warms up your body from the inside. You can also easily make the tea yourself and do not have to resort to overpriced products from the tea house or syrup with unnecessary additives.

When buying spices and tea, it is particularly important to rely on organic quality. This avoids pollution from pesticides. When it comes to black tea, also look out for the Fairtrade seal. This guarantees you fair trade, from which the workers on the tea plantations also benefit.

The classic Indian chai tea has a very intense taste. That is why it is often prepared with milk. With regional plant milk, such as oat milk, you can easily conjure up a vegan version.

There are also countless options for sweetening your chai tea. Honey or coconut blossom syrup round off the flavor of the tea particularly well, but brown sugar is also a good choice.

If you like it spicy and a little hotter, you can of course also drink Chai tea pure.

Ingredients for about a liter of chai:

1 stick of cinnamon
5 capsules of cardamom
4 cloves
2 teaspoons aniseed
1 tbsp fennel seeds
2 tsp finely chopped ginger root
3 tbsp organic black tea (alternatively 3 tea bags)
sweetener of your choice
optional milk of your choice

Black radish tastes sharper and more aromatic than other varieties. You can grow it yourself – find out here what you need to look out for and how you can use the winter radish.

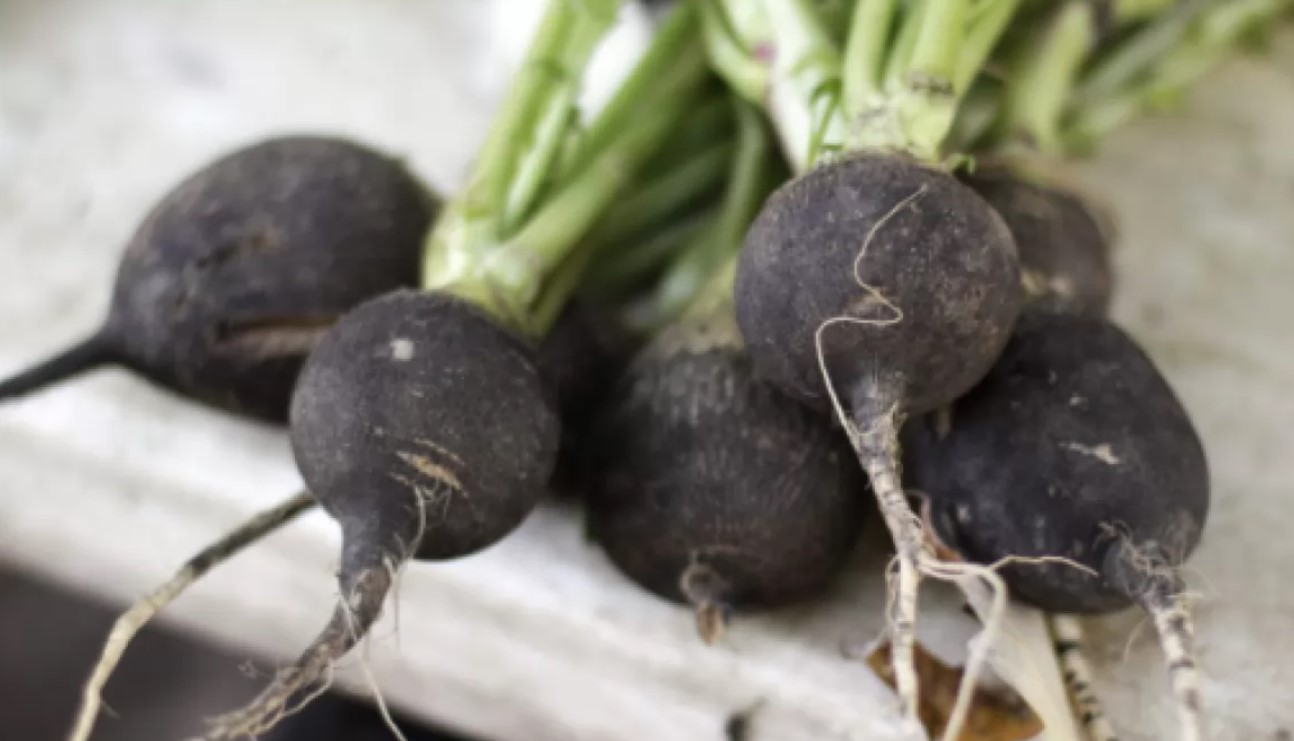
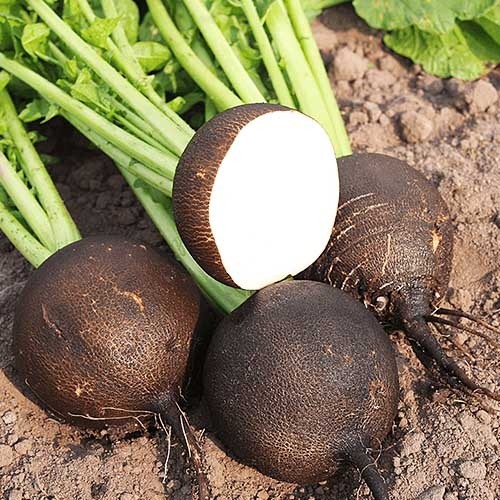
Also called winter radish, black radish is a particularly undemanding type of radish. It has a thick, mostly dark brown or almost black skin – hence its name. Inside, however, the root vegetable is white.

You can use black radish both as a food and as a home remedy for coughs. Since it is quite easy to care for, you can also plant it as a beginner when growing vegetables. To ensure that it thrives in your garden, you should follow a few tips.

How to grow black radish

Plant black radish: Depending on the species, sow the black radish from mid-June to August. You can find out the exact time from the seed packet. Preferably buy organic seeds. Proceed as follows when sowing:

First, make furrows in the soil into which you will later scatter the seeds. Keep a distance of at least 20 centimeters between the individual rows.
Now scatter the seeds in the rows of plants.
Cover round seeds very lightly with soil. If you bought a species with elongated seeds, you need to sow the seeds about two centimeters deep.
Finally, water the seeds generously.
The right location: Similar to white radish, black radish prefers full sun to half shade.

The right soil: It is best to plant black radishes where the soil is nice and loose, deep and rich in humus. Mix some compost into the soil about a month before sowing.

The right care for the black radish

Black radish is quite easy to care for. With a few tricks you will soon be able to harvest the first tubers:

Watering: Water regularly, because the black radish needs a lot of water, especially during the growth phase. Rainwater is best; you can, for example, collect rainwater.
Weeding: Black radish grows relatively slowly. To ensure that it always gets enough sunlight and water, you should regularly loosen the soil and remove weeds.
Fertilizing: If you have fertilized the soil with compost before sowing, you do not need any further fertilizer. After a month you can mix some horn shavings or other organic fertilizer into the soil if needed.
Harvest: Depending on the variety, you can harvest the first radishes after eight to thirteen weeks. It is only important that you do not leave the black radish in the ground for too long, otherwise it will become woody. First loosen the tubers with a digging fork before you pull it out of the ground.

How to use black radish

You can use black radish in different ways:

In the kitchen: Similar to the white radish, black radish is particularly popular as a raw vegetable. Peeled and finely grated, you can eat it as a radish salad or on a piece of bread. If you sprinkle it with salt, you reduce its sharpness a bit. You can also pickle black radish or cook it in vegetable soups. For example, you can replace the horseradish with black radish in this recipe: Horseradish Soup: Easy Recipe and Tasty Variations.
As a medicinal plant: Black radish contains a lot of vitamin C, mustard oils, magnesium and potassium. These and some other ingredients make it very interesting for medicinal and folk medicine. It is used there, for example, to alleviate the symptoms of rheumatism, gout and respiratory diseases.
As a cough syrup: black radish gets its typical spiciness from the mustard oils it contains. These have an antibacterial effect and can help with dry coughs, for example. Therefore, you can make an effective cough syrup from the tuber.

Black radish cough syrup recipe

For the black radish cough syrup you need:

a black radish
honey, sugar or rock candy
This is how you can use the cough syrup in the quick version:

Halve the black radish with a sharp knife.
Place both halves in front of you with the white insides facing up. If the halves wobble a bit, cut off a small piece at the bottom so they stay put.
Take a teaspoon. In the center of each half, dig a hole about two inches wide and one inch deep. You can eat the inside of the radish right away or use it in a dish.
Place each halves in a small bowl. Now put your sweetener in the hole.
Leave the bowls for a few hours until the sugar has drawn liquid out of the black radish. Then you can spoon out the cough syrup and enjoy!
Then enlarge the hole to continue using the halves.
If your black radish sits small and shriveled in the bowl, the sugar has drained all of the liquid and it’s time to discard it.

This is how you prepare the cough syrup a little more complex:

First, use a sharp knife to cut the top of the black radish straight off. The upper end must later act as a “lid”.
Now scoop out the radish with a teaspoon or knife in a cone shape. Finely chop the radish insides and set aside.
Now poke a few holes in the bottom of the radish. It is best to use a skewer or a knitting needle for this. The cough syrup later runs through these holes.
Now fill the hollowed-out radish halfway with honey and add the remaining radish pieces.
Give everything a quick stir and put the radish “lid” back on.
Place the stuffed radish on a plate or in a jar and let it sit for a few hours.
Pour the reserved syrup into a clean jar and store in the refrigerator.

Mohnstriezel is a sweet pastry from Silesia. It is traditionally eaten at Christmas or Easter. We show you a delicious recipe with a vegan version.

Originally Mohnstriezel comes from the former Silesia. The area is now mostly in Poland. The Silesian Mohnstriezel are still served in these regions as a traditional pastry at Easter or Christmas. They consist of a sweet yeast dough filled with poppy seeds or almonds. There are also delicious sprinkles and a sweet glaze. You too can make the Silesian Mohnstriezel yourself. We will show you a recipe for the sweet pastry with a vegan version.

Pay attention to the organic quality of the ingredients. In this way you can support species-appropriate animal husbandry and avoid chemical-synthetic pesticides. Above all, we can recommend the organic seals from Demeter, Bioland and Naturland, as they comply with stricter criteria than the EU organic guidelines. Also, make sure to buy eggs without chick shredding.

Buy ingredients that are locally and seasonally sourced. This avoids long transport routes and reduces global CO2 emissions. You can also support local providers in your region.

Mohnstriezel: The recipe

Ingredients:

600 gwheat flour
42 g yeast
630 mlmilk
230 g butter
260 gsugar
1vanilla bean
0.5 untreated lemon
100 g marzipan raw mass
2 tablespoons starch
1 egg
180 g blue poppy seeds
100 gicing sugar

Directions:

Put 500 grams of flour in a large mixing bowl and make a small well in the middle.
Crumble the yeast and pour it into the well.
Heat 130 milliliters of milk until lukewarm. Pour the warm milk over the yeast and let it soak briefly.
Cut 150 grams of butter into flakes and add them to the mixing bowl.
Now add 100 grams of sugar and process the ingredients with the hand mixer to form an even dough. Cover and let the dough rise for about an hour.
In the meantime, you can make the sprinkles. Put the remaining flour and 80 grams of sugar in a bowl.
Halve the vanilla bean and carefully scrape out the pulp with a knife. Put this in the bowl as well.
Wash the lemon thoroughly and grate half of the lemon zest into the bowl.
Now add the remaining butter in flakes and mix the ingredients into a crumbly dough. You can put the finished crumbles in the fridge.
Then it’s time for the filling. To do this, cut the raw marzipan into small pieces. Pour the marzipan into a pot.
Pour half of the remaining milk into a measuring cup. Whisk together the cornstarch or cornstarch substitute and egg until smooth.
Heat the marzipan with the remaining milk and sugar. Stir constantly so it doesn’t burn. Let the ingredients boil up briefly.
Then take the marzipan off the stove and stir in the blue poppy seeds and the milk with starch. Reheat the filling and keep stirring until you get a smooth mass. Then let them cool down.
On a floured work surface, roll out the dough into an oval shape.
Spread the poppy seed filling evenly over the pastry base. Roll up the Striezel from the two longer sides towards the middle.
Place the finished Mohnstriezel on a baking sheet lined with baking paper. Spread the crumbles evenly over the pastry and press lightly.
Bake the Mohnstriezel at 180 degrees top and bottom heat for about 45 to 50 minutes. Then let it cool down completely.
Halve the lemon. Use the half that you already scraped off the skin. Squeeze out the juice from this lemon half and stir in the icing sugar (tip: make your own icing sugar). Brush the cooled Mohnstriezel with the glaze as you like.

Mohnstriezel: Tips for the preparation

The Silesian Mohnstriezel need a certain resting and baking time. However, the effort is worth it for the tasty treat. With a little practice and patience, even baking beginners can prepare the sweet Striezel. The following tips will help you with a sustainable, varied or even vegan preparation:

Blue poppy consists of the seeds of the opium poppy. It contains alkaloids that are used in the production of intoxicants and narcotics. The well-known morphine is also obtained from the opium poppy. The poppy seeds usually do not contain morphine, but they can become contaminated with it during harvest. The Federal Institute for Risk Assessment therefore recommends a maximum intake of 6.3 micrograms of morphine per day and kilogram. This corresponds to around 94.5 grams of poppy seeds per day for a person weighing 60 kilograms.
Vanilla originally comes from Mexico. Madagascar is now the largest cultivation area for vanilla beans. Unfortunately, pods from Germany or Europe are not available. Since the vanilla has to travel long distances, you should use it sparingly. Consume them consciously and preferably buy them with the Fairtrade seal.
You can refine the Mohnstriezel with various ingredients. For example, healthy raisins, almonds or other chopped nuts taste great in the filling. Jam or pieces of apple also give the filling a whole new taste. If you replace the wheat flour with wholemeal spelled flour, your pastries will be more nutritious and rich in fibre. However, the dough may need more liquid.
If you want your Striezel to be less sweet, you can reduce the sugar as you like.
You can also prepare your Mohnstriezel vegan. Replace the milk with plant-based milk and the butter with vegan margarine. You can use an egg substitute instead of eggs.

Pickling feta is one of the classic ways of preparing sheep’s milk cheese. We’ll show you a simple recipe that you can use to make pickled sheep’s cheese at home – also with vegan alternatives.

To pickle feta, you need olive oil, fresh herbs, and a little patience. The preparation of the Mediterranean appetizer is quick and uncomplicated, but in order for the flavor of the herbs to develop fully, the cheese must then sit for at least 24 hours. You should pay particular attention to this quiet time if you are expecting guests.

You can insert feta in one piece or diced. We show you a recipe for pickled feta cubes here – but you can also use the same ingredients to pickle two whole slices of feta. You may need a little less olive oil.

Especially when it comes to dairy products like feta, it is important that you choose products with an organic seal when shopping. This is how you support companies that keep their animals in a more species-appropriate manner. If you generally do not consume any animal-based foods, we will give you tips for vegan variants of pickled feta at the end of this article.

It is also worth paying attention to organic quality and regional origin for the other ingredients. You can get thyme and rosemary, for example, from German cultivation and can thus avoid unnecessarily long transport routes. Or you grow your herbs yourself. You can find tips on this here, for example: Creating a herb bed: Tips on types, care and harvest.

Pickle Feta: Easy recipe for feta in olive oil

Ingredients:

5 sprigs of thyme 2 sprigs of rosemary 2 small chili peppers
4 cloves) garlic
400 g feta
400 mlolive oil

Directions:

Prepare two mason jars, about 250 milliliters each.
Wash the thyme and rosemary and then shake them dry. Pluck the thyme leaves from the sprigs and cut the rosemary sprigs into short pieces.
Wash the chillies and cut them in half lengthwise. Remove the core casings. Then cut the chili halves into strips.
Peel the garlic and cut it into thin slices.
Dice the feta. If you want to insert it in one go, skip this step.
Pour the feta cubes into the provided mason jars. If you want to pickle two whole pieces of feta, place them side by side in a shallow lidded container instead.
Sprinkle the feta with herbs, garlic and chili.
Distribute the olive oil evenly between the two glasses or pour it over the two feta pieces.
Close the jars tightly and leave them in the fridge for at least 24 hours. The longer the glasses stand, the more intense the herbal aroma becomes. However, you should not leave the pickled feta for longer than a week.

Insert feta: Serving suggestions and vegan alternatives

Pickled feta cheese goes well with most Mediterranean herbs. You can therefore change the herbs in the recipe according to your own taste and, for example, use oregano, basil or marjoram. The feta also tastes very good with herbs de Provence.

For example, you can serve flatbread or ciabatta bread with the pickled feta. It is also good for antipasti plates or a Greek salad. It is best to take the feta out of the fridge about half an hour before serving. At room temperature, its taste is stronger.

By the way, if you avoid animal products in your diet, you can simply swap the feta for the same amount of untreated tofu. This is the simplest alternative. You can find detailed instructions here: Vegan Feta: With this recipe you make it yourself.

In many health food stores you can now also find other plant-based substitutes for feta, most of which are based on coconut oil. As a rule, you can process them in the same way as real feta made from sheep’s milk.