Tag

recipe

Browsing

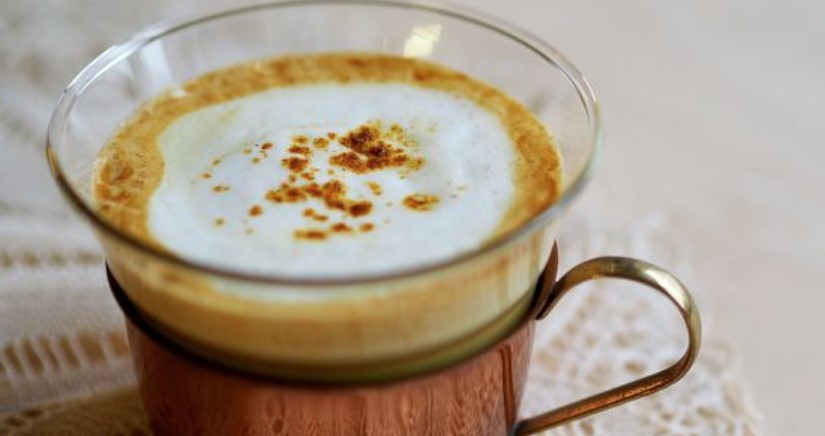
A warming turmeric tea is the ideal companion for the winter months. Here you can find out how to prepare the strengthening tea and what effect it has.

Turmeric has been considered a superfood for many centuries. The turmeric root originally comes from Southeast Asia. Its resemblance to the ginger root is due to the fact that it also belongs to the ginger family. Chinese and Indian medicinal medicine have been using the root for many centuries – including in the form of turmeric tea. Turmeric is also popular as a kitchen spice in Far Eastern cuisine. The coloring agent curcumin is responsible for the yellow color of “Indian saffron”.

How does turmeric tea work?

“Spice of life” or “magic tuber”: That’s what many call the yellow dye curcumin, which gives turmeric tea its characteristic yellow and is said to help with various ailments. Although the current study situation is not very advanced, some positive effects of curcumin have already been demonstrated:

BR-Wissen speaks of an anti-inflammatory effect that may prevent or reduce cell damage. In this context, the allergist Peter Schnabel mentions above all the potential to alleviate gastrointestinal complaints.
According to BR-Wissen, in animal experiments, turmeric was also able to slow down the rate of division of cancer cells or ensure that they died.
Furthermore, the federal government also mentions in its report on the healing effects of turmeric that curcumin can lower cholesterol levels.
As the federal government continues to write, Alzheimer’s can also be slowed down by the use of turmeric. Since turmeric halts the loss of mitochondrial function, the onset of dementia could progress more slowly.
The Freiburg University Hospital reports an overall positive effect that regular consumption of turmeric products such as turmeric tea would have. For example, in India, where a lot of turmeric is used in cooking, there are fewer cardiovascular diseases or cancers. The mortality rate is also lower compared to western industrialized nations.
Ayurvedic medicine also uses turmeric to treat liver problems. Since turmeric is said to promote the formation of bile, this facilitates fat digestion.
Turmeric tea in particular can also have an expectorant effect and provide relief for respiratory diseases. In addition, the tea warms the body from the inside in winter.
Important: The previous studies are cell or animal studies that can only be transferred to humans to a limited extent. So more clinical studies are needed to better assess the effects of turmeric in general and turmeric tea in particular.

Turmeric tea: How to prepare the strengthening tea

For example, you can take turmeric tea in the morning and at noon. If you have a sensitive stomach, you should not drink the tea just before bed because of its pungent aroma. To prepare a strengthening turmeric tea, you need the following ingredients:

a piece of turmeric (one to two centimeters) or a teaspoon of turmeric powder
a pinch of pepper
250 milliliters of water
if desired: ginger, cinnamon or organic lemon to refine
When preparing turmeric tea, you should do the following:

Boil the water in a saucepan or kettle.
Pour over the powder or root and let the mixture steep for 5 to 10 minutes.
Strain the tea through a sieve.
Infuse your turmeric tea with ginger, cinnamon, or lemon if desired.
Tip: Your body absorbs the water-soluble curcumin best in combination with fat. It is therefore recommended to drink the turmeric tea with or after a high-fat meal or to take it together with a spoonful of fatty plant milk, butter, coconut oil or similar. Alternatively, you can enrich your turmeric tea with warm milk and honey. Milk fat is said to improve the absorption of turmeric. Turmeric and honey mixed together is also known as Golden Honey.

A substance called piperine also helps to increase the biological availability of curcumin. This is contained in abundance in black pepper. A pinch of it can therefore increase the effect. Together with ginger, turmeric is said to have a stronger effect on digestive problems due to the gingerols. You benefit from this, for example, if you mix ginger tea with turmeric. Cinnamon, in turn, is said to regulate blood sugar levels and thereby boost fat burning.

How common is turmeric tea healthy?

You should not drink more than four cups of turmeric tea throughout the day. As the Freiburg University Hospital explains, the WHO recommends around three grams of turmeric powder a day. The Federal Institute for Risk Assessment also advises not to permanently exceed the recommended daily intake.

Caution: Some groups of people should only drink a little turmeric tea. Pregnant women, nursing mothers or children can react sensitively to the substances. Because the slightly hot note of turmeric can irritate the gastric mucosa in higher quantities and thus promote cramps, diarrhea or nausea.

You should also note that the active ingredient curcumin causes interactions with certain drugs. Since curcumin interacts with certain enzymes in the liver and these are also responsible for breaking down medicines, there can be an increased or reduced concentration in the blood. Interactions have so far been observed, for example, in connection with anti-cancer drugs. If you take medication regularly, it is better to seek medical advice before drinking turmeric tea regularly.

The vegan vegetable goulash tastes hearty and hearty – without any meat. We’ll show you which ingredients you can use for the plant-based alternative and present a delicious recipe.

This vegan vegetable goulash is a delicious alternative to the traditional meat dish. In other recipes such as the vegan goulash or the jackfruit goulash, we replace the meat with plant-based alternatives. The vegetable goulash does not contain any meat substitutes and tastes especially good with fresh and crunchy vegetables.

Here you can find out what you should look out for with the ingredients and how you can easily prepare the dish yourself.

The best ingredients for the vegetable goulash

A few ingredients should not be missing so that the vegan vegetable goulash tastes just as hearty as its traditional counterpart:

Gherkin water and gherkins give the goulash its spicy and slightly sour taste. They provide variety alongside the traditional ingredients.
Red wine: The red wine brings the hearty aroma to the vegetable goulash. By deglazing at the beginning, the alcohol boils away and a hearty note remains.
Fresh vegetables: The fresher the vegetables, the crunchier and more flavorful your vegetable goulash will be.
Flour: The flour will help you make your goulash thick. The result is a creamy, full consistency. If you are following a gluten-free diet, use cornstarch or a cornstarch substitute as an alternative.
When buying your products, make sure that they come from organic farming. So you can be sure that no chemical-synthetic pesticides pollute the soil and your food. Organic seals such as Bioland, Naturland or Demeter are a good indication of sustainable purchasing.

Tip: Buy your vegetables at the regional weekly market or, for example, grow your own balcony vegetables. Tomatoes and peppers are in season from August up to and including October, so you are acting in the most sustainable way if you include vegetable goulash in your menu during this period. You can get an overview of the seasonality of vegetables and fruit in our seasonal calendar.

Vegetable goulash: How to prepare it

Ingredients:

1 large onion
200 g tomatoes
300 large peppers
2 carrots
5 pickles
2 clove(s) garlic
4 EL vegetable oil
3 tablespoons flour
2 tbsp tomato paste
200 mlred wine, dry
50 ml pickle water
500 ml vegetable broth
2 tablespoons mustard
1 pinch(s) of salt
1 pinch(s) of pepper

Directions:

Wash and peel your vegetables as needed. Cut the peppers, carrots, tomatoes and onion into bite-sized pieces. Finely chop the garlic. Cut the pickles into small cubes.
Heat the vegetable oil for frying in a large saucepan.
Sweat the onions in it until translucent. Add the garlic and the pickles and sauté for another three minutes.


Dust everything with flour and mix the ingredients in the pot with the (homemade) tomato paste. Sauté everything for two minutes until the tomato paste turns slightly brown.
Deglaze everything with red wine and cucumber water. Stir in the liquid slowly so that no lumps form.
Now add the vegetable broth to the pot along with the vegetables. Mix the ingredients together evenly and let the goulash simmer for 20 minutes. Stir occasionally to keep the sauce from thickening at the bottom.
Season the goulash with mustard, salt and pepper to taste.

Tip: Garnish the vegetable goulash with fresh herbs and serve with fresh flatbread, bread dumplings or boiled potatoes.

Ful Medames is an Arabic bean stew that you can prepare quickly and easily. You can find out how it works and what it tastes best with here.

Ful Medames – or Ful for short – originally comes from Egypt and is eaten in a modified form for breakfast in many countries in the Arab world. Fava beans serve as the basis. They have numerous other names such as broad beans, field beans, pork beans or broad beans.

We show you a typical Egyptian recipe for one person.

Note: It is best to soak the dried beans in a bowl of plenty of water overnight or for at least eight hours. This allows them to soak up water and take less time to cook. You can also buy canned fava beans cooked, saving you time. However, dried beans require less packaging and are therefore the more sustainable alternative.

Ingredients:

100g dried fava beans (equivalent to about 250g cooked beans)
1 onion (red or white)
2 clove(s) garlic
1green chili
1 tbsp olive oil
2 tbsp tomato paste
2 teaspoons cumin
150 ml bean water
lemon juice
Parsely
as a side dish: Arabic flatbread

Directions:

It is best to soak the beans the day before as described above.
The next day, drain the water and rinse the beans thoroughly.
Cook the beans in three times their volume of water over medium-low heat for about 50 minutes. Do not cover the pot to prevent the water from overflowing as it cooks. About ten minutes before the beans are done, add a teaspoon of salt. When you drain the beans, be sure to save the bean water as you will need it later.
Finely chop the onion, garlic and chili.
Start by adding the onion and chili to a hot pan and sweating over medium-low heat, stirring frequently. Add the garlic a little later as it burns faster.
After about three minutes, you can add tomato paste and cumin and sauté for a few minutes. Certain spices, including cumin, develop their full aroma only when they are roasted.
Add the cooked beans and douse with the bean water. Season the ful with a little salt and let it simmer over low heat for about 20 minutes.

Now mash part of the ful with a potato masher or a fork so that it gets the consistency you want. Alternatively, you can also use a hand blender and puree the ful. To do this, pour the ful into a container that is suitable for pureeing.
When serving, you can drip some lemon juice over the ful and garnish with parsley.

By the way: The ful keeps in the fridge in an airtight container for about three days.

Lemon salt gives your dishes a particularly aromatic note. We’ll show you how easy it is to make your own.

Homemade lemon salt brings a refreshing and fruity change to your dishes. It goes particularly well with vegetable pans, salads or salad dressings and dips. We recommend choosing organic ingredients. This is how you avoid chemical-synthetic pesticides.

Lemon salt: A recipe to make yourself

This recipe gives you a supply of lemon salt that is sufficient for many dishes. For example, you can put the lemon salt in a large salt shaker or put it in a small mason jar.

Ingredients:

200g salt

1 organic lemon

Directions:

Wash the lemon with hot water and then dry it with a kitchen towel.
Grate the lemon zest with a grater.
Juice the lemon with a lemon squeezer. Pour the juice through a fine mesh strainer to remove the pulp. You only need the juice.
Mix the salt with the zest and the lemon juice.
Spread the lemon salt on a baking tray and put it in the oven at 100 degrees for 20 minutes. This step is important so that your lemon salt loses water and has a long shelf life.
Allow the lemon salt to cool completely and then pour it into a glass container.

Tips for your homemade lemon salt

These tips will make your lemon salt even more aromatic:

You can mix your lemon salt with herbs of your choice. Add the fresh and chopped herbs in the fourth step. You can add already dried herbs after the salt has come out of the oven and cooled down. For example, rosemary can complement lemon salt wonderfully.
When grating the lemon zest, make sure that you do not rub off any or only a little of the white skin. This is just below the yellow peel and would add a bitter note to your lemon salt.
Of course, the salt can also be made with other citrus fruits. You can also use an orange or lime in place of the lemon.
Choose a salt of your choice. For example, you can use fine-grain sea salt or coarse-grain rock salt. The coarse-grained lemon salt is suitable for filling a salt mill with it. You may also want to leave the coarse-grained salt in the oven a few minutes longer so that your lemon salt is really dry.
Incidentally, homemade lemon salt with its refreshing yellowish color is a wonderful gift idea. You can still decorate the glass and you already have a homemade souvenir.

Wild garlic risotto is the spring version of the Italian rice classic. Here you will find a delicious recipe for the aromatic main course.

Spring is wild garlic season. The green leaves are good for adding a garlic-like aroma to all kinds of dishes. Our simple risotto recipe also gets a special freshness from the wild garlic.

Do you want to collect wild garlic yourself? In another article, you will find tips for harvesting wild garlic.

Note: Our recipe for wild garlic risotto contains dairy products. Pay particular attention to organic quality with these ingredients. This way you can be sure that the products come from cows that have been raised humanely. We can particularly recommend the organic seals from Demeter, Bioland, and Naturland, as they stipulate stricter criteria than the EU organic seal.

Wild garlic risotto: A simple recipe

Ingredients:

1 small onion
250 grisotto rice
2 tbsp organic butter
100 mlorganic white wine
750 ml vegetable broth
1 handful of wild garlic
50 gOrganic Montello
Salt
pepper

Directions:

Cut the onion into small cubes. Wash the rice thoroughly under cold water in a colander.
Heat 1 tablespoon of butter in a medium saucepan over medium-high heat. Sauté the diced onions in it for about 3 minutes, stirring occasionally.
Then add the risotto rice to the pot and cook until translucent, 3 to 5 minutes, stirring occasionally. Add the white wine and simmer until the wine is almost gone, about 5 minutes.
In the meantime, prepare the vegetable broth so that you can use it while it is still hot. Turn the stove to low heat. Then add 2 ladlefuls of the stock to the rice and let it simmer, stirring occasionally. Continue until the broth is used up and the rice is cooked through. This takes about 30 minutes in total.
Wash the wild garlic and chop it into fine strips. Grate the Montello.
Stir the wild garlic, the Parmesan and the remaining butter into the risotto. Finally, season the wild garlic risotto with salt and pepper. Complete!

Wild garlic risotto: possible variations

A wild garlic risotto can easily be enriched with other ingredients. For example, you can start by frying a handful of chopped mushrooms together with the onions and then prepare the risotto as in the recipe. Or you stir finely diced smoked tofu into the wild garlic risotto before serving.

Preparing biryani vegan is not difficult: You simply add some vegetables to the Asian rice stir-fry. We will introduce you to a biryani recipe and explain what you should pay attention to.

Biryani is a rice dish that comes from Asia. The dish is particularly popular in India, Bangladesh and Pakistan. The word “biryani” comes from Persian and means something like “fried”. The rice stir-fry is often prepared with meat, but you can make biryani vegan by adding your choice of vegetables, nuts or tofu to the rice.

We recommend looking for organic quality when buying the ingredients. This is how you avoid chemical-synthetic pesticides. Rice often comes from Southeast Asia and uses a lot of water to grow. Then there are the long transport routes to Europe. Rice that was grown in Europe (e.g. in Italy) is therefore ecologically more advisable. If you do use rice from countries further away, we recommend looking out for the fair trade seal. In this way you guarantee that manufacturers have observed human and labor rights during the production process and the long delivery routes.

Vegan Biryani: Recipe for the rice dish

Ingredients:

300 ml water
200 g basmati rice
1 tsp salt
1.5 tsp curry spice
1 tsp pepper
1 tsp paprika spice (sweet)
1carrot
1Zucchini
1 piece ginger (thumb size)
1 clove(s) garlic
1red onion
2 tablespoons oil
50 g cashew nuts

Directions:

Start cooking the rice. Put it in a pot with the water. Add salt and the spices. Let it gently simmer for five to ten minutes. It shouldn’t be raw anymore, but it shouldn’t be fully cooked either.
While the rice is cooking, you can grate the carrot and cut the zucchini into pieces.

Place the vegetables in a bowl and pour boiling water over them. Let it steep for five minutes. This will lightly pre-cook the carrot and zucchini so that the vegetables are not fried raw. Then drain the water again.

Now cut the ginger and garlic into small pieces as well. Then place the pieces in a mortar and grind them into a paste. This unfolds even more flavors. Tip: If you don’t have a mortar at home, you can also chop the ginger and garlic very small with a knife and press into a paste with the bottom of a spoon.

Gradually add the vegetables and finally the half-cooked rice.

Biryani with peanut sauce

As a dip for biryani, you can stir together a quick peanut sauce. The nutty taste goes very well with the dish. You need the following for this:

2 teaspoons fresh ginger, finely grated
1 garlic clove, finely chopped
65 g peanut butter without additives
2 tbsp sesame oil
2 tbsp soy sauce
1 tbsp rice vinegar
1 tsp maple syrup (alternatively rice syrup or date syrup)
Juice of half a lime
1 pinch cayenne pepper or chilli powder
2 teaspoons water, as needed
First chop the ginger and garlic. Then mix all the ingredients together and stir them into a smooth sauce. You can garnish the sauce with peanuts or fresh herbs.

Soy sauce also goes well with the rice dish. You can simply pour it over the rice on the plate.

Possible variations for the Biryani

You can not only prepare the rice pan with zucchini and carrots, but also with other types of vegetables. Well suited are, for example, broccoli, peppers or mushrooms. It is best to buy seasonal vegetables that do not come from overseas but grow regionally or within Germany. This protects the climate and reduces CO2 emissions. Our seasonal calendar can help you with that.

In Asia, biryani is often prepared with meat. As a vegan alternative, you can use smoked tofu, for example. Cut the tofu into cubes and fry it in a pan or bake it in the oven at 200 degrees Celsius with top and bottom heat until crispy. Later you can sprinkle it on top of your biryani as a topping.

You can also replace the cashew nuts with other nuts. Peanuts, almonds or walnuts go just as well in biryani. Many nut varieties cannot be grown in Europe and are therefore imported from Africa, among other places. There they are sometimes grown under poor, inhumane working conditions. In order not to support this, you should look for a Fairtrade seal when buying the nuts.

In March, the wild garlic season finally begins again. Wild garlic spaetzle are perfect as a fresh and delicious spring dish. We’ll show you how to prepare the spaetzle.

Spaetzle are a typical Swabian dish. They are served as a side dish, but often also as a main course. Wild garlic spaetzle taste unique and are filling at the same time. You can prepare them relatively easily and quickly with just a few ingredients. The wild garlic season is from mid-March to mid-May. During this period you can buy wild garlic regionally and freshly or pick it yourself:

Make sure that your food is organic if possible, especially animal products. An organic seal confirms species-appropriate animal husbandry. In addition, it is also worth buying eggs without chick shredding. In this way you ensure that the male chicks are also raised.

Wild garlic spaetzle: Spring recipe

Ingredients:

100 g wild garlic
400g flour 4 eggs
1 pinch(s) of salt
50 ml water 2 onions
1 tablespoon neutral vegetable oil

Directions:

Wash the wild garlic, spin dry and then chop very finely.
Place the flour, eggs, and salt in a bowl and use a mixer to mix the ingredients into a smooth batter. Gradually add a portion of the water while stirring until the 50 milliliters are used up. Stir the batter until it bubbles.
Stir the chopped wild garlic into the batter. Then let the dough rest for at least 30 minutes.
Peel the onions, halve and cut into thin slices. Then fry them in a pan with neutral vegetable oil over low heat until golden brown.
Then bring salted water to a boil in a saucepan.
As soon as the water boils, rub the dough into the boiling water using either a spaetzle strainer or a spaetzle press. It’s easiest if you pour the batter into the strainer or press in batches and scrape or press into the water.
If you don’t have a spaetzle sieve, spread the dough very thinly on a board. Hold the board against the edge of the pot, use a long knife to pry off small strings from the dough and slip them into the water.
Remove the spaetzle as soon as they float to the surface and place them in a bowl of cold water. That way they don’t stick together.
Mix the finished spaetzle with the onions and season with pepper and salt. The delicious, homemade wild garlic spaetzle are ready.

Wild garlic spaetzle: Vegan variant

With a few small changes, you can also prepare the wild garlic spaetzle vegan. The eggs are omitted from the recipe. For the dough, you need a little more water, soy flour, and a little turmeric for the yellowish color. The rest of the steps remain the same.

Use in step 2:

  • 250 ml water instead of 50 ml water
  • 3 tbsp soy flour or egg replacer instead of eggs
  • 0.5 tsp turmeric (for the color)

Korean pajeon are savory pancakes with spring onions and are popular as a side dish in Korea. Here you will find a vegan and gluten-free recipe for the crispy vegetable pancakes.

The Korean name Pajeon is composed of Pa, which means “spring onion” in Korean, and Jeon, which means pancake. The crispy pancakes are both vegan and gluten-free and are usually served as an accompaniment to vegetables and tofu. But Pajeon are also very suitable as a hearty snack between meals.

When buying the ingredients for the Pajeon, make sure that they are organic if possible. In this way you support ecologically more sustainable agriculture that treats the earth’s natural resources with care. Products with the organic seals from Demeter, Bioland and Naturland are particularly recommended. These seals specify stricter criteria than, for example, the EU organic seal.

Pajeon: Savory pancakes with spring onions

Ingredients:

1 bunch spring onions
3 cloves garlic
80 grice flour
40 gbuckwheat flour
25 g cornstarch
0.5 tsp salt
1 pinch(s) of Kala Namak
160 ml water
1 tablespoon rapeseed oil
1 tbsp soy sauce
2 tablespoons coconut oil

Directions:

Cut the spring onions into fine rings. Chop the garlic.
Combine the rice flour, buckwheat flour, cornstarch, salt, and kala namak in a medium bowl.
Then add the water, canola oil, and soy sauce. Mix everything with a whisk to form a smooth batter. Fold in the spring onions and garlic.
Heat the coconut oil in a pan and fry the pajeon on both sides until golden brown. Complete!

Korean Pajeon: Possible Variations

You can easily modify the Pajeon. They are also good for using up leftover vegetables, for example, and thus avoiding food waste. Simply cut carrots, zucchini and/or peppers into fine pieces and mix them with the pancake batter before frying.

You can also add dried chili flakes to the Pajeon batter for even more flavor.

Croissants from the bakery are rarely vegan because they contain butter and often eggs. But if you don’t want to do without the French pastries, you can use the following recipe to prepare vegan croissants.

You need a lot of time to prepare the vegan croissants, most of which is resting time for the dough. The actual work takes about an hour.

Vegan croissants: fluffy and delicious

Tip: It is best to cook the dough the night before and leave it in a sealed bowl in the fridge overnight.

Ingredients:

500g flour
60 gsugar
2 teaspoons dry yeast
1 tsp salt
300 mloat milk
250 g vegan butter or margarine

Directions:

In a large bowl, whisk together the flour, sugar, yeast, and salt until you have a smooth batter. Heat the oat milk to about 40°C and stir it into the batter. Knead the dough well again for five to eight minutes.
Cover the bowl of dough with a damp kitchen towel and place in the fridge for 60 minutes. If you prepare the dough the night before: Place the dough in a sealable container and leave it in the fridge overnight.
Roll out the dough into a large rectangle. The rectangle should have straight edges and right angles. It is best to straighten it with your hands.
Cut the vegan butter or margarine into thin, even strips and distribute them in the middle third of the dough. Be sure to leave some space around the edges so the butter doesn’t spill out while baking. Now fold the bottom third up and the top third on top, making three layers.
Laminating for the first time: Carefully roll out the dough into a long rectangle. Press with the rolling pin first, then roll to avoid cracking the dough. Then put the top and then the bottom third in the middle. Wrap the dough in parchment paper or a suitable parchment paper substitute and place in the fridge for an hour.
Second time laminating: Rotate the dough 90° and repeat the process of the previous step. Put the dough back in the fridge for an hour.
Laminate for the third time: Turn the dough 90° again and repeat the whole procedure a third time. Let the dough rest again in the fridge for an hour.
Roll out the dough into a square. Using a sharp knife, cut it in half to create two rectangles. Cut out six triangles per rectangle. Pull each triangle apart slightly and cut a slit (1 cm) down the middle of the wide side. Now pull the two ends of the wide side slightly apart and roll them up towards the opposite tip.
Place the croissants on a baking sheet and cover with a damp kitchen towel. Let the dough rise again for an hour. The croissants should then be about twice as big.
Bake the croissants at 220 °C top/bottom heat for about 15 minutes until golden brown. Your homemade, vegan croissants are ready.

Both sweet and savory go well with the vegan croissants, such as these vegan spreads made from 2 ingredients or fresh jam with pectin as a vegan gelatine substitute. Nut butter or sugar-free pear butter also taste delicious on the vegan croissant. You could also make ham substitute from smoked tofu and enjoy a hearty croissant with vegan cheese.

White bean puree tastes delicious and is also a valuable source of protein. In this article we will show you a recipe that you can easily prepare yourself.

White bean puree looks confusingly similar to the well-known hummus made from chickpeas. However, it tastes different and brings variety to your diet. You can prepare the bean puree very easily and quickly. All you need for additional kitchen utensils is a blender or hand blender. The white bean puree is particularly suitable as a dip for vegetable sticks or as a creamy component in salads or wraps.

We recommend that you choose all organic ingredients. In this way you avoid chemical-synthetic pesticides and thus support species and soil protection.

White bean puree: A recipe to make yourself

Ingredients:

400 grams of white beans
2 cloves)garlic juice of half a lemon
2 tbsp olive oil
2 tbsp almond butter or tahini salt pepper

Directions:

Remove the beans from the can or jar and wash them thoroughly.
Peel the garlic and cut it into slices. Halve the lemon and squeeze the juice from one half.
Put all the ingredients in a blender. Mix everything until you get a creamy and homogeneous mass.
Season the white bean puree with pepper and salt to taste. Now you can serve it and/or store it in an airtight container in the fridge for a few days.

Tips for your homemade bean puree

Finally, we would like to give you a few tips that can help you with the production of your homemade bean puree:

Of course you can prepare the recipe with beans of your choice. So you can use kidney beans in the same way or combine different types of beans.
If you don’t want to use canned or jarred beans, you can cook dried beans yourself. You can find out how to do this here: Cooking white beans: This is how they get the right consistency. But keep in mind that the preparation time given above will be significantly longer.
Add kitchen herbs and spices as you wish. You can supplement the white bean puree with dried tomatoes or cumin, for example, and add fresh herbs as a topping.
If you like roasted flavors, you can roast the garlic in a pan or in the oven beforehand. Use several cloves of garlic for this because they lose their intensity when cooked.