Tag

remove

Browsing

Natural home remedies help to remove and prevent spider veins. For many of those affected, even alleviating this can be helpful. Initially, the varicose veins are not a problem. But in some cases, that may change. We have summarized the most important information about spider veins.

Many people suffer from spider veins. These are not only unsightly to look at, but can also cause pain in some cases. In the advanced stage, they can cause swollen feet and legs. Skin ulcers can also occur. This is why you should treat your spider veins.

What are spider veins?

Strictly speaking, spider veins are small, dark red or bluish shimmering enlargements of the veins. These occur mainly on the calves, ankles, and thighs. From a medical point of view, they are among the varicose veins and are usually harmless. But they often make themselves felt by burning.

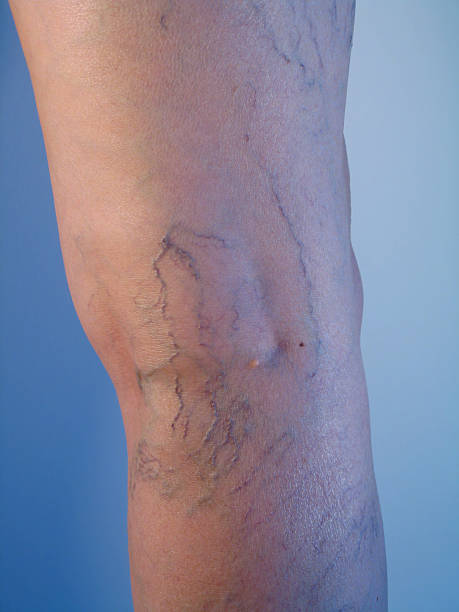
They can also lead to other uncomfortable symptoms, such as swollen feet and aching legs. In addition, many sufferers perceive them as an unsightly blemish. Therefore, many are looking for ways to remove them.

Natural home remedies for spider veins

If you are overweight, changing your eating habits is a good way to prevent spider veins from developing. Other habits, such as sitting incorrectly, also promote the development of unsightly enlarged veins. A comfortable sitting position that promotes blood circulation instead of impeding it can be a simple remedy. And the following spider veins home remedies can also help. Also, note our other tips for beautiful legs in summer.

1) With cold water against spider veins

To remove or get rid of spider veins, you can regularly shower your legs with cold water. For this, you always have to wash your legs with cold water in the morning and in the evening. Because the cold shower works wonders and is an effective home remedy for swollen legs. Especially if you are on your feet all day for work or have to stand for a long time, you will quickly feel relief. Because cold water stimulates blood circulation. In this way, you can specifically prevent the formation of spider veins.

2) Elevate your legs and prevent varicose veins

Another good and easy method is to put your legs up. To do this, your legs are often elevated, for example on the sofa in the evening. And your legs should also lie higher in bed at night. You can support your legs with a pillow. As a result, you ensure that no additional vein enlargements occur. In addition, this is also an effective tip against varicose veins.

3) Prevent spider veins with apple cider vinegar

Muscles can be strengthened naturally with the use of apple cider vinegar. You can also use it to stimulate your blood circulation. Therefore, the popular home remedy is ideal for the treatment of spider veins. To do this, soak a clean kitchen towel in some apple cider vinegar and rub it on your legs. Then leave the apple cider vinegar on for 15-20 minutes. If you do this daily you should see improvement soon. Also, read our effective tips against swelling.

4) Get relief with medicinal herbs

Creams or sprays that contain natural extracts from horse chestnuts, arnica, or red vine leaves are particularly suitable for treating enlarged veins. as they increase the elasticity of the vein walls and inhibit inflammation. The products are easy to use. Likewise, the active ingredient aescin contained in horse chestnuts is said to support the strengthening of the veins and thus counteract the formation of edema.

5) Let spider veins die-off

If home remedies and ointments don’t help, you can have the enlarged veins removed medically. This is often referred to as sclerotherapy (sclerotherapy). As a result, the doctor injects you with a specific sclerosing agent using a fine needle. This leads to intentional irritation, which is followed by inflammation of the vein walls. As a result, the blood vessels close, and the spider veins become desolate or dissolve. And laser treatments are now also possible. Also, note our home remedies for water retention.

Tips for cleaning the coated tongue and removing tongue coating with natural home remedies and tricks. The coating on the tongue is usually harmless. Nevertheless, tongue cleaning can be useful. This prevents bad breath, caries, and periodontitis.

The removal of the tongue coating makes sense to prevent diseases. However, a different discoloration of the tongue can also indicate a disease. If cleaning with our home remedies is not enough, you should consult a doctor.

What is a coated tongue?

You use your tongue to taste, speak, and move food around your mouth. You can also learn a lot about your health by looking at your tongue. Because it can give us information about possible diseases of the body. The healthy tongue is usually pink or pale red, moist, and smooth.

It is usually covered by a thin whitish coating. This is the lining of the tongue. It consists of germs, food remains, and old cells. But as a rule, this coating is rubbed off when eating. Consequently, a coating on the tongue is usually harmless. However, if your tongue coating becomes unusually discolored or thicker, you may have a medical condition. Therefore, a visit to the doctor may be advisable.

The causes of tongue coating

There are many causes of a coated tongue. The type of discoloration plays a role here. Because different colors indicate different diseases. Consequently, possible causes can be infectious diseases, fungal diseases, or problems with the digestive system. In addition, poor oral hygiene or certain diets can be responsible for tongue coating.

Symptoms and diagnosis

If you don’t notice any unusual coating on your tongue, you can clean your tongue with simple home remedies. If your tongue shows an unusual coloration of the tongue coating, you may have another condition. A red coating (raspberry tongue) can indicate infectious diseases such as scarlet fever. In contrast, a greyish coating can indicate anemia or iron deficiency. Also, read our tips on diet for iron deficiency. Other discolorations of the tongue are as follows:

White tongue coating

A white tongue coating tells you something about the condition of your gastrointestinal tract and your digestion. But you can also get a thick white coating on your tongue if you have a pancreas disorder or a cold. Then you should drink a lot and leave longer breaks between meals. In addition, note our natural home remedies for colds and our tips for gastrointestinal complaints.

Yellow coated tongue

Drinking too much coffee or smoking can lead to a yellow coating on the tongue. However, it can also indicate that you have a yeast infection or have bile or liver problems. If tongue cleaning doesn’t solve the problem, you should see a doctor and get the trigger cleared. Also, note our natural home remedies for lowering liver values ​​or our tips on becoming a non-smoker.

The brownish coating on the tongue

Food such as coffee or black tea can also play a role here. And habits like smoking can also cause a brown discoloration. In addition, you can recognize a disorder of the intestine with a brown tongue coating. It can also be an indication of kidney failure. Please also note our article on home remedies for colon cleansing.

Home remedies to clean the coated tongue

As long as your tongue is not heavily coated and does not show any unusual discoloration, you can clean your coated tongue with natural home remedies. Consequently, removing the coating on the tongue is easy and effective against bad breath, caries, or periodontitis. We have collected the best natural methods for you. In addition, note our contribution to oral care for clean teeth.

1) Cleaning with a tongue scraper

The easiest way to clean your coated tongue is to use a tongue scraper. In India, this has long been used to clean the tongue every day. This allows you to effectively remove bacteria and tongue coating. You have to put the tongue scraper on the back of the tongue. Then gently pull forward to the tip of the tongue with a little pressure. Then rinse off the residue sticking to the scraper with water and repeat the process until the scraper stays clean. Also, note our tips and home remedies for removing plaque.

2) Regular oil pulling

Traditional oil pulling is said to have a positive impact on dental and oral health. Because regular use kills bacteria and the body is supported in detoxification. Before oil pulling, the tongue is cleaned with a scraper. Then take a tablespoon of the effective coconut oil (or another oil) into your mouth and draw it back and forth through your teeth for about 20 minutes. Finally, you have to spit out the liquid. In addition, it is said to whiten teeth naturally.

3) Mouthwash against the coated tongue

Excessive tongue coating often causes bad breath. Therefore, you should effectively remove the tongue coating. Use a mouthwash for this. Since the chemical mouthwashes from the drugstore are usually aggressive, you can simply make a saline solution yourself. To do this, dissolve 1 teaspoon of salt in 250 ml of water. Then gargle with this mixture for 2-3 minutes. So you have a good home remedy for bad breath and can effectively relieve inflammation in the mouth.

Smelly fridge? Many tips against smelly refrigerators will help you to eliminate odors in the kitchen. Removing and combating unpleasant odors in the fridge made easy. Finally got the fridge odorless again. Avoiding musty refrigerators is made easy.

Reasons for smelly fridge

Before removing fridge odors, you should understand the reasons behind a smelly fridge. It’s hard to ventilate the fridge, so you have to do something else.

  • There is an unpleasant odor in the refrigerator due to strong-smelling food.
  • These include stinky cheese, sliced ​​onions, fish, and cooked vegetables like cauliflower or sauerkraut.
  • Moldy food can even produce toxic odors.
  • Even when removing smelly food, the refrigerator can smell for a long time.
  • The odor can also build up in rubber seals, especially if liquids leak in the refrigerator.

Home remedies and tips against the smelly fridge

Tips and home remedies against unpleasant smells from the fridge will help you to combat the smell in the fridge. In this way, unpleasant odors are dispelled quickly and in an environmentally friendly manner. If the smelly odors in the fridge don’t go away, be sure to defrost and wash the fridge thoroughly.

1) Apple

There is a home remedy for unpleasant odors that can be found in every household. A normal apple. Simply cut an apple in half and place half in the middle of the fridge. Remove or replace as soon as the apple begins to shrivel.

2) Vinegar

The refrigerator should be wiped out regularly with vinegar water or vinegar cleaner. Vinegar itself does not smell and neutralizes the unpleasant smells in the fridge. In acute emergencies, you can also put a vinegar bowl in the fridge for a few days.

3) Coffee

Coffee is a miracle cure for odors. Place a bowl of freshly ground coffee in the refrigerator. Strong odors are neutralized with a nice fragrance.

4) Lemon

You can also squeeze a lemon and put the fresh lemon juice in a bowl. The fresh lemon juice eliminates many smelly odors quickly and safely.

Avoid fridge odors

You can avoid refrigerator odors by observing the following tips:

  • Always pack smelly food airtight or store it in a can.
  • Wipe and clean the fridge regularly with vinegar to neutralize the odor.

Useful tips and home remedies for removing make-up stains. Who does not know it? You overslept a little in the morning and have to get ready quickly. A little make-up was applied quickly and it happened. Due to a little inattention, mine got a stain on my shirt or jeans. But even when you’re out and about, careless movements on warm days can easily damage your clothes. Lying on the couch with make-up on can also lead to unpleasant stains. But how do you get rid of them?

Basic information on make-up stains

When removing make-up stains, it is important to note which textiles they are on. In the case of particularly fine fabrics such as silk, dry cleaning should definitely be sought. With more robust textiles, you can achieve a lot with simple household remedies. Gallseie is a true all-rounder. For more stubborn stains, alcohol and spirits can also prove to be helpful in an emergency. It is only important that the cleaning agent is not too aggressive.

Remove make-up stains from clothing

There are make-up remover wipes for the face. Unfortunately not for the clothes. The make-up stains stand out, particularly on light-colored clothing. In some cases, washing at 40 degrees Celsius is enough to remove the stains. However, this is not enough for many oil-based make-ups. If you’re not careful when cleaning, you’ll only make the stain worse. In addition, also note our tips for doing laundry.

Make-up stains on leather

Hurry is the order of the day, especially when it comes to leather clothing. The longer the oily make-up is on the leather, the more stubborn it is to remove. There is also a higher risk that a grease stain will remain in the affected area. A special leather cleaning agent is primarily recommended for removing such stains. You hardly have a chance with other products. Also, note clever tips for cleaning leather.

Make-up stains on synthetic fabrics

Especially with synthetic fabrics, such as a T-shirt, gall soap can work wonders for cleaning. To do this, the stain simply has to be generously moistened and rubbed in with the soap. You can press a little harder to roughen up the fibers. Now let the soap soak into the stain. As a rule, five minutes should be sufficient for this. The t-shirt can then be put in the washing machine. The gall soap is available in both liquid and solid form in every drugstore. However, solid soap is more suitable for removing stains.

Remove make-up stains from cotton

When it comes to cotton, there is another alternative that has proven to be very effective for removing make-up stains. Gall soap can of course also be used here. With white cotton fabrics, such as sweaters, however, the soap can cause discoloration. Baking soda is a good stain remover here. A tablespoon of baking powder, which is placed directly on the stain, is sufficient for this. Now rub the powder into the garment with a damp cloth. It is important to let the baking powder work for a while. Now the powder can be carefully rinsed out with lukewarm water. Then you put the garment in the wash as normal and the make-up stain is gone.

Makeup stains on the carpet

To remove make-up stains from carpets, speed is of the essence. The stain should not have too long to dry. Otherwise, the make-up oil would settle on the carpet and cause ugly grease stains. Gall soap can also be used to remove make-up from carpets. To do this, simply lather up the soap with a little water. The special feature of carpet cleaning is that only the foam of the gall soap is used for cleaning. This is skimmed off and applied directly to the stain. A brush is best for this. The smaller and finer the bust, the better the fibers of the carpet are roughened. Therefore, it is best to use a toothbrush to apply the foam to the stain and work it into the carpet.

When working in the soap foam, it is important to work from the outside in. Otherwise, you would smear the stain broadly. You can then pat the affected area dry with a cloth. Now let it sink in for a while. Once the stain has been removed, the carpet must be rinsed again with clean water. This is important so that the gall soap itself does not stain or damage the carpet. If the treatment with gall soap does not lead to the desired success, you can also use professional carpet cleaners that work on an oxygen basis. The stain removal procedure is the same.

Advice on how to stick the sticker on the car correctly and remove the means to remove the car sticker. With tips to remove stickers from car paint. Many cars are decorated with stickers: the country code is emblazoned on the back, advertising messages are sometimes applied to the side and the bonnet can also be glued over a large area. But if you want to attach stickers to the car or simply remove them from there, you should follow a few basic rules.

If you want stickers on your car, you should moisten the car with soapy water on the affected area before sticking it on. The sticker can then be applied better. If you have enough of it later, you can loosen it again with a heat gun and a plastic spatula.

Stick the sticker correctly on the car

It sounds simple to just stick the sticker on the car. However, if you want to stick a stripe or something similar straight and without creases, you will usually face problems. It’s quite easy because the secret lies in the preparatory work: the sticker is to be stuck on a wet surface and can dry there if it is positioned correctly.

Take a bowl of water and dish soap. Clean the area where the sticker is to go as thoroughly as you can over a large area. Rinse the dirty water off the car carefully. Then wet the area again with soapy water. This does not damage the sticker, the dishwashing water cannot harm the adhesive.

Attach the sticker where you want it to go. Since it’s not sticky yet because of the water, you can slide it into place. You can now effortlessly smooth out air bubbles under the sticker. Allow the decal to dry in place. The water disappears by itself after a few minutes and the sticker adheres perfectly to its position.

Properly detach the sticker from the car

Once a sticker has really stuck to the car for a long time, it is difficult to remove it with just water and washing-up liquid. If you resort to harsher means, however, you run the risk of ruining the paintwork. Caution is, therefore, the top priority. You will need a heat gun and a plastic spatula. You can get both at the hardware store.

The heat gun should be turned to a warm but not hot setting. This is used to blow the warm air from about 10 centimeters onto the sticker until it bubbles. The sticker can now be scraped off with the plastic spatula without endangering the paintwork. The glued areas should then be cleaned with a soft sponge and soapy water.

Remove sticker residue from car paint

You can also easily remove sticker residue. In order to remove adhesive residues from stickers from the car paint, you should not use a chemical club. Good results can be achieved with butter: apply, leave to work, and remove the adhesive residue with a cloth.

A stain on the wall can easily happen, especially if there are children in the household. Food splashes, splashes from fallen drinks, or even traces of paint from the last painting attempt cannot be easily removed from a painted wall or wallpaper, such as woodchip wallpaper. There is always a danger that the paint will peel off and a light wallpaper stain will appear in place of the original eyesore.

Procedure for freshly painted wallpaper and walls

It’s easy to remove the stain from a freshly painted wall or wallpaper – as long as some of the original colors are still there. If the wall has not been painted long enough for the color to fade or yellow, a stain can usually simply be painted over.

How to deal with older wallpaper stains

The only thing that helps here is to remove the wallpaper stain as gently as possible. The eraser can be used very carefully for strokes of colored pencils or wax crayons. It is important that the eraser is soft so that the wallpaper is not roughened.

It is also possible to soften the stain, which works particularly well for water-based stains. So if, for example, a glass of juice falls over and the wall gets a few splashes, the stain can usually be soaked a little and then wiped away. You also have to be careful here, the wallpaper must not get too wet, otherwise, the paint will peel off.

What else do you have to consider?

If nothing helps, the wall in question can almost only be repainted or decorations are used skillfully. Wall decoration can be attached from a corresponding height. Or climbing plants are hung up. These can hide stains to some extent. If the stains are found in a “less important” place, the children can also be entrusted with removing them. Why not conjure up a beautiful mural out of it? Of course, talented adults can also try this. In addition, note tips for wallpapering yourself and simple tricks for repairing wallpaper.

Tips and means for removing chewing gum residue and chewing gum at a glance. We’ve collected all the useful household tips and grandma’s natural home remedies for chewing gum removal and help you finally get rid of the disgusting things from your clothes, hair, or stepping stone.

Miracle cure cold and heat

Anyone who has a freezer or at least a freezer compartment can remove the chewing gum relatively easily. Simply place the garment or shoe in the freezer until the rubber is frozen. It can then be easily removed from the fabric or shoe without leaving stains.

In principle, any stain can be removed even with the heat. You can cover the affected area with a sheet of paper and place the hot iron on it. The gum then magically sticks to the paper.

Remove gum from the carpet

Chewing gum stains on carpets or rugs is not a catastrophe but can be removed with cold without any problems. We recommend the following procedure: place ice cubes on the stain and wait for the rubber to harden. Then you can carefully remove the rubber from the carpet, e.g. with a knife. Alternatively, you can freeze the gum with ice spray and then remove it. Chewing gum residue can be removed with spirit or white spirit.

Clothing and fabrics

Chewing gum sticks particularly badly in wool, fabrics, and clothes. Removing all residues from clothes made easy with housewife tips. It sticks particularly stubbornly to almost any fabric, clothing, and shoes.

The growth of moss is particularly favored in wet and windy weather. Moss is particularly annoying on stones and moss also likes to accumulate on your own house wall. Over time, the moss growth can damage the joints until they finally begin to crumble.

Cola as an effective moss remover

However, there is a simple and effective solution to the problem: Conventional cola, regardless of the brand, can be used to remove moss and can also prevent any moss infestation.

Due to the phosphoric acid contained in the cola, the moss dies off within a few days and, thanks to the acid it contains, leaves an unfavorable environment for the growth of moss.

A trick without negative consequences

You don’t have to worry about staining the stones with this simple trick, as the dye in the cola isn’t strong enough to cause discoloration. The joints in the house wall are also not damaged by the cola.

This method can be used on any stone surface infested with moss. It is particularly effective on fine moss and therefore also suitable for hard-to-reach places. With a coke and a sponge or cloth, you can get rid of the stubborn moss so that the stone shines again in its original appearance.

Over time, unpleasant odors settle in every trash can that can no longer be removed by simply washing out. In this case, a solution with soda is simply a remedy.

Clean the trash can with a solution of 1 part baking soda, 1 part dish soap, and 10 parts warm water.

Put the solution in the trash can and let it sit for at least 5 minutes. Then clean the bin with a brush and warm water and the bad smells will be a thing of the past.

Here’s a little tip: Add a few drops of scented oil to the cleaning solution to create a great scent. Depending on how intense the fragrance may be according to your personal preferences.

Removing smelly toilet odor made easy. Now expel the stench of the smelly toilet and clean the air in the toilet.

Causes of a smelly toilet

There are many causes, all of which must be checked in case of doubt.

Feces such as urine or feces naturally produce unpleasant odors due to the sulfur or urea contained in the feces.
The sealing sleeve between the drain pipe and the toilet could be defective or too loose. The sealing boot could have hardened or cracked if it got too old. In any case, the whole musty smell rises up from the downpipe.

Eliminate odor with feces

If there is an unpleasant smell in the toilet after “a big deal”, there is a little trick to eliminate the odor. After the stool, simply light a few matches and then blow them out again immediately. The smelly smell is eliminated by the burnt sulfur and the air smells neutral again.

Lessor duties with a smelly toilet

If the porcelain basin has cracks or the sealing sleeve between the drainpipe and the toilet is damaged or has slipped, you should contact the landlord. You shouldn’t lose any more time, especially if the seal is torn or displaced. Also, if the downpipe for the feces is damaged, check the pipe to see if it has cracks, residues have collected there, or if the vent of the pipe is blocked.

Also, note our guide to removing brown limescale in the toilet. Also home remedies for clogged toilets.