Tag

Stains

Browsing

It doesn’t have to be chemicals: how to remove mildew stains yourself with inexpensive home remedies.

The difference between mildew and mildew

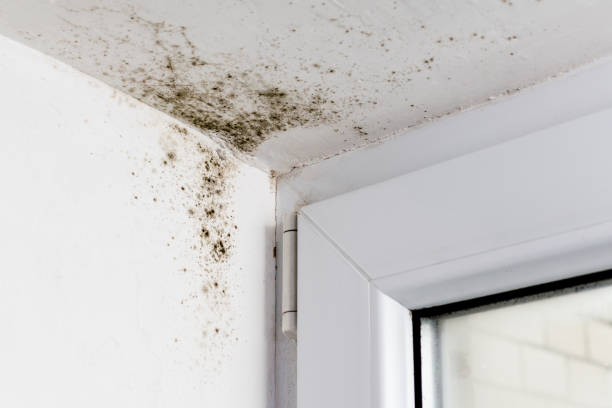
Is the dark spot behind the cupboard mold or mold stains? Mold stains and mildew look very similar at first glance, as both are visible as brownish to yellowish or greyish discolorations on the wall, they also have a musty and musty smell. On closer inspection, however, a difference becomes clear, since most mushrooms consist of what is known as mycelium. This, in turn, is made up of filamentous cells, as evidenced by thin, coherent, and puffy filaments that continue to spread out. In contrast, mold stains do not form any visible threads, although mold is also active here. Due to a higher pressure, these show a different growth, but mold stains can form from the mildew stains over time.

Mold stains are just as harmful as mold, and not just for allergy sufferers. Irritation of the mucous membranes, sleep disturbances and lack of concentration can often be the result of mold stains. Mildew stain fungal spores can fly in the air, but will not stick to a surface. As soon as so-called mycotoxins (= metabolites) from mold stains get into the respiratory tract, this can even lead to allergies, gastrointestinal complaints and a weakening of the immune system. In return, mold stains do not cause any structural damage or optical discolouration. If such dark spots appear, it can usually

Mold and mildew mostly develop when there is insufficient ventilation and too much humidity. All factors, such as drying clothes, hot baths, cooking, but also inadequately sealed walls, leaks or holes in pipes contribute to an increase in humidity. Condensation forms, which settles on surfaces and walls, since the air can no longer fully absorb the moisture. Damp, cold and uninsulated walls in particular are the ideal breeding ground for mold stains and dangerous mould. Forced airing ensures sufficient ventilation, a hygrometer helps to determine the humidity level in the air. As soon as mold stains become visible, the cause must be sought, because in many cases mold is a side effect of the discoloration. At best, these should be removed by a specialist, because mold spores can cause significant health problems, ranging from respiratory problems to lung and heart diseases or even burnout. Furthermore, an already widespread mold infestation results in considerable additional costs, which can often lead to lengthy differences in tenancies.

Home remedies for stains

The yellowish to brownish discoloration is not only found on walls and wallpaper, mold stains can also form on wood, paper, textiles or plastic. In the case of mold, professional removal is usually essential, but mold stains can often be removed yourself with the help of household remedies or special cleaners.

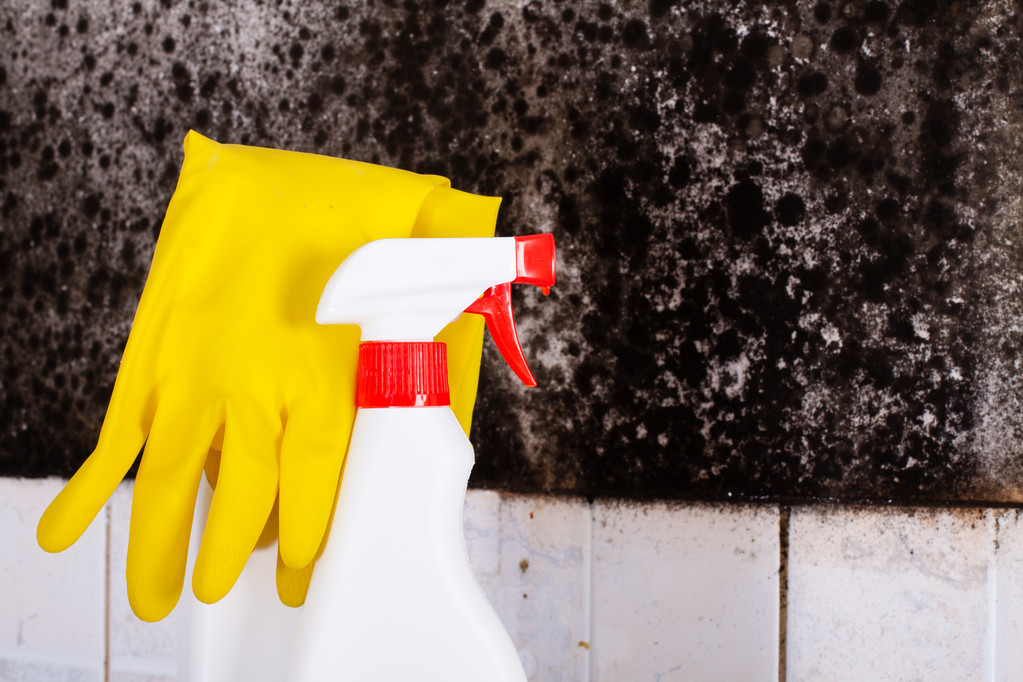
However, some protective measures should also be taken here when removing mildew stains. Rubber gloves, a respirator mask and suitable safety goggles are important. Furthermore, the infested stains should not be vacuumed off or swept away, as the fungal spores can easily detach in this way. The inhalation of mold spores should also be avoided by adequate ventilation. Direct skin contact with the home remedies should be avoided due to the sometimes caustic effect. After the stains have been removed, all sponges and cloths used, as well as masks and gloves, should be thrown in the garbage immediately, ideally in the garbage can outside the apartment. Clothing should also be changed, and a shower is advisable to avoid spreading more fungal spores in the area. Other items can be cleaned and disinfected.

Mold stains can be removed from numerous objects, but can only be concealed from some, such as books. Here they appear relatively frequently, often not only on the cover, but also on the pages of the book. When pressed together leaves in a book have soaked up moisture from the environment, they provide a perfect habitat for mold stains. The exclusion of air often causes moisture damage, which can only be concealed by dusting the affected areas with starch. The flour should remain in place for some time so that it sticks to the damp stains and lightens the damaged side at least a little.

Infestation of walls, textiles and wood

Already in earlier times there were stains and mold growth. To this day, some very useful home remedies that have been used since grandmother’s time to effectively remove mildew and mold have proven their worth.
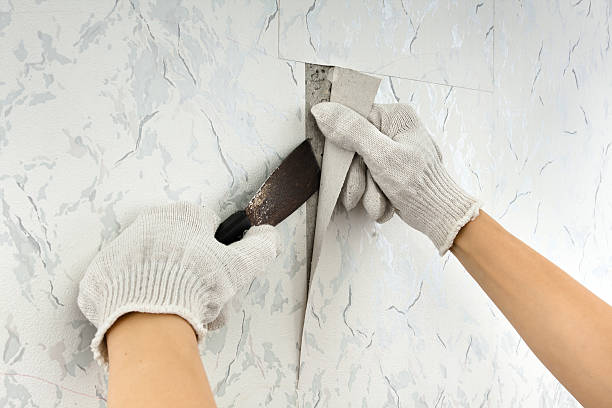
wall and wallpaper
Mold stains can be removed quite easily from walls. If woodchip wallpaper is infested and is not to be changed, glass cleaner can be sprayed onto the stain. After an exposure time of five minutes, you can spray again and then rub the wall clean with a microfiber cloth. However, if the mold stains are deeper in the wallpaper, it usually cannot be saved. Woodchip wallpaper, which you can paint yourself, can still be used to a limited extent after the stains have been removed, but printed wallpaper should be replaced.

If stains are to be removed from the wall itself, you need vinegar or spirit. To do this, one of the two agents is simply placed in a small bowl, mixed with water and a clean cotton cloth immersed in it. The mold stains are then dabbed off with the cloth until they can no longer be seen. Another home remedy is a mixture of 50 grams of baking soda, 50 grams of citric acid and 150 millimeters of water. The solution is applied with a clean cleaning cloth and after half an hour it is wiped off with a lye mixture of water and washing powder. Finally, everything should be wiped off with .

On clean plaster, commercially available chlorine cleaners are suitable for removing stubborn mold stains. Mold stains on the wall are usually caused by moisture. If there is furniture in front of the infested area, move it a little further away from the wall to allow for better air circulation.

textiles and clothing
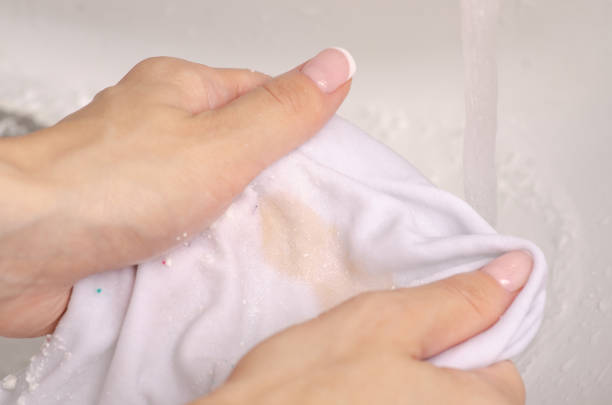
Mold stains not only appear on walls, but can also be found on textiles. These unwelcome yellow to brownish stains occur, among other things, when laundry has not been completely dried and placed in the closet. The unsightly mold stains on textiles can also be harmful to health. However, mildew stains can also be removed from clothing with simple household remedies. First of all, textiles that tolerate high temperatures can be washed at 60 degrees. In the best case, light stains have disappeared afterwards. Another inexpensive home remedy for fabric stains is buttermilk. For this purpose, the affected pieces of fabric should be placed in buttermilk for one to two days and can then be washed as usual. Vinegar not only helps with mold stains on the wall, but also on clothing and fabrics. The discolored pieces should be soaked in vinegar for one to two hours and then washed normally. Another way to counteract stains on textiles is alcohol. For this purpose, the areas with the mold stains should be soaked in it and then washed. Smaller stains can be treated with baking soda, for this purpose the areas must be moistened and rubbed with the baking soda. After the powder has dried, it can be removed with a brush. Alternatively, baking soda or baking soda can be used to combat mold stains. Another method is a mixture of water and denture cleaner, in which the laundry can be soaked. This inexpensive and at the same time effective cleaning agent has also proven itself in the area of ​​discolored porcelain and is suitable as an alternative to baking powder. The same applies to other textiles such as seat cushion covers or blankets. In the worst case, chlorine cleaners or bleach may also be necessary for white and robust fabrics. In order to avoid mildew stains from the outset, laundry should not be left wet for too long and should not be sorted when it is damp.

wood
In the event of discoloration of wood, action must be taken quickly. Mold stains caused by water damage appear on wood in the form of gray to black or brownish discolouration, which can also be yellowish depending on the type of wood. To remove stains from varnished wood, the wood must first be cleaned with water. It should be well dry before washing the wood with a 1:1 solution of detergent and water using a brush. The wood surface will then dry and the stains should be gone. However, if these cannot be removed, vinegar can also be applied to the affected areas and allowed to act for around an hour. Finally, the area should be cleaned with water and a sponge.

If it is too late and mold has already developed from the mold stains, you must act immediately. Black mold massively damages the wood substance, it can even completely decompose it within a very short time. In addition to the health consequences, there may be other risks if the wooden components are stable or load-bearing. If the staining is light, superficial, the wood can be treated with a mixture of chlorine cleaner, vinegar essence and pure alcohol. In the case of deeper and larger infestations, a suitable fungicide from a specialist store should be used to prevent complete destruction of the wood. If stains are still visible after treatment with the cleaning agent, the mold has already penetrated deeper into the wood. The stains must be removed mechanically, which requires sanding the wood. In the case of deeper infestations, a planer can even be used in addition to the grinder. The stains must be thoroughly removed and the clean surface rubbed again with vinegar essence. After the treatment, the wood must be dried thoroughly.

Since black mold is harmful to health, care must be taken to protect yourself when removing mildew and mildew. In addition to suitable respiratory protection, work should be done outdoors if possible.

In order to avoid mildew stains on wood, wooden surfaces should be aired regularly and dried completely. Dirt must also be removed promptly. Wooden parts that are exposed to permanent weathering are more susceptible to mildew and mold growth, which is why storing garden furniture is recommended, especially in winter. Regular care of the wood and preventive mold protection are definitely recommended. Even before buying, you should pay attention to a suitable type of wood, for example hardwoods and pine species are considered to be more resistant to discoloration.

Infestation of joints, mattresses and prams

silicone joints
Even if the elastic and hard-wearing silicone is often used in homes, it is exposed to daily stress there and becomes porous over time. Even if it is considered relatively resistant to fungal attack, harmful mold can form again and again, which should be eliminated soon, especially here. Since moisture is always a perfect breeding ground for mildew and mold growth, rooms with high humidity, such as bathrooms and sanitary areas, are particularly affected by mold and need more frequent checks. Long-lasting moisture in combination with heat and condensation can not only cause mold to form on the windows, but also dirt often occurs on the seals and the water gets caught in the joints when it drains, which in turn promotes mold growth.

Basically, you should try to keep these areas as dry as possible. However, mold cannot always be completely removed from silicone joints. First, all gaps should be cleaned of dirt. A grout brush or toothbrush can be used to reach hard-to-reach areas. Then a mushy mixture of water and baking powder can be applied to the joints and worked in. The joint should not be damaged and the baking powder mixture should not dry out. Leave it on for an hour and then rinse off with clear water.

mattress
Unsightly and unhealthy mold stains can also form on mattresses. Reasons for mildew stains on mattresses can be a missing slatted frame, if the mattress is lying directly on the floor, moisture and moisture can accumulate. Air circulation through a slatted frame would be better. When buying a mattress, you should also pay attention to a certain level of breathability in order to rule out unfavorable ventilation and damage to health. Above all, allergy sufferers should prefer a high-quality mattress, as they can be particularly sensitive to pollen. Cold foam mattresses or gel mattresses are particularly suitable for preventing the formation of mold, a breathable cover for pillows and duvets, and regular ventilation and changing of the bed linen is also recommended. Mattress covers or bed underlays that rest on wider slats should also be adequately aired, since excessive pressure can contribute to the formation of mildew stains.

As soon as mold stains become visible on a mattress, you should act quickly, as mold can form as a result of the moisture. There are several home remedies for this: on the one hand, a solution of buttermilk can be applied to the affected areas, and direct sunlight is also often recommended as a home remedy for mold stains. However, if the mold has spread to the entire cover, the mattress must be disposed of. If the affected area is relatively small, a 1:1 mixture of vinegar and water can be applied to the mildew stain. This should act on the cover for 15 minutes and then be washed in the washing machine without rinsing. White laundry and a white cover can also be washed with a bleach containing chlorine.

stroller
Clothing and textiles are not the only things that can start to mold and develop mildew due to moisture. Everyday objects in particular, which are often used in all weathers, have an increased risk of infestation. If the yellow-greenish or brownish-grey spots form on the stroller, caution is advised. There is already a health risk here. However, you don’t have to throw the car away just yet. If you don’t want to resort to a chemical solution based on chlorine bleach right away, you can use simple household remedies to counteract the unpleasant discolouration.

To do this, vinegar essence and water must be mixed in a 1:1 ratio. Instead of the vinegar-water mixture, you can also use undiluted, high-proof alcohol, such as denatured alcohol or isopropanol. Then the respective solution is applied and then the corresponding area is covered with a cloth for at least 60 minutes. To prevent the vinegar essence or alcohol from evaporating, the area can also be covered with foil. Then wash off with clear water and repeat the process until the mold stains have been completely removed. Air out the pram well and let it dry completely. Another home remedy for getting rid of mildew stains on more sensitive areas of less robust fabrics is a paste made from baking soda or baking soda and water. This is applied to the affected area with a sponge or brush and then brushed off with clear water. Here, too, the cleaning process should be repeated until the stains have been removed and the stroller allowed to dry out completely. Washable items should also be cleaned in the washing machine. Stubborn stains can also be removed with an organic mildew remover.

In order to prevent mold from forming in the first place, the stroller should be completely dry, especially after rain. For this purpose, individual parts can be removed and dried separately. Storage in a damp condition should also be avoided. For a longer storage period, attention should be paid to a cool and dry storage location with low humidity.

Useful tips and home remedies for removing make-up stains. Who does not know it? You overslept a little in the morning and have to get ready quickly. A little make-up was applied quickly and it happened. Due to a little inattention, mine got a stain on my shirt or jeans. But even when you’re out and about, careless movements on warm days can easily damage your clothes. Lying on the couch with make-up on can also lead to unpleasant stains. But how do you get rid of them?

Basic information on make-up stains

When removing make-up stains, it is important to note which textiles they are on. In the case of particularly fine fabrics such as silk, dry cleaning should definitely be sought. With more robust textiles, you can achieve a lot with simple household remedies. Gallseie is a true all-rounder. For more stubborn stains, alcohol and spirits can also prove to be helpful in an emergency. It is only important that the cleaning agent is not too aggressive.

Remove make-up stains from clothing

There are make-up remover wipes for the face. Unfortunately not for the clothes. The make-up stains stand out, particularly on light-colored clothing. In some cases, washing at 40 degrees Celsius is enough to remove the stains. However, this is not enough for many oil-based make-ups. If you’re not careful when cleaning, you’ll only make the stain worse. In addition, also note our tips for doing laundry.

Make-up stains on leather

Hurry is the order of the day, especially when it comes to leather clothing. The longer the oily make-up is on the leather, the more stubborn it is to remove. There is also a higher risk that a grease stain will remain in the affected area. A special leather cleaning agent is primarily recommended for removing such stains. You hardly have a chance with other products. Also, note clever tips for cleaning leather.

Make-up stains on synthetic fabrics

Especially with synthetic fabrics, such as a T-shirt, gall soap can work wonders for cleaning. To do this, the stain simply has to be generously moistened and rubbed in with the soap. You can press a little harder to roughen up the fibers. Now let the soap soak into the stain. As a rule, five minutes should be sufficient for this. The t-shirt can then be put in the washing machine. The gall soap is available in both liquid and solid form in every drugstore. However, solid soap is more suitable for removing stains.

Remove make-up stains from cotton

When it comes to cotton, there is another alternative that has proven to be very effective for removing make-up stains. Gall soap can of course also be used here. With white cotton fabrics, such as sweaters, however, the soap can cause discoloration. Baking soda is a good stain remover here. A tablespoon of baking powder, which is placed directly on the stain, is sufficient for this. Now rub the powder into the garment with a damp cloth. It is important to let the baking powder work for a while. Now the powder can be carefully rinsed out with lukewarm water. Then you put the garment in the wash as normal and the make-up stain is gone.

Makeup stains on the carpet

To remove make-up stains from carpets, speed is of the essence. The stain should not have too long to dry. Otherwise, the make-up oil would settle on the carpet and cause ugly grease stains. Gall soap can also be used to remove make-up from carpets. To do this, simply lather up the soap with a little water. The special feature of carpet cleaning is that only the foam of the gall soap is used for cleaning. This is skimmed off and applied directly to the stain. A brush is best for this. The smaller and finer the bust, the better the fibers of the carpet are roughened. Therefore, it is best to use a toothbrush to apply the foam to the stain and work it into the carpet.

When working in the soap foam, it is important to work from the outside in. Otherwise, you would smear the stain broadly. You can then pat the affected area dry with a cloth. Now let it sink in for a while. Once the stain has been removed, the carpet must be rinsed again with clean water. This is important so that the gall soap itself does not stain or damage the carpet. If the treatment with gall soap does not lead to the desired success, you can also use professional carpet cleaners that work on an oxygen basis. The stain removal procedure is the same.

Lots of useful tips and grandma’s old home remedies for removing coffee stains. With these housewife tips, the brown coffee stain is quickly cleaned again. Now you can easily and safely remove coffee stains from clothing, fabrics, carpets, or tablecloths.

It’s probably happened to everyone. The table is set, and now the coffee is poured. For some reason, you nudge your cup and spill coffee on that good new tablecloth or new carpet. The anger is great. Now it’s time to quickly but gently remove the brown coffee stains.

Remove coffee stains from clothing and textiles

You can first try to remove coffee stains with the miracle cure gall soap. If this does not work, you can dab the stain with a cloth soaked in alcohol. Work from the edge to the middle so that the stain does not spread and there are no edges. Then wash the textile thoroughly.

Remove coffee stains from tablecloths

The first thing to do is to prevent the coffee stain from soaking into the tablecloth. Take a tear-resistant kitchen towel and press it onto the stain. Please do not rub it, you only spread it on the blanket. Now the kitchen towel soaks up the roughest traces. It is advantageous to place a small plate on it so that the cloth lies firmly on the stain. Also, note home remedies for removing tea stains and how to get rid of red wine stains.

Further treatment of the coffee stain

When the coffee table is covered, make sure that the plate remains standing with the coffee stain underneath. In this way, the stain can be found again quickly. Now prepare a solution of one-third Vanish Oxi Action and two-thirds water. It is best to stir this in a cup.

Take the plate and kitchen towel from the coffee stain and pour the prepared solution on them. Now roll up the tablecloth and place it in a washbowl or sink. By rolling up the tablecloth, moisture usually does not remain on the table. Should this happen, you can easily remove the marks with a kitchen towel.

Last step in removing coffee stains

Now leave the rolled-up tablecloth with the coffee stain in the sink for a few hours, preferably overnight. You can then put it in the washing machine with other things and wash it as normal. After washing, there will be no stain left. The removal of coffee stains is always successful with Vanish Oxi Action. Even if the stains are older and more stubborn, the solution can be applied as already described. You just have to let them soak in longer.

A stain on the wall can easily happen, especially if there are children in the household. Food splashes, splashes from fallen drinks, or even traces of paint from the last painting attempt cannot be easily removed from a painted wall or wallpaper, such as woodchip wallpaper. There is always a danger that the paint will peel off and a light wallpaper stain will appear in place of the original eyesore.

Procedure for freshly painted wallpaper and walls

It’s easy to remove the stain from a freshly painted wall or wallpaper – as long as some of the original colors are still there. If the wall has not been painted long enough for the color to fade or yellow, a stain can usually simply be painted over.

How to deal with older wallpaper stains

The only thing that helps here is to remove the wallpaper stain as gently as possible. The eraser can be used very carefully for strokes of colored pencils or wax crayons. It is important that the eraser is soft so that the wallpaper is not roughened.

It is also possible to soften the stain, which works particularly well for water-based stains. So if, for example, a glass of juice falls over and the wall gets a few splashes, the stain can usually be soaked a little and then wiped away. You also have to be careful here, the wallpaper must not get too wet, otherwise, the paint will peel off.

What else do you have to consider?

If nothing helps, the wall in question can almost only be repainted or decorations are used skillfully. Wall decoration can be attached from a corresponding height. Or climbing plants are hung up. These can hide stains to some extent. If the stains are found in a “less important” place, the children can also be entrusted with removing them. Why not conjure up a beautiful mural out of it? Of course, talented adults can also try this. In addition, note tips for wallpapering yourself and simple tricks for repairing wallpaper.

Removing stains made easy. Here you will find the most important housewife tips for gently removing all common household stains from clothing or from the surface.

No matter what stain you want to remove, we have a home remedy for a bloodstain, grease stain, grass stain, yoghurt stain, candle wax, ketchup stain, red wine stain, sweat stain, mustard stain, smudge stain, furniture stain, rust stain, tar stain, dirt stain, pressure stain or an egg stain.

Most of the time you are standing in front of stains and don’t know how best to get to grips with the stain without damaging the fabric or the surface of the material. There’s a pretty sure housewife-style antidote for almost every stain. This is often quite simple and very effective. Only: You have to know the housewife’s tips for stain removal.

Remove blood stains

Saltwater helps with bloodstains. Wash stubborn blood stains with cold saltwater. Then wash off with lukewarm water.

Remove red wine stains

White wine helps with red wine stains. Fresh red wine stains are best removed with dry white wine. Just pour something on the red wine stain and it will become paler. You can do that with green soap too. Wash out the stain as quickly as possible.

Remove sweat stains

Vinegar helps with sweat stains. Thoroughly wash out sweat stains in warm vinegar.

Remove grease stains

Mineral water or flour will help with grease stains. Sparkling mineral water works wonders to remove grease stains, sprinkling flour soaks up fresh grease.

Remove yoghurt stains

Drying helps with yoghurt stains. Allow the yoghurt to dry thoroughly first. Then brush out and remove residues with lukewarm water.

Remove mustard stains and ketchup stains

Glycerin helps with mustard stains and ketchup stains. Wipe off mustard and ketchup stains immediately and soak them in lukewarm water as soon as possible. Rub with some glycerin. The stain may turn red, but this will come out with washing.

Remove grass stains

Alcohol helps with grass stains. Dab out thick grass stains with 70% alcohol. Lay the fabric on an absorbent surface, e.g. a soft towel. Then wash thoroughly with clear water.

Remove candle wax

A hairdryer or benzine will help with candle wax. Never scrape candle wax off tabletops. Blow the drops of wax with the hairdryer until they are soft. Then soak up with kitchen paper. Wipe with vinegar water and polish. White spirit helps against red wax stains.

Remove smudges

Margarine helps with smudges. If there are stubborn smudges, e.g. from the bicycle chain on the trouser legs, you simply take some margarine: spread it on the stain and wash it out thoroughly after a while.

Remove light stains on furniture

Cork helps with light stains on furniture. If there are light stains on the beautiful wooden table: Dip a cork in some cooking oil or cigarette ash and rub it over the stain. Then polish with a soft cloth.

Remove rust stains on white items

Lemon juice helps with rust stains on white things. Rust stains disappear effortlessly with hot lemon juice. Be careful with delicate fabrics.

Remove tar stains

Butter helps with tar stains. Rub tar stains with butter, leave on and then wash out. This also works for resin stains from the Christmas tree.

Remove dirt stains on the wallpaper

An eraser will help with dirt stains on the wallpaper. Unsightly smudges on the wallpaper can usually be removed with a clean, white eraser.

Remove print marks

A piece of velvet will help with pressure marks: The best velvet brush is another piece of velvet. Simply moisten and brush against the grain.

Remove egg stains

Moist salt helps with egg stains: fresh egg stains on a blouse, tablecloth or shirt: dab a little moistened salt on it and leave it to work. Rinse thoroughly later with clear, cold water.

Many tips for removing chocolate stains at a glance. Small children and babies especially love chocolate. Unfortunately, the little ones pay little attention to the fact that the delicious treat disappears completely in their mouth. The little hands are quickly smeared with soft chocolate mass, which is then unerringly distributed on the sofa, trousers, or car seat.

But chocolate stains usually look worse than they are. First of all, keep calm and act prudently. Many people tend to immediately rinse the chocolate stain under warm water. However, this is counterproductive and can allow the stain to penetrate even deeper into the fabric. With the right tips, you can almost always completely remove the annoying stains without having to resort to expensive stain removers or special cleaners.

General chocolate stain tips

Depending on the type and amount of material the chocolate stain is on, you should use different stain removal procedures. However, there is one thing in common: In the beginning, you always remove the chocolate with the unsharpened back of a breakfast knife, regardless of the surface. Using gentle pressure, scrape off the excess chocolate mass with the knife without making the stain worse.

A large part of the contamination has already disappeared. What remains is a small residue and a grease stain. And this is the real problem with a stain treatment. You need the following things to completely remove chocolate stains:

  • dinner knife
  • gall soap
  • cloth or sponge
  • detergent
  • possibly flour and salt
  • possibly milk
  • possibly potato flour
  • possibly sparkling mineral water
  • spirit of wine

Remove chocolate stains from clothing

Blouses, jeans, jackets, dresses, skirts, and T-shirts, in particular, are popular targets for chocolate stains. Be sure to remove the garment for cleaning. This makes it a lot easier to clean. First, carefully remove the excess chocolate mass with the blunt side of the knife. Then dab and rub the remaining chocolate off the garment with a soft cloth, some warm water, and a few drops of washing-up liquid.

A light greasy film will probably remain in the fabric. To remove this as well, rub the greasy spot with some effective gall soap and leave it on for a good 10 to 20 minutes. Then wash the garment at the highest possible temperature (observe the washing label) in the machine. After the wash, the chocolate stain should be a thing of the past. You should also try the following household tips for removing chocolate stains:

  • Lukewarm milk is a home remedy for removing chocolate stains. Pour slightly tempered milk into a large bowl or bowl. Then soak the dirty clothes in it for a good 30 minutes. Then rinse the chocolate stain out with cold water and wash the clothing in the washing machine at the highest possible temperature.
  • You can also tackle this annoying stain with potato flour. Sprinkle this on the remaining grease stain and let it soak in well. The finely ground flour literally attracts and binds the fat molecules. After about 20 to 30 minutes you can brush the potato flour out of the stain again. Last but not least, with this household tip you have to wash the wardrobe at a high temperature in the washing machine.
  • Another possibility for this staining problem is bottled water. But it must contain carbonic acid. Pour the carbonated water generously over the dirt and let it soak in. In the meantime, you should regularly rub your finger gently over the stain. You can also use it to remove fruit stains.
  • Flour and salt also give good results and you probably have these two ingredients at home. First, sprinkle the salt on the chocolate stain and let it sit for a while. Then shake it off and sprinkle flour over it, which you also leave to work. After shaking off the flour, you can machine wash the fabric. Salt and lemon have a similar effect against red wine stains.

Remove chocolate stains from upholstered furniture

When nibbling or snacking, a chocolate crumb falls on the seating area or sofa. You quickly sit this wide and only notice the mishap later. In order to be able to clean the upholstery properly, proceed as follows: First scrape off the chocolate mass with a paring knife. Then rub the stain with a cloth, lukewarm water, and a little washing-up liquid without enlarging it or smearing it. The detergent dissolves the fat and is absorbed by the cleaning cloth. Then treat the dirt with gall soap to remove the last shadows. Finally, rub the damp area dry with absorbent towels.

Eliminate chocolate stains from velvet and silk

Silk and velvet are very sensitive fabrics, which is why the chocolate grease stain often gets stuck in the fabric. We ingest from the pharmacy is your salvation here. Rub the area with it and then wipe with lukewarm water.

Learn how to remove mold stains safely and easily. Receive valuable tips and tricks.
Mold stains can be removed from laundry, clothing, walls, mattresses, or the shower curtain. There are various remedies against mildew stains. Mildew stains are often caused by poor insulation or insufficient ventilation.

Many stain removers are based on chlorine bleach. Care should be taken to combat mold stains. A useful tip: reduce humidity to prevent mildew stains.

Remove mold stains from clothing, textiles, and laundry

If you want to remove mold stains from your clothes, you can soak the garment with the stains in buttermilk. The clothes are then washed as usual. In many cases, this method could prove to be helpful.

Removing Mold and mildew stains from the laundry is also important from a health perspective.

Javel water (bleach) is also suitable for removing mildew stains from textiles. Disinfectants are also included here. But you should be careful with it here – it is best to only use it on light-colored and hard-wearing textiles. UV light from the sun can also help to remove mild mold stains.

Remove mold stains from the mattress

Poor ventilation can cause mold stains on mattresses. Because at night, people sweat into the mattress. If the air cannot circulate, the result is mold stains on the mattress.

In order to be able to successfully remove the mildew stains, the mattress should be aired out in fresh, dry air for a long time if possible. It is best to stand it upright and align the mattress to the sun.

If instead of mildew stains there are already full-blown mold stains, then it is advisable to dispose of the mattress. To prevent mold stains you should have a slatted frame. It is also important to remove the bed linen from the mattress in the morning so that it can air out.

Remove mold stains from wallpaper or walls

Spirit and water can also help against mildew stains. When using a retail cleaning product, it is important to note that it often contains chlorine bleach.

Remove mildew stains

A solution of spirits and vinegar essence can be used to treat mold stains and spots. In the case of very severe stains, it is advisable to consult a professional. Mold spores can pose serious health risks.

Remove mold stains on parquet or wood

Mold stains on parquet or wood can usually only be sanded down. Immediately reseal after sanding. Removing mold stains from wood is no easy task. This is because the wood has absorbed the moisture. If there are only slight mold stains in the wood, you can dry them. You can then try to remove them with Schimmel.

Removing mold stains from leather

A mixture of water and spirit can also be used to remove mildew stains on leather. In this case, the mold stains can best be removed with this. Because you can simply wipe the material and the stains are gone.

Remove mold stains from the tent

Mold stains often appear in the tent if you pack the tent up while it is still damp. There are special mold removers for stubborn mold stains on tents. However, these methods do not always lead to a good result. For example, mold stains on a white tent are better removed with hydrogen peroxide. To do this, the material is placed in a 3 to 6 percent solution.

Remove mold stains from paper

In order to remove mold stains from paper, all moisture must be removed from the stains. To do this, you can sprinkle starch or talcum powder on the stain. After a certain time, this is then usually completely removed.

Remove mold stains from the shower curtain

In the case of mildew stains in the shower curtain, special stain removers are usually not used. You can easily wash the shower curtain at the maximum temperature. In this way, the mold stain disappears.

Remove mold stains from upholstery

How to remove mold stains from furniture and upholstery? A combination of vinegar essence and alcohol is considered an effective stain remover. Simply rub the mildew stain with the solution. Then you should rinse the upholstery thoroughly with water. Do not get a new one immediately afterward. To prevent new mold stains from forming, the upholstery must first air out and dry.

How to avoid mold stains?

To avoid mildew stains, you should air the rooms in your apartment or house regularly. You should also make sure that you ventilate sufficiently after showering and bathing. In this way, the probability of getting mold stains in the apartment decreases. In addition, regular ventilation of the rooms also reduces the risk of mold forming. If you have a problem with mold stains caused by moisture, an ergometer is helpful. This allows you to measure the humidity and get to the bottom of the cause of the moisture.

Lots of useful tips for removing tomato stains. Now it’s child’s play to remove tomato stains at home. Nowadays, many dishes are unthinkable without the use of tomatoes. While there are some recipes for good tomato dishes, none for removing tomato stains from clothes. Cooking with tomatoes should be fun, be it for spaghetti bolognese or any other dish, without fear of possible stains on clothes.

Removing tomato stains from clothing and textiles

Many are of the opinion that removing tomato stains from clothes is difficult. However, this is easier than you think. If you slip up, stay calm and act quickly, because a fresh tomato stain is much easier to remove than a tomato stain that has already dried. First of all, it should be determined what the stain on clothes consists of.

This is of enormous importance, as the finished products made from tomatoes can consist of a wide variety of ingredients such as vinegar, sugar, or oil. This should be taken into account when removing the stain. If you are still inexperienced in treating such stains, you should first test them with a wide variety of cleaning agents and cleaning processes in small and inconspicuous areas. Best in the inner area. By doing this, it can be recognized whether there will be damage to the clothes or not. You can also read tips on removing carrot stains.

Removing tomato stains from homemade tomato sauce

The cleaning process for a homemade sauce made from delicious tomato plants is quite simple:

  1. First, a knife should be used to scrape off as much of the tomato stain as possible. Then let cold water run over the affected area from the wrong side of the fabric. This wash removes the tomato stain in the same way as it was on the clothing. Turning the fabric over or rubbing the affected stain should be avoided at all costs, as this would only aggravate the situation and the stain would set in.
  2. Once the first step is done, it is advisable to take a wet and clean cloth with a little detergent and wipe the stain with a small circular. washing out movements. You should pay attention to the instructions for use of the detergent so that the fabric is not damaged.
  3. If all steps have been followed properly, most of the tomato stain should be removed from the clothing. The piece of textile must then be washed with a high-quality detergent. A gentle washing program in the washing machine would be helpful here.

Remove tomato sauce with oil

If a tomato sauce contains oils or fats, you have to proceed differently here. Because removing oil stains is a little more difficult.

  • First, the stain on the clothing should be blotted with an enzyme-based liquid detergent. This attacks the oil and fats directly.
  • Then, when most of it is removed, finish the rest with Kreis. Remove movements and the use of cold water and then put in the washing machine.

Remove tomato sauce with vinegar and sugar

For tomato stains with sugar or vinegar, the use of warm or hot water should be avoided. If you use hot water to remove it, you only strengthen the stain on the clothing. The affected fabric should therefore be cleaned with cold water and dried in the open air. You can also learn how to effectively clean your workwear.

All tips and home remedies for removing resin stains at a glance. If you work with wood, you will have already noticed that the tree sap that escapes is very difficult to get out of your clothes.

But there are many proven methods that you can use to get the textiles clean again. In general, it can be said that resin dissolves in alcohol or oil. Various methods are examined and described in more detail below.

1) Remove resin stains with stain remover

This is a chemical method to restore cleanliness. There are many different providers on the market that offer solutions for this. The advantage of this is that procurement will prove to be very easy. You can buy such a solvent in practically every drugstore. These products can also be found in retail stores.

The handling is very simple. The soiled area is sprayed with the solution and it is waited for some time to see if the stain comes off. To prevent the area from drying out, you should place a piece of cling film on it, for example. If you do not succeed immediately, the procedure must be repeated again. After the stain has been removed by rubbing, the item of laundry can be cleaned as normal in the washing machine.

2) Mechanical stain removal

Anyone who cannot or does not want to use a stain remover for various reasons (e.g. due to allergies or very sensitive skin) can succeed in this way.
All you need is a plastic bag and a freezer or compartment, which is available in every household.

The garment is now placed in the bag and placed in the freezer for some time. It is important that the textiles are completely frozen. You will find that this also makes the resin stain stiff and brittle. Now the bag is removed and the tree sap can be broken out. Please make sure that this work is done quickly and expeditiously as there is a rapid thaw. It is important that the area where you work is protected with newspaper, for example, so as not to contaminate the floor.

3) Remove resin stains with heat

This way is also very quick and easy to remove resin stains. All you need is an iron and two blotting papers. One is placed above and one below the contaminated area. Now the iron is used. Driving over it causes heating, which leads to liquefaction. The two blotters will prove to be very absorbent and will absorb the juice. After that, further cleaning is possible without any problems. Wax stains can also be removed with this method.

4) Remove resin with spirit and alcohol

This path requires very little effort and quickly leads to success. All you need is a cloth on which one of the listed liquids is spread. Now the stain is dabbed with the household remedy alcohol until it disappears by itself.

5) Use oil or butter when removing stains

If the liquids mentioned above are not available, oil or butter can also be used as a home remedy, the principle is exactly the same. However, it must be noted that this will result in a grease stain on the garment, which will then have to be removed by other cleaning processes.

Even if most people can no longer hear the advertising slogan “Then it’ll work with the neighbor too” of the beaming housewife with a sparkling wine glass in the camera, the nagging envy tells us all: “I also want to have clean glasses like that .”

However, today’s cleaning lady thinks economically and avoids environmental pollution wherever possible. This commendable attitude is in no way opposed to the Clean Glasses plan. Here are a few tips on how glasses, cutlery, and porcelain, and especially stainless steel, can shine in the kitchen cupboard without water stains.

How are water stains formed?

The given tips work against contamination on dishes, which are usually due to incorrect treatment. Water stains occur when the water cannot flow freely down the clean dishes. Therefore, very well cleaned dishes can air dry without forming water stains. Usually, this condition does not last very long, so it is advisable to dry the dishes well right away.

1. What the dishwasher really needs

Unfortunately, this is often the case: the dishes come out of the dishwasher unclean. On the one hand, this can be due to the wrong acknowledgment, but more often the lack of salt is the devil in the details.

Dishwasher owners should therefore always make sure that there is enough salt in the filling device provided for this purpose. Although the “Minna” washes with hot water alone, the composition of the rinsing water contains magnesium and calcium ions, depending on the degree of hardness, which is deposited in a light layer on the dishes.

The dishwashing salt prevents this process by precisely separating these ions and leads to clean dishes that do not show any streaks when dried with a clean tea towel. Also, note tips for descaling and cleaning the dishwasher.

2. Washing by hand: Crystal clear, environmentally friendly

It’s not the amount of detergent that causes clean dishes. It’s washing dishes with your head. For people who have their own household for the first time: First, the glasses, then the plates, then cutlery, pots, and pans, as these are the dirtiest, in the end. The glasses should be washed so hot that you almost (!) burn your fingers. It is enough not to let the sink fill up completely with water.

Once briefly cleaned underwater with a kitchen sponge inside and outside as well as on the handle, a small amount of cold water can always remove the foam. This means that the washing-up water also has a more bearable washing-up temperature for the dishes that follow the glasses. The other cutlery and dishes are then treated in the same way before they are wiped dry with the tea towel.

3. Tea towel is not a hand towel

Before using them for the first time, new tea towels should be washed just like another laundry, as the textiles often contain chemical color pigments. Not only are these unhealthy, but they also leave a film on the dishes that make spot-free cleaning difficult. Failure to do this first wash can lead to smeared dishes that cannot stand up to scrutiny in the sunlight.

Surprisingly, many people, mostly men, students, and trainees, do not know the difference between a hand towel and a tea towel. In the industrial processing sector, too, this differentiation is no longer made exactly, since they are both almost the same size. However, the tea towel is made of thin cotton or linen fabric, while the hand towel, as a category of body towels, is made of less absorbent but thicker cotton fabric. Since cotton fibers fluff easily, the long-fiber linen tea towel with a dense weave structure is the better choice for drying glasses and good china.

Cutlery and stainless steel can also be perfectly polished with it. The extremely absorbent microfiber cloths are just as powerful. However, when washing at 40 or 60 degrees, they must never get fabric softener on them, as the remains lead to the formation of streaks and the absorbency of the microfiber cloth is reduced by the fibers being pressed together. To ensure that dishes are cleaned as germ-free as possible, the tea towels should also be changed regularly. In addition, note how you can remove coffee and tea rims from cups.

4. When the dishes “take a hit”

If the enamel is broken, it is unfortunately not possible to have a flawless tableware appearance without a professional repair. If, on the other hand, water or dirt stains have formed over a long period of time due to incorrect treatment, which is becoming increasingly clear under the barely visible layer that is not so easy to remove, pure vinegar or citric acid can work wonders.

However, these household helpers, which can effectively replace almost all special chemical cleaners anyway, require a little more exposure time for stubborn dirt. Concentrated vinegar or vinegar essence with 75% water content or acetic acid is easily degradable and the somewhat unpleasant scent disappears in no time. However, this cleaner is powerful against calluses, grease, and limescale and even makes blind glasses and mirror surfaces shiny again.

For burnt pots or greasy pans, a dash of vinegar essence diluted with a soda can be spread over the surface with a sponge. After a short exposure time of about 10 minutes, this mixture, which has practically absorbed dirt and lime, can be easily washed off. Even stubborn burnt residues, such as those often found on grills or in ovens, can be removed in this way without having to scrub.