Tag

this

Browsing

Eating Brussels sprouts raw is possible in principle, but can put your digestion to the test. Here you can find out how to prepare the small cabbage florets as easily digestible as raw food.

Brussels sprouts are in season in Germany between September and March. It is therefore a popular ingredient, especially in autumn and winter cuisine. It is usually served boiled, fried or gratinated – for example as a Brussels sprouts casserole, Brussels sprouts in a pan or Brussels sprouts stew. Recipes with uncooked Brussels sprouts are rarer.

In principle, it is possible to eat brussels sprouts raw – the uncooked kale florets are not poisonous or otherwise harmful. However, they can be difficult to digest. You can prevent this by preparing them as gently as possible on the stomach.

Eat brussels sprouts raw – this is the most digestible way

Brussels sprouts have a slight bitter note both cooked and uncooked. For this reason, the prejudice persists that the raw leaves are poisonous. In fact, a bitter taste in some types of vegetables is a warning signal: in zucchini or pumpkins, for example, it can indicate that the toxic substance cucurbitacin has formed. With Brussels sprouts, on the other hand, the slightly bitter aroma is normal and therefore not a cause for concern.

Cooked Brussels sprouts are one of the more digestible types of cabbage. However, it is harder to digest raw and can lead to flatulence and other digestive problems. This is mainly due to its high fiber content. If raw cabbage always causes problems for your stomach, you should also be careful with Brussels sprouts. Then try a smaller amount first to see how your body reacts to the uncooked Brussels sprouts.

Eating Brussels sprouts raw: Preparation and recipe ideas

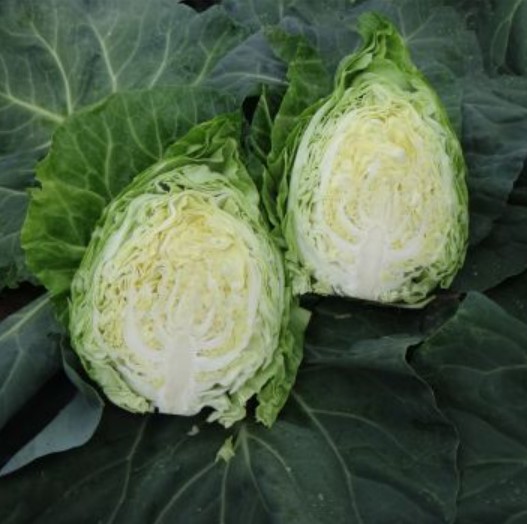
The florets harvested from November are best suited for recipes with raw Brussels sprouts. They have usually been exposed to freezing temperatures and taste milder and sweeter as a result. When cleaning Brussels sprouts, it is also best to remove the outer, dark green leaves. They are usually dry, fibrous and taste less pleasant than the light green inner leaves, especially when raw.

You can eat Brussels sprouts raw, for example, by preparing them as a salad. Some recipes for Brussels sprouts salad use pre-steamed Brussels sprouts—the florets are usually cut in half. If you use raw Brussels sprouts for salad, you should chop them up as finely as possible. This makes it easier to digest and easier to digest. For example, cut the florets into thin slices, grate them or pluck off the leaves individually.

You can dress the raw Brussels sprouts salad with a classic vinaigrette, a honey-mustard dressing or a lemon dressing, for example. Walnuts are particularly suitable as a topping because they harmonize with the slightly bitter note of the cabbage. You can add other ingredients to taste. A few Brussels sprouts also add an interesting touch to a classic mixed salad.

Tip: It is best to buy your groceries seasonally and regionally and, if possible, pay attention to organic quality. We can recommend the organic seals from Demeter, Bioland and Naturland, as they follow stricter criteria than the EU organic seal. In this way you contribute to biodiversity and soil protection.

Maceration means “soaking in liquid”. You can read in this article how this works and for which foods it makes sense to macerate.

Maceration is a term from the kitchen. It was borrowed from the French “macérer” – “to soak/soak something” and goes back to the Latin “machrare” – “to soak”. It sounds fancy, but chances are you’ve already macerated while cooking or baking.

Why is maceration useful?

Preservation: Maceration makes fresh food last longer. Another side effect is that fruit does not turn brown.
Flavoring: You can add another flavor note to macerated foods.
Change consistency: Depending on the type of food being macerated, the consistency can remain the same, become softer or juicier.

You need this

Maceration is very easy. You need two components; it is up to you how much and what combinations it will be. Maceration is usually understood as meaning when fruit is marinated in alcohol with a little sugar, but there are many variations.

Ingredient One: Foods You Want to Macerate:

Fruit like strawberries or apricots
vegetables like onions
Pastry like biscuit
When macerating, you put the food in or sprinkle it over it in order to then process it further. For example, you dip ladyfingers in coffee to use for (vegan) tiramisu; or you macerate fruit in sugar to make jam. You can also macerate meat.

Ingredient Two: Liquid

Depending on the flavor you want and the purpose, you have different liquids to choose from in which to put the food:

Alcoholic beverages such as liqueur or sparkling wine
Oils such as olive oil or garlic oil (tip: make your own garlic oil)
Vinegar like balsamic
Juices (fruit or vegetable) such as orange juice or tomato juice
Broths like vegetable broth (tip: make your own vegetable broth)
Fairtrade coffee or tea such as black tea
Note: We recommend buying organic food. Then you can be sure that they are free of chemical-synthetic pesticides and come from environmentally friendly cultivation. If you use seasonal and regional fruit and vegetables, you can save CO2 emissions due to the shorter transport routes. Our seasonal calendar shows you when which fruit and vegetables are in season in Germany.

Maceration tips

Use a liquid of your choice for maceration. You can add extra flavor with spices. For example, when macerating fruit, add some cinnamon to the liquid. Herbs, on the other hand, often go well with savory pickles. You can try different flavors. How about a dash of lemon juice and some sugar in a fruit-juice maceration?

It is crucial that the flavors of the liquid harmonize well with those of the food. For example, drinks such as rum, wine or fruit juice go well with fruit, coffee or sweet liqueurs go well with baked goods and spice-oil mixtures, vinegar or broth go with vegetables.

Basically, you should macerate food cold (or at least lukewarm). Pre-heating only makes sense in some cases, for example to boil off residual alcohol or to obtain roasted aromas.

To macerate, simply place the food in the liquid and let it steep for a bit. How long that is varies. For example, soaking strawberries in sugar for 15 minutes may be enough. Others you leave for 24 hours, such as a punch. For pastries such as cake bases, it is sufficient to drizzle or dip them briefly. The aroma usually intensifies with a longer soaking time.

Incidentally, macerating works in a similar way to marinating. However, a marinade contains many spices, and marinated foods are often boiled, simmered, or fried afterwards. Food is often macerated longer than marinated. As a rule, the food’s own liquid and aroma are included in the maceration liquid, which is usually not the case with marinating. Therefore you can continue to use the maceration liquid.

It is not possible to generalize how long a food can be preserved through maceration. That depends on the liquid used and the preparation method. For example, olive oil preserves for up to six months and canola oil for up to a year, while sugar alone doesn’t really extend shelf life. However, if you further process fruit pickled in sugar by heating it to make jam or compote, the food can even last for several years. Also alcohol preserved for several months (for example Rumtopf). However, it is always important that the macerated food does not come into contact with dirt and bacteria and that you store it in a cool and dark place – otherwise the product will spoil.

Recipes: Macerate strawberries with balsamic vinegar

Ingredients:

500 g strawberries
3 tablespoons balsamic vinegar
3 tablespoons sugar or agave syrup
some leaves of fresh mint

Directions:

Wash the strawberries and pat them dry.
Cut the strawberries into small pieces – preferably in halves or quarters, depending on their size. Then place the strawberries in a sealable container.
Pour in the vinegar and sprinkle over the sugar (or agave nectar or other sweetener). You can either add the mint at the end when serving or add it to the bowl in small pieces.
Cover the bowl and place in the refrigerator for at least 3 hours. Get the strawberries out of the fridge in time so that they return to (almost) room temperature.
You can eat balsamic strawberries just like that, serve as an appetizer or dessert. You can also combine the macerated strawberries as a sweet and sour ingredient or side dish, for example in a salad or in a bowl.

You can eat pointed cabbage very well raw, because that way no vitamins are lost. We’ll show you how to prepare raw pointed cabbage in a tasty and digestible way.

Combine raw pointed cabbage correctly

Many types of cabbage are difficult to digest and can cause flatulence. However, to make the raw pointed cabbage tasty and digestible, you should combine it with digestive spices and vegetables. With caraway, aniseed, marjoram, ginger or fennel you can stimulate digestion and prevent flatulence. At the same time, your dishes with raw vegetables will taste more varied and easily digestible. In addition, pointed cabbage contains a lot of vitamin C and is available all year round from regional cultivation.

Raw pointed cabbage mixed with ginger

Raw pointed cabbage combines well with ginger in a smoothie. It goes perfectly with sweet dishes and has a lot of vitamin C, vitamin B, iron and copper. Ginger also has an antibacterial effect on the intestinal flora.

Ingredients:

2leaves pointed cabbage
1 piece of ginger
1banana
0.5 pieces of apples
200 ml water

Directions:

Tear the cabbage leaves into smaller pieces.
Cut up the apple. You don’t need to peel it. This way no vitamins are lost. So that the fruit is not sprayed and you can use it without hesitation, pay attention to organic quality when buying.
Then mix all the ingredients together well so that there are no chunks left.
Add a little more water if the smoothie has become too thick.

Eat raw pointed cabbage in a salad with cumin

Pointed cabbage and cumin seeds are a wholesome combination, because the cumin has an antispasmodic, calming effect and relieves flatulence. Together with carrots, the salad is rich in vitamins and delicious. In addition, they are all regional products that have a good CO² balance.

Ingredients:

1pointed cabbage
2carrots
5 tsp cumin
7 tablespoons olive oil
10 tbsp white balsamic vinegar
5 pinch(s) of pepper
4 pinch(s) of salt

Directions:

Cut the cabbage into fine strips, the thinner the better.
Then grate the carrot and put it in a bowl with the cabbage.
Mix together the other ingredients for the dressing and add them to the bowl as well.
Finally, stir the salad thoroughly and let it sit for an hour before eating.

Eat pointed cabbage raw: in a dip

You can also combine raw pointed cabbage with raw fennel to make it digestible and tasty. The fennel bulb is considered a medicinal plant and also relieves flatulence and gastrointestinal complaints. In addition, fennel is very healthy and contains vitamin C, iron and potassium. The fennel season is between June and October. You can use the cream cheese cream made from pointed cabbage and fennel as a spread or as a healthy dip.

Ingredients:

150 g pointed cabbage
100 g fennel
fennel green
200 g cream cheese
3 pinch(s) of chilli powder
3 pinch(s) of pepper

Directions:

Cut the cabbage and fennel into very small pieces. The smaller you cut the pieces, the better the consistency of the cream will be.
Then mix the pointed cabbage and fennel with the cream cheese.
Season the cream with chilli powder and pepper.
As a topping, you can chop the fennel greens and add them to the dip. The delicious and wholesome pointed cabbage dip is ready. You can keep it in the fridge for at least 2-3 days.

Making crushed ice yourself is easy and there is no plastic packaging. We’ll show you how to make the cool refreshment. This makes hot summer days more bearable.

You can buy crushed ice, but making it yourself isn’t difficult. Especially on hot summer days, it is a refreshing addition to drinks such as slush ice and summer (non-alcoholic) cocktails, or you can use it to cool other alcoholic drinks such as sparkling wine. All you need are ice cubes. With our tips you can easily make crushed ice yourself.

Make crushed ice yourself with a tea towel

Probably the most sustainable and easiest way to make your own crushed ice is with a clean tea towel and a solid object. So there is no plastic packaging and you don’t have to buy any additional new devices.

To do this, place ready-made ice cubes in the middle of a clean tea towel. Hold the open sides tightly together. Now you need a solid object. For example, a hammer, a rolling pin or something similar are suitable. Now break the ice cubes out of the kitchen towel with your solid object. Your homemade and sustainable crushed ice is ready.

Tip: Be careful not to break the ice cubes too small. This way you get more of your crushed ice because it melts more slowly.

Make your own crushed ice with a stand mixer

Another way to make your own crushed ice is with a stand mixer. However, this method only makes sense if you already own a stand mixer. In general, you should not buy any new equipment for the production of crushed ice to avoid wasting unnecessary resources. You can prevent this by using the dishcloth crushed ice method above.

If you already own a stand mixer, the crushed ice method with a stand mixer is the faster and less complicated method for you.

Simply put the ice cubes in a blender and crush them in batches. This makes it easier to crush the ice cubes than if you use the normal smoothie function. In addition, the blade of the blender does not wear out as quickly. Also make sure that your blender has enough power to crush the ice cubes.

Tip for sustainable ice cubes for your crushed ice

The basis for making crushed ice yourself are ice cubes. But you don’t necessarily need the classic plastic ice cube tray. A sustainable alternative is to simply make the ice cubes yourself in glasses. Make sure that you fill the water mainly in cone-shaped glasses and do not screw a lid on top. Let the ice cubes thaw briefly at room temperature before processing them into crushed ice – this is how you get them out of the glasses. Also, to avoid expanding the glass, you should only fill the glass up to three quarters full with water.

The basis for the best biscuit classics

Baking biscuits without shortcrust pastry – unthinkable! The classic dough is just perfect for biscuits to cut out and decorate, not only the children are happy! Even adults like to let their creative streak play with the shortcrust pastry. Shortcrust pastry is also wonderfully versatile: with a little cocoa or with grated nuts, things look different – but they still taste incomparably delicious!

The classic shortcrust pastry ingredients for a sweet shortcrust pastry are cold butter, flour, sugar, eggs, and a pinch of salt. Knead quickly into a smooth dough and wrap in cling film and leave to rest in the fridge.

Are you new to baking? – No problem! This video explains how to prepare a basic shortcrust pastry.

Trick 17 for the shortcrust pastry: the cold does the trick

When making shortcrust pastry, all the ingredients and all the equipment used must be cold! It’s worth putting the kneading hooks of the hand mixer in the freezer for 30 minutes or washing your hands with cold water (then dry them thoroughly!). If you have a stone or marble worktop, put cold packs on it for 30 minutes, for example, and then even the worktop for kneading the dough will be chilled. You can even put the flour in a tightly sealed container in the fridge to chill!

In classic shortcrust pastry recipes, the dough is wrapped in cling film and placed in the fridge for at least 20 minutes. Especially when baking biscuits, it is advisable to prepare the dough the day before and let it rest in the fridge overnight so that the sugar crystals can dissolve better.

Help, my shortcrust pastry is on fire!? – What is a “burned” dough?

If you mean it too well with your shortcrust pastry and knead it for an extra-long time, it may become “burnt”. This means that the butter separates out and the dough does not bind well. It becomes tough and sticky and can no longer be rolled out well. Shortcrust pastry likes it quick and cool! To save your battery, you can try spooning a well-chilled egg white into the batter to help the flour and butter combine.

It is important that the fat used is by no means liquid so that the finished pastry – regardless of whether it is a small biscuit or a large tart – remains fluffy. If you want a very fine dough, it is best to use icing sugar instead of conventional granulated sugar for your shortcrust pastry!

In addition, baking powder has no place in shortcrust pastry! Do you feel like baking cookies now? With our tips for baking biscuits from a professional, it’s guaranteed to succeed. We have also put together a large selection of Christmas cookie recipes for you here.

If you were too eager and ended up with cookies, here are the best ways to freeze cookies.

Anyone who has ever taken a tray full of melted puddles of chocolate out of the oven instead of chocolate sticks is well advised to use these tips because fine shortbread cookies are not as complicated as you think if you pay attention to a few points!

Trick 17 for shortbread: The cold does it

Shortcrust pastry, for example, likes it cold. It is advisable to place the baking tray in the fridge for about an hour before you apply the dough, or if possible in front of the door or on the balcony. After the biscuits have been placed on the well-chilled tray, it is best to put them back in the fridge or on the balcony for an hour. Then they go straight into the preheated oven. This way the biscuits keep their shaped shape.

What eggs and butter might have to do with it… If the dough is much too soft, this may be because the eggs or yolks used are too large. If you get along well with your dough, you can try to use a little more flour in this case – but please dose carefully! Otherwise, the matter will become too tight and will not push well through the spout.

It might also help to use a little less butter next time. It is not advisable to use cornstarch in shortbread cookies, as the dough can become tough.

Hard is not hearty!

Shortbread is a sensitive dough that needs to be treated with a lot of attention. You should also give the butter enough time to become creamy. Depending on the temperature of the butter, it can take up to 20 minutes until it has really foamed well for a spritz dough. Of course, the easiest way to do this is with a food processor, but if you do it with a hand mixer, you have earned the sweet delicacy with plenty of butter in the end!

If the dough is too firm and cannot be pushed through the spout, it could also be because too much flour was used or the flour was mixed in for too long. Mix the butter and sugar very thoroughly until fluffy, then stir in the remaining ingredients (e.g. cocoa or grated organic lemon zest) and only briefly mix in the sifted flour at the very end.

It depends on the right tool

If it doesn’t work well with the piping bag, using the meat grinder with the matching cookie attachment will help. High-quality meat grinders are made of cast iron, which means that firmer dough can also be pressed through. In Spain, people like to eat “churros” with coffee, a shortbread baked in plenty of oil. In addition, you get your own churros presses, sometimes even made of sturdy metal.

Freezing pasta is a good solution if you misjudged your cooking. Here you can find out what you should keep in mind so that they still taste good after defrosting.

If you ever have pasta left over after cooking and eating, you don’t have to throw them away. They don’t last long in the fridge either. All the better that you can also simply freeze pasta.

Freezing pasta: This is how you prepare the pasta

Before you freeze pasta, there are a few things you should do to prepare.

Let the leftover pasta cool completely.
Pour into a container suitable for freezing. In order to protect the environment, you should not use single-use plastic utensils. You can easily freeze pasta without plastic using mason jars or stainless steel cans.
A cotton bag is best for freezing noodles: Fill it up and lay it flat in the freezer – this is how you get a noodle sheet. From this you can easily break out the required portions later.
Tip: To prevent the noodles from freezing into a large, indivisible lump, you can toss them in a little oil beforehand. Wet them well and then pour them into the jar.

Freeze and thaw pasta

Then store your pasta in your freezer or freezer.

By the way: If you are still looking for an energy-efficient appliance, take a look at our best list of freezers.

You then have a number of options for defrosting the frozen pasta:

Moisten the noodles with a little water and briefly heat them in the microwave.
Put the frozen noodles in lukewarm water and slowly thaw them.
To keep them tasting freshly cooked, simply place the frozen noodles in a pot of boiling water for 2-3 minutes.
Tip: You can also freeze leftover sauce in a separate container.

As soon as they are ripe in summer, you can freeze currants in advance. That way you can still have some of the delicious fruit for the rest of the year.

Red, black or white currants grow in many gardens. Among other things, they contain a lot of vitamin C and, with their sour taste, are a great ingredient in sweet pastries. You can just as well use them to make jam or jelly, or add them to your muesli in the morning. Like the other berries, currants are sensitive. Therefore, you should process or freeze them within a few days of picking them.

Cook currants

How to cook the currants for freezing:

Discard unripe or mushy fruit.
Wash the berries. Make sure the water pressure is not too high, as the currants are delicate.
Dry the berries.
Now remove the berries from the panicles. If you do this before washing, the berries will leak juice through the resulting cracks in the skin. You can easily scrape the berries from the panicles with a fork.
Remove any remaining stalks.

Pre-freeze currants

Pre-freeze the berries so that you can thaw them individually later. To do this, place the currants not too close together on a large plate or tray and place it in the freezer for one to two hours. If you don’t have enough space for this, you can also freeze the berries in a jar and shake them carefully after an hour so that they separate.

After pre-freezing, you can put the currants in a freezer box (preferably made of glass) and freeze it. The fruits will keep for up to 12 months.

Defrost currants

Slowly thaw the berries before using them. So they lose little aroma. This works best if you first let the berries thaw in the refrigerator and then thaw them completely at room temperature.

Defrosting the currants will make them a little mushy. You can then no longer use them as well as decoration, for example for cakes. But they are still good for:

Compote, currant jam and currant jelly
currant syrup
Currant cake, in which the berries are baked in the batter
muesli or porridge
milkshakes or smoothies
fruit sauces

Alternative: Freeze currant puree

You can also process the currants into a puree with a little powdered sugar or agave syrup before freezing and freeze it without pre-freezing. Small molds are particularly suitable for this. This way you can defrost the puree in portions.

If you freeze broccoli, you can still enjoy the summer vegetable in the fall and winter. We’ll show you how it’s done – and tell you the best way to defrost the florets again.

Broccoli is a relative of cauliflower, grown in Europe mainly in Italy. From June to October he is also in season in Germany. The vegetable with the dark green florets is very healthy: broccoli is rich in minerals such as potassium, iron and zinc. It also contains various B vitamins and lots of vitamin C.

Freezing broccoli: How to cook it

It is best to buy the broccoli at the market during the season, where you can get it unpackaged. The florets should look fresh and green and still be connected. Avoid broccoli that is already bruised or discolored.
At home, wash the broccoli thoroughly, removing the leaves and the woody end of the stalk. Cut the florets into 1-1/2 inch pieces and the stem into 1/4 inch slices.
If you like, you can now put the broccoli pieces in a bowl with water and some lemon juice for five minutes. This is how the broccoli keeps its green color.
Tip: If you buy organic broccoli, you avoid chemical-synthetic pesticides.

Also: If you want to eat the broccoli right away, don’t worry about bruises when you go shopping – they are quickly removed and the vegetables taste just as good.

Blanch the broccoli before freezing

Before freezing, you should blanch the broccoli briefly. Otherwise it will get mushy later when defrosting. Boil a few liters of water in a large saucepan. Place the chopped broccoli in the boiling water for about 2 minutes, then scoop out the pieces with a slotted spoon. Now let the broccoli cool in a colander.

How to freeze broccoli

To freeze the broccoli, fill a freezer container, such as a glass one, and place it in the freezer. The broccoli can be kept for up to a year.

If you later want to thaw the broccoli pieces individually, you should prefreeze them before freezing. Place the broccoli florets a little apart on a board or tray and place in the freezer for half an hour. This will prevent the broccoli pieces from sticking together when you freeze them. You can then freeze them as described above.

Thaw frozen broccoli

There are several ways you can defrost the broccoli:

You can thaw the broccoli at room temperature or in the refrigerator. Depending on the ambient temperature, this can take a few hours.
Broccoli can be thawed much faster in a large pot: Bring water to a boil and blanch the frozen broccoli in it for a maximum of 90 seconds. This also keeps the vegetables nice and crunchy. Attention: For this method you need a large pot with a lot of water so that the liquid does not cool down too much due to the cold broccoli. Caution: Consider whether you can still use the broccoli water after cooking. If not, another method might be more water-efficient.
In the oven, you can defrost and roast the broccoli at the same time. To do this, place the broccoli pieces in a mold, drizzle them with a little olive oil and season with salt and pepper. Then place the mold in the 200 degree oven for 15 minutes.

You can freeze basil well and make it last longer, for example if you have harvested too much of it. Find out here what you should consider.

Basil is used both in the kitchen and as a medicinal herb. The nutrient-rich and aromatic leaves give numerous dishes a typical aroma. To have basil on hand all year round, you can freeze it. We’ll tell you how this works best.

Freezing fresh basil: This is how it works

If you want to freeze the basil leaves in their actual form, you should blanch them. That way they won’t be mushy after defrosting. For this you need:

ice cubes
a bowl
a cooking pot
water
a clean kitchen towel
a plate
a container for freezing
In order for the basil to retain its aroma when you freeze it, you must first blanch it. Proceed as follows:

Cut the leaves off the plant. Preferably directly above the leaf node, where more leaves grow, because this allows new ones to grow back.
wash the leaves
Place the ice cubes in the bowl.
Boil water in a saucepan. Make sure the pot is big enough for all the basil leaves.
Blanch the basil leaves in hot water for about 5 to 10 seconds. This means: Dip the leaves in the boiling water for five to ten seconds at a time, preferably with a slotted spoon.
Then, as quickly as possible, dip each leaf into the ice water.
Then place the basil leaves individually on a clean kitchen towel and let them dry for about ten minutes.
Place the individual basil leaves on a plate. Make sure the leaves are really individual on the plate so they don’t stick together when frozen.
Place the plate in the freezer until the leaves are completely frozen.
Now you can put them together in a sealable container, such as a lunch box or an empty screw-top jar.
Put these in the freezer.

How to freeze pureed basil

You can also freeze basil pureed and use it later for cooking. How it works:

Remove the stems from the basil leaves.
Rinse the leaves under cold water.
Drain the basil well and then gently pat dry.
Once the leaves have dried, place them in a food processor or blender.
Chop the basil depending on how coarse you want the leaves to be.
Add some olive oil as you go.
Once the basil leaves have reached the desired consistency, place them in a sealable container.
Basil can be stored in the freezer for several months.