Tag

with

Browsing

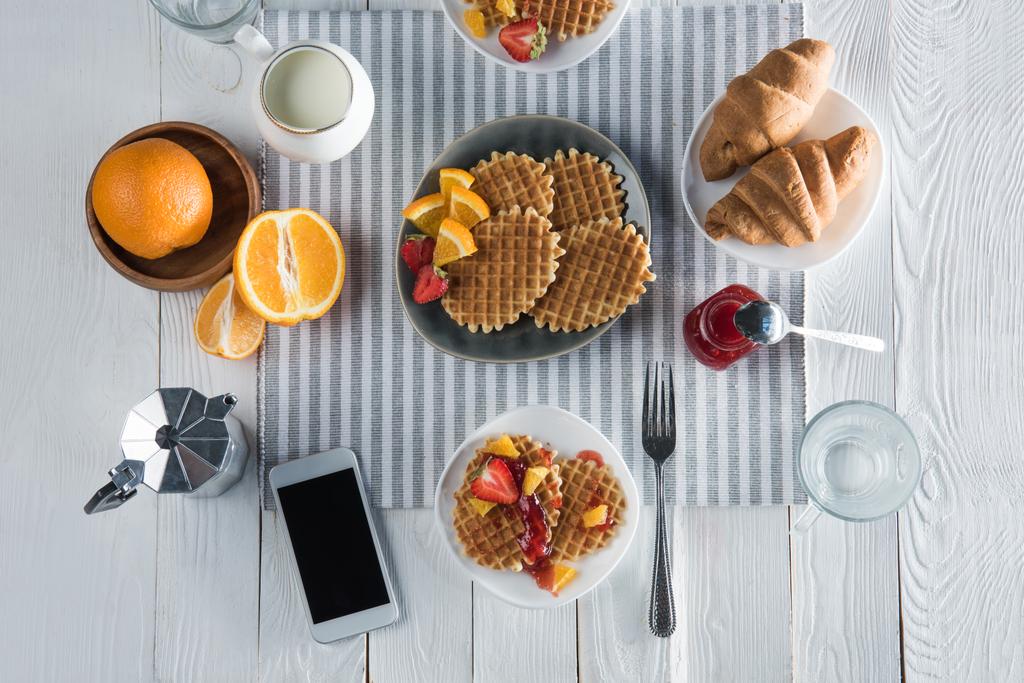
Caramel pastries, waffles, homemade cookies, sweets and much more – the selection is enormous. But which coffee side dish is the right one?

The accompaniment to the coffee makes the difference

Our streets and shopping alleys are now littered with a variety of cafes. But which one appeals to people the most and where does it taste best? As a café operator, you shouldn’t just think about the perfect coffee, but also include everything that goes around it. A very special topic here is the accompaniment to the coffee.

An aromatic coffee, which is also served beautifully, can secure some regular customers. However, if you want to be on the safe side with your café, you should also work on your coffee side dishes. Just such little things can significantly influence the taste experience and make the coffee something special. A small biscuit on the side of the saucer, a crunchy croissant or pastry specialties from the region sweeten a visit to the café. A special attention speaks to people directly and creates a homely atmosphere – just like at home. Of course, everyone should decide for themselves which side dish is the right one for their coffee. In general, however, it is advisable to rely on homemade products or to offer specialties. In this way, a café can stand out from its competitors and offer its customers that little something extra. Which coffee drinker wouldn’t be happy about a home-baked cookie or a pastry specialty from the nearby pastry shop?

Finished pastries and sweets for the business environment

Of course, homemade delicacies can impress in terms of quality, taste and individuality. Nevertheless, homemade and fresh pastries also have a number of negative aspects, especially when it comes to use in the business sector. The key keywords here are above all consistent quality, hygiene, shelf life, storage and price.

Depending on the size of the company, countless coffees are prepared for employees, guests and customers every day. Homemade accompaniments to every hot drink are sure to be a pleasant surprise, but they prove to be an extremely expensive investment that is difficult to plan for the business operator. It is not uncommon for homemade products to be used up on the same day, otherwise they lose quality or even their shelf life. If less coffee is drunk than planned on a day, the surplus of elaborately made homemade coffee unfortunately has to be disposed of. This means not only a high cost factor, but also unnecessary food waste.

As beautiful and tasty as homemade pastries may appear, they quickly lose quality, do not always meet all the necessary hygiene standards, can only be stored for a short time due to their short shelf life and are often more expensive than ready-made pastries. This certainly doesn’t bother baking cookies and preparing homemade cakes in the kitchen at home, but in the business area every step must be monitored and quality checked for the customer.

Ready-made pastries from well-known manufacturers offer many advantages in the business sector. It has a high and consistent quality and meets all hygiene standards. Many ready-made products can also compete with home-made products when it comes to taste. During production, care is taken to ensure that the pastries go perfectly with the coffee. Business operators in particular enjoy the individually wrapped pastries and inexpensive sweets. Whether biscuits, chocolates or other delicacies – ready-made baked goods can definitely hold their own against homemade ones. This applies to quality as well as taste.

The pastry also has a much longer shelf life than homemade delicacies, can be served to the customer in hygienic individual packaging and can be stored for weeks without losing quality. On top of that, the finished pastries are usually cheaper than homemade ones, which is clearly reflected in the purchase price, especially for larger quantities. In the business environment, the finished baked goods are convincing across the board. Employees, customers and guests also enjoy the little delicacies, as they always inspire with their diversity, excellent taste and optimally emphasize the enjoyment of coffee, tea and co.

A large selection of coffee side dishes

The selection of coffee side dishes is almost endless. Companies and cafés around the world compete for every customer and come up with new ideas every day on how they can stand out from the competition. Individuality and unusual campaigns are always worthwhile here. Get a head start by opting for special coffee side dishes. You should choose a delicious specialty for each hot drink. It is also worthwhile to refresh the assortment again and again. Every coffee lover will appreciate such attention.

Pickling feta is one of the classic ways of preparing sheep’s milk cheese. We’ll show you a simple recipe that you can use to make pickled sheep’s cheese at home – also with vegan alternatives.

To pickle feta, you need olive oil, fresh herbs, and a little patience. The preparation of the Mediterranean appetizer is quick and uncomplicated, but in order for the flavor of the herbs to develop fully, the cheese must then sit for at least 24 hours. You should pay particular attention to this quiet time if you are expecting guests.

You can insert feta in one piece or diced. We show you a recipe for pickled feta cubes here – but you can also use the same ingredients to pickle two whole slices of feta. You may need a little less olive oil.

Especially when it comes to dairy products like feta, it is important that you choose products with an organic seal when shopping. This is how you support companies that keep their animals in a more species-appropriate manner. If you generally do not consume any animal-based foods, we will give you tips for vegan variants of pickled feta at the end of this article.

It is also worth paying attention to organic quality and regional origin for the other ingredients. You can get thyme and rosemary, for example, from German cultivation and can thus avoid unnecessarily long transport routes. Or you grow your herbs yourself. You can find tips on this here, for example: Creating a herb bed: Tips on types, care and harvest.

Pickle Feta: Easy recipe for feta in olive oil

Ingredients:

5 sprigs of thyme 2 sprigs of rosemary 2 small chili peppers
4 cloves) garlic
400 g feta
400 mlolive oil

Directions:

Prepare two mason jars, about 250 milliliters each.
Wash the thyme and rosemary and then shake them dry. Pluck the thyme leaves from the sprigs and cut the rosemary sprigs into short pieces.
Wash the chillies and cut them in half lengthwise. Remove the core casings. Then cut the chili halves into strips.
Peel the garlic and cut it into thin slices.
Dice the feta. If you want to insert it in one go, skip this step.
Pour the feta cubes into the provided mason jars. If you want to pickle two whole pieces of feta, place them side by side in a shallow lidded container instead.
Sprinkle the feta with herbs, garlic and chili.
Distribute the olive oil evenly between the two glasses or pour it over the two feta pieces.
Close the jars tightly and leave them in the fridge for at least 24 hours. The longer the glasses stand, the more intense the herbal aroma becomes. However, you should not leave the pickled feta for longer than a week.

Insert feta: Serving suggestions and vegan alternatives

Pickled feta cheese goes well with most Mediterranean herbs. You can therefore change the herbs in the recipe according to your own taste and, for example, use oregano, basil or marjoram. The feta also tastes very good with herbs de Provence.

For example, you can serve flatbread or ciabatta bread with the pickled feta. It is also good for antipasti plates or a Greek salad. It is best to take the feta out of the fridge about half an hour before serving. At room temperature, its taste is stronger.

By the way, if you avoid animal products in your diet, you can simply swap the feta for the same amount of untreated tofu. This is the simplest alternative. You can find detailed instructions here: Vegan Feta: With this recipe you make it yourself.

In many health food stores you can now also find other plant-based substitutes for feta, most of which are based on coconut oil. As a rule, you can process them in the same way as real feta made from sheep’s milk.

In our guide you will find helpful tips for preparing your espresso with the portafilter machine. We show you how it works.

What is a portafilter machine?

The portafilter machine was developed in Italy to simplify the preparation of an espresso. No wonder it is often referred to as an espresso machine. The first portafilter machine came onto the market as early as the beginning of the 19th century. The aim of such a machine was to better extract the aromatic substances from the coffee beans. When preparing an espresso manually, the contact time between water and coffee powder was too long, so the coffee often tasted bitter. The right pressure with which the water is pressed through the coffee powder is decisive for a short contact time. In the beginning, portafilter machines worked with a lever. Then semi-automatic machines followed, and there are now modern devices with many parameters that can be set individually.

How a portafilter machine works

The portafilter machine is named after the removable portafilter. This is the holder for the sieve. The sieve is filled with freshly ground coffee powder and fixed in the machine. For perfect coffee enjoyment, water is pressed through the coffee powder in the sieve at high pressure. In addition to the portafilter, the machine consists of the following elements:
Electric pump for optimal pressure
Heating element and boiler to achieve the right brewing temperature
Steam lance for frothing the milk
water tank
brew group

This is how the perfect espresso succeeds

Use our eight-step guide for an espresso from the portafilter machine. This shows you all the important basics:

Preheat the espresso cup and machine
To ensure that the espresso does not cool down too quickly and that the drink is not exposed to severe temperature changes that negatively affect the coffee aroma, you should fill the cup with hot water in advance and set it aside. Most portafilter machines have an integrated hot water dispenser for this purpose. The portafilter machine itself must also be warm. Therefore, turn on the machine at least 25 minutes before preparation and let it warm up.
Clean portafilter machine
As with any coffee maker, you should first remove old coffee grounds from the portafilter and then carefully wipe off oils, fats and other residues. These can then no longer influence the taste of the espresso. Make sure the portafilter is dry before filling.
grind the coffee finely
A coffee grinder with a disc grinder grinds the beans extremely evenly and thus delivers a perfect grinding result. Be sure to grind the coffee beans finely. Beans that are ground too coarsely can quickly taste bitter. In addition, finely ground beans have more surface area and therefore require less contact time to release the aromas.
Dose the coffee powder correctly
The portafilter should ideally be filled to the base for dosing. The dose is crucial – the powder should therefore only be slightly heaped. In most cases, a portafilter contains around 7 – 9 grams of coffee powder for 25 ml of espresso.
Smooth the surface
As soon as you have filled the portafilter to the brim, you can gently tap the espresso powder and smooth it out with your index finger. With an optimal surface you do the preparatory work for the subsequent tamping.
Tamp espresso powder
When it comes to the tamper, one usually speaks of the so-called “coffee tamper”. This is used to compress the powder and compact it enough to withstand the incoming water pressure, allowing the flavors to unfold slowly. For an optimal result, a pressure of 10 – 15 kilograms is recommended.
Pre-rinse group head
Like almost all parts of the portafilter machine, the brewing head must be cleaned before use. To do this, you can simply run hot water through the group head. This is called making an empty reference. Any coffee residues from the last extraction are loosened and the water that is too hot is drained.
Clamp in the portafilter
Now all the precautions for a perfect espresso have been taken. Finally, clamp the portafilter into the machine and press the lever to brew. After about eight seconds, the first espresso flows into the preheated cup. For 25 ml of espresso, wait around 25 seconds before you pull the lever up again. Stir in the crema before drinking so that the aromas can unfold in the espresso.

Espresso without portafilter

In order for the perfect espresso to be successful even for beginners, the right equipment must of course be used. In the home, the user usually does not have professional catering equipment. Even a small portafilter machine is not cheap. Part of the investment is in accessories such as the espresso grinder. This does a crucial part of the work and helps you to find the perfect degree of grinding. If you want something a little less artisanal, but still just as tasteful, then rely on a fully automatic coffee machine. At the push of a button, this not only brews espresso, but also all coffee specialties with espresso, such as cappuccino or latte macchiato. Good to know: The espresso maker cannot make an espresso at all because there is not enough pressure. Nevertheless, the coffee can be espresso-like.

Muckefuck, i.e. substitute coffee, not only has many names, but also a long history. In any case, the taste should not be underestimated. We’ll tell you what it’s made of and how it’s made.

What is Muckefuck and what does it consist of?

The Muckefuck is a kind of substitute coffee that is very reminiscent of the original in terms of taste and colour. Since it is caffeine-free and can therefore also be drunk by children, it is often referred to as children’s coffee. Other names are country coffee, grain coffee, chicory coffee or malt coffee. The substitute coffee can be obtained from different foods: from dandelion, date kernels, figs and asparagus to corn kernels, potatoes and acorns. In most cases, however, cereals such as spelt, rye and barley are used as the main ingredients. There is also the chicory plant (also common/common chicory), a so-called composite plant that grows along the way. Chicory roots give the drink a slightly bitter note. As a result, the taste of the Muckefuck is reminiscent of that of a real coffee.

The origins of Muckefuck coffee

Muckefuck is not as old as normal coffee, which was probably drunk as early as the mid-15th century. But the Muckefuck is already a few years old. It is said that Friedrich II ordered the production of the substitute coffee when he drastically increased the coffee tariffs in the 18th century. Muckefuck gained importance especially during wartime, since there were hardly any opportunities to buy normal coffee. People became inventive because nobody wanted to give up the taste of coffee entirely.

Where does the word muck fuck come from?

There are two different theories as to the origin of the name Muckefuck: On the one hand, it could be derived from the French “mocca faux”, which means something like “wrong coffee”. It is also suspected that it is also composed of the Rhenish words “Mucke” for “brown wood mulch” or “brown dusty earth” and “fuck” from “lazy”. Both theories provide information about the special nature of the substitute coffee. That it is not real coffee, but tastes slightly like coffee due to the chicory ingredient and its color is reminiscent of brown earth.

Is the Muckefuck healthy?

The substitute coffee is currently experiencing a small revival, which could be due in particular to its healthy properties. Above all, the natural food movement relies on the biological origin of many Muckefuck coffees. Especially for coffee drinkers who want or have to do without caffeine, it is a good alternative in terms of taste.

The chicory plant is said to have a digestive and appetizing effect, as it contains bitter substances and inulin. In addition, it is particularly gentle on the stomach and intestines. The minerals and trace elements should also have a positive effect. Chicory was voted Medicinal Plant of the Year in 2020. Of course, if you are not making the coffee yourself, you always have to check how much of the plant is in the substitute coffee.

Recipe for making Muckefuck coffee

You can prepare a fresh Muckefuck in various ways. We will show you a variant of how you can make the substitute coffee yourself with just two ingredients and do without grain.

The basic ingredients:

dandelion root
chicory root

Step 1: Gather and chop

Dig up dandelion and chicory roots. Then tap the soil well and wash the roots. Cut them into small pieces.

Step 2: Dry in the oven

Dry the root pieces on a baking sheet in the oven at about 50 degrees for 90 minutes. Then increase the temperature to 225 degrees and roast the roots fat-free until they have some roasted aromas. Turn them occasionally.

Step 3: Grind and infuse

After the roasting process, allow the roots to cool. Grind them into a fine powder or pulp mixture. For a Muckefuck, put a teaspoon of the powder in a 200ml cup and pour hot water over the powder. Alternatively, you can first pour the powder into a filter and then pour it on to avoid any pieces.

Have you ever made coffee with the Chemex? No? No problem, we’ll explain how you can use the glass filter carafe to make a particularly clear and aromatic coffee.

What is a Chemex?

The Chemex is a traditional way of preparing filter coffee. The German chemist Peter Schlumbohm invented the filter carafe in the mid-20th century by building a glass funnel onto a simple Erlenmeyer flask. You may remember the latter from your school lessons, because the Erlenmeyer flask is normally used for chemical experiments. Schlumbohm traveled to the United States to sell patents for other inventions there. In 1941 Schlumbohm registered the patent for the invented filter carafe. To this day, the Chemex and its special filters are manufactured by the Chemex Corporation in Chicopee (Massachusetts, USA) and distributed worldwide.

At the time, Schlumbohm was probably not aware that he had invented a real cult device. The shape of the machine is reminiscent of an hourglass. The heat-resistant wooden belt that connects the two pieces of glass and also serves as a handle is striking.

What is special about a Chemex?

In 1958, thanks to its design, the Chemex even made it into the New York Metropolitan Museum of Modern Art, one of the most important art museums in the world, and it is still there today. However, the long-standing popularity of the machine can be explained above all with the consistently high-quality coffee result. Its secret lies in the extra thick coffee filter, in which oils, suspended matter or sediments are retained. This gives you a very pure and tasty coffee without a lot of bitter substances. In addition, the filter is shaped like a cone, which means that the coffee is extracted very evenly with this pour-over method. You usually have to buy the coffee filters separately.

How to make coffee with a Chemex

Preparation with a Chemex is quick and easy. Nevertheless, it is important that you follow the individual steps in order to be able to enjoy the full coffee aroma at the end. This is the pour-over method with a filter, which we will now present in more detail.

Ingredients needed for one liter:

60 grams of ground coffee with a medium to coarse grind
1 L of water with a temperature of 96 degrees

Step 1: Heat the water

The ideal water temperature is about 96 degrees. If you don’t have a thermometer, heat water in a kettle and then wait two minutes. The water is then almost at the perfect temperature.

Step 2: Unfold and insert the filter

When you unfold the filter, you get a page with three layers of paper. It is very important that this side is on the Chemex spout. This makes the filter paper more stable on this side and prevents it from getting stuck in the spout during extraction and preventing air from escaping from the carafe.

Step 3: Rinse the filter

Pour hot water into the filter without coffee in it. In this way, you already warm up the filter and can use the water that has passed through to remove any residue from previous preparations. At the same time, the inherent odor of the filter disappears. Then throw away the water that has run through. Then reinsert the filter.

Step 4: grind coffee

Grind the coffee on a medium to coarse setting. After grinding, the coffee should resemble the structure of sea salt.

In general, the more coffee you use, the coarser the grind should be.

Maybe try a little bit here. You have found the best result when the extraction of the coffee, i.e. the process in which the coffee runs through the filter, takes between four and five minutes.

Step 5: Start blooming process

Put the appropriate amount of coffee  in the filter and add some water. The amount of water depends on the amount of coffee. For blooming, you should always take twice as much water as coffee. It is advisable to add the water slowly and in circles from the inside out. The ground coffee should be completely covered with water. Now wait about 40-45 seconds. During this time, the remaining CO2 escapes and the coffee soaks up the water. By allowing the CO2 to escape, blooming ensures a more even extraction and a more stable coffee bed.

Step 6: Add water

Slowly pour in the rest of the water in a circular motion. There should be at least an inch of space between the water and the top of the funnel. Avoid pouring water directly onto the filter. In this case, the water would pull through the paper and not come into contact with the coffee. You may have to refill several times.
If the coffee has seeped into the lower part of the Chemex, remove the filter. The Chemex coffee is ready!

Freezing rhubarb is a great way to preserve it and enjoy it out of season. We’ll show you how to do it and whether you have to cook it beforehand.

Rhubarb is in season from early April through June. The rhubarb harvest time is always over far too quickly. Maybe you have a surplus harvest and are looking for a way to preserve the vegetables. Freezing is a good option – we’ll show you how it works.

It’s best to avoid plastic containers and freezer bags when freezing the rhubarb. Screw-on jars are a good alternative. It also makes sense to portion the rhubarb before freezing; so you can thaw and process the right amount later.

Freezing rhubarb: this is how it works

First remove the rhubarb leaves. The leaves are not edible, but you can make plant fertilizer out of them, for example: put the leaves in cold water and let them steep for 24 hours. With the resulting extract you can water your plants and give them valuable nutrients.
Rinse the rhubarb stalks under running water and then drain them.
Cut off the ends with a knife. This is only necessary if the ends are hard. You can usually process fresh rhubarb without this step.
Now you can peel the rhubarb.
Cut the pickled vegetables into chunks. These should be between two and five centimeters long.
At this point you can blanch the rhubarb. However, the investment of time and energy is not absolutely necessary. Blanching preserves the color better, but does not change the taste. The shelf life does not change if you freeze the rhubarb raw.
Layer the rhubarb pieces in screw-top jars. Fill it up to just under the brim and seal it. Label the glasses with the respective date. Then you can store them in the freezer and freeze the rhubarb.
Frozen rhubarb will keep for 10 to 12 months. After defrosting, you can make rhubarb compote or rhubarb crumble, for example.

Tip: If you want to avoid the rhubarb pieces sticking together after freezing, you can prefreeze them: spread the pieces out on plates – they shouldn’t touch each other. Freeze the rhubarb for about an hour and then pour the pieces into glasses. If you have a freezer instead of a small freezer compartment, you can also prefreeze the pieces on a baking sheet or tray.

In the Netherlands, chocolate sprinkles (hagelslag) or flakes (vlokken), raisin rolls, syrup waffles (stroopwafels), pancakes (pannekoek) and honey cake (ontbjitkoek) are a really enjoyable start in the early morning. To balance this intense sweetness, the Dutch also like to eat a piece of bread or rusks (beschuit) with cheese (kaas), sausage, ham and salty peanut butter (pindakaas) for a hearty breakfast. And with this meal, fresh fruit, yoghurt and cornflakes ensure your health. The whole thing is rounded off with freshly squeezed orange juice and coffee, tea or warm drinking chocolate. And even twice a day.

Yes, you heard that right! The Ontbijt (breakfast) takes place twice a day here in Holland and often replaces lunch.

If you want a true Dutch breakfast experience, we explain how and also when you should eat this tasty, healthy meal.

Two breakfasts, please!

When they wake up early in the morning, the Dutch have their first breakfast with some bread, honey, jam and thinly sliced ​​cheese to get the circulation going. A few hours later, around 12.30 p.m., it is time for the coffee table in the Netherlands, a kind of second breakfast that very often replaces the actual lunch. A breakfast snack is put together from sweet and savory dishes: from bread, cheese and sausage to warm egg dishes and honey cake.

How do you prepare a Dutch breakfast?

Would you like to be in Amsterdam, but you are not and would you like to at least experience the flair of the Dutch city? Then start early in the morning by preparing a charming, colorful and delicious Dutch breakfast for you and your loved ones, or rather, a really typical Ontbijt, as the Dutch call it. With the rich variety of sweet and savory ingredients, you can already feel the anticipation on your palate!

Now let’s take a look at the ingredients you need to prepare a typically delicious Dutch breakfast.

Ingredients (2 servings)

Popular types of bread (white bread, black bread or wholemeal bread) and rusks
Some chocolate sprinkles and/or chocolate flakes (eaten sprinkled on buttered bread)
butter, honey and jam
2 raisin rolls
2 stroopwafels – available at most health food stores – and/or 2 pancakes
2 pieces of honey cake – we’ll give you the recipe for it in a moment
Sausage and cheese platter (we recommend typical Dutch Gouda cheese)
Salty Peanut Butter
2 boiled eggs
Fresh fruit (e.g. strawberries, melon, pineapple, apple, etc.) and vegetables (e.g. cherry tomatoes)
yogurt and cornflakes
8 oranges (for the juice)
Coffee, Ceylon tea or Choco Classic chocolate
some milk (for the latte)

Recipe Dutch honey cake:

Ontbjitkoek is the name of the typical Dutch honey cake, which can literally be translated to “breakfast cake”. A cake that is eaten specifically for the morning meal. It should not be missing from your Dutch breakfast. So, let’s see how to make the honey cake.

Ingredients:

Flour: 350 gr
Honey: 150 gr
Baking Powder: ½ packet
Eggs: 3
Brown sugar: 100 gr
Cream: 100 gr
Cinnamon: ½ tsp
Ground cloves: ¼ tsp
Ground almonds: 150 gr
Mace: 1 pinch

Preparation:

In a small saucepan, heat the honey, sugar, and cream, stirring constantly, then allow the mixture to cool. In a clean bowl, mix all the spices (cinnamon, cloves, mace) with the almonds and baking powder. Now whisk the honey mixture with the eggs and gradually stir in the sifted flour. Pour the batter into the pre-greased baking pan (loaf pan, length: 24 cm) and bake in a preheated oven at 175 °C for 50 minutes. Once the cake is ready, let it cool before cutting it on the breakfast table!

Wondering if you can safely eat leeks raw? We have the answer and will show you what to look out for when eating raw vegetables.

Leeks – also known as leeks – contain many healthy ingredients, such as iron and magnesium as well as vitamin C and vitamin K. You can buy them from regional cultivation almost all year round (from July to April).

A distinction is made between summer leeks, which grow in the summer months, and winter leeks, which are grown in the winter months. The difference between the two varieties lies in the taste: the winter leek is much hotter and more bitter.
So you can use leeks in the kitchen almost all year round. But you can not only cook or fry leeks, you can also eat them raw. The advantage of this is that the many nutrients and vitamins are retained and, unlike with cooking or frying, are not lost. In another article, you will learn more about why you should eat vegetables raw.

Eat leeks raw – you should pay attention to this

With our little hints you can safely eat not only the summer leek, but also the tart winter leek raw:

Especially if you want to eat leeks raw, you should cut leeks and wash them well to remove the soil between the leaves.
Raw leeks taste similar to onions. That’s why you’re less likely to bite into a leek than into a crunchy apple. On the other hand, it is good to chop raw leeks finely and add them as an ingredient in a salad, for example.


As already described above, the winter varieties are tart and sometimes quite hot. They differ in this from the summer varieties. Would you like to eat raw leeks in winter too? You can take the spiciness out of the winter leek by blanching it briefly in apple juice or water.

The Paleo diet (or Paleo nutrition) has attracted more and more interest in recent years, not only in the USA but also here. Athletes, stars, and even doctors swear by the so-called “Stone Age diet” for a slim and healthy life. We took a closer look at what is actually behind the Paleo nutrition trend.

How does the paleo diet work?

To put it simply, the Paleo diet is the so-called Stone Age diet. So the species-appropriate nutrition for humans. Basically, it consists of high-quality meat and fish, nuts, seeds, and vegetables. The Paleo diet is modeled after the eating habits of our hunter-gatherer ancestors. It’s not about imitating life in the Stone Age. Rather, advocates of the Paleo diet assume that with this principle you are eating exactly what human beings have been prepared for by hundreds of thousands of years of evolution. Accordingly, the Paleo diet aims to become particularly slim, powerful, and healthier.

Criticisms of the Paleo Diet

One weakness of Paleo is the genetic changes that humans have undergone since the Stone Age. In addition, the sometimes quite high meat consumption in the context of the Paleo diet is viewed critically.

The basic rules of the Paleo diet

Give up sugar

With Paleo, you should avoid sugar as much as possible. Sugar is often “hidden” in finished products and beverages in particular.

Avoid grain

In addition, white flour products should be avoided. Rice and corn should also not be on the menu, as they contain a lot of carbohydrates.

Leave out finished products

Finished products, such as packet soups, should not be eaten on the Paleo diet. Because they often contain flavor enhancers and other additives.

No dairy products

After a short familiarization phase, you can then take the next step. And this consists of avoiding milk and milk products, such as yogurt and cheese.

You can easily make vegan lard with onions yourself. We use kidney beans as a healthy base. We show you a delicious recipe for vegan lard.

Lard is an animal fat that is commonly used in cooking and frying. Butter lard or onion lard is also very popular as a spread. Since lard consists entirely of fat, it is considered very unhealthy. It also contains a lot of saturated fatty acids, which, according to the German Nutrition Society, can have a bad effect on the cardiovascular system and promote lipid metabolism disorders. Therefore, more and more people are turning to vegetarian or vegan lard.

Vegan lard with onions is mostly made from vegetable fats like margarine. We avoid using too much fat in our recipe. Our onion lard is prepared with white beans. These are very healthy as they are rich in protein and fiber. They provide important proteins, especially for a vegetarian and vegan diet. We show you a vegan recipe for delicious onion lard.

Vegan lard: the recipe

Ingredients:

2 onions
2 tablespoons rapeseed oil
2 pieces of bay leaves
2 pieces of cloves
0.5 teaspoon
400 g kidney beans (one can)
40 ml water
1 tsp soy sauce
1 pinch(s) of salt
1 pinch(s) of pepper
0.5 tsp marjoram

Directions:

Peel the onions and chop them finely. Heat the rapeseed oil in a pan and fry the onions in it.
Add the bay leaves, cloves and allspice. Let everything simmer for another five minutes. Then remove the pan from the stove.
Drain the white beans and put them in a measuring cup with the water and soy sauce.
Using an immersion blender, mash the beans until they have a mushy consistency.
Pick the cloves and bay leaves from the pan. Stir the onions into the bean paste.
Depending on the desired consistency, you can further puree the lard with the onions. If you prefer coarser pieces, this step isn’t necessary.
Season the lard with salt, pepper, and marjoram to taste. Pour the finished onion lard into a mason jar.

Vegan lard: tips for preparation

The vegan onion lard is ready in just 15 minutes. You can prepare it ahead of time and store it in the fridge. The lard can be kept for several days in this way. With the following preparation tips, the lard is not only delicious, but also sustainable:

When shopping, pay attention to the organic quality. The Demeter seal, the Bioland seal and the Naturland seal are particularly recommended, as they represent strict guidelines.
Buy preferably regional and seasonal ingredients. In this way you can support local providers, avoid long transport routes and reduce CO2 emissions. White beans originally come from tropical areas. However, Europe is now one of the main growing regions. Since they grow all year round, you can prepare the onion lard for every season. Onions are in season in Germany from June to October. But you can buy them all year round from German storage. You can find out when which fruit and vegetables are seasonal in Germany in our seasonal calendar.
You can refine and vary the vegan lard with different ingredients. For example, chickpeas or kidney beans are an alternative to white beans. Garlic, chilli or cumin also give the lard a whole new taste.
The vegan onion lard is delicious and versatile. You can use it to fry for stir-fries or stews. It also tastes delicious as a dip or as a spread. Sometimes lard is also used in baking recipes.