Tag

how

Browsing

Parsnip and parsley root look confusingly similar. We’ll show you how to tell the two types of vegetables apart.

Parsnip and parsley root: these are the differences

Parsnip and parsley root are two types of root vegetables that are best known as fall and winter vegetables. So you can get the two tubers in Germany from October to February from regional cultivation. They are very similar in shape and color: both are white to beige in color and get narrower towards the end.

However, you can easily distinguish between the two roots by a few basic characteristics:
Parsnip and parsley root are two types of root vegetables that are best known as fall and winter vegetables. So you can get the two tubers in Germany from October to February from regional cultivation. They are very similar in shape and color: both are white to beige in color and get narrower towards the end.

How to use parsley root and parsnips

You can use parsnips and parsley roots in a similar way in the kitchen. Both bulbs are suitable as individual side dishes or as an ingredient for soups, stews and vegetable pans. You can also eat them raw and use them grated for salads, for example.

However, you should note that parsley roots taste much spicier – so only use them in moderation. Parsnips, on the other hand, are a good basic ingredient thanks to their mild aroma and are also suitable, for example, as a puree or baby food or as an ingredient for casseroles and gratins. If you slice them and bake them in the oven, you can also make healthy oven fries from the root vegetables.

You can let the yeast dough rise and store in the fridge overnight. This reduces the effort for fresh rolls or yeast buns in the morning. Here we show you what you should consider.

Many recipes with yeast dough state: the ingredients should not come cold out of the refrigerator, the yeast should be dissolved in lukewarm liquid and the dough must rise in a warm place. These clues are there because yeast is a leavening agent and consists of yeast fungi. These yeasts die off when the yeast is processed too hot and do not become active when it is too cold.

But the last aspect is not entirely correct. Yeast fungi also work in the cold, but much more slowly. Some recipes take advantage of this and let yeast dough rise in the fridge rather than in the heat. This has many advantages that you can take advantage of when baking with yeast.

Leaving yeast dough in the fridge has advantages

If you let the yeast dough rise in the fridge, you benefit from a number of advantages:

You can prepare the yeast dough the night before, let it rise in the fridge overnight and use the risen dough straight away in the morning. So you can look forward to fresh, homemade cinnamon rolls, rolls and more for breakfast. Doing it yourself is particularly worthwhile for pastries, as you can do without many of the additives. You can find out more about this in the article: This is why many people can no longer tolerate bread.
If you have made more yeast dough than you can handle at once, you can store the rest in the fridge for up to a day and don’t have to throw it away. Alternatively, you can also freeze it. It lasts like this for several months.
In addition, you only need half the yeast for refrigerator yeast dough.
The refrigerator dough is prepared with cold liquid. This avoids the risk of your yeast dying from water that is too hot.
Yeast dough from the refrigerator is often looser later. Because he has enough time to rise. Pastries made from frozen and thawed yeast dough are in no way inferior to fresh yeast pastries. The taste does not change when stored in the cold.

Yeast dough in the fridge: you have to pay attention to this

You can let yeast dough rise in the fridge overnight and store it there for up to a day. Pay attention to the following:

Prepare the yeast dough with cold liquid so that it doesn’t puff up too much.
You don’t need a pre-dough and you shouldn’t let the yeast dough rise in a warm place first.
Immediately after kneading, dust the yeast dough all over with flour and put it in a reusable and sealable bag or tin. This should be large enough for the yeast dough to spread out.
Now put the yeast dough in the fridge and let it rise overnight. The ideal duration for this is 12 to 18 hours. You can use the dough first thing in the morning or keep it in the fridge. However, it should not be left in the fridge for more than 24 hours, otherwise it could ferment.

Tips for the yeast dough in the fridge

You can form the yeast dough into balls, snails or braids before you even leave it. If you have formed small balls or pastries, you can store them in a bag that you blow open after filling. This creates more space in it and the yeast pieces do not hit the bag and deform when they rise.
Alternatively, place the yeast pieces on a baking sheet lined with parchment paper or on a floured board. Pay attention to the distance between the individual pieces of dough. You then slide the baking sheet or board into a large bag, which you seal and put in the fridge.
The bag or tin should always be closed tightly so that the dough does not dry out.
After rising: The yeast dough has risen well in the fridge overnight. If you want to bake it now, shape it as you like (if you haven’t already done so) and let the shaped pieces of dough rise again at room temperature for 20 minutes. This makes the pastry particularly fluffy.

Freezing yeast dough: What you have to consider

If you don’t want to use your yeast dough immediately after rising, you can store it longer. To do this, you put it in the freezer. There it stays at minus 18 degrees Celsius for up to six months. You can store yeast dough in the freezer as follows:

Shape the dough into a ball or patty before freezing. Then flour the dough.
Place the dough in freezer bowls or freezer bags and place in the freezer.
If you want to bake the dough later, let it thaw thoroughly beforehand.
After thawing, you can process it like conventional yeast dough. So he has to rise first. Give the yeast dough enough time to do this. Defrosted yeast dough takes about twice as long to rise as fresh dough.
Once the dough has risen, you can process it like conventional dough.

Aquafaba is a great vegan alternative to egg whites. The production is very simple and quick. We’ll show you how to make the vegan egg whites yourself.

What actually is aquafaba?

Aquafaba is the liquid that forms when you cook chickpeas or beans. You may also know it as bean or chickpea water. In vegan cuisine, aquafaba acts as a substitute for egg whites or egg whites.

Important: Only use the cooking water from the chickpeas. The water from the soak contains large amounts of phytic acid and should therefore not be used for aquafaba.

The liquid acts as a leavening agent and emulsifier. Emulsifiers combine substances that do not naturally mix. This effect is especially necessary when making cakes, otherwise you will find it difficult to make dough. You also need emulsifiers for potato pancakes or similar dishes. They hold the ingredients together and act like glue. So you can also use aquafaba to make savory vegan dishes.

However, aquafaba is probably most popular as a substitute for beaten egg whites. For example, you can use aquafaba to make meringues or mousse au chocolat.

Making aquafaba: Here’s how

You don’t need many ingredients to make aquafaba:

100ml chickpea water (after boiling or from the can)
1/2 tsp cream of tartar baking powder
1 pinch of salt
1/2 tsp locust bean gum

Now all you have to do is mix all the ingredients together and whip them up with the whisk or hand mixer. You can now use the foam that is created like egg whites. You can use the remaining chickpeas, for example to make hummus yourself.

Soy is a healthy legume found in many plant-based substitutes. Here you can find out more about their nutritional values, characteristics and possible uses.

How useful is soy? ingredients and nutritional value

Soy is best known as a plant source of protein. It is about 35 percent protein. Unlike many other plant foods, soy has a complete amino acid profile, in particular, it contains all the amino acids required by the human body.
The fat content of soy is about 18 percent and is mostly made up of unsaturated fatty acids. They play an important role in many bodily functions, including hormone production, brain function, and cell division. They also have a positive effect on the cardiovascular system.
With only about six percent carbs, soy is one of the low carb foods.
100 grams of legumes contain about 329 kilocalories.
Healthy soy also has a lot to offer when it comes to micronutrients: it contains significant amounts of magnesium, calcium, iron, zinc, and some B vitamins, among others.

Soy: This is how you use the healthy legume

In this country, soy plays an important role, especially in the context of a vegan or vegetarian diet. In the form of tofu, among other things, it is the main ingredient in many meat alternatives. This applies, for example, to plant-based burger patties, schnitzel, steaks, nuggets or cold cuts. Soy milk and soy yoghurt are also common milk alternatives.

But you can also buy the pure soybeans in Asian or health food stores and well-stocked grocery stores. You can usually get them in frozen form. When buying, pay attention to organic quality. In this way you ensure that the healthy soybeans are not genetically modified and are not contaminated with synthetic chemical pesticides.

Also, try to buy soy as locally as possible. You get soy products from German or at least European (e.g. French or Italian) cultivation.

If the beans are still in the pod, you can simply cook them in boiling water according to the package instructions and then sprinkle with a little salt and serve as finger food.

Almost every household has a washing machine, but delicate items of clothing are often unsuitable for this. What now? Do you go to the dry cleaners or do you prefer to wash by hand?

What temperature for handwashing?

Hand washing is not as complicated as you might think at first glance. And you don’t need a tumble dryer to get your favorite pieces back in shape. It doesn’t matter whether it’s your favorite jacket or an evening dress, the first thing you should do with all items of clothing is the label beforehand washing them. Because even if you don’t put your clothes in the machine, temperature specifications may have to be observed. These help you to ensure that your best piece does not shrink and that you do not bring your favorite classics out of shape by washing them incorrectly. You can easily determine the temperature with a bathtub thermometer.

The right detergent for sensitive clothing

It is best to use a washbowl or a corresponding basin, where you fill in enough water at the required temperature. Then add the detergent according to the recommended dosage. But be careful: you have to make sure that the detergent is suitable. A mild detergent is the best choice for many sensitive items of clothing. On the other hand, if the item is made of wool, you should use a wool detergent. If you need to remove stains first, you can treat them with cold water or a suitable stain remover. Please also note our tips for removing make-up stains with the effective gall soap.

Hand wash instructions

Once you have found the right temperature and detergent for your hand wash, you can begin. To do this, choose a bucket suitable for the laundry or wash larger items by hand in the bathtub. You should proceed as follows so that everything works perfectly:

Step 1: Soak

You now put the garment completely into the soapy water and move it back and forth a little. Be careful not to twirl, rub, or scrub, as this will distort the delicate fabric fibers. Now wait about 30 minutes and let your clothes soak. If stains are still visible afterward, add more warm water and extend the time. Here, too, make sure that you do not exceed the maximum temperature on the washing label.

Step 2: Rinse

The next step is to drain the soapy water or empty the tub. Now fill it with cold, fresh water and gently squeeze out the garment inside. Repeat this process until no more foam comes out of the fabric. The water must remain completely clear before the next step, as soap residue can cause discoloration.

Step 3: Express

After the cold water runs clear, empty the tub again and squeeze the liquid out of the fabric. Please make sure that you do not rub, twirl or even wring, as this will damage the fabric. Spread a dry towel on the floor and place your garment on it. Now you can carefully pull it back into shape. Now roll up the towel along with your clothing to draw even more moisture out of the fabric. And you’re done with the hand wash. In addition, read our guide to removing stubborn stains with lawn bleach.

Hand wash to dry properly

After you have largely removed the excess water with the towel, you can start drying the clothes. Layout a wide, dry towel on the drying rack or a table and spread out the washed clothes on it. Now you let it dry until there is no more liquid in the tissue. Make sure to turn every 2-4 hours so the garment dries evenly.

Preparing green tea takes a lot of learning: you have to pay attention to a few things when it comes to the infusion and the temperature so that the green tea doesn’t become bitter and the desired effect occurs.

Green tea is said to have many positive effects on the metabolism, fat burning and the immune system. Since it contains caffeine, it also wakes you up and is better tolerated than coffee.

If you want to prepare green tea in the traditional Japanese way, there are a lot of things to consider: the type of tea, the brewing time, the water quality, the temperature and the amount of tea. The teapot can also affect the taste.

Preparing green tea: that’s what matters

The water temperature and brewing time are particularly important when preparing green tea. If it brews too long, it becomes bitter. If it is too short, it hardly tastes good. If the water is too hot, good ingredients such as antioxidants or tanning agents are dissolved. If the water is too cold, these substances are not bound in the water and your tea has no effect.

For a good green tea you have to pay attention to the following:

Use low lime water
Brewing time: Depends on the type of tea, but no longer than three minutes
Water temperature: depending on the type of tea between 60 and 90 degrees Celsius
Amount of tea: 1 -2 teaspoons loose tea or 1 tea bag (approx. 10 g)
Amount of water: depending on the type of tea, one cup to one pot
In most cases, the packaging states how much tea needs to be brewed, for how long and at what degrees.

As a vegetarian, do you even get all the nutrients? As a vegan, don’t you have to do without a lot? As a vegetarian, can you still…? If such questions sound familiar to you, you can find out here how to deal with them in a relaxed manner.

Your diet is your decision. And if you don’t want to talk about it, you can tell the person you’re talking to in a friendly manner. But: You can use such questions as an opportunity to arouse interest in plant-based nutrition and break down prejudices. A few general tips:

Don’t take questions as criticism. Maybe your counterpart is just curious.
Eating is an emotional issue. You will feel this when the relevant questions trigger something in you. Nevertheless, always remain factual, avoid accusations and do not appear “proselytizing” – this is how your arguments reach your counterpart best.
The principles of so-called non-violent communication help to formulate concerns clearly and precisely and promote a successful exchange.
For the other person, too, your own diet is probably an emotional matter. Therefore, good arguments do not necessarily lead to a change of mind. And even if a person has a positive opinion about sustainable eating, they still may not act on it: this phenomenon, where good intentions and actual action diverge, is known as the attitude behavior gap.

However, if you make good arguments, treat others with respect, and are patient, you may see an increase in interest in your lifestyle over the coming weeks, months, or years. The following sections provide ideas for answers to common questions.

Why do you have to eat veggie schnitzel?!

Not all vegetarians eat veggie schnitzel and not all meat eaters despise tofu sausage. And of course nobody has to eat tofu mince and vegan sausages. You can eat very well vegetarian or vegan without meat-like alternatives. However, if you enjoy the hearty taste or the meaty texture, you don’t have to do without it.

Incidentally, language has a major impact on whether things are perceived as desirable. If you’re trying to convince someone to try a vegetarian product, describe it in a way that gets them interested. If you think it’s “super delicious”, don’t hide it behind a shy “tastes pretty good too”.

It’s still harder for vegans to live healthy, right?

Of course, vegans (and to a certain extent vegetarians too) have to take a close look at nutrients and supplement certain substances such as vitamin B12. Meat eaters tend to be less concerned about their diet, but that too comes with risks:

According to the consumer center, men consume on average almost twice as much meat as recommended. Women are at the highest recommended limit with an average of 600 grams. High meat consumption can have health consequences: For example, scientists at the World Health Organization (WHO) classify processed meat products such as salami, ham or sausages as “carcinogenic”. Unprocessed red meat is considered “probably carcinogenic”. The risk depends heavily on how much of it you eat.

Note: Sensitive groups such as children, pregnant women and the elderly must pay particular attention to their diet. If you are unsure whether a diet is right for you, seek medical advice.

Wholemeal rice contains a particularly large number of vitamins, dietary fibers and trace elements. In this article you will find out exactly what nutritional values ​​are in whole grain rice and what you should consider when preparing it.

Parboiled rice, white rice, basmati rice, wild rice: there are many different types and varieties of rice, some of which differ greatly from one another. In this article, we take a closer look at whole grain rice, also known as brown rice or brown rice. Utopia tells you what you should know about nutritional values ​​and cultivation and what you need to look out for when shopping and preparing.
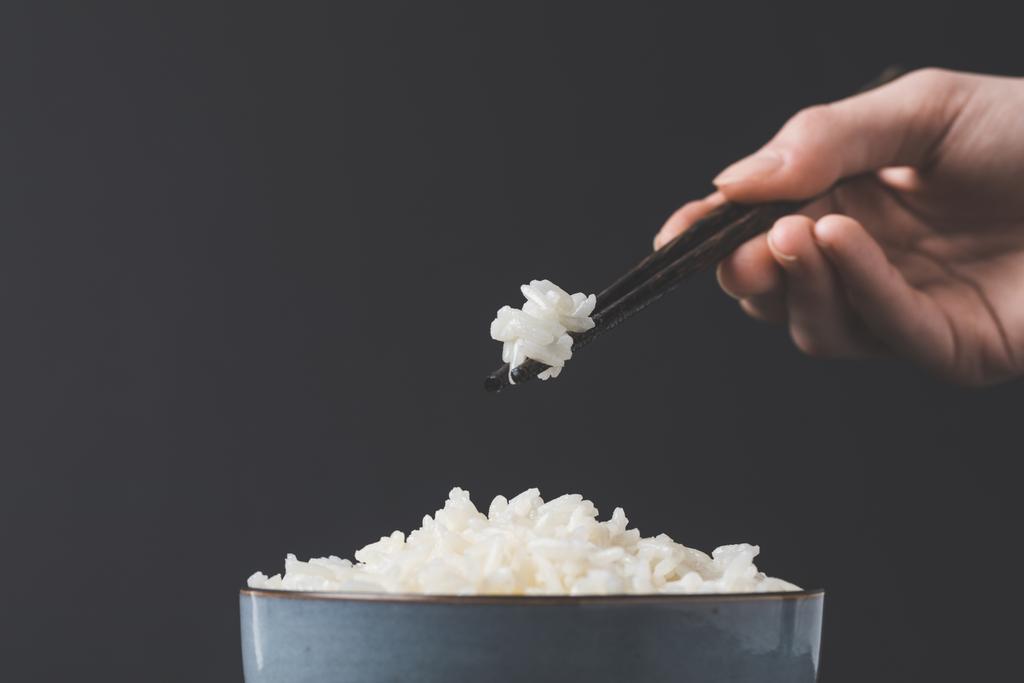
Brown Rice: These nutritional values ​​make it so healthy

The nutritional value of rice largely depends on how far the rice grain has been processed. For white rice, for example, the silver skin and the germ are removed. However, these parts of the grain of rice contain a particularly large number of nutrients. Wholemeal rice, on the other hand, is largely untreated: it only lacks the inedible husk. That is why brown rice is also considered to be the healthiest rice.

Since rice is a natural product and the exact nutrient content depends on the rice variety and the growing conditions, the nutritional values ​​of whole grain rice also differ depending on the product.

In terms of calories, carbohydrates and protein, whole grain rice hardly differs from white rice. However, whole grain rice contains significantly more minerals such as potassium, magnesium and iron as well as more vitamin B1 and vitamin B3.

The carbohydrates are primarily long-chain carbohydrates, which are considered to be the healthier carbohydrates. With almost eight percent protein, brown rice is also a good source of vegetable protein.

However, there is one major shortcoming with whole grain rice: the arsenic content. The harmful semi-metal is mainly found in the husk of the rice grain, which is why whole grain rice contains significantly more arsenic than white rice. To reduce the arsenic content, you should therefore rinse and soak rice well. Reading tip: In our special article we explain everything you need to know about rice and arsenic.

Prepare whole grain rice: tips for the kitchen

As mentioned in the first section, you should wash whole grain rice thoroughly before preparing it and ideally soak it for several hours. This allows you to significantly reduce the arsenic content. You can find out the background and what you should pay attention to in our article Washing or soaking rice – does that make sense? If you want it to be extra quick, you can skip the soaking. In any case, you should wash the brown rice until the water runs clear.

You can then cook the whole grain rice in two different ways:

Add five times as much water as rice to the saucepan. With this cooking method, the arsenic content in the rice is further reduced. Due to the high water and energy consumption, this is also less environmentally friendly.
With the quick swelling method, you only add twice the amount of water to the pot.
In any case, you put the whole grain rice in the cold water, then bring it to a boil and simmer the covered rice for about twenty minutes over a low heat. Then let the brown rice soak in the saucepan for another ten minutes.

Chicle is a sustainable raw material that some companies use to make petroleum-free chewing gum. Here you can find out what exactly is behind the substance and how recommendable it really is.

What is chicle?

Chicle is a rubbery substance derived from the milky sap of tropical trees. For the most part, manufacturers use the sap of the pulp apple tree. But the balata tree and other members of the so-called Manilkara tree family also provide the required liquid.

To get the milk from a tree, you carve a canal in the bark and siphon off the liquid. The trees are usually not damaged by this harvesting method. Even the ancient Aztecs are said to have obtained chicle and used it as chewing gum.

This is how chicle is used

Chicle is now the basis of some alternative chewing gums. In contrast to conventional products, these are therefore biodegradable. Because conventional chewing gum is based on gum made from petroleum. The production of oil brings with it major ecological problems: Among other things, it promotes social grievances and political conflicts and destroys forest areas.

In addition, petroleum-based rubber is not biodegradable. So the chewing gum sticks to roads and forest paths for a long time. Chewing gum made from chicle is said to solve this problem.

But chicle also has an ecological disadvantage: the pulp apple tree and other Manilkara species mostly come from the tropical regions of Central America. The milky juice therefore has to travel long distances to Germany and has a correspondingly poor eco-balance.

Chicle chewing gum: These products exist

Despite their questionable eco-balance, it can be assumed that chicle chewing gum is generally a more sustainable alternative to products containing petroleum. The most well-known chicle products that you can find in German drugstores as well as organic and supermarkets are:

True Gum: The Danish company produces fully biodegradable chewing gum in Denmark. The chewing gums are sugar-free and vegan-certified.
Forest Gum: This Cologne start-up also produces biodegradable, sugar-free and vegan chicle chewing gum. According to its own statements, the company relies on direct trade and pays attention to fair working conditions.
Chicza: This company’s chewing gums are one of the few chicle products to be certified organic. Overall, Chicza products have been awarded five different organic seals. This also includes the Swedish Krav seal, which stands for fair working conditions in addition to ecological criteria. Like Forest Gum, Chicza practices direct trading. The Chicza chewing gums contain sugar syrup.

Sprouting buckwheat is very easy and takes a maximum of two days. We explain step by step how you can grow your own buckwheat seedlings.

Even if the name suggests otherwise, buckwheat has nothing to do with conventional wheat. In fact, buckwheat belongs to a different plant family and is therefore also referred to as a pseudocereal.

Buckwheat is healthy, suitable for celiac disease (gluten intolerance) and versatile. You can also germinate the pyramid-shaped grains so you can even eat them raw. In our guide we will show you exactly how to do this.

Sprouting buckwheat: step-by-step instructions

To germinate buckwheat, you only need the following utensils:

a sprouting jar with a boiled lid
alternatively: make a sprout glass yourself or use a fine sieve
a handful of buckwheat, preferably organic and raw food quality
Sprouting buckwheat – instructions:

Rinse the buckwheat kernels thoroughly.Place the buckwheat in the sprouting jar. Be careful not to fill the jar more than a third full, as the buckwheat grains will increase in volume considerably as they germinate.
Fill the glass at least halfway with water so that the buckwheat is well covered. Let the kernels soak for about 2 hours.
After about two hours, drain the water and wash the buckwheat again. Don’t be surprised by the slimy consistency of the water. This is perfectly normal and will subside with each flush.
Now place the sprouting jar upside down so that the excess water can drip off. Leave the jar of buckwheat in a warm place away from direct sunlight.
From now on, rinse the buckwheat three times a day with clear water and then let the water drain thoroughly.
Depending on the ambient temperature, the buckwheat will start to germinate after 12 to 24 hours. After two days at the latest, the buckwheat grains should have sprouted half a centimeter to a whole centimetre. Then at the latest you should use the sprouted buckwheat. You should not wait longer, otherwise the grains could become musty.
By the way: If you don’t have a germination jar and use a normal sieve, the buckwheat grains may dry out faster. In this case, you’ll need to rinse them more often to keep them slightly damp. You can also cover the grains with a cup or bowl to keep them from losing moisture as quickly.

Using buckwheat sprouts: ideas for the kitchen

You can use the buckwheat sprouts in many ways. For example, try the following ideas and recipes:

Bake a buckwheat bread with whole or broken buckwheat sprouts. Of course, you can also add the sprouts to other breads and baked goods.
Add sprouted buckwheat to salads or sprinkle over soups.
Supplement muesli, porridge or yoghurt with buckwheat sprouts.
Use the sprouted buckwheat as an ingredient in the smoothie.
Blend the buckwheat with other ingredients like oil, garlic, and spices to make a pesto or spread.
Dry the buckwheat sprouts in a dehydrator or in the sun on hot summer days. The dried germs have a much longer shelf life.
Shelf life: You should use the sprouted buckwheat as soon as possible. The sprouts will keep for a maximum of three days in the refrigerator.