Tag

them

Browsing

You can actually eat banana peels. Raw they taste rather bitter, but they are easy to process. We’ll show you how.

Eating banana peels sounds strange at first. But not only the inside of the banana contains many nutrients, but also the banana skin – it is particularly rich in potassium. Since banana peels are quite firm and fibrous when raw and also taste bitter, you should eat them cooked. The banana peels taste a little sweet and slightly nutty.

Eat banana peel – You should pay attention to this

If you want to eat banana peels, you should buy organic bananas. According to a sample from Öko-Test, unripe bananas are very susceptible to caterpillars and fungal diseases, which is why they are protected from infestation in conventional agriculture with synthetic chemical pesticides.

Also make sure that you wash the bananas well before further processing, even if you use organic bananas. Sometimes pesticide residues are also found on bananas from organic farming.

Eat banana peel: That’s why it’s a good idea

When you eat banana peels, you’re not only helping to reduce food waste – banana peels contain many vitamins, such as vitamin C, vitamin B6, vitamin K and folic acid.

In addition to the vitamins, there are also some minerals such as potassium, magnesium and phosphorus in the banana peel.

Four quick banana peel preparation ideas

There are several ways to eat banana peels. These recipes are quick to make and taste good:

Baked Banana Peel:

Separate the top and bottom of the banana peel and cut into strips.
Sprinkle the banana peel with sugar or drizzle with simple syrup or honey.
Let the banana peels cook in the oven at 180 degrees for half an hour.
Pulled banana peels:

Cut off the ends of the banana peel again.
Using a fork, tear the banana peel lengthwise into strips. Season with oil, paprika powder and cumin.
Sauté chopped onions and garlic in oil. Then add the banana peels with some water and wait five minutes.
Now add barbecue sauce and let the pulled banana peels simmer for ten minutes.
Season everything with salt and pepper.
Banana Peel Smoothie:

Cut two peeled bananas into small pieces.
Add 1 tablespoon cocoa, 3 teaspoons chia seeds, and 3 teaspoons grated chocolate, and 8 ounces apple juice.
Blend everything in a blender for about 30 seconds.

Banana Peel Cake:

Preheat your oven to 180 degrees.
Cut three banana peels into chunks and place in a blender with 1/4 cup of water.
Separate the yolks from two eggs and save the whites for later. Then beat the egg yolk with a cup of cane sugar and 30g of butter until a light yellow mass forms.
Mix in the banana peels, then add 1.5 cups of flour and 3 teaspoons of baking powder.
Then beat the egg whites until stiff and carefully fold them into the cake mixture. Pour the mixture into a baking pan and let it bake for about 30 to 40 minutes (depending on the thickness of the cake).

Oranges smell wonderful and taste delicious. But the orange peels are too good to be thrown away. We’ll tell you how to continue using them.

Oranges are one of the most popular types of fruit, and not just in the cold season when you’re sitting comfortably indoors. No wonder, because they are delicious and contain a lot of vitamin C. But very few people think about the ecological balance of the delicious citrus fruit. For their production alone, 560 liters of water are used per kilogram of oranges in Mediterranean regions. If the citrus fruits come from further away, it is often even more liters. The oranges that you can buy from us mostly come from Spain or Italy. A lot of CO2 is emitted on the long transport routes.

Therefore, you should pay attention to the following when buying:

Only buy organic oranges and make sure they are grown fairly. Many pickers in conventional farms are only paid a pittance.
Pay attention to the country of origin. Opt for fruits that have been grown in Europe rather than those from South America.
Although oranges can be bought all year round, their main season is from November to March, as they are harvested in autumn. So it is better to buy oranges in these months than in summer.
Keep the oranges in a cool, ventilated place and consume them within a few days. Otherwise they can easily spoil.
Since the ecological balance of oranges is rather poor, you should use the citrus fruit completely – including its peel.

Basically, you can use the bowl in different forms:

Fresh: Use the zest immediately after peeling the orange
dried: Place the orange peels on the heater or let them dry at room temperature on a kitchen towel for several days. Once the peels are dry, you can store them for a long time.
If you want to use the orange peel in the kitchen, you should definitely buy unsprayed organic fruit.
By the way: You can also use all of these tips on tangerine peels.

You can find out how you can use orange peel in the following sections.

This is how you continue to use orange peels in the household

Remove limescale: You can use fresh, undried orange peels to combat limescale stains in the bathroom or kitchen, as the peels contain citric acid. You can rub off affected fittings with the inside of fresh orange peel, which will make them look almost like new again.
Neutralize odors: You can use fresh orange peel to remove odors, for example if plastic bowls or lunch boxes smell unpleasant. Rub them with the peels and then wash them out thoroughly.
Against stench in the oven: Orange peels even help against stench in the oven: simply heat them briefly in the oven. Thanks to the essential oils it contains, the bad smell will soon be a thing of the past.
Orange peel instead of fabric softener: You can also use untreated orange peel as an alternative to fabric softener. Simply put the shells in a cotton bag and put them in the wash. They help soften the water. In addition, everything smells wonderfully of oranges afterwards.
Orange peels instead of rinse aid: The same works as a rinse aid substitute for the dishwasher: simply put the fresh orange peels in the cutlery tray.
Orange peels against moths: Dried orange peels help against moths. Just put or hang a few in your closet.
Homemade all-purpose cleaner: You can easily make your own all-purpose cleaner from fresh orange peel and vinegar.

Orange peel: A versatile ingredient in body care

Help with blemishes: With the essential oils from orange peel you can fight age spots and pimples. Rub the white inside of a fresh orange peel over the affected area. If you repeat this a few times, the affected skin should recover.
Bad breath remedies: Chewing on untreated orange peel can help against bad breath. However, you should not do this too often, as the acid it contains can damage your tooth enamel. You should then give yourself some time before brushing your teeth the next time.
Shiny hair: You can also make hair conditioner from orange peels. Put the orange peels in a bowl and cover them with apple cider vinegar. Let the whole thing steep for about two days. Then pour off the orange peel and fill up the vinegar solution with water. It should be about three times as much water as apple cider vinegar. After washing your hair, pour the conditioner over your head without rinsing it out afterwards. The acidic rinse removes residue from your hair and gives it new shine.

Orange peels bring delicious flavors to the kitchen

Orange tea: You can quickly and easily make your own tea from orange peel. To do this, pour hot water on them when they are fresh or dry. The tea should steep for about ten minutes. The peel of an orange is enough for a pot of tea.
Citrus aroma for baking: With dried lemon, tangerine or orange peel you can give your home-baked pastries a fruity note. Plane off part of the peel and let it dry well. After that, you can store the pieces in a jar. Make sure the can is dry and airtight.
Vitamin C powder: Using a blender or food processor, crush dried tangerine or orange peel until pulverized. You can sprinkle the vitamin C powder obtained in this way over your muesli or eat a spoonful every now and then to strengthen your immune system.

Freezing chickpeas is a great way to always have the healthy legumes ready to cook. We’ll show you what to look out for when freezing chickpeas and how to use them.

Freezing chickpeas preserves the legumes even when cooked. Recipes that use chickpeas usually call for cooked chickpeas. However, the cooking time of legumes is very long, so they are not suitable for a quick meal uncooked.

Chickpeas are healthy because they have valuable vegetable protein, proteins and other healthy ingredients. Legumes are used in a variety of ways in the kitchen. If you freeze cooked chickpeas, you’ll always have them ready to cook.

When buying chickpeas, pay attention to organic quality. This protects the environment, since organically certified seals such as Demeter or Bioland do not use synthetic chemical pesticides.

By the way: in your own garden is very easy. You can grow your own chickpeas in the garden to avoid having to buy them at the store. This is how to plant and care for chickpeas.

Freeze chickpeas: this is how it works

Freezing chickpeas is quick and easy. Only the cooked chickpeas are suitable for freezing. Because in the dried state, properly packaged, the legumes can be kept for many months.

If you want to freeze chickpeas, then proceed as follows:

Cook the chickpeas according to package instructions. In another article, you’ll learn everything you need to know about cooking or soaking chickpeas.
Catch the chickpea water, because you can use it in many ways. In another post we have tips on this: Don’t throw away chickpea water! 5 ideas how to use it
Let the cooked chickpeas cool.
Place the cooked chickpeas in a freezeproof, sealable container. Make sure the containers are reusable. This is how you avoid rubbish. Also read: Freezing food without plastic
Place the container of chickpeas in your freezer. Important: If you are freezing in glass, do not fill the glass to the top, but leave some space so that the chickpeas can expand during freezing. Also, only close the lid after a few hours in the freezer, otherwise the jar may burst if the contents expand too much.
Tip: Freeze the chickpeas in several small containers. So you always have the right amount at hand for a meal.

Recipe ideas for chickpeas

Freezing cooked chickpeas will keep the legumes for a few months. Get them out of the freezer when you need them and use them in delicious dishes. You have two options for this:

Thaw the chickpeas before cooking:

Place them in a bowl in the fridge overnight to use the next day, or
let them thaw at room temperature for a few hours.
If you want it a little faster, put the frozen chickpeas in a small bowl and thaw them in a water bath over medium heat.
With the thawed chickpeas, you can cook particularly well recipes in which the chickpeas are pureed or should be used fresh, i.e. not further cooked and baked. For example, try the recipe for a classic hummus or a fresh chickpea salad.

Use frozen chickpeas:

Add the frozen chickpeas to a soup or warm dish and cook with the remaining ingredients until soft again.

Recipes that use cooked chickpeas also work well to use your frozen chickpeas. For example, they taste great in chickpea curry or chickpea soup.

Tip: Fry the frozen chickpeas in a little oil in a pan. Once they have softened, season them with herbs and spices of your choice.

If an avocado is brown on the inside, you don’t necessarily have to throw it away. In many cases, the delicious fruit is still edible. In this tip, we explain how to distinguish ripe avocados from spoiled ones.

Avocados are delicious, are rightly considered a healthy superfood and are becoming increasingly popular. However, the tropical fruits have a catch in addition to their bad ecological balance: It is not exactly easy to distinguish ripe or spoiled avocados from the outside – the surprise often only comes after cutting open. If you then find that the avocado is brown on the inside, you don’t have to throw it away right away. We explain how you can recognize a good avocado.

Avocado brown inside – still edible or spoiled?

There are two reasons why avocados turn brown on the inside:

If you cut open an avocado and don’t use it right away, the flesh will turn brown over time. This is due to oxidation, which also causes the brown coloring of sliced ​​apples. As a result, the avocado no longer looks as appetizing, but it is still edible. It is better to cut open avocados just before eating them. Alternatively, you can brush the cut surface with a little lemon juice to slow down the browning.
However, if the avocado is already brown on the inside when you cut it, it may no longer be edible. Below you will find out what you should pay attention to in this case.
If the avocado is brown on the inside, you should rely primarily on your senses and feelings. The following indicators will help you distinguish a ripe from a spoiled avocado:

If there is only a brown spot under the avocado skin, it is most likely a bruise. In this case, you can cut away the spot and still use the remaining fruit.
If the avocado only has one or two small brown spots inside, it’s still edible in many cases. Simply cut away the spots and use the remaining pulp.
However, if the flesh is streaked with brown spots or brown in several large areas, the avocado is no longer edible. In this case, you should discard the fruit.
The same applies if the fruit is very fibrous and has thin threads. Then the avocado is also no longer edible.
If you then have an unpleasant smell or taste or even moldy spots, you should definitely not eat the avocado anymore.
Caution: If the avocado has visible mold anywhere, you should definitely not eat it. It is then not enough to just cut away the moldy area, since the mycelium of the mold could have spread invisibly throughout the fruit.

Recognizing ripe avocados: you should pay attention to this

If you observe the following points, you can tell a spoiled avocado from a ripe one before you buy it and thus avoid food waste:

With the pressure test, you can see the degree of ripeness of an avocado from the outside: press lightly on the skin with the palm of your hand – an unripe avocado is hard, while a ripe avocado gives slightly. On the other hand, if it feels mushy or seems to have collapsed under the skin, the avocado is probably already bad. Attention: Don’t just do the pressure test with one finger but with the palm of your hand, otherwise the avocado will easily bruise.
Pay attention to the base of the stem: If the avocado is already brown here, it is probably already brown on the inside and no longer good. A better sign is if the avocado is still fresh and green at this point.
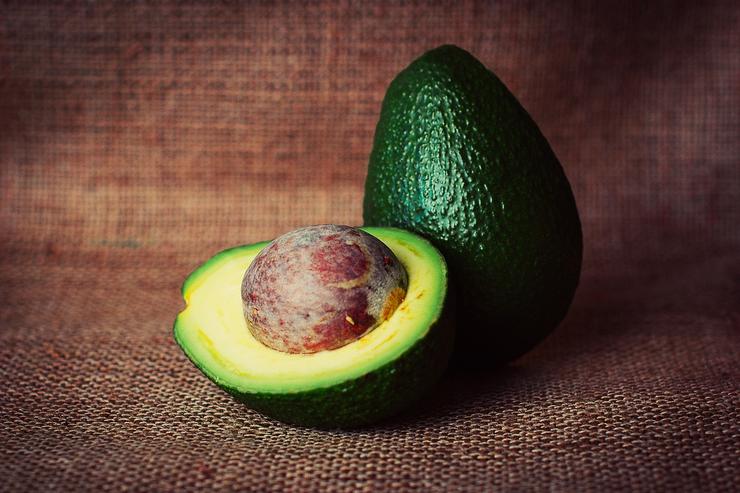
The color of the skin can also indicate a spoiled avocado: In the case of the most common type of avocado, ‘Hass’, it should be dark green or brown. If the skin is already black, the avocado is probably no longer good – especially if it feels a bit spongy. Other avocado varieties, such as the ‘Fuerte’, keep their green color even when they are already ripe.
Mold is always a clear indicator of a spoiled avocado. Even if the avocado only has a moldy spot on the outside, you shouldn’t buy it anymore.

Use unripe and overripe avocados
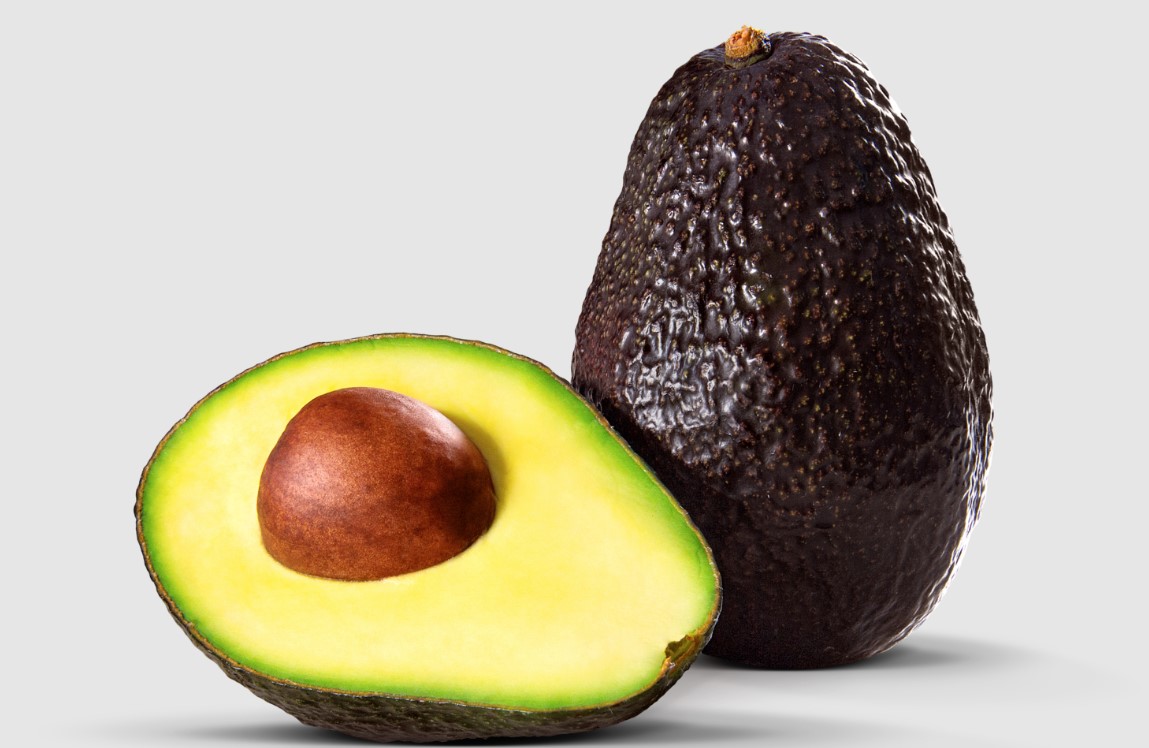
A sliced ​​avocado should be light green to yellowish on the inside and pleasantly soft (see picture above). If the flesh is still hard, the avocado is not yet ripe and has not yet developed its delicious aroma:

Unripe avocados ripen within a few days at room temperature. This is even faster if you store the avocado near apples.
If you have already cut open the avocado and only then discovered the hard flesh, you can still let it ripen a bit. So that it doesn’t turn brown inside, you should brush the cut surface with a little lemon juice or olive oil, put the stone back in the middle and close the two avocado halves together again. So you can easily let the avocado sit for another day and ripen.
If an avocado is already very ripe and soft, you can no longer cut it into pieces and use it in a salad. Nevertheless, you can still conjure up delicious dishes from overripe but edible avocados:

Especially for homemade guacamole, avocados should be really ripe and soft anyway, as the flesh is crushed anyway. Our recipe shows you how to make the delicious dip yourself.
You can also use overripe avocados for other sauces, dressings and dips. Depending on the recipe, you can simply puree them with the other ingredients.
You can also use ripe avocados in smoothies. It is particularly tasty, for example, if you puree an avocado with two bananas, a heaping tablespoon of cocoa powder and, if necessary, some sweetener.

Buying avocados sustainably – buying tips

Avocados are rightly considered a healthy superfood: The tropical fruits are rich in unsaturated fatty acids and have a high content of B vitamins, vitamin A and vitamin E. They also provide several essential amino acids and minerals such as potassium and magnesium.

However, the avocado is not so brilliant in terms of its ecological balance: Most of the fruits come from Central and South America and have therefore been transported long distances in refrigerated containers. In addition, avocado trees need a lot of water: an estimated 1,000 liters of water are needed for one kilo of avocado – and the growing areas are usually already dry.

Organically farmed avocados have a better life cycle assessment than those from conventional farming that uses mineral fertilizers. In some supermarkets and health food stores you can also buy avocados from Spain, Portugal or Israel. This means that the delicious fruits have a significantly shorter transport route behind them.

Nevertheless: Even organic avocados from Spain have an immense ecological footprint and should therefore only be bought and used seldom. Instead of guacamole, you can also make pesto yourself from local ingredients, for example.

When you cook carrots, you ensure that your body can better utilize the healthy nutrients. Here you can find out what else you should consider when preparing carrots.

Vitamins and nutrients in carrots – It depends on the cooking

Carrots taste wonderful in a salad or as a snack between meals. But did you know that their valuable ingredients can be utilized even better by your body with the right preparation method?

A study conducted in Sweden in 2012 examined how the availability of the healthy, fat-soluble carotene varies depending on how it is prepared. The conclusion was that both adding fat and cooking the carrots made the valuable ingredients easier for the body to utilize. Above all, however, chopping the vegetables has a positive effect on availability, as reported by ZEIT online.

According to the study, around three percent of the carotene in whole or roughly chopped carrots passes into the gastric juice.
By cooking, the amount can be increased to six percent.
By adding additional oil, the value increased to eight percent.
However, if the carrots were strained or grated before consumption, the value increased many times over: the availability of beta-carotene in boiled and grated carrots increased to a full 27 percent. With additional oil, the value even increased to 45 percent.

Boil the carrots or cook them in a sieve

In order to preserve as many of the healthy ingredients in the carrots as possible during cooking, you should cook them as gently as possible. That’s how it’s done:

Using a vegetable brush and water, scrub the carrots thoroughly to free them from soil.
Cut off the base of the leafy greens and the carrot into small pieces – as you need them for the dish.
Just barely cover the vegetables in the pot with water. The carrots don’t have to be completely immersed in water to cook, as the vitamins are lost in large quantities in the cooking water.
Steam cooking with a sieve insert is even gentler. This allows the carrots to lie in the sieve without coming into contact with the cooking water. Vitamins and nutrients are optimally preserved. Make sure to close the pot and sieve insert with a suitable lid. This will ensure that the steam cooks the carrots properly.
The cooking time in the sieve insert is slightly longer than when cooking in water. Depending on the size of the pieces, carrots require between 10 and 15 minutes. Before the time is up, test your carrots for consistency by puncturing them with a sharp knife. Anything you like is allowed! If you prefer your carrots to be soft, let them cook a little longer. If you like them crispier, shorten the time accordingly.


Season the carrots with as little salt as possible. Salt removes water from the carrots and thus the healthy nutrients.
Tip: Use carrots from organic farming. It has been scientifically proven that organic vegetables and fruit contain more vitamins than conventionally farmed vegetables. Enjoy your meal!


There are a number of ways you can use mulled wine. We’ll give you an overview of how to incorporate the leftovers when cooking and baking and present a quick and easy recipe for mulled wine jelly.

As a seasonal specialty, mulled wine is mainly popular during the cold season. When it gets warmer again, the desire for the hot drink gradually decreases and whole or opened bottles are often left behind. But even after a convivial winter evening, the question can sometimes arise the next day as to how leftover mulled wine can still be used.

Whether the leftovers are whole bottles or just small leftovers, you don’t have to throw them away. Even a few tablespoons can still be useful when baking. Here you can find out what options you have for using mulled wine in the kitchen.

Use mulled wine: Various possibilities

Christmas pastries are particularly good for using up leftover mulled wine. After all, mulled wine contains spices such as cinnamon, cloves or orange peel and therefore goes well with recipes that use similar combinations of spices.

You can add a special touch to a simple frosting by mixing it with mulled wine instead of water. Traditionally, such a mulled wine icing goes well with spice cakes, for example. You can also use it to glaze gingerbread, gingerbread, gingerbread or other Christmas cookies.
You can also refine the taste of the dough of a spice cake by replacing all or part of the water in the recipe with leftover mulled wine. This also works with other Christmas cake specialties or with classics such as Bundt cake and chocolate cake.
If you prefer to use the mulled wine in liquid form, it is a good basis for homemade sangria or a Christmas punch, for example. By the way: You can also use leftover punch in a similar way to leftover mulled wine by using it to refine pastries or desserts.
Mulled wine is also popular as a base for mousse. For example, in this recipe for gingerbread mousse, you can swap out the kirsch for the same amount of mulled wine. Or you prepare a classic red wine mousse with mulled wine.
Or you can try our simple recipe for mulled wine jelly.

Recipe for using mulled wine: mulled wine jelly

The basis for this recipe is 350 milliliters of mulled wine, i.e. about half a bottle. You can fill four small glasses (200 milliliters) with the finished jelly, for example. If you are working with leftovers, you can of course adjust the quantities and make more or less jelly accordingly.

Ingredients:

350 ml mulled wine
400 ml orange juice
500 g preserving sugar 2:1
1.5 tsp

Directions:

Pour the mulled wine and orange juice into a sufficiently large saucepan and bring the mixture to a boil.
Stir the jam sugar into the boiling liquid and let it simmer for about 10 minutes. Keep stirring constantly.
After ten minutes, reduce the heat to zero. The foam that forms during the boil should then collapse, leaving a clear jelly mass. You can skim off the remaining foam if necessary.
Pour the mulled wine jelly into sterilized glasses. Turn the jars upside down and let them cool in this position for at least 4 hours.

Unopened, stored in a cool and dark place, the mulled wine jelly will keep for at least six months. You can eat it pure on bread, but it also goes well with soft cheeses such as Brie and Camembert or with strong hard cheeses.

If you want, you can refine the taste with additional Christmas spices. In the second step, for example, let a clove cook in a hanging sieve or add some grated orange zest. Instead of orange juice, you can use apple juice in the jelly.

Vegan substitute products can expand the plant-based kitchen and facilitate the switch to a vegan diet. With these recipes you can make soy milk, tofu, vegan cheese and more yourself.

The range of vegan substitute products is getting bigger and bigger – from classics such as plant-based milk alternatives and vegan cream to schnitzels that do not contain any meat or other animal products. Some of these substitutes have become so popular that they’ve found their way into vegetarian and flexitarian kitchens.

The vegan substitute products are no longer only available in health food stores and health food stores, but also in all supermarkets. You can also make the plant-based alternatives yourself at home: in many cases you only need a few ingredients. We will introduce you to various recipes for vegan substitute products.

Vegan substitute products: it’s worth making your own

Many people find vegan cuisine to be more creative and varied than conventional cuisine with milk, cheese and meat. The reason for this is, among other things, the large variety of vegan substitute products, thanks to which you do not have to do without your usual dishes. For example, you can replace cow’s milk with one of the many plant-based alternatives, such as soy, oat or almond milk. There are also good alternatives for yoghurt, cheese and various meat products.

Above all, the plant-based substitutes make it much easier to switch to a vegan diet. So you don’t have to do without the usual dishes such as pizza, gratinated casserole or rice pudding.

Most people buy pre-packaged vegan substitutes at the store. You can often make the plant-based alternatives yourself with little effort. This has several advantages:

Costs: Doing it yourself is usually much cheaper than buying it. A liter of homemade organic oat milk only costs around 20 to 30 cents. You pay at least 90 cents for it in a shop, which is easily three to four times as much.
Ingredients: Purchased vegan substitute products sometimes contain additives such as emulsifiers, preservatives or flavorings. By making the vegan foods yourself, you have full control over the ingredients.
Health: The “Albert Schweitzer Foundation for our environment” examined 250 meat alternatives in a study. Compared to animal products, these fared significantly better in terms of health and the environment. Nevertheless, the researchers criticized the mostly excessive salt content and unfavorable fatty acid profiles of the products. You can make homemade substitute products healthier – for example with less salt and linseed oil or rapeseed oil instead of sunflower oil.
Less waste: By making vegan substitute products yourself, you create less waste. You can buy the basic ingredients such as soybeans, oatmeal or walnuts in larger quantities and don’t have to buy new packaging every time. This means that homemade substitute products are also more environmentally friendly.

Make vegan milk substitutes yourself

Milk is not only popular in coffee, but also as an ingredient for many dishes such as rice pudding, pudding or béchamel sauce. Vegan cuisine knows more than just one milk alternative and has something to offer for every taste.

Carotenoids are natural pigments that give carrots their orange color. They are also essential nutrients. Here you can find out what they can do and where you can find carotenoids.

Carotenoids and Vitamin A

Carotenoids are a whole group of phytochemicals. According to the medical portal DocCheck, over 1,000 different carotenoids are known in the plant world. The plant substance is fat-soluble pigments that color plants from yellow to red. The color of fruit or vegetables gives you an indication that they might contain carotenoids. Yellow, orange or red fruits and vegetables are usually rich in carotenoids.

But there are exceptions. Carotenoids can also be found in green leafy vegetables. Here the green leaf pigment covers the reddish carotenoids.

Of the numerous carotenoids in the plant kingdom, six are vital for the human organism:

  • alpha and beta carotene
  • lycopene
  • lutein
  • cryptoxanthine
  • zeaxanthin

Carotenoids – here they are contained everywhere

Of the carotenoids, beta-carotene is the most common in our food. The German Society for Nutrition (DGE) explains that the body can process beta-carotene most easily.

You can find beta-carotene in a variety of different vegetables and fruits. According to the DGE, the following foods are good sources of the plant substance:

Vegetables: carrots, sweet potatoes or squash.
Fruit: apricots, honeydew melon, but also persimmons or persimmons.
Leafy greens: kale, spinach, or lamb’s lettuce.
These vegetables also contain essential carotenoids:

Tomatoes: they mainly contain lycpoin.
Paprika or chili: here the carotenoid capsanthin not only provides the color but also the spiciness. You can use the hot chilies in a peach chutney with tomatoes, for example.
Maize or einkorn: Maize and the ancient grain einkorn contain zeaxanthin. You can make a protein-rich snack yourself from roasted corn.
With these recipe ideas you bring the healthy carotenoids to the table:

Stuffed Pumpkin: A recipe with spinach and feta
Kale: vegetarian recipe ideas to cook at home
Tomato and polenta casserole: A simple recipe
Paprika vegetable recipe: This is how you prepare it deliciously
Oil or fat is an important ingredient when preparing meals containing carotenoids. Carotenoid is a fat-soluble plant compound. The fats make it easier for the body to absorb the substances. According to the DGE, 2.4 to five grams of fat per meal are sufficient. Fry the vegetables with a little oil or serve creamy quark with the fruit salad. The vegan solution is to add some linseed oil to the dressing.

The carotenoids are essential nutrients

Carotenoids are an essential nutrient for humans. The body needs the plant substances, among other things as a precursor for the vital vitamin A (retinol). The medicine portal Netdoktor explains that vitamin A is important for healthy bones, teeth and eyes. It is further involved in the structure of the skin and plays a role in the development of the fetus during pregnancy.

To ensure an adequate supply of the important vitamin A, the human body has two options:

Carotenoids from plant food – They are a precursor, also called provitamin A. The body then uses it to build vitamin A itself.
Get vitamin A from foods of animal origin. The organism of animals also builds vitamin A from carotenoids in vegetable feed. That is why ready-made vitamin A is already contained in cheese, milk or meat products, for example.

Carotenoids are much more than just a precursor to vitamin A. They themselves are also involved in important functions in the body:

One study found that the retina of the eye contains carotenoids such as lutein and zeaxanthin. Beta-carotene is also necessary for vision.
Carotenoids strengthen the immune system and act as antioxidants. They help keep body cells intact. This is what DocCheck calls beta-carotene or lycopene in connection with cancer prevention. Studies indicate, for example, that lycopene could reduce the risk of prostate cancer.
Carotenoids are part of the human pigment melanin and are therefore involved in the formation of the color of skin, hair and eyes. The pigmentation acts as a natural protection against UV rays.

Carotenoids in a vegan diet

The body can usually cover its vitamin A requirements well with the carotenoids from plant-based food. The DGE explains that there are no thanks for a vegan diet and healthy fat digestion.

But there are exceptions: If fat digestion is disturbed or you have problems with the pancreas, you should seek medical advice to be on the safe side. This also applies if you have an increased need for nutrients, for example if you are pregnant or breastfeeding.

Oversupply and undersupply of carotenoids

Don’t worry about oversupply. The DGE explains that too much carotenoid from natural sources is hardly possible. In addition, no health risks were found when carotenoids were ingested through vegetables and fruit. For this reason there is no limiting value.

On the other hand, there is a maximum amount for beta-carotene as a coloring agent (E 160a). It can be added to foods such as fruit juices, butter, margarine or cheese. The European Food Safety Agency (EFSA) has set a minimum amount per day for this. The tolerable amount is six to 15 milligrams a day.

The DGE also points out that improper intake of high-dose vitamin A or beta-carotene in food supplements can cause long-term vitamin A intoxication (poisoning) with liver damage.

Vitamin A deficiency is extremely rare. According to the DGE, a deficiency in our latitudes can usually only be caused by illness. For example, in the case of chronic intestinal diseases or severe burns, the body has an increased need for vitamin A. Symptoms that can indicate a deficiency are very dry skin and mucous membranes as well as loss of appetite or night blindness.

Storing asparagus properly will help the vegetables stay fresher for longer. We give you tips for white and green asparagus and also show you how to store asparagus dishes.

How long you can store asparagus depends on its condition: peeled, unpeeled, or already cooked. In this article, you will find out how best to store white and green asparagus and what you should pay attention to when storing prepared asparagus dishes.

Vegetable asparagus is one of around 200 species from the genus asparagus. You can find the young shoots of the plant in stores. Germany is the largest asparagus producer in Europe and one of the five largest asparagus producers in the world.

The asparagus season in Europe runs from April to the end of June. In order to avoid long transport routes and to protect the environment and climate, you should only buy asparagus regionally and seasonally. Buy organic asparagus to be sure they are free of synthetic chemical pesticides.

Store white asparagus correctly

In the trade, you usually get white asparagus packed in bundles that are fixed with a rubber band. To keep the white asparagus fresh for a long time, proceed as follows:

  • Remove the rubber band from the asparagus. The rubber cuts into the asparagus spear and prevents fluid exchange between the cells. This will dry out the asparagus faster. Tip: Don’t throw away the ribbons, but keep using them, for example to make Easter eggs.
  • Check all asparagus spears for rotten or moldy spots and cut them off if necessary. Pay particular attention to the sensitive asparagus tips and the cut.
  • Remove spoiled asparagus spears.
  • Wrap the asparagus in a damp, clean kitchen towel to keep it fresher longer.
  • It is best to keep white asparagus unpeeled and lying flat in the vegetable compartment of your refrigerator.

Stored in a damp cloth in the refrigerator, white asparagus stays crisp for up to 4 days.

Tip: You can freshen up slightly dried-out spears by cutting off the dry ends and briefly placing the asparagus spears in cold water.

Store green asparagus correctly

Green asparagus stays fresh best when stored upright.

As already described for the white asparagus, remove the rubber band from the asparagus.
Check all asparagus spears for rotten or moldy spots and cut them off if necessary. Pay particular attention to the sensitive asparagus tips and the cut.
Remove spoiled asparagus spears.
Place the asparagus spears in a vase or jug of cold water.
You can also wrap the tips in a beeswax wrap to protect them from wilting. Tip: You can also make oilcloths yourself.
Place the “bunch of asparagus” in a cool place out of direct sunlight. The refrigerator, the cellar, or the pantry are also suitable for this.
Green asparagus will keep in a cool vase for 3 to 4 days.

Store peeled asparagus correctly

You should prepare peeled asparagus within a few hours.

Store peeled asparagus in an airtight container in the refrigerator.
Process the peeled asparagus within 3 to 4 hours.
If you have already peeled the asparagus and then prefer not to cook it, you should freeze the asparagus to prevent spoilage. Fill the cut asparagus in portions into freezer cans or into a glass dish with a lid. Tip: Freeze food in a jar: this is how it works

Frozen asparagus will keep for up to 6 months. Use frozen asparagus for your meal without defrosting it first.

Recipe ideas for the preparation of asparagus

Asparagus can be prepared in many different ways as a starter, soup, salad or main meal. You can find recipes for it here:

  • Shelled asparagus soup
  • Asparagus Cream Soup
  • Recipe ideas for asparagus salad
  • Asparagus risotto
  • asparagus bake
  • Asparagus quiche
  • Springlike asparagus tarte flambée
  • Asparagus strawberry salad
  • Fried noodles with asparagus
  • Asparagus casserole: classic from the oven
  • and more asparagus recipes

You can eat asparagus raw, but there are a few things to keep in mind. Or get creative with the following cooking methods:

  • Grilled asparagus
  • Roasted asparagus
  • Cooked asparagus
  • Asparagus from the oven

Store asparagus dishes correctly

Asparagus dishes should be eaten as fresh as possible. Even cooked asparagus only stays fresh to a very limited extent. If you store cooked asparagus for too long, bitter substances will develop.

If something is left over, do the following:

  • Pack the asparagus dish in a well-sealable tin. Alternatively, you can store asparagus sauce or asparagus soup in a small saucepan with a lid.
  • Store the asparagus dish at refrigerator temperature.
  • You should eat the asparagus dish within a day.
  • Reheat the dish fully before eating.
  • An exception is the asparagus soup, which stays fresh for up to two days.

Tip: If you know that you won’t finish your asparagus dish within a day, simply freeze the meal in portions.

Fermenting radishes is a quick and healthy way to preserve the tubers for a few months. You also benefit from their healthy nutrients in winter. We’ll give you a simple recipe to make yourself.

If you ferment radishes, you can enjoy them all year round. Root vegetables are usually in season from May to October. That’s when the little red bulbs taste best.

By fermenting you can preserve their taste and the valuable ingredients for the other months. Radishes owe their hot note to their mustard oils. They are good for the immune system and make radishes so healthy.

Radishes originally come from Asia. However, they are also available from regional cultivation. When buying, make sure that they come from organic farming. This protects your health and the environment, since no chemical-synthetic pesticides are used.

Tip: Prefer radishes and plant radishes yourself. This can be done in the garden or on the balcony.

Fermenting radishes: How to do it

Ferment radishes quickly with this easy recipe. You need for this:

  • Cutting board and knife
  • Sterile mason jar with a capacity of 1.5 l (tip: this is how you can sterilize jars)
  • Fermentation weight: the weight is important to keep the radishes covered in liquid. Purchase special glass or ceramic weights from specialty retailers. Alternatively, use acid-resistant items. It is important that you can take the weight off easily. For example, place the weights in a reusable freezer bag. There are also weights that come with a handle so you can take them out easily.

Ingredients:

1 bunch of radishes
20 grams of salt
1 liter of water
1 tsp black peppercorns
1 tsp mustard seeds

Directions:

Mix the salt with the water and stir until the salt is completely dissolved. Here’s how to make 2% brine.
Remove the leaves from the radishes and wash the radishes thoroughly. Tip: reuse the radish leaves to avoid wasting food.
Cut off the tops of the radishes. Optional: Halve or quarter your radishes so you can enjoy them as a snack afterwards. Of course, you can also ferment them whole.

Now put the pepper and mustard seeds in the glass. Add the radishes to weigh the spices down.
Place a fermentation weight on the radishes and top up the jar with the brine. Leave a small rim of about an inch so the jar doesn’t overflow when fermentation begins. Close your jar and label it with the contents and the date.
Store the radishes at room temperature for the first week to allow fermentation to begin. Then put them in a cool place or in the fridge for at least two weeks.
After three weeks, the radishes are fully fermented. Keep them cool and make sure they are always covered by the brine. Then the radishes will keep for a few months.
The fermented radishes taste delicious as a snack between meals and go great as a side dish with bread or in fresh salads.

Fermenting: why does it make sense?

Fermenting radishes and other foods is a traditional way of preserving fresh produce longer. As a result, important nutrients and vitamins are retained. This was particularly important in the past, when there was no imported food from the south in winter.

Fermented radishes are probiotic. This means that they contain living microorganisms that have a positive effect on the stomach and intestinal flora. The fermentation process is called lactic acid fermentation. Don’t let the name put you off. Lactic acid is formed when food begins to ferment. The product remains completely vegan. Also read: Is lactic acid vegan? You should know that.

If you want to ferment your radishes, use the right helpers. This allows you to ferment quickly and safely.

By the way: If you store your radishes properly, they will stay crisp longer. Freeze radishes to make them last longer.