Tag

Tips and tricks of cooking.

Browsing

Will the weather be good for the May holidays? .. You know, it doesn’t matter. True connoisseurs of “rest with taste” are ready for anything: they have already ordered the Grill Master uniform, for which the decree is only the owner’s appetite! Are you planning to join too? Then it’s time to get acquainted with useful recommendations and master the subtleties of cooking nutritious and aromatic … Light, juicy and crunchy … Ruddy, bright, striped … In general, absolutely irresistible treats on a home grill!

  1. Remove the meat from the refrigerator 20 minutes before grilling to allow it to warm to room temperature. Frozen meat will not cook evenly.
  2. Do not leave meat at room temperature for more than an hour, otherwise, bacteria will multiply rapidly and the meat will become less fresh. If you need to defrost meat, leave it overnight or all day in the main compartment of the refrigerator.
  3. Do not add salt until the steak is cooked or it will become tough as the salt wicks moisture away.
  4. Do not pierce the meat with a fork or prong. The juices will run away, the meat will become drier and less flavorful. Use a spatula or tongs to push or turn the pieces.
  5. When grilling, do not rush to turn it over – wait until the crust appears on the grill. If you try to lift the meat until it is tender, it may stick to the wire rack.
  6. Indirect heat is best for grilling chicken, i.e. placing the meat in a cooler grill area for a slow, soft, and even heat.
  7. Test for hardness with the simplest tool: your own finger. A poorly done steak feels soft and spongy, a medium steak is lightly served when pressed, and a well done feels firm.
  8. Do not overdo it. It is better to undercook the grill than overcook it. You can always grill the meat if it’s damp.
  9. Let the dish rest. After removing the grill from the wire rack or baking dish, wait at least 5 minutes before slicing. This will allow the juices to soak back into the meat.

They joke that the ancient Romans were the first to invent steaks during the sacrifice to the gods. Apparently, some priest furtively licked his fingers, and … did not carry the victim to the altar. I ate, I was not afraid of the gods. But, perhaps, this is speculation. People obviously learned how to roast meat before they built altars.

The next milestone in steak history was the discovery of America. After Columbus, Europeans arrived there and brought with them cows of various breeds: LongHorn, Hereford, and Angus. This laid the foundation for American barbecue culture.

In 1735, the world’s first Steak Club opened in England. It even included members of the royal family. And the club existed for over a hundred years. Until now, one of the varieties of steaks bears its name – club steak.

  1. Look for steaks with good marbling. The best is the meat of young (150-180 days old) grain-fed gobies. Look for information on the label.
  2. A rib-eye steak is best for pan cooking. It is versatile. The name comes from two English words rib-eye, i.e. “Rib” and “eye”. The rib is where the cut comes from, and the eye is its cross-sectional shape, which is also inherited by ribeye steaks. The abundance of fatty layers, the very marbling of the meat, quickly melt when frying, making the ribeye the juiciest and most unpretentious of all steaks to cook.
  3. Before cooking the steak, you need to lie down a little so that it reaches room temperature. If you took a steak out of the refrigerator, where the temperature is “zero”, leave the meat on the plate for half an hour.
  4. Salt and pepper the meat before putting it in the pan or grill.
  5. You can make seasoning with salt, water, spices, lemon juice, and rosemary. Pour the steaks directly on the grill.
  6. After frying on each side at the maximum temperature, reduce it to 100-120 ° C. If you are cooking at home, just turn the heat down. When grilling, simply increase the distance from the grate to the coals.
  7. Use tongs or a spatula to turn the steaks. But, by no means a plug! Otherwise, the juice will flow out.
  8. The total cooking time for steaks to Medium level is about 7 minutes.
  9. Before serving, put a small piece of butter in a skillet, directly on top of the meat, cover with foil and leave for 5-8 minutes. The steaks will be delicious!

A properly cooked steak is a piece of incredibly juicy meat that just melts in your mouth. To prevent it from turning into a rubber sole, you need to know 10 secrets that will completely change the idea of cooking.

  1. There is no need to take meat out of the refrigerator and leave it for half an hour or an hour to warm it up to room temperature. This is a completely useless procedure. We take a piece of meat from the refrigerator and cook immediately.
  2. Yes, the meat should be marinated in natural yogurt, which will make the steaks tender and flavorful.
  3. When frying in a pan, the pepper will simply burn out, so you need to pepper the meat when it has been removed from the stove or grill. It is enough just to salt it, if desired, you can lightly sprinkle it with cornstarch, which will help form a beautiful golden crust.
  4. The butter often burns while the steak is fried. Therefore, it is recommended to cook meat with animal fat or ghee. But thanks to bacon, the steak will have a more pronounced meat flavor.
  5. Gordon Ramsay suggests using the easiest way to determine the degree of doneness of a steak. This is its own face. The bloody steak feels like our cheeks, the medium-rare steak matches the chin, and the well-done can be compared to the forehead.
  6. Everyone loves the grill marks on the meat. And in vain, because they are nothing more than burnt meat. A properly cooked steak is a completely caramelized piece.
  7. Another myth is that a steak is flipped only once. Chefs recommend doing this at least six times, frying for a total of 3-4 minutes on each side.
  8. This is the most difficult task when preparing steak. The meat should rest for 10 minutes so that all the juices are distributed over the piece. To keep it warm, you need to cover it with foil.
  9. It is customary to first fry the steak in a pan, and then bring it to readiness in the oven. We suggest doing the opposite. We bake the steak in the oven at a low temperature, and then fry it in a pan and get a piece of fragrant and juicy meat with a beautiful crust.
  10. It is possible to marinate meat before frying, but this often complicates the process of obtaining a crust on the steak, in addition, the sugar, herbs and garlic contained in the marinade can burn. It is best to marinate the meat after cooking when it is resting.

Sometimes you want to make delicious sushi or hot rolls at home. How to choose the most important component for them – rice? Nothing seems to be easier. However, choosing the right rice and preparing it will depend on the quality of the final dish.

  1. Not all types of rice are suitable for making sushi and rolls. Usually, round grains of rice with a high starch content are chosen for this dish so that the final product has sufficient stickiness. The following varieties can be recommended: Kokuho, Kahomai, Maruyu, Minori and Nishiki, but you can limit yourself to absolutely any round grain, opaque rice.
  2. Choosing the right sort of rice for sushi is half the battle. It is much more important to cook it correctly so that the rolls turn out to be canonical and tasty. It is necessary to cook the rice in such a way that balls can be easily molded from it.
  3. It is washed first. At this stage, due to the treatment with water, all dirt, dust and husks, as well as excess starch, are washed off the rice. Important! Rice must be rinsed with cold water until it becomes completely transparent, otherwise it will burn to the bottom of the pan during cooking. Some adherents of Asian traditions are sure that clean water should be passed through rice nine times. After that, you will need to drain all the liquid from the rice, leaving it to dry.
  4. Now it’s time for cooking. To cook rice properly, it is important to maintain the correct proportions. For water and rice grains, they are 1: 1.25. Let’s choose a saucepan in which we cook ordinary rice. You can add nori algae to the pot to add a sea-scent flavor while boiling. After boiling, it is removed. Adding other ingredients will add spice and extra flavor to the rice. Try using rice wine or even sake for this.
  5. The final stage is rice dressing. Spread the boiled rice in an even layer in a container, evenly pouring rice vinegar mixed with salt and sugar on its surface. In this case, the rice must be mixed. After stirring, the rice should be transferred with a spatula to one half of the container. Then each portion is leveled with a spatula to allow each rice grain to soak in the vinegar. When the rice is spread over the bottom, cover it with paper towels for the final soak.

Grilling season has come, and now, after a long winter period, when everything was cooked in four walls, you can refresh your memory of all the subtleties of grilling meat. To do this, we turned to a person who not only loves meat but loves it very much: Chef Tim Love, one of the hosts of the Restaurant Startup show on CNBC, a Texan resident, owner of 10 popular restaurants, and a master of grilling meat. The Love chef shared his secrets of cooking meat and told his own steak recipe.

  1. In the supermarket, choose the most tender meat.

“The most tender meat is a long beef sirloin”, – jokes Love. This refers to meat from the narrow end of the tenderloin. This filet mignon is the most tender meat and the most expensive. If your store’s price tag is too high, check out the second option (New York chop tenderloin), the third (rib steak), or even the fourth option (short sirloin tenderloin) of the most tender meats, as advised by butcher Chris Heyword of Lobel’s Prime Meats in New York City. If you have a group of people, the flank pulp is also a good low-cost choice.

  1. Don’t underestimate the most inexpensive cuts of meat.

Love and Heyword find flank meat is most often underestimated when choosing meat to grill. “This tenderloin is very thin so it cooks very quickly and is also quite flavorful,” says Love and gives a secret recommendation. “The outside flank is softer than the inside neckline, but these clippings are not always labeled, so you should ask the butcher a question. “

  1. Ask for tenderloin sirloin or bavette.

According to Love, the steak with fries, which is very popular in Argentina and France, is served with bavette, but in American restaurants, it is practically not ordered, so it is quite inexpensive. “It is very aromatic and has a very good texture. It looks like brisket but fries like a steak, ”he says. This meat is hard to find in supermarkets, but if you see it, take it! You will not be disappointed.

  1. Do not grill meat that you usually stew or fry in a pan.

“Ribs, brisket, shank, or rump are not suitable for grilling, as are any” working muscle “tenderloins, says Love. There is a little fat in this place, so this meat takes longer to cook. “If you cook this meat, you have to try hard to chew it,” says Love. This meat is best cooked in the oven or smoked.

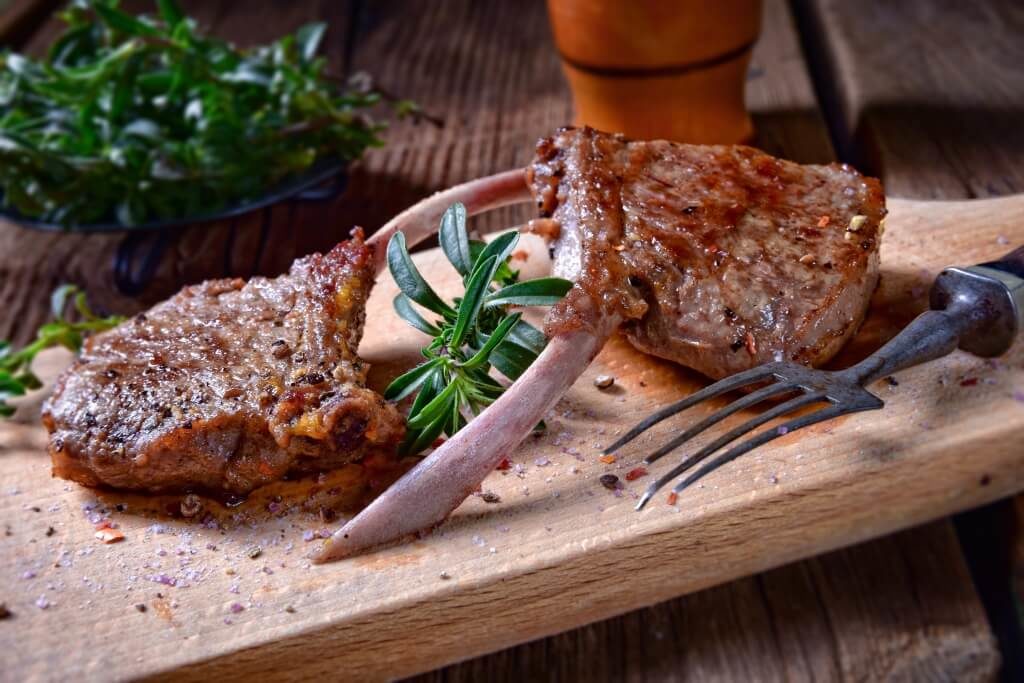
  1. Look for meat that has as many streaks of fat as possible.

When choosing a steak, take a close look at the intramuscular fat, that is, the fat streaks. If fatty streaks run through the entire piece of meat, then this is a clear sign that the meat is very fragrant. If you like a juicy and soft steak, look for meat with as many of these veins as possible.

  1. Choose dark red meat.

“I always choose the darkest red meat I can find. The lighter the meat, the longer it lasts and the more it oxidizes, ”says Love.

  1. Trust your intuition.

“Don’t be afraid to tell a butcher or supermarket clerk, ‘I want that piece over there, fifth from the top,’” recommends Love. When you find what you are looking for, choose the very best from what you see.

  1. Use peanut butter instead of olive oil.

Love rubs steaks with peanut butter instead of olive oil because it has a higher smoke threshold. This means that if you grill meat at a high temperature (“the way it should be” according to Love), the oil will not burn and there will be no bitter taste. Love also loves the scent of peanut butter, but if you are not an avid peanut butter fan, go for grape seed oil, which has a neutral odor and a high smoke point.

  1. Add spices before frying.

Love always salt and pepper the steak before frying. This creates an excellent crunchy crust with a beautiful texture. “If you add salt and pepper to a steak during the frying process, then this effect will no longer be there,” says Love. Moreover, salt the steak twice as much as you think is necessary, and add spices with your hand high to distribute more evenly over the steak. “Plus, you’ll look great,” says the chief.

  1. Turn meat only once.

“The more you turn the meat, the drier it gets. But if you want well-done meat, turn as much as necessary, ”experts say.

  1. Close the cover.

This is one of the biggest secrets. Even though this secret is very simple, most people who grill do not close the lid. “You want to take full advantage of the grilling and smoke aroma! So close the lid. This will change the flavor of the meat you are cooking and also keep it hot, which is very important, ”says the master.

  1. Use a thermometer.

“The best way to determine the degree of cooking of meat is to use a thermometer,” says Love. Here’s a quick guide: Meat with blood at 130 ° F, lightly cooked at 135 ° F, medium-cooked at 145 ° F, well-done at 150 ° F, and fully cooked at 160 ° F. “Don’t worry, if you constantly have to pierce the meat with a knife, all the juice will not come out. This is a myth, ”says the chief.

  1. Remove the meat from the grill early, let it rest, and then quickly fry the meat again on both sides.

“As soon as the meat touches the grill grate, it begins to shrink, the top layer begins to stretch.” says the cook. If you want the steak to be tender, Love recommends that the meat rest, “relax”, not on the grill. Meat can cool down when it is allowed to rest, so Love has one trick he uses to ensure that meat is always served at the ideal temperature:

Firstly, he cooks the meat in such a way that it is slightly undercooked. Then he turns the steak over, removes it from the grill, and lets it rest for 15 minutes. The meat will juice up a bit, but Love says it’s okay: “All the juices won’t come out of the steak.”

Then he puts the steak back on the grill (with the side up where the steak was removed from the grill) and grills the meat for another three or four minutes to bring the temperature up to the desired temperature. “This way the steak will be hot when you serve it, and the steak will be as deeply cooked as necessary when you put it on the plate,” says the master.

  1. Add some lemon juice.

After the steak is removed from the grill, Love squeezes a lemon onto the steak to add some acidity and flavor and release some fat. For even better results, use a slightly grilled lemon. Just cut the lemon and place it on the grill, cut side down. This will make the lemon softer and squeeze easier.

  1. Drink some wine.

Another important Love secret: a bottle of chilled rosé or white wine. Not for meat, but for a cook. After all, as Love says, “You need to entertain yourself a little.”

Cooking the perfect juicy steak at home “like in a restaurant” is the cherished dream of many hostesses. However, after several unsuccessful experiments with making “rubber soles” instead of soft pink meat, it is so easy to despair and abandons this venture forever. But you just need to use the tips of the professionals and take into account all the subtleties.

Mastering the art of making juicy and mouth-watering steaks is not difficult. The main thing is to strictly follow several rules and remember the difficulties that both beginners and regulars of the kitchen may encounter.

  1. The steak should only be prepared with fresh, chilled meat. If the steak has been frozen, leave it in the refrigerator overnight.
  2. The meat is usually brought to room temperature before frying. Before frying, the meat should “warm-up” at room temperature for 1–2 hours. This way you will not only achieve even browning but will also be able to more easily control its degree.
  3. Control the dryness of the meat. In order not to smoke the entire kitchen and to fry the steak evenly, the surface of the meat should be perfectly dry. Wipe the meat dry before starting the cooking process.
  4. Use kitchen paper towels for this and never wash the meat before cooking.
  5. The width of the meat is also very important. Ideally, this is a piece of 2.5 to 4 centimeters.
  6. If you cut the meat yourself and at home, then it is worth remembering one simple rule: cut it strictly across the fibers.
  7. Don’t cook too many pieces at once. No more than 2 steaks should be laid out on 1 pan, otherwise, the surface temperature will drop sharply, and the meat, instead of golden brown, will begin to release juice.
  8. The result is a cooked steak, not a juicy one.
  9. Season the meat well. When it comes to spices, there is absolutely no need to be shy, because in many ways the very taste of a restaurant steak is due precisely to the generous amount of salt and pepper.
  10. Just before placing the cuts of meat in the preheated skillet, pepper them generously and salt on 2 sides, then proceed to fry.
  11. For steak, use a heavy skillet or grill pan. They make it easier for you to control the temperature and the frying process in general.
  12. For the perfect striped steak, use the cast iron ribbed grill pan. Dry and heat well until a slight haze appears. It is better to fry the steak itself without oil, otherwise, the whole kitchen will be covered with smoke.
  13. If the pan is not cast iron, then it is important to preheat the pan correctly. It should be very hot, but not smoke. Otherwise, the meat will burn on the outside before it has time to cook on the inside. The steak should sizzle when it comes into contact with the surface of the pan.
  14. It is better to start frying meat at high temperatures, and then switch to lower ones. This will ensure even roasting and prevent the meat from losing its flavor and color.
  15. When frying, the protein – primarily on the surface of the piece of meat – curls up and blocks the drainage of the liquid. Therefore, the meat is first quickly fried at a high temperature and then brought to a condition at a lower temperature.
  16. Typically, cook a medium-rare steak for 4 minutes on each side.
  17. Meat with the blood takes 1-3 minutes.
  18. Fully fried steak is fried for 3 minutes on each side over high heat and then cooked until fully cooked for 6-8 minutes.
  19. However, you should still carefully monitor the meat, because the cooking time can vary depending on several factors. When the steak reaches a temperature of 40 ° C, proteins begin to break down, then, after 50 ° C, collagen shrinks, at 70 ° C the meat ceases to retain oxygen and becomes gray. Cutting across the grain allows high-temperature streams to pass through the piece of meat. After the steak has been removed from the heat, it continues to heat up from the inside.
  20. The steak can be flipped frequently. This will ensure even frying, and the edges of the steak will not dry with this technique. If you decide to turn it over rarely, only 2-4 times during the cooking process, then the final result will be a beautiful lattice pattern. However, only if you are grilling the steak.
  21. And if you want to get a beautiful mesh on the surface of the steak, first fry the piece for 1.5 minutes, then turn it 90 degrees and hold it in the pan for another 30–45 seconds. Then follow the same procedure on the other side.
  22. Forget about forks. To prevent the juice from leaking out of our perfect steak, turn it over with culinary tongs, not with a fork.
  23. You can check the readiness of the steak with your fingers. To do this, lightly press down on the steak with your fingertip. The bloody steak is soft and pliable to the touch; well done – hard; medium roast is a cross between the two previous options.
  24. Bring the steak until tender. Preheat the oven to 190 degrees and after browning the steak on both sides, use the tongs to place the meat in a baking dish. Cover the tin with foil and bake for 10-12 minutes for filet mignon or 7-8 minutes for flat steaks.
  25. Remove the meat from the oven and, without removing the foil, hold for 10-15 minutes at room temperature, then serve.
  26. You should not neglect this rule, because this is the only way to get a really juicy, mouth-watering, and delicious dinner.
  27. The steak is best served on warm plates. Knives must be sharply sharpened.

Do you like healthy and wholesome food? The electric grill will help you keep all the nutrients and vitamins in your food! With its help, barbecue, fish with a golden crust are quickly and tasty cooked, chicken is fried, vegetables and fruits are baked, pancakes, pies, pancakes, and pies are baked. This is not yet a complete list of grilled dishes. The electric grill improves the taste of food and prepares it so that it is easily absorbed by the human body.

Millions of consumers deservedly love the home grill; it is practical, convenient, and versatile. True gourmets have already appreciated the delicious taste of the dishes that can be prepared with this modern household appliance. All dishes have a unique taste and excellent appearance! Both novice chefs and masters of the kitchen can cook on the grill.

Safety rules when working on the electric grill

  • Connect the appliance only to a properly grounded, safe electrical outlet.
  • Multi-pin socket-outlet models cannot be used.
  • You cannot cook indoors without a hood and a vent.
  • Protect contact points from moisture.
  • Install the device strictly on a flat surface.
  • The thermostat should be inserted into the grill only before plugging in the power cord.
  • Do not allow small children to access technology.

Benefits of grilled food

  • Grilling pork, lamb, beef, or chicken cannot be compared to other cooking methods and is suitable for the perfect golden crust. Fish, meat, vegetables, and other food cooked on an electric grill are considered a healthy food, they are cooked without oil, there is no excess fat, cholesterol, carcinogens, impurities of harmful tar from real coals, and poisonous smell of burning.
  • Cooking food with this household appliance is a simple process, it allows even inexperienced chefs to create delicious and appetizing dishes. The grill is used to prepare hot snacks, pancakes, pancakes, sandwiches, meat, vegetables, fish, fruits, pies, and pies. When starting to cook, it should be remembered that this will take much less time than with the usual method.

It is not the first time that beginners manage to cook a steak on the grill with high quality and tasty. The first failed attempt is not a reason for frustration, but a great opportunity to analyze your mistakes to take into account and correct them in the future. Below we will share useful tips and tricks from experienced chefs on how to cook a deliciously and unmistakably grilled steak perfectly.

  1. Preheating the grill. The first rule to remember once and for all. For the planned dish to turn out equally tasty from time to time, it is necessary to take care of heating the grill in advance. Set the temperature to maximum and preheat the barbecue for 10-15 minutes before starting the cooking process.
  2. Continuous flame control. Drops of fat dripping off the steak during frying can trigger flames. A strong fire can dry out the meat, and in this case, you do not need to use water at all. It is enough to reduce the heat to a minimum or completely extinguish the burners. Wait a couple of minutes and continue the cooking process.
  3. There must always be an adequate supply of fuel. It doesn’t matter if you cook on a charcoal or gas grill, to avoid unforeseen situations during the cooking process, always have enough fuel to roast the meat.
  4. Temperature control. As you know, when preparing various dishes over an open or indirect fire, it is important to adhere to the existing recommendations for temperature conditions. For example, there are certain rules for roasting poultry and pork. In the case of thick pieces of meat or baking whole poultry, it is rational to choose medium temperature conditions. In the case of thin steaks, the fire can be more intense and the roasting time may be limited.
  5. Experiment and master new culinary techniques. To enhance the usual taste of meat, it can be fried on both sides over high heat. This technique will allow you to get an appetizing golden-brown crust. So that the meat is not overdried, it is better to continue frying until fully cooked over medium or low heat. It is rational to use and not direct heat until the dish is fully cooked. Slow simmering allows the taste of the dish to unfold as much as possible, without overdrying the meat fibers and completely preserving their juiciness.
  6. Experiment with flavors. To revive the usual taste of the dish, we recommend using different variations of sauces, combining them individually each time. For example, a pinch of sugar will give the meat a more intense flavor and a delicious crust. Remember also that you need to grease the steak with sauce 5-10 minutes before cooking. If the meat has been pre-marinated for several hours, it should be cooked at minimum temperatures, gradually increasing the heat. Thus, the finished dish will turn out to be evenly fried, without a specific, burnt aftertaste.
  7. Stay alert while preparing food. For your dish to turn out perfectly fried, without burnt edges, you need to monitor not only the temperature and intensity of the fire but also the state of the steak frying. Especially, this rule is relevant when frying chops, thin pieces of meat, burgers over high heat.
  8. Cleanliness is the key to health. Interaction with any food, including meat, requires certain hygiene rules. The work area must be kept as clean as the grill itself. Pay special attention to the cleanliness of hands and cutlery. It is better to check the degree of roasting of meat not with improvised means, but with a special, disinfected temperature probe.
  9. It is also important not to forget about the cleanliness of the grill. As with any kitchen equipment, the grill must be kept clean. After cooking, until the particles of fat and food are completely dry, they must be removed. All types of dirt can be easily removed by intensive heating of the grill. After firing, the ash can be easily removed with a sponge or barbecue brush. Timely removal of dirt will allow you to always prepare delicious food, without any foreign odors. Do not forget about the timely maintenance of your grill. Monitor the serviceability of burners, temperature controllers. We also recommend purchasing professional grill cleaning tools. With their help, it will become much easier and more convenient to monitor the health of the equipment.
  10. Organize proper storage of your grill. To make your grill, gas, or charcoal, serve you for many years, get a special cover for it. It will protect the metal from moisture, dust, and mechanical damage.

In fact, sushi is very simple: rice, fish, and various additives like cucumber or avocado. However, in order for your sushi to turn out really cool and not worse than in a restaurant, we advise you to adhere to a few rules.

  1. The knife is the main participant in the preparation of sushi after you. Therefore, he must be at his best. That is, it must be very sharp. Therefore, do not be too lazy to sharpen it before starting your culinary experiments. Choose knives with wooden handles: when wet, they won’t slip in your hands. Such knives in Japan are called “bento” and are used to make sushi.
  2. All ingredients must be exceptionally fresh or, as they say in the markets, the freshest. Otherwise, you risk not only tasteless rolls, but also your own health: we think we don’t need to say that stale fish is dangerous. In addition, whatever fish you choose – fresh, smoked or dried – it is important to cut it correctly. Do not cut tender fish fillets as they will lose their presentation. Here we go back to rule number one: the sharp knife.
  3. Fig. It is very important to prepare it properly. Sushi is made from warm round-grain rice prepared using a special technology. 460 g of rice requires 750 g of water. Rice must be washed and dried for an hour, then placed in a saucepan with a tight lid, pour in water and cook over minimum heat for 5 minutes after boiling. Then it needs to be steamed for 12-15 minutes on low heat, remove the pan from heat, remove the lid and cover with a towel for 15 minutes. Then gradually add vinegar dressing to the rice and let it dry.
  4. Mat. That is, the rug with which the rolls are rolled. It should be made of bamboo so you can press the sushi rice properly. Many beginners use a plastic bag for these purposes, but it does a poor job: rice will quickly fall apart.
  5. Acetic water. When forming sushi by hand, use vinegar water. It is convenient to wet your hands in this solution during cooking and rinse them after working with rice. To make vinegar water, mix two tablespoons of apple cider vinegar with a glass of water.
  6. Proportions. Do not coarsely chop the sushi ingredients; this can impair the appearance and taste of the dish.
  7. Nori. Supermarkets sell sliced nori sheets, which are convenient only for making traditional sushi. If you bought these algae by mistake, don’t throw them away. Lay the sheets tightly together and crush a few boiled rice at the joints. This technique will help you easily glue nori and use them to prepare any kind of sushi.
  8. Wasabi. Do not get carried away by it. An excessive amount of this sauce will not let you enjoy the taste of the dish, because its sharpness dulls the taste buds.
  9. Eat immediately. Sushi should be eaten immediately, because this dish, prepared from fresh products, deteriorates very quickly. The maximum shelf life of sushi is six hours, provided that special boxes are used.

These are very important tips for making delicious pastries!

  1. Keep a bowl of ice water nearby. When you work with oily dough, it can melt due to your warm hands, making the job much more difficult. To avoid this, keep a bowl of very cold water nearby and dip your hands into it as needed.
  2. Use butter and eggs at the right temperature. If a recipe calls for your eggs and butter to be at room temperature or cold, take it seriously. This is how you will achieve the best result.
  3. Warm eggs quickly. The easiest way to bring your eggs to room temperature quickly is to put them in a bowl of warm water. However, you can overheat them this way. The best way is to break the eggs into a stainless steel bowl, put it in warm water and control the heating process with your finger for 1-2 minutes.
  4. Heat the oil quickly. To heat up the oil faster, place it between layers of polyethylene and hit it hard with a rolling pin. Continue rolling the butter in this way until it is about one and a half centimeters thick. Let the oil rest for 5 minutes, turn over, wait another 5 minutes and then use to cook.
  5. Foam the butter and sugar as needed. If the recipe states that you need to beat the butter and sugar, then just mixing them is not enough. Foam both ingredients to blow air into the oil. This is especially important for pastries. For cookies, on the other hand, butter and sugar should only be whipped if the recipe requires it. Otherwise, the baked goods will settle in the oven.
  6. Do not whisk flour. Foaming flour is not recommended – just mix it with the rest of the ingredients with a mixer until smooth. Otherwise, the baked goods will be too hard.
  7. Don’t worry about the lumps in your cupcakes. Any lumps that are present in the muffin batter will disappear during baking.
  8. Bake muffins on parchment paper. The baking paper will keep the cake from burning or escaping from the mold.
  9. Use parchment paper for the pies. Regardless of the recipe, always line the bottom of the tin with baking paper. This will make it easier for you to get the finished cake out of the mold.
  10. Fill empty muffin molds with water. If you are making muffins and you do not have enough dough for all the notches in the mold, fill the empty holes with a little water. This will save the shape from deformation.