Author

main-admin

Browsing

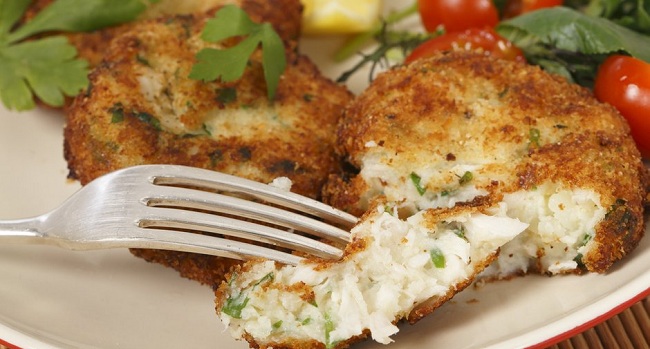
Do you like fish cakes? After our advice, they will definitely not leave you indifferent! 🙂

  1. For the cutlet mass, you can use any fresh or well-soaked salted fish that does not contain small bones.
  2. The most suitable fish for this purpose are cod, pike perch, haddock, catfish, pike, sea bass and burbot, motley catfish, fresh chum salmon.
  3. Fish for cutlet mass, cut into fillets without skin and bones, cut into pieces and pass through a meat grinder.
  4. Stale wheat bread soaked in milk or cold water (without a crust), salt, ground pepper are put into the resulting mass, everything is mixed well and then passed through a meat grinder for the second time.
  5. You can add raw pork fat, fat or butter to the cutlet mass from low-fat fish (50 – 100 g per 1 kg of pulp).
  6. When using raw lard and fat from the insides of the fish, it is passed through a meat grinder together with the fish; the butter is pre-softened and then mixed with the finished cutlet mass.
  7. If fat is not added to the cutlet mass from low-fat fish, then to increase the friability it is recommended to add chilled steamed fish passed through a meat grinder.
  8. To obtain a homogeneous consistency, the cutlet mass is thoroughly stirred.
  9. Cutlets, meatballs, meatballs, zrazy and rolls are prepared from the cutlet mass.
  10. For 1 kg of fish fillets, take 250 g of wheat bread from flour not lower than the first grade, 350 – 400 g of water or milk. 20 g salt, 1 g pepper.

These tips are sure to help you cook the tastiest fish ever! 🙂

  1. The fish is easier to peel if the hard fins are cut off with scissors or a knife first.
  2. When boiling fish that smells like mud, you need to add a little spicy herbs and spices to the water.
  3. To prevent the fish from falling apart during frying, it must be salted 10-15 minutes before the start of heat treatment.
  4. Fish fried in breadcrumbs looks more appetizing than fish fried in flour, but inside it is not fried enough. Therefore, in order to bring the fish to full readiness, it is necessary to put it in a preheated oven for a short time.
  5. If the broth prepared for jellied fish turns out to be cloudy, it can be clarified with egg white. To do this, it is enough to pour the protein into the chilled broth, stir, heat to a boil and hold for 15 minutes over low heat. Then let it settle and carefully, without shaking, strain the broth through a napkin.
  6. Do not cook the fish over high heat: otherwise it will become tough, and the broth will become cloudy.
  7. The fish will be tastier if you fry it in a mixture of sunflower oil and butter (both equally). Do not cover the pan – and the pieces will be covered with a crispy appetizing crust.
  8. Herring will be very tender and juicy if, after cutting, it is soaked for 40 minutes in milk or in tea infusion.
  9. Boiled fish will be very tender if fresh milk is poured into boiling water.
  10. Fish fried in foil is very tasty and juicy. The fish should be peeled, washed, salt, spices, wrapped in foil and placed in a preheated oven.

It is rare to meet a person who does not like fried fish. Thanks to our tips, you can cook fish fast, tasty and hassle-free!

  1. Fish is fried, sprinkled with salt, pepper and breaded in wheat flour.
  2. Products from the cutlet mass are also breaded in silt breadcrumbs in white breading before frying.
  3. To give the fish a more delicate flavor, you can moisten it with cold milk before breeding.
  4. Put prepared fish in a frying pan or baking sheet with well-heated fat and fry on the stove until a crispy crust forms on both sides.
  5. If the portioned pieces of fish have not been fried during the formation of the crust, they are placed in the oven for 5-7 minutes.
  6. You can fry fish in vegetable lard, hydro fat, ghee or vegetable oil.
  7. From vegetable fats the best for frying fish in this way are sunflower oil, olive oil and refined cottonseed oil.
  8. Can be used for frying fish and melted pork lard.
  9. Beef and lamb fat for frying fish in this way is usually not used, since these fats are not in harmony with the taste of the fish.
  10. The total duration of frying portions of fish is 10 – 15 minutes.
  11. Deep-fried fish is mainly fried, cut into fillets with skin or bey skin and without rib bones. The exception is small fish (navaga, smelt, hamsa, etc.), which are fried whole.
  12. Before frying, fish is breaded in flour, moistened in an egg and breaded in breadcrumbs or white breading.
  13. For deep fat, you can use vegetable oil (sunflower, cottonseed), vegetable lard, hydro fat.
  14. The best fat for deep-frying fish is a mixture of 60% hydro-fat and 40% vegetable oil, 1 since such a fat does not change its chemical composition when heated to a high temperature, as a result of which, when frying it, chad is formed, and fried products are of higher quality.
  15. The ratio of fat and simultaneously fried product in it must be at least 2: 1; the best ratio is 4: 1.
  16. Before frying, the fat is heated to a temperature of 170 -180 °.
  17. Breaded fish is dipped into the heated fat and fried until golden brown.
  18. The fried fish is quickly removed from the deep fat, transferred to a dry baking sheet or frying pan and, if the fish has not reached readiness, put it in the oven.
  19. The fish is deep-fried for 3 to 5 minutes and cooked in an oven for 5 to 7 minutes.
  20. After three to four frying times, the fat sometimes needs to be filtered through a metal sieve, as the charred particles of the breading left over from previous frying impairs the appearance of the fried fish.
  21. It is recommended to fry the fish just before serving it to the consumer.

These are the most helpful tips that you will definitely need!

  1. Fish dishes must not be cooked over high heat. As the fish broth boils, you should reduce the heat and continue cooking the fish over low heat (boiling should be, but very weak).
  2. When cooking, frozen fish can only be put in cold water.
  3. It is recommended to fry fish in a small amount of fat; it is better to use a mixture of butter and vegetable for this.
  4. To get an appetizing crust on all sides, you should not put the fish pieces in the pan tightly to each other.
  5. Small fish or cut into pieces are placed in boiling water. This is done so that it is not digested. When cooking, large fish is placed in cold water, and when the water boils, water is added as needed.
  6. Granular caviar will last longer and will not dry out if you pour a thin layer of vegetable oil into the jar with it on top and then close the jar tightly with a lid.
  7. If there is fried or boiled fish left after lunch or dinner, it can be stored in the refrigerator for no more than 1-2 days, and before serving, boiled fish should be boiled in fish broth (or water), and the fried fish should be fried one more time as usual – on both sides each piece of fish.
  8. To make fish broth tastier and more aromatic, use several types of fish when cooking it.
  9. Determining the readiness of boiled fish is simple – stick a match into it. If it easily enters the meat of the fish, then the fish is ready.

We often don’t cook steaks at home because they are less juicy than in restaurants. In fact, making the perfect steak at home is a snap if you know the secrets and subtleties.

Mastering the art of making juicy and mouth-watering steaks is easy. The main thing is to strictly follow several rules and remember the difficulties that both beginners and regulars of the kitchen may encounter.

  1. The steak should only be prepared with fresh, chilled meat. The meat is usually brought to room temperature before frying. If the steak has been frozen, leave it in the refrigerator overnight. Wipe the meat dry before starting the cooking process.
  2. The width of the meat is also very important. Ideally, this is a piece of 2.5 to 4 centimeters.
  3. If you cut the meat yourself and at home, then it is worth remembering one simple rule: cut it strictly across the fibers.
  4. For steak, use a heavy skillet or grill pan. They make it easier for you to control the temperature and the frying process in general.
  5. It is important to preheat the pan correctly. It should be very hot, but not smoke. Otherwise, the meat will burn on the outside before it has time to cook on the inside. The steak should sizzle as it touches the surface of the pan.
  6. It is better to start frying meat at high temperatures, and then switch to lower ones. This will ensure even roasting and prevent the meat from losing its flavor and color.
  7. Typically, cook a medium-rare steak for 4 minutes on each side. Meat with the blood takes 1-3 minutes. A fully fried steak is fried for 3 minutes on each side over high heat and then cooked until fully cooked for 6-8 minutes. However, you should still carefully monitor the meat, because the cooking time can vary depending on several factors.
  8. The steak can be flipped frequently. This will ensure even frying, and the edges of the steak will not dry with this technique. If you decide to turn it over rarely, only 2-4 times during the cooking process, then the final result will be a beautiful lattice pattern. However, only if you are grilling the steak.
  9. You can check the readiness of the steak with your fingers. To do this, lightly press down on the steak with your fingertip. The bloody steak is soft and pliable to the touch; well done – hard; medium roast is a cross between the two previous options.
  10. After the meat is ready, you need to remove it with special cooking tongs and leave for 10-15 minutes. If you are afraid that the steak will cool, then use food foil. You should not neglect this rule, because this is the only way to get a really juicy, mouth-watering, and delicious dinner.
  11. The steak is best served on warm plates. Knives must be sharply sharpened.

Most of us love fish dishes. Useful tips will help you learn how to cook fish quickly, tasty and hassle-free.

  1. You need to cook fish on low heat. If you smell fish in the kitchen, it means that it takes too long or too fast to cook.
  2. The best way to preserve the flavor of the fish during the cooking process is to grill it, in the oven, steam it, simmer it in a sauce or broth, or fry it in a little fat. To enjoy the taste of fish, it is better to forget about cooking.
  3. Overcooked fish becomes too oily to be eaten. You cannot salt the fish in advance – as a result, it will lose juice and become tasteless. 30 minutes before cooking, you should keep the fish in the marinade and sprinkle with lemon juice.
  4. Finished fish of some varieties lose their inherent transparency and become snow-white (flounder, haddock, cod). To check if the dish is ready, you need to pierce the thickest part of it with the tip of a knife: the fish is ready if the fibers are easily separated from each other. Cooking too long will soften the fish and give off an unpleasant odor.
  5. A slightly dry fish will taste better with a garnish of peas, parsley, mushrooms, cheese, green beans, onions, and milk or tomato sauce.
  6. Fatty fish (herring, mackerel, pink salmon) go well with seasonings based on sour fruits such as lemon or gooseberry.
  7. It is better to make vegetable garnish and salads in advance so that the fish can be served on the table as soon as it is ready. If you try to keep it warm, it will become tasteless. If you do not have time with the side dish, and the fish is already ready, you need to remove it from the heat and pour over the sauce, and reheat it before serving.
  8. Before giving a fish to a child, you need to carefully check if there are any bones in it: once having experienced fright, having choked on a fish bone, he can maintain a dislike for this valuable product for life. Some adults never eat fish just for fear of choking on the bone. It is necessary to teach the child to always check the fish that is given to him and find bones.
  9. For cooking, use: fish in its entirety, links, portioned pieces, portioned pieces from plastered fish with skin and bones, with skin and without bones. The pieces are cut across the fibers, while holding the knife at right angles to the fish. On each piece, the skin is cut in 2-3 places so that the fish does not change its shape during heat treatment.
  10. Fish in whole form, medium-sized links, portioned pieces of plastered fish with skin without bones, without skin and bones (pure fillet) are used for poduspaniya. The pieces are cut starting from the tail, holding the knife at a 30 ° angle to the fish. In this case, flat wide pieces are obtained, convenient for quick and uniform heating in a small amount of liquid.
  11. For frying, the main method is used: fish in its entirety, links, portioned pieces, portioned pieces cut from plastered fish with skin and bones, with skin without bones, without skin and bones. Round and fillets with vertebral bone are cut, holding the knife at right angles to the fish; fillets with rib bones or without bones are cut at an angle of 30 ° into wide flat pieces that have a large surface of contact with the frying surface.
  12. So that the fish does not lose a lot of liquid and nutrients during frying, and a crispy crust forms on its surface, the prepared fish is breaded. Breading is the application of breading to the surface of a semi-finished product. Depending on the further use, different breading methods and different breading are used. For a better attachment of the breading to the product, it is moistened in a special liquid – llezone, which is a mixture of raw eggs with milk or water, with the addition of salt. For deep-fat frying, fish is used in its entirety, portioned pieces cut from plastered fish without skin and bones. The fish is cut, holding a knife at an angle of 30 °, dried, sprinkled with salt, breaded in flour, moistened with lezon and breaded in breadcrumbs.

Will the weather be good for the May holidays? .. You know, it doesn’t matter. True connoisseurs of “rest with taste” are ready for anything: they have already ordered the Grill Master uniform, for which the decree is only the owner’s appetite! Are you planning to join too? Then it’s time to get acquainted with useful recommendations and master the subtleties of cooking nutritious and aromatic … Light, juicy and crunchy … Ruddy, bright, striped … In general, absolutely irresistible treats on a home grill!

  1. Remove the meat from the refrigerator 20 minutes before grilling to allow it to warm to room temperature. Frozen meat will not cook evenly.
  2. Do not leave meat at room temperature for more than an hour, otherwise, bacteria will multiply rapidly and the meat will become less fresh. If you need to defrost meat, leave it overnight or all day in the main compartment of the refrigerator.
  3. Do not add salt until the steak is cooked or it will become tough as the salt wicks moisture away.
  4. Do not pierce the meat with a fork or prong. The juices will run away, the meat will become drier and less flavorful. Use a spatula or tongs to push or turn the pieces.
  5. When grilling, do not rush to turn it over – wait until the crust appears on the grill. If you try to lift the meat until it is tender, it may stick to the wire rack.
  6. Indirect heat is best for grilling chicken, i.e. placing the meat in a cooler grill area for a slow, soft, and even heat.
  7. Test for hardness with the simplest tool: your own finger. A poorly done steak feels soft and spongy, a medium steak is lightly served when pressed, and a well done feels firm.
  8. Do not overdo it. It is better to undercook the grill than overcook it. You can always grill the meat if it’s damp.
  9. Let the dish rest. After removing the grill from the wire rack or baking dish, wait at least 5 minutes before slicing. This will allow the juices to soak back into the meat.

Everyone loves to eat fish, but not everyone knows how to cook it properly and tasty. Following our advice, you will have the most delicious fish!

  1. At the flounder, the head is removed with an oblique cut so that the abdomen is simultaneously opened, then the fish is gutted. After that, grab the skin on the dark side of the fish with a knife and finger and tear it off with a sharp movement, then cut off the fringe of the fins and the caudal fin, peel off the scales on the light side of the skin and thoroughly wash the fish.
  2. The carp and silver carp are cleaned of scales, the head is cut off and, without cutting the abdomen, the insides are removed, and the gills are removed from the head. After that, they are washed in cold water and cut across into portions.
  3. It is recommended to remove the skin from burbot, eel and large navaga; in small navaga, the skin may not be removed.
  4. The skin is removed only from large fish and in the manufacture of minced cutlet.
  5. In burbot, eel and catfish, the skin around the head is cut and, by separating the skin from the meat with your fingers, it is removed entirely. Then the abdomen is cut, the entrails and fins are removed, and the head is cut off. The cut fish are washed with plenty of cold water.
  6. Mackerel should be cleaned as follows: with your thumb and forefinger, take the gills from one side of the head and tear them off with a sharp movement, while part of the viscera is removed along with the gills. Then, with a sharp knife, cut along the abdomen, open and clean thoroughly. Rinse with plenty of water and soak in cold water for 10 minutes. You do not need to cut off the head, after baking or frying it will be soft and tasty.
  7. Processing zander and perch should begin with the removal of the hard dorsal fin. Pull the fin towards the head, after cutting the flesh on both sides of it. It is advisable to dip the fish in boiling water for a minute.
  8. Sauces and soups can be prepared from broth in which heads without gills, spine, rib bones were cooked; fins, tail and skin with scales. It is advisable to strain the broth.
  9. To obtain a fillet with skin and rib bones, the pulp is cut along the back of the carcass to the ribs, then cut along the spine, while cutting off the pulp with rib bones. Two fillets are obtained: one with a backbone and rib bones, the other with only rib bones. If you need to get both fillets with only rib bones, then the first is also cut from the spine. This is how fish is cut for cooking and frying in portions.
  10. Fillets of pike perch, catfish, cod, mackerel are cut into thin wide slices (one per serving), sprinkled with salt, pepper, breaded in flour, moistened in a lezon (an egg loosened with 1 tablespoon of milk) and breaded again in breadcrumbs.
  11. Portions are fried on a wire rack, medium-sized fish is fried as a whole. Before frying, place a grate over hot coals and, when it warms up, rub it with pork bacon, then put the fish and fry on both sides.
  12. Fish, fried on a spit or wire rack, is served with lemon and herbs, sauces, ketchup – tomato or kebab.

When buying meat for a steak, some do not risk taking cuts on the bone. Some consider the bone to be overweight, while others do not know how to grill steaks on the bone. Today we will dispel all doubts and tell you about the benefits of steaks on the bone and the intricacies of their preparation so that your dish will be delicious from the first try.

  • Tip # 1: choose the right meat. For steaks, it is better to buy marbled beef. It has a large number of small layers of fat, which give the meat a special softness. Moreover, such beef undergoes a dry or wet fermentation process, due to which the steaks on the bone are fried quite quickly. The meat acquires a richer taste and aroma.
  • Tip # 2: Choose the right thickness for your steaks. This is a very important point, because if the piece is thin, then the meat will dry out during frying, and the bone may be raw. Therefore, buy a cut with a thickness of at least 4-4.5 cm. And if it has a side layer of fat, do not cut it off, it will give juiciness.
  • Tip # 3: Grill it right. To cook meat properly, you need to create two heating zones. In the direct heat zone, a crust is applied, and in the indirect heat zone, the steak is brought to readiness. But for steaks on the bone, cooking begins in the cold zone. The meat is heated on it and then transferred to the direct heating zone for frying.
  • Tip # 4: Consider the characteristics of the bone steaks. For example, there are two types of meat in Tibon steak: striploin and tenderloin with a smooth, fine-grained structure. Place the Tibon steak on the grill so that the Striploin is in a hotter area than the tenderloin. Cook until low to medium cooking.
  • Tip # 5: Use a meat thermometer. It is especially needed for frying bone steaks. Unlike boneless steaks, meat on the bone takes a little longer to cook. First, the bone picks up the temperature on itself and then gives it back. For this reason, it can be difficult to determine the degree of roasting by eye, and the thermometer makes it possible to control the entire process. To measure the temperature correctly, place the thermometer in the pulp near the bone.
  • Tip # 6: Measure the doneness. Grill the boneless steaks until lightly cooked at 53-54 ° C, or medium at 57-58 ° C. Such roasting will preserve the juiciness of the meat. But, if you are cooking a large cut with good marbling, grill it to an internal temperature of 60-63 degrees to melt the fat as much as possible.

They joke that the ancient Romans were the first to invent steaks during the sacrifice to the gods. Apparently, some priest furtively licked his fingers, and … did not carry the victim to the altar. I ate, I was not afraid of the gods. But, perhaps, this is speculation. People obviously learned how to roast meat before they built altars.

The next milestone in steak history was the discovery of America. After Columbus, Europeans arrived there and brought with them cows of various breeds: LongHorn, Hereford, and Angus. This laid the foundation for American barbecue culture.

In 1735, the world’s first Steak Club opened in England. It even included members of the royal family. And the club existed for over a hundred years. Until now, one of the varieties of steaks bears its name – club steak.

  1. Look for steaks with good marbling. The best is the meat of young (150-180 days old) grain-fed gobies. Look for information on the label.
  2. A rib-eye steak is best for pan cooking. It is versatile. The name comes from two English words rib-eye, i.e. “Rib” and “eye”. The rib is where the cut comes from, and the eye is its cross-sectional shape, which is also inherited by ribeye steaks. The abundance of fatty layers, the very marbling of the meat, quickly melt when frying, making the ribeye the juiciest and most unpretentious of all steaks to cook.
  3. Before cooking the steak, you need to lie down a little so that it reaches room temperature. If you took a steak out of the refrigerator, where the temperature is “zero”, leave the meat on the plate for half an hour.
  4. Salt and pepper the meat before putting it in the pan or grill.
  5. You can make seasoning with salt, water, spices, lemon juice, and rosemary. Pour the steaks directly on the grill.
  6. After frying on each side at the maximum temperature, reduce it to 100-120 ° C. If you are cooking at home, just turn the heat down. When grilling, simply increase the distance from the grate to the coals.
  7. Use tongs or a spatula to turn the steaks. But, by no means a plug! Otherwise, the juice will flow out.
  8. The total cooking time for steaks to Medium level is about 7 minutes.
  9. Before serving, put a small piece of butter in a skillet, directly on top of the meat, cover with foil and leave for 5-8 minutes. The steaks will be delicious!