Tag

cooking

Browsing

Someone thinks that a steak is too expensive, and a simple stew is more economical, someone thinks that a good steak cannot be cooked at home. But in reality, meat lovers will pay much more for a restaurant steak than for a homemade one. Although they could easily cook the same in their own kitchen.

  1. Which meat to choose from? Of course, only high-quality, fresh chilled meat should be chosen for the steak. And certainly beef. We cook steak at home, that is, in a pan. For these purposes, ribeye is suitable, it has a large amount of thin fat layers, so it will turn out better in a pan than all other steaks.
  2. Preparation. It is best to fry warm meat, at room temperature. This is easy to arrange if you are not in a hurry – 2 hours before cooking, remove the meat from the refrigerator, close it with something so that it does not get weather – the path heats up. But if you come home from work and you need to fry the meat now? Then it can be wrapped in cling film, but only tightly enough and in several layers. And put in warm (about 50 ° C) water. For half an hour. The meat will heat up while you wash your hands and ask the children if they have done their homework. Second point. Do not cook moist meat. Dry it with a paper towel before cooking. Otherwise, the meat may develop an unpleasant odor.
  3. Thickness. It all depends on personal taste and the degree of roast that you prefer. If you like lightly roasted meat, then you can cut the steaks about 4 cm thick. If the roasting is supposed to be more serious, then you can make the steaks thinner, about 3 cm thick. But it must be borne in mind that you did not get thinly sliced meat will not be juicy, so less than 2.5 cm thick is no longer a steak.
  4. Salt and spices. It is often not recommended to salt the meat until the end of its cooking. Because of salt, the meat loses its juiciness. But this point of view also has a downside. After the meat has been fried, you cannot salt it so that the seasonings are evenly distributed over the piece. And that’s a big loss for the steak. Therefore, it is best to rub the meat with salt and spices and leave to lie down for 5-7 minutes. This will help the seasoning spread evenly. And the meat, by the way, will be fried more evenly. For meat, sea salt and freshly ground black pepper are ideal. Perhaps nothing else is required.
  5. Fat for frying. Steaks are usually fried in a dry skillet. But you can grease a piece of meat with a drop of odorless oil before frying. This will give it a shine, help in crust formation, and prevent the meat from drying out. The second option: drip a little olive (refined) oil and a few drops of lemon juice on the meat. The aroma will be extraordinary.
  6. Scent. The oil can give the meat a great flavor. For example, you can add it in the middle of frying, when a firm crust has formed on the meat. A slice of butter mixed with minced garlic will make the steak simply unforgettable. Attention: after you put the oil in the pan, you do not need to fry for a long time so that the oil and garlic do not start burning.
  7. Temperature. First, we heat the frying pan on the fire. Very much. If you carry your hand over it at a distance of 15 cm, then strong heat should be felt. With such a strong heat, the meat will immediately grab a crust and may even char a little. Just a little bit, just to give off a nice roasted flavor. After the steak is in the skillet and you have formed a crust, you can lower the temperature. Medium fire will be just right.
  8. Be sure to turn over. The more often you turn the meat, the juicier it becomes. That is, you cannot fry the meat on one side, then on the other and it will calm down. First, you need to form a crust. To do this, fry the meat for a minute over high heat, pressing the meat to the pan with a spatula. Then you can reduce the heat a little and fry the meat for 6-8 minutes, turning it over every minute. If you want a steak with blood, almost soggy inside, then turn it over even more often. That is, first form a crust, and then twirl the steak in a pan every half a minute. It will turn out juicy and hardly fried. The frying time should be shortened slightly. But remember that it depends on the thickness of the meat too.
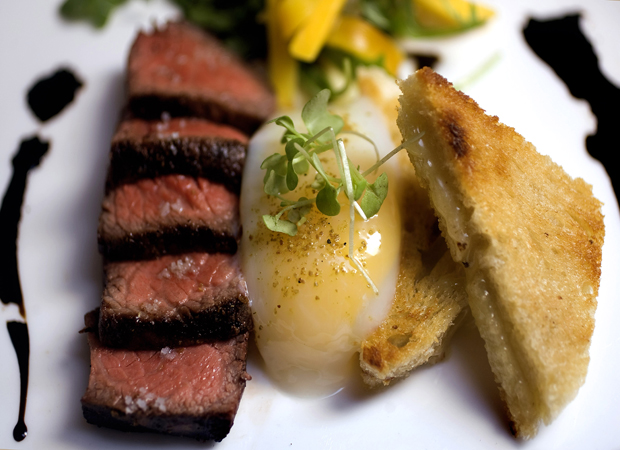
  9. Finally, when the steak is fried, let it rest for 5 minutes. And only then garnish with mustard, vegetables, or something else.

Most steaks are grilled very quickly – literally in minutes. It is important to use this time correctly, but it is equally important to consider that the dish begins to cook even before it reaches the wire rack. Therefore, everything in order. Here’s how a Weber chef advises making your steaks taste even better.

  1. SALT THE STEAKS ON TIME
    You may have heard the warning not to salt meat long before grilling because salt can draw out juices. It indeed draws out moisture, but within 20-30 minutes, this is good, because the salt begins to dissolve in a small amount of moisture. When the steak hits the hot grill, the sugars and proteins of the meat juice combine with salt and other seasonings to create that very aromatic crust. But if the meat loses a lot of moisture, it will affect the taste and aroma for the worse.
  2. LET THE REFRIGERATOR MEAT STAND
    What kind of steak do we want when we grill it? Juicy and crispy, perfect toasted, right? But if you put the cold steak on the wire rack, it will take longer than usual to cook to the desired degree, and the meat inside can become overcooked and become gray and dry. Let the steaks sit at room temperature for 20-30 minutes before grilling – then the core will cook faster and the steaks will remain juicy.
  3. ROY MEAT – IT IMPROVES THE TASTE
    It is a good habit for barbecue masters to fry steaks at high temperatures, such as the Weber Sear Grate GBS grill. Pros understand that roasting gives hundreds of flavors and aromas to the surface of the steak, so let the meat sizzle indirect heat until the surface turns dark brown. Don’t let anyone convince you that roasting “traps the juices inside.” This is just a myth. But she really makes the steaks tastier.
  4. MOVE THICK STEAKS TO INDIRECT HEAT
    Most steaks cook excellently indirect, high heat, and only need to be moved when there is a burst of flame. However, some steaks can be so thick that if left on direct heat they will burn on the outside faster than they will cook on the inside to the desired degree. Therefore, if your steaks are thicker than 2.5 cm, then use the indirect method. After you have cooked both sides well in direct high heat, move the steaks to the indirect heat zone and finish cooking there.
  5. GET THE MOMENT OF READY
    Since steaks are fried over high heat, they quickly lose moisture. This is the price we pay for delicious meat. Perhaps the most important step in cooking a steak is to remove it from the heat before the meat loses too much moisture. As a rule, in just 1-2 minutes, the degree of doneness changes from medium-rare to medium, or from medium to medium-well. To get into this window, you need to be careful. Don’t go too far while your steaks are grilling. And remember that it is better to take them off undercooked and then return to the grill than overcooking.

The fact that you are not a professional chef and you do not have a grill is not a reason to leave your loved one without juicy, tasty meat. We assure you that you can get the perfect steak even in a frying pan, if you remember our tips and apply them in practice.

First of all, let’s figure out what ingredients are needed for a classic steak:

  • meat (beef, cut into pieces no thicker or thinner 3-5 cm);
  • salt, pepper, spices;
  • oil (sunflower or olive)

Actually, this is all that is needed for a basic recipe that can be modified depending on your taste. At first glance, both the list of ingredients and the cooking process seem simple enough, but this is not at all the case. This is exactly the case when the devil is in the details.

  1. Defrosting meat

In no case should you defrost the meat in the microwave: as a result of this manipulation, the edges of it will begin to cook, and the middle will remain frozen. This will prevent you from controlling the process of roasting the steak. The best option is to place the meat in a vacuum package in cold water.

  1. Preparation

Sprinkle the meat with pepper around the entire perimeter (fatty beetroot), and then salt and add spices. Then – grease the steak with butter on all sides: this will contribute to better thermal conductivity, which will allow the middle to fry evenly around the edges. Do not under any circumstances beat the meat, otherwise, it will lose its structure and release all the juice.

  1. Cooking

Heat a skillet without oil over high heat and place the meat on one side. After two and a half minutes, turn the steak over and fry on the other side. Repeat the same manipulations one more time (on each side again for two and a half minutes). Juicy steak – ready. Tip: when roasting meat, take into account the desired degree of doneness.

Frying a real steak is not an easy task. The chef shared the subtleties of the recipe: with this approach, the steak will certainly turn out to be juicy and very tasty.

  1. It’s worth starting with the choice of meat. The shoulder blade, neck and outer thigh of the hind leg do not fit. The edges should not be unnecessarily thin or thick.
  2. The ideal choice is tenderloin. This muscle is located under the ribs of the animal and almost does not move, the meat will be exactly soft and tender. A common mistake is not to peel the clippings before frying. This must be done, otherwise it will pull off the steak when frying.
  3. A thin piece of steak will not make the right steak. The height is not less than 2.5 centimeters, if you like to fry to the state of meat in the Tatar way, you can take a thicker one.
  4. When frying, rush will be in the way. You need to cook until medium rare. And when serving, it is customary to salt the meat already at ease – a steak is a dish of aesthetes.

There are certain subtleties that relate to the choice of meat and various culinary methods of toasting, the knowledge of which will help in mastering this virtuoso art. So, let’s try to cook meat steak at home!

  1. The most important rule of steak cooking is choosing the right meat. Initially, steaks were prepared from beef, so if they say “steak”, then they mean exactly a dish of beef. For other meat, clarification is required, so in this case, they write pork, chicken, salmon steak, and so on. But true steak connoisseurs argue that steaks made from any meat other than beef are not steaks.
  2. They say that the most delicious steaks are obtained from slightly dried meat. The most important thing is that the meat is not steamed, otherwise, the steak will turn out to be tough, and its taste, which is just provided by fermentation, will not be so rich and rich.
  3. The meat should be removed from the refrigerator about an hour before cooking to bring it to room temperature. This is necessary to evenly grill the steak.
  4. You can quickly and deliciously cook a steak in the oven, the Josper charcoal grill oven, on an open grill, and on a grill pan in which the meat does not burn and acquires an appetizing pattern.
  5. Some cooks mix the two oils for the best result, but steaks are ideal in ghee that does not burn and is mild in flavor.
  6. The main rule for preparing a steak is that at first it is fried very quickly in a hot pan until crusty, and then it is brought to readiness over a slower heat.
  7. The fact is that the protein curls up under the influence of high temperature and does not allow the juice to flow out of the meat.
  8. Before frying, some cooks dry the steak for an hour in the oven at a temperature of 60 ° C, since the dried meat instantly gives a dense golden brown crust when frying. If you neglect this rule, the steak will be dry and tough.
  9. When doing this, do not forget to fry the sides of the steak as well, holding it for convenience with meat tongs.
  10. A steak covered with a dense crust on all sides will cook well and remain juicy. This is one of the main steak cooking tricks.
  11. Do not overdo it with the fire and do not bring the pan to the point that it starts to smoke, because if the steak burns, you will not be able to continue frying, and it will turn out raw.
  12. An important secret of steak preparation is to give it a “rest” and recover from intense frying. To do this, place a piece of butter on the steak, cover it loosely with foil and leave for 10 minutes. The longer the steak “rests”, the tastier, more aromatic, and tender it will turn out.

Italians, as everyone knows, are considered to be the true connoisseurs of filled round yeast cake. But any gourmet is not averse to treating himself with such a delicacy, no matter how different his food preferences from the standard ones.
Pizza will conquer with its versatility because there are hundreds of thousands of recipes for vegetable, fruit, meat, and cheese open pies.
But becoming a real pizza maker is not so easy, you need to have valuable knowledge about making the perfect dough for your favorite snack – Italian pizza.

  1. The final taste of the dish depends on the dough. Therefore, the base is prepared from several varieties of wheat (ordinary and coarse grinding) and spread on a hot baking sheet.
  2. True pizza makers knead the dough very quickly but leave it to rise for a couple of days. Their movements are smooth but confident, they try to knead every fold, fill the dough with oxygen, make it soft and elastic.
  3. A true master will never use a rolling pin. He works with the dough with his hands, stretches it, throws it into the air, twists it, thinning his “canvas”.
  4. The thickness of a classic Neapolitan pizza is exactly 3 mm in the center and 1-2 cm at the side. This strict rule is followed in all restaurants.
  5. To keep the dough from getting wet, you can brush it with extra virgin olive oil.
  6. You should not stock up on freshly prepared dough for future use; after defrosting, its delicate texture may be disturbed, and you will not be able to achieve an ideal result with maximum effort.
  7. A semi-finished product is baked at high temperatures in stone ovens on hot stones that serve as a baking sheet. For a short time in the oven, the ingredients have time to cook without losing their useful properties, the crust becomes perfectly crispy.
  8. If you want a flat base, then preheat 2 trays in the oven at different levels. You will need them to properly bake the dough. Put the dough on the upper tier, the heat from the lower one will rise upward, evenly heating the 1st baking sheet. This will cook the pizza in half the time.
  9. Kneading. This is the most delicate process. The secret lies in the patience and experience of the master. Do not use rolling pins, knead the dough with your hands, feel how it becomes pliable, do not tear when stretched. Do this lovingly, without too much fuss, preferably in a warm room.

Making pizza at home is now easier than ever. In supermarkets, you can find a ready-made pizza base, which is very easy to prepare with your favorite filling. You don’t need to be a chef to do this, just follow a few simple tips and you’ll save money by not ordering this dish at home. Here are some pizza-making tips you should know before you get started.

  1. Always preheat the oven before baking your pizza. If you start baking in a cold oven, then the pizza will be raw, it will take longer to bake it, and it will lose its taste.
  2. To evenly and thoroughly bake a pizza with a double filling and a diameter of 30 cm, preheat the oven to 200 ° C.
  3. Always place the pizza tray in the center of the oven.
  4. Don’t forget about potholders! You don’t want to get burned!
  5. Put the finished pizza on a flat horizontal surface, so you can cut it as evenly as possible. The layout on a wooden board or tea towel.
  6. To correctly determine if the pizza is done, make sure the cheese is completely melted and golden brown. The edge of the base should be slightly ruddy, and if you raise the bottom of the pizza a little, then the dough should have a uniform brownish color.
  7. To make your pizza taste as fresh as possible, use different herbs and spices: a mixture of Italian herbs, garlic powder, sesame seeds, etc.
  8. Pre-grease the base ready for baking with a small amount of olive oil, then it will absorb its aroma and taste very pleasant.
  9. Remember to dust the work surface with flour when rolling. Always check the thickness so that the dough is not too thin.
  10. Roll out the dough from the center to the edge, so it is evenly distributed.
  11. If the rolled base is larger than the pallet, you can cut off the excess with a knife or simply roll it up with a “tube”, but then the edge will be thick. You can also use curly scissors or edging tins to make the pizza grooved.
  12. Some vegetables, like carrots, zucchini, broccoli, require preliminary heat treatment, otherwise, the dough will not bake, but will remain raw. Onions, mushrooms, spinach, and bell peppers contain a lot of moisture and the dough can be sticky. Therefore, lightly fry (until half cooked) these products, and drain the excess liquid.

Pizza is considered to be quite high-calorie and not a very healthy dish. But sometimes it is simply impossible to refuse delicious, aromatic Italian pizza! 10 tips to help you make pizza healthy and fit.

  1. Pizza dough is best made from whole grains, which have a beneficial effect on the intestines and rejuvenate the body.
  2. It is advisable to choose low-fat cheese.
  3. Add plenty of fresh tomatoes to your pizza – they are rich in antioxidants and can protect against cancer.
  4. You can make your pizza healthier by garnishing it with fresh basil leaves.
  5. Remember that red pepper speeds up metabolism and burns fats, which will not allow extra centimeters to form at the waist.
  6. For the sauce, use olive oil, which has been praised by nutritionists around the world.
  7. Parsley, spinach, arugula, olives can serve as an excellent healthy addition to a recipe.
  8. Chicken, mushrooms, and seafood are the healthiest pizza toppings. Omega-3 fatty acids, which are rich in sea fish, improve memory, fight back diseases and reduce the appearance of cellulite.
  9. You can season seafood pizza with lemon juice.
  10. Pizza filling made from vegetables, nuts, and goat cheese is delicious and very healthy. It enriches the body with fiber and calcium, the combination of which gives the body every opportunity to find its perfect shape.

This dish is simply adored by all adults and children. They are ready to sit for hours in a pizzeria and gobble up crispy pieces of dough with a variety of fillings. But how do you make delicious pizza at home? What subtleties do you need to know? Read on for the secrets of making delicious pizza.

  1. Cooking any pizza begins, of course, with dough. Traditionally, it is made from water, flour, salt, sugar, spices, and yeast. You can use different yeast to make pizza: both live and dry. To make the dough for your pizza tasty and crispy, the water with which you will dilute the yeast must be heated to 38 degrees. And only then this same yeast and a little sugar are added to it. Please note: Dough salt is best mixed with flour. Experts advise combining all the products together only after 10 minutes after the yeast is saturated with oxygen. It remains to add olive oil to the mixture and, carefully adding flour, knead the dough. Before baking, the finished dough must be left in a bowl covered with cling film for at least 40 minutes.
  2. Now for the proportions. For 3 pizzas with a diameter of about 30 cm, you need to take: 300 ml of water; 2 tbsp. tablespoons of sugar; 1 teaspoon of salt; 30 ml olive oil; 5 g dry yeast or 8 g pressed; 650 g flour.
  3. Most often, meat, sausage, bacon are added to the pizza. If such a standard set seems boring to you, you can also diversify the pizza with fried minced meat, fish, As for cheese, chefs recommend using cheeses such as mozzarella or parmesan for making pizza. But you can also experiment a little and add Grana Padano, Pecorino, Provolone, Gorgonzella, Scamorza, etc., and smoked meats.
  4. Perfectly complements pizza and vegetables. You can also add asparagus, spinach, broccoli, zucchini, zucchini, eggplants to the dish (besides the usual tomatoes, mushrooms, and herbs)!
  5. You can also add raw eggs to your pizza. It is important to do this at the very end of cooking. It can be both chicken and quail eggs. So, the protein will bake well until the pizza is cooked, and the yolk will still be a little liquid. Delicious!
  6. And finally, one more secret of making delicious pizza. Bake this dish at high temperatures (minimum 220 degrees). If you have an electric oven at home, turn on the lower and upper heating, and if the convection mode is also provided, do not forget to turn it on.

We have prepared 7 tips for you to help you cook delicious pizza in a pan.

  1. If you don’t have an oven, you can cook pizza on the stovetop in a skillet. There are pans with thermal glass lids; they are most convenient for baking pizza.
  2. Roll out the dough in a small layer, spread it on a preheated pan, greased with a large amount of vegetable oil, and immediately put the filling on it. Cover with a lid and reduce the heat to a minimum so that the dough is baked evenly.
  3. In a frying pan, pizza is cooked much faster than in an oven: the baking time is 15 minutes. The plain dough can be kept on the fire for 10 minutes, as it roasts faster than yeast dough. We remind you: its thickness should not be too large.
  4. Its readiness is checked with a match, piercing it in the thickest place. If the match is dry, the pizza is ready. In an open pan, the dough is baked in 2 steps, so the baking time is slightly increased (the pancake should be allowed to cool slightly before putting the filling). Thus, pizza preparation takes 20-25 minutes.
  5. Since the dough is baked pretty quickly, the raw filling simply won’t keep up with it. All of it must be prepared in advance – fried, stewed, or boiled.
  6. Its thickness must also be monitored so that it does not spread, as the juice or syrup will be absorbed into the dough and it will remain damp and tasteless. In addition, the liquid can seep through the layer of dough and burn the pizza. The best filling option, in this case, is when the bottom layer is meat or fish, dry boiled vegetables, and on top – slightly softer or raw foods. Then they will saturate the lower layers, but nothing will leak to the bottom of the pan.
  7. When baking pizza in a frying pan, do not top with mayonnaise or the like (to prevent the main layers from burning).