Tag

perfect

Browsing

Creating the perfect steak is more challenging than just choosing a stove to cook your food until it’s cooked! Here are some practical tips to help you with this task:

  1. The right choice of meat. For flavor and tenderness combined, Ribeye is considered one of the best cuts. A high degree of marbling, which means juiciness, allows you to cook a steak quickly and easily. Inspect the piece before you start cooking. A large number of veins allows you to cook meat without losing juiciness. Even with a great desire and ability to cook the perfect steak from low-quality beef, it will not work;
  2. The use of marinades. Good beef for a steak is expensive (from 2,000 rubles per piece), you can buy more affordable tenderloins and then use various marinades to improve the taste. The meat, of course, will not become expensive, but it will be softer and juicier;
  3. Grill beef should be at room temperature. Before you start frying the steak, remove the meat from the refrigerator, leave it at room conditions for a couple of hours. After such a rest, the pieces will be evenly fried, the texture and color of the finished product will be uniform;
  4. Steak thickness. The thickness of a classic piece of beef for a steak is 3-4 centimeters. Minions are cut 5-7 centimeters thick and the width of the piece is made smaller;
  5. Oil use. The oil is applied in a thin layer on both sides. The need to use the product is that when frying, the oil burns out, and a golden crust forms on the piece, which holds all the meat juices of the steak. It is not recommended to use cold-pressed oil, the taste and aroma are too pronounced;
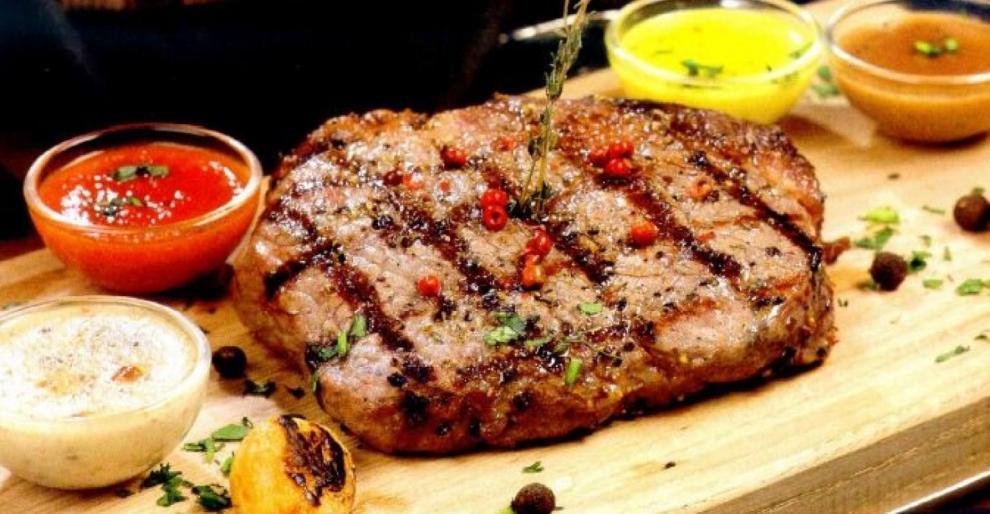
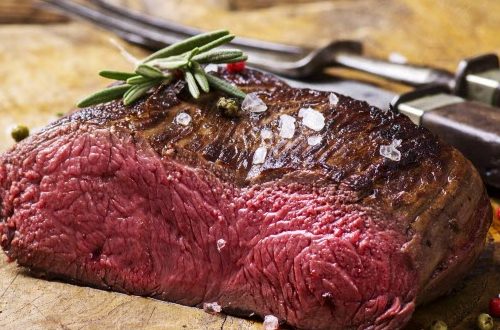
  6. The use of spices. The perfect grilled steak does not require a large amount and variety of spices, just freshly ground black pepper and salt is enough. Grilled marbled beef will be great without adding unnecessary ingredients. The real taste of the meat is lost when the steaks are seasoned with a lot of aromatic herbs. Never pre-salt the meat you are going to fry. The salt will draw out all the juices and the finished product will be dry and tough;
  7. Fire. A delicious steak requires good grill heat. The coals are distributed evenly so that the temperature on the surface of the grate is uniform. A small fire will not hurt, it will quickly fry the meat on top, while it will not be completely fried inside;
  8. Don’t turn the steak. For a deliciously tasty meal, don’t flip the piece too often. Constant fussing on the grate will not give a beautiful trellis pattern, the spices will be burnt;
  9. The degree of doneness of the steak. From what kind of meat is preferred, so much it is necessary to fry it on fire. With a crust and red cold meat inside, the dish is cooked for 1-2 minutes on each side (the meat should cool down under the foil for nine minutes after cooking). The steak is cooked with blood for 2-3 minutes (cools down for 8 minutes). A more fried piece with less blood is fried for 3-4 minutes (cools down for 7 minutes). To get pink meat cut and blood inside the piece, grill it for about 4-5 minutes, then let it brew for six minutes. After frying the meat for 6 or 7 minutes on each side, you will get a baked gray-brown steak, as a rule, this roasting makes the meat dryish. The need to cool the steak after frying is necessary to distribute the temperature and juiciness inside the piece;
  10. Serving to the table. Steaks are best served with vegetables and herbs, this combination will emphasize the tenderness of the meat and give it spicy notes. Red wine perfectly sets off the unique taste of grilled beef.

Not everyone succeeds in cooking the right and perfect steak the first time; a little practice and patience will fix this defect with ease. Cook, use the proven advice of professionals, enjoy delicious and aromatic steaks, cooked with your own hands!

Delicious steaks are made only from the rib and lumbar parts of the carcass. So that the meat does not deform during frying, it must be on the bone, and layers of fat are needed for the taste. The ideal option is a piece of beef from the lumbar part of the carcass on a T-bone. It is called a short loin and contains a thin edge of the dorsal muscle with a soft notch. We advise you not to waste time looking for it in stores but order it from a butcher in the market. In this case, you will have to cut the meat into steaks yourself with a hacksaw, but we think that this is a slight inconvenience compared to the deliciousness that will turn out.

  1. You can cook steaks from fresh meat, but they will turn out to be harsh and not fragrant. In steak houses, cuts are exposed for a long time, up to 4 weeks, in refrigeration chambers at low humidity, good ventilation, and temperatures close to zero. This process is called “dry” maturation. During it, meat enzymes destroy connective tissue fibers and some proteins, it loses excess moisture. As a result, completely different meat is obtained: tender, rich in flavoring, and aromatic substances. Frying it is a real pleasure.
  2. Pickled and defrosted meat is not suitable for “dry” ripening: changes have taken place in it, due to which ripening becomes impossible.
  3. Before cooking, cut off the dried “crust” if you have meat after “dry” aging, and let it warm up to room temperature: a cold steak will take longer and unevenly to grill. Cut the meat across the grain into pieces at least 2.5 cm thick. One steak should weigh between 500 and 800 g. Before frying, brush the meat with vegetable oil – it will be juicier.
  4. The actual roasting: press the piece against the wire rack for a short time so that the “classic” stripes appear on it. Fry one side for 2-5 minutes, then use tongs or a spatula to turn the meat over to the other side. To check if the steak is ready, do not poke the steak with a knife or fork over and over again to prevent the juice from leaking out. Do this once in the fourth minute, and if the meat is not tender enough, hold the steak for another minute or one and a half.
  5. When the steaks are ready, cover them with foil and let them rest. Let them get to the condition due to the internal heat.

You will definitely need these rules to make the perfect burger at home!

  1. The alpha and omega of a good burger is minced meat. Ready, of course, we do not buy under any circumstances. We choose moderately lean beef on the market (you can add pork and lamb to it) and ask the seller to scroll (or we do it ourselves). And – the main secret – add a little pork or lamb fat to the minced meat – also, of course, ground. Fat or lard should be 20% of the total. If you want to add cheese or bacon to your burger, reduce the percentage of fat to 10-15%.
  2. What can be mixed into minced meat? Try adding bacon, raw sausage, smoked meats, or basturma; good are pine and walnuts (especially in minced lamb), pieces of cheese, fruits, and dried fruits (they must be wrapped in the center of the minced meat, otherwise they will burn when frying). Spices, herbs, onions, and garlic – no questions asked.
  3. Rule number one – never press the patties while frying! Let the bad actors do it in cheap films about the American hinterland. By pressing the cutlet into the skillet, you squeeze the juices out of it, making the burger dry and lifeless. Rule number two – don’t flip the cutlet too quickly, let the crust fully form.
  4. There are two options: either urgently buy a country house and install a stationary grill there, or get a good cast-iron frying pan with a thick bottom and a non-stick coating. It is tempting to use a regular grill pan, but, alas, in the case of burgers, it is not very suitable: the cutlet will not cook evenly. But on a cast-iron skillet (which, of course, needs to be warmed up properly), the cutlet will be exactly as it should – with a crust on the outside and soft inside.
  5. Do not forget to lightly fry the roll on the cut so that the crust does not allow the roll to get wet from cutlet juices. With fillings, you need to balance between two fires. On the one hand, it’s silly to make a clone of a restaurant burger at home with a standard cheese and cucumber set. Try adjika instead of ketchup, jam instead of mayonnaise, pickled tomatoes instead of fresh ones, and lightly salted cucumbers instead of salted ones. On the other hand, you shouldn’t turn a burger into a multi-story structure with everything in the refrigerator. You will regret the guests, and leave something for your breakfast.

A properly fried steak will become a decoration of any table, and it is absolutely not necessary to light up the grill for this, you can cook it in your home kitchen. Today we will tell you a few secrets of how to prepare this dish.

  1. The classic size of a steak is a meat tenderloin 3 cm thick and weighing 400 g, and such proportions were not chosen by chance. They are established through the experiments of many chefs, so their experience should not be neglected. The mass of a piece of meat can be more, some deviations in thickness in the range of 2.5-4 cm are also allowed. But keep in mind that the further you are from ideal, the more difficult it is to choose the time of frying.
  2. Do not cook a steak on an empty stomach. The logic of this secret is very simple if you are drooling, then keeping the meat on the fire for the right time is extremely difficult.
  3. Salt, pepper, and other spices are rubbed into the meat 10-15 minutes before cooking. If you are not a fan of a lot of spices, then just take a knife and gently peel them off the surface of the steak before you start frying.
  4. Steak is a lazy dish and likes to relax. Therefore, the meat is taken out of the refrigerator in advance, about 60 minutes before the start of cooking. And after it is cooked, do not rush to start eating, let the steak lie down for 3-4 minutes.
  5. Proper roasting implies the formation of an appetizing crust at the beginning of the process. To do this, the grill or frying pan (be sure to use special grill pans) must be very hot. To form the desired crust, the meat is fried for 4 minutes on each side.
  6. The frying formula is as follows, 8 minutes per crust, 4 times on each side. And then two times for two minutes on each side, that is, 2 + 2 + 2 + 2 to bring the meat to the desired condition. If the weight of the steak is more than 500 g, then the number of roasting cycles on each side for 2 minutes is increased by 1.5 or 2 times.
  7. The steak is tender and requires proper handling. Turn the meat over with a spatula or special tongs, no punctures or cuts. It is forbidden to press the meat against the grill to speed up the cooking. To assess the readiness of the steak, briefly press on it with the edge of the spatula, the finished meat is more elastic. You will learn this art over time, but first focus on the mass of meat and the time of frying, do not hesitate to set a timer for additional time control.

A burger seems like a simple dish only at first glance. In fact, this is a whole art and science, which have certain rules, tricks and secrets. If you love to cook and are thinking of tackling such a controversial dish like a burger, this article will be useful to you.

  1. The cutlet should contain from 10 to 20% fat, therefore, give preference to collar, rump, sirloin. Choose beef especially carefully, as it is a fairly lean meat. If you’re ready to experiment, combine lean and fatty meats.
  2. No ready-made minced meat. You may not know which part was used in the store for minced meat, and the level of freshness is unknown. Even if minced meat looks aesthetically pleasing and greasy, it can contain dried meat, lard, leather, water to increase weight and give a fresh shine effect.
  3. Cold and coarse. Disturb the structure of the meat as little as possible – the texture of the cutlet also depends on it. Keep the meat in the refrigerator before cooking, do not grind too finely. You can also use the chopped steak format instead of the cutlet: it is more expensive and more difficult, but definitely worth it.
  4. The cutlet is meat! No onions, no bread, no breadcrumbs, no eggs, no even garlic – this is no longer a burger patty. Do not disturb the natural meaty taste; salt and black pepper are enough. Another important detail: salt is added last, so that it ruins the protein taste of the meat as little as possible.
  5. With a hot heart and a cold … cutlet! During the sculpting process, moisten your hands with cold water – this way the cutlets will stick to your hands less and heat up more slowly. Keep the patties cold until you grill them. It is best to send the cutlets to the refrigerator after sculpting – let it stand for 10-15 minutes while you prepare the grill.
  6. Gentle frying. The grill should not be overheated – when you can hold your hand over it for 7-9 seconds, this is the ideal temperature. And in no case press on the cutlets – they will lose their juiciness. Turn the cutlets over carefully and gently, making sure that their integrity is not compromised and the level of frying is not excessive. To check, cut one cutlet: if it is pink on the inside, this is sufficient roast.
  7. The perfect bun. It should be fresh, have a neutral, but not insipid taste: not too salty and not too sweet, at the same time smooth and tender. Avoid buns with a lot of seeds and bran – they will only spoil the taste picture. Before assembling the burger, fry the halves of the bun until golden brown on the inside, otherwise the cutlet will absorb the juice and turn the burger into porridge.
  8. The juiciness of a burger is not a sauce. Don’t overdo it with sauces, ketchup, and mayonnaise. They give moisture, fat content, but not juiciness. Responsible for juiciness is the cutlet and, of course, vegetables – lettuce, tomato rings, pickled cucumbers. If you want a veggie-free burger, add at least pickled onions! Vegetables refresh the taste and brighten the burger.
  9. It’s about the cheese. In a burger, you need to choose not just “cheese that melts well”. You need a fatty cheese with a rich taste and aroma, this is a very important part of a burger. Cheddar, Mozzarella, and Parmesan are great for classic variations. For more exotic burgers, you can use Camembert, Dor Blue, Suluguni.
  10. Traffic light rule. A tasty dish is one that works on all receptors. Burger is no exception. In a burger, you need to harmoniously and carefully combine notes of salinity, sweetness, acidity and a light spice

Making the perfect burger is not as easy as it seems at first glance. In today’s roundup, we’re sharing some cool tips to turn you into a true burger expert. Take on arms!

  1. Of course, the temptation is great on the way home to buy ready-made minced meat in the supermarket so as not to waste time cooking it. But in this case, it is better to immediately give up the idea of making a burger – in 9 cases out of 10 it will turn out to be dry and tasteless. To make the burger cutlet perfect, do not be too lazy to cook the minced meat yourself from fresh meat. Bonus tip: To make the cutlet juicy, cut the meat across the fibers and scroll through the large attachment of the meat grinder.
  2. More, more fat. The burger is by no means a dietary meal. Therefore, do not spare fat: ideally, the ratio of meat to fat in minced meat should be 80 to 20 (80% meat and 20% fat) or even 75 to 25 (75% meat and 25% fat). For example, minced meat made from 2/3 lean beef (shoulder) and 1/3 fatty beef is perfect for a burger.
  3. Only salt and pepper. The perfect cutlet requires no additional ingredients other than salt and pepper. No onions, garlic, and even more so bread, potatoes, and eggs, which housewives like to add to ordinary cutlets.
  4. The ideal cutlet must be perfect in shape. If you cook burgers often enough, buy a special press, but if you don’t, a regular cooking ring will do. Do not forget that during cooking your cutlet will fry, so make it a little larger than you want to end up.
  5. Chill the minced meat before shaping the burger patties. Otherwise, the fat included in its composition will stick to the mold and work surface. But not only the minced meat itself should be cold, but also the hands and the tools that you use. Therefore, keep the culinary ring or press in the freezer, and wipe your hands periodically with an ice cube while forming cutlets.
  6. Once the cutlet is formed, forget about it until the very moment of frying: the less you touch the cutlet, the more chances that it will not fall apart on the grill or pan.
  7. Fry burgers in a well-heated skillet or grill with a couple of tablespoons of vegetable oil.
  8. The approximate frying time is 5-8 minutes on each side. Remember that the longer you fry the cutlet, the less juicy and flavorful it will be.
  9. Choose the right bun. It’s simple: now in every supermarket, you can buy a special burger bun sprinkled with sesame seeds. But if you haven’t found any, then any will do, the main thing is that there are no additives in its composition that distract from the taste of the meat.
  10. Don’t forget vegetables, cheese, and gravy. Any cheese you like will work for a burger. The main thing is its location: so that the cheese does not get too wet from the meat juice, put it on the bottom bun. Ideal burger vegetables: onions, pickles, lettuce (iceberg, lettuce, or romano), tomatoes. Traditionally, ketchup and mustard are used for the hamburger. But barbecue sauces, chili, and others are also great.

Delicious and juicy beef steak, it’s easy to cook if you know some tricks. Each chef has his own steak recipe, and you can endlessly try to cook according to these recipes, but we decided to introduce you to tips from four chefs in America, a country that knows a lot about meat.

  1. Always take only high-quality meat. It is best to buy meat from the same supplier in which you are confident. It is better to take farm meat, on farms, cows grow on free pasture, which makes the meat more tender and tasty.
  2. Before cooking steaks, the meat must be removed from the cold for at least an hour, or better for two, and allowed to reach room temperature, then during frying or baking, the steak must be cooked evenly.
  3. While the steak is at the right temperature, season with salt. The salt will draw out some of the moisture, which will create a golden-brown crust during cooking.
  4. Always use a heavy-walled cast iron skillet for grilling steaks. During frying, the meat reduces the temperature of the pan at the time of laying on it, this applies to any metal, except cast iron. Cast iron keeps the temperature without dropping.
  5. Don’t shy away from spices. But you need to know when to add them. When the meat in the pan is already more than half ready (in time), you can add butter with various seasonings of your choice to the pan, thyme and rosemary are ideally combined with meat (the main thing is not to overdo it). Drizzle the aromatic oil over the steak as it cooks.
  6. After you fry the steak, let it “rest”, that is, just lie down for 5 to 10 minutes (it is best to cover the steak with foil). The juices in the meat during “rest” will dissipate through all the fibers, and make the meat juicy and tender. Good appetite!

What is your favorite pizza topping?

  1. Classic pizza with ham. Cut sweet peppers into small strips, ham into slices, and salami into a semicircle. Spread the dough with tomato sauce, spread the ham, salami, pepper in a circle, and sprinkle generously with cheese.
  2. Pizza with mushrooms and onions. Cut the mushrooms as small as possible and fry them in a little olive oil, then add a little heavy cream. You should get a mushroom paste, which we distribute on the dough as a base, put thin onion rings on top, and sprinkle with Parmesan.
  3. Pizza with chicken, pesto, and cheese. You will need a boiled chicken breast, divided into small pieces by hand and laid out on a dough previously greased with pesto sauce. Before putting the pizza in the oven, sprinkle it with grated hard cheese so that it turns out not only delicious but also very juicy.
  4. Hearty pizza with ground beef. Peel and finely chop a small onion and a clove of garlic. Fry them in a frying pan in olive oil, add the ground beef. At this time, grease the dough with tomato paste, and then evenly distribute the meat filling on top. Sprinkle the finished pizza with fresh chopped herbs just before serving.

Cooking a perfect steak can be challenging, even for a skilled cook: small cuts of meat can cook too quickly, becoming dry and tough, too large to burn on the outside without being cooked on the inside. If you are new to steak, I recommend using a heavy skillet or grill pan – charcoal or electric grills are also great for steaks, but the pan will be easier to control the temperature.

Step 1 – prepare the steak

  • Cooking a steak begins by choosing meat from a grocery store or butcher. As a rule, imported beef is used for steaks, and although quality steaks from Russian beef have recently begun to appear, foreign terminology is still used to classify meat cuts. It is easiest to train in frying steaks on ribeye and striploin steaks, aka New York (in our classification, these cuts more or less correspond to a thick and thin edge) – they are soft in themselves, and will turn out to be tasty, even if you miss a little with the fry …
  • Pay attention to the so-called marbling of meat: the fat should be distributed as evenly as possible over the meat, then during the preparation of the steak, these inclusions of fat will melt, making the meat more tasty and juicy. The classic thickness of steaks is 2.5 centimeters, and if you buy meat already cut, make sure that the steaks are of the correct thickness, if you take a large piece, try on how you will cut it. So let’s get started.
  • If the steak has been frozen, defrost it overnight in the refrigerator and wipe it dry.
  • Remove the steak from the refrigerator at least 20 minutes before frying to allow it to warm to room temperature.
  • Brush the steaks on both sides with vegetable oil (I use olive oil, but you can use any unscented vegetable oil instead) and season generously with salt.

Step 2 – preheat the pan

  • Preheat the skillet over medium-high heat – it should be hot, but not smoking (if the skillet is too hot, the steak will burn on the outside before cooking on the inside, and it will be tough).
  • The hiss after placing the steaks in the pan will tell you if it is at the correct temperature.
  • Another way to check the heating of the pan is to drip a little water on it: if you have heated the pan well, the droplet will gather into an elastic ball that will run along the surface of the pan like crazy.

Step 3 – cook to taste

  • For medium-rare, place the steaks in the skillet so that they are not touching and let cook for 1 minute.
    Use tongs to gently turn the steaks over (be careful not to damage them to prevent the juices from leaking out) and cook for 1 minute more to form a crust.
  • Turn steaks over again and reduce heat to medium. Cook for 2 minutes, turn over and cook for another 2 minutes.
  • To check the doneness, gently press down on the steak with your fingertip. The steak with blood should be soft and pliable, well done and firm, and the middle one, as expected, will be something in between.

Steak cooking time

You can vary the degree of frying of the steaks to your taste by increasing or decreasing the cooking time. Below is the approximate time that is suitable for a 2.5 cm thick steak. Thicker steaks require a longer cooking time and vice versa.

  • Rare (with blood) – 1-2 minutes on each side, rest for 6-8 minutes;
  • Medium rare (low roast) – 2-2.5 minutes on each side, rest for 5 minutes;
  • Medium – 3 minutes on each side, rest 4 minutes
  • Well done – 4.5 minutes on each side, rest 1 minute.
  • However, the most accurate (although not always accessible to a beginner) way to determine the degree of doneness of a steak is to use a meat thermometer.

Step 4 – rest the steaks

  • Leaving the meat to lie down for a while is just as important as cooking it correctly – in these few minutes, the juices will be distributed inside the piece, the temperature will even out inside and outside, and the whole steak will become warm, juicy and tender.
  • Remove steaks from skillet, season with black pepper, and place in a baking dish. Place a slice of butter on each steak, cover with foil and leave in a warm place for 4-5 minutes.
  • Remember, it’s better to rest the steak longer than necessary, and not less, this will allow it to acquire the greatest flavor and softness.

Step 5 – serve the steaks

  • Steaks require sharp, non-serrated knives to cut the meat evenly.
  • Serve the steaks on hot plates to keep them cool.
  • It is believed that good meat does not need sauce – and if you agree with this statement, simply pour the juices mixed with the melted butter on the bottom of the mold on the steak.
  • Choosing a side dish for a steak is a personal matter, I prefer a green salad.

Pizza! At the mere mention of this word, profuse salivation begins and in the subsequent time, you will not be abandoned by thoughts of a delicious aromatic pizza with the most tender dough and stretching cheese. There is hardly a person who would say that he does not like this divine delicacy, and if such an eccentric lives on this planet, then he, most likely, tried some kind of wrong pizza. The basis of a delicious pizza is, of course, the dough, which must be cooked correctly for the dish to be truly unforgettable. We have prepared for you the secrets of the perfect pizza dough.

  1. The easiest way is to roll out the dough on baking paper, after sprinkling it with flour. This will save you from unnecessary and completely unnecessary movements since you can send the pizza to the oven right on the parchment.
  2. Pizza tastes differ dramatically from person to person. If you love the fluffy dough, then take on board a simple life hack: let the rolled dough rest for 5-10 minutes. If you are worried that during this time it will have time to wind up, cover it with cling film.
  3. If, on the contrary, you like a thin dough that will crunch in your mouth, then you need to roll it out as much as possible, sparing no effort, and bake at elevated temperatures – 230-250 degrees.
  4. Another secret to the deliciously crispy dough is olive oil. They should grease a baking sheet. Put the dough on top and send it to the oven preheated to 220 degrees for 5 minutes. Only then add the filling.
  5. What if you didn’t roll out the dough on parchment? Do not worry ahead of time. You will need a rolling pin. Wrap it in half of the dough and transfer it while holding the handles.
  6. You can and should experiment with the ingredients for the dough. So, advanced gourmets prepare pizza dough from a mixture of flour and semolina. It turns out to be more crunchy and tender. You can use this mixture not only for making dough but also for dusting a baking sheet.
  7. The tedious part of making pizza is waiting for the dough to rise. Add more yeast to speed up this process. You only need 3/4 teaspoon more than the recipe says.
  8. Italians love aromatic herbs and actively use them in cooking. Take on board a cool life hack: To make the dough tastier and more aromatic, stir in oregano, basil, or other dried seasonings of your choice.