


For me, new homemade bread recipes are always a holiday. I baked Barvikhinsky bread for the first time and the result was expectedly excellent. Unusually attractive loaves with a crispy crust, tender, airy, almost weightless crumb - delicious and aromatic pastries at home.
I took the recipe for Barvikhinsky bread from the Honest bread program, and I repeated it exactly to the gram. By the way, there are options for this baking without the use of industrial yeast (leavened), but personally I have not tried such methods, so I can not say anything. In addition, in the original, the yeast dough contains wheat grits, but it is almost impossible to find this product here, so I replaced it with wheat grits.
From the indicated amount of ingredients used, I got 2 small loaves of Barvikhinsky bread, each weighing 308 grams. If you wish, you can bake 1 standard loaf (for example, in an L-7 aluminum baking pan). In the finished form, the crust of the bread will be very crispy (pieces of wheat grits are especially crunchy and some do not like it), but after a day it softens.
Mix everything thoroughly (with a spoon or fork) and let stand for 5-7 minutes. By the way, not only fresh, but dry or fast-acting yeast is suitable for this recipe, which is required 3 times less (that is, 4.5-5 grams). It works with dry yeast in the same way as with fresh yeast. But with high-speed ones, you can work right away, that is, mix them with wheat flour.
Add a loaf of room temperature to the yeast mixture, as well as 19 grams of a chicken egg (shake a whole egg with a fork, then take the amount necessary for making Barvikhinsky bread). We mix everything.
It remains to add 200 grams of sifted wheat flour mixed with 8 grams of fine salt. You may need a little less or more flour - it depends on its quality (in particular, moisture). It took me exactly 200 grams for the dough and literally a tablespoon for forming the blanks.
It is best to knead the dough using a mixer or a kitchen machine with a hook attachment (5-7 minutes at medium speed), but it will also work out with your hands no worse, but longer (10-12 minutes). It is advisable to grease the bowl in which the dough will ferment with a little vegetable oil - this way the dough will not stick. As a result of kneading, a soft, tender and rather sticky dough is obtained: we round it and leave it to ferment in a warm place for 2.5 hours. In steps 9-17, the dough is fermenting. Where is the best place for dough to roam and what does a warm place mean? There are several options. First of all, in the oven with the light on (it turns out about 28-30 degrees - the ideal temperature for fermenting yeast dough). Then we tighten the bowl with the dough with cling film or cover with a towel made of natural fabric (linen is best suited) so that the surface does not wind up and does not become covered with a crust. You can also let the dough ferment in the microwave, in which we first bring a glass of water to a boil. The dough will rise with the door closed, and the glass will stand in the same place. Then the bowl does not need to be closed with anything, since the water will evaporate, thereby maintaining the necessary humidity. Just make sure that no one accidentally turns on the microwave, otherwise the dough will disappear and homemade bread will not work.
After 1 hour of fermentation, the yeast dough will noticeably increase in volume - at least twice.
In this recipe for homemade bread, we will use a technique called "stretch and fold", which means "stretch and fold" in English. This is how we will affect the dough (stretch and fold), due to which gluten will develop, and the dough itself is not only smooth, but also very fluffy. It must be said that this is the best way to passively develop gluten in the dough. I will try to show in the photo how it looks in the process without video. So, moisten our hands a little with water, take the far edge of the dough, spread it to the sides and fold it to the near side. At this stage, you will already notice a difference in the consistency and texture of the dough: it has become smooth, stretches well and does not tear.
We turn the bowl over and repeat the manipulations: from the far edge we pull the dough with both hands (do not forget to moisten them in water after each time) and put it back to the near side. Due to the fact that we greased the dishes with oil, the dough practically does not stick to it, thus the gluten frame will be perfectly preserved.
It remains to stretch and fold the dough in the same way two more times. From a narrower edge, stretch and fold the dough towards you, then turn the bowl over 180 degrees and repeat the action.
It turns out to be an almost square workpiece.
It must be turned over with the seam downward, parallel to giving the dough a slightly rounded shape. Leave the dough warm for another 30 minutes.
The second time, yeast dough for Barvikhinsky bread will suit even faster.
Repeat folding and leave the bun to ferment for another 1 hour.
This is what the dough looks like after 2.5 hours of fermentation - this is the total time.
Lightly sprinkle the work surface with wheat flour. I decided to cook 2 small loaves, so I divided the dough into 2 equal parts. You can also bake 1 large loaf. Round off the pieces of dough.
We take one piece of yeast dough and gently knead it on the work surface with our palms.
Divide the dough into 3 parts visually. We fold one edge to the center, sealing the seam with a short punching with the edge of the palm.
We repeat in the same way with the second end of the workpiece.
Now fold the dough in half along the seam and seal the seam in the same way.
We roll up the workpiece, giving it an oval shape. Let's shape the second piece of dough in the same way.
Now we put the blanks in a baking dish / mold, which we grease with a small amount of vegetable (I have sunflower) oil. I also did not indicate it in the ingredients - literally a teaspoon is enough. Here I use my favorite cute little loaf molds. You can bake Barvikhinsky bread in any form suitable for its volume, but keep in mind that the dough will double in two times exactly during baking. Cover the workpiece with a towel or cling film and leave to distance for 40-45 minutes at room temperature. Time again depends on the temperature in the kitchen and the activity of the yeast. The main thing is that the dough grows well. At this time, we heat the oven (210 degrees).
When the workpiece has doubled or slightly more, you can put the future bread in a hot oven. Additionally, lightly sprinkle the surface of the dough with water from a spray bottle.
We bake Barvikhinsky bread at 210 degrees for about 75-80 minutes on an average level for a couple. In other words, this wheat bread needs to be baked at a relatively high temperature and high humidity. Steam can be created in two ways. Firstly, just throw a few large ice cubes into an already heated oven at the very bottom. Or put a bowl of water on the bottom of the oven in advance. By the way, if you bake bread in the form of one large loaf, it may take a little more time - be guided by the appearance of the product and the nature of your oven.
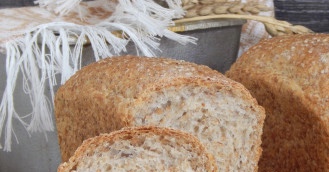
We immediately take out the finished loaves from the molds, cool them on a wire rack and enjoy fresh, fragrant, tender and very tasty pastries.
Unusually attractive Barvikhinsky bread with a crispy crust, tender, airy, almost weightless crumb is delicious and aromatic pastries at home. Cook for health, friends!
For me, new homemade bread recipes are always a holiday. I baked Barvikhinsky bread for the first time and the result was expectedly excellent. Unusually attractive loaves with a crispy crust, tender, airy, almost weightless crumb - delicious and aromatic pastries at home.
I took the recipe for Barvikhinsky bread from the Honest bread program, and I repeated it exactly to the gram. By the way, there are options for this baking without the use of industrial yeast (leavened), but personally I have not tried such methods, so I can not say anything. In addition, in the original, the yeast dough contains wheat grits, but it is almost impossible to find this product here, so I replaced it with wheat grits.
From the indicated amount of ingredients used, I got 2 small loaves of Barvikhinsky bread, each weighing 308 grams. If you wish, you can bake 1 standard loaf (for example, in an L-7 aluminum baking pan). In the finished form, the crust of the bread will be very crispy (pieces of wheat grits are especially crunchy and some do not like it), but after a day it softens.
Mix everything thoroughly (with a spoon or fork) and let stand for 5-7 minutes. By the way, not only fresh, but dry or fast-acting yeast is suitable for this recipe, which is required 3 times less (that is, 4.5-5 grams). It works with dry yeast in the same way as with fresh yeast. But with high-speed ones, you can work right away, that is, mix them with wheat flour.
Add a loaf of room temperature to the yeast mixture, as well as 19 grams of a chicken egg (shake a whole egg with a fork, then take the amount necessary for making Barvikhinsky bread). We mix everything.
It remains to add 200 grams of sifted wheat flour mixed with 8 grams of fine salt. You may need a little less or more flour - it depends on its quality (in particular, moisture). It took me exactly 200 grams for the dough and literally a tablespoon for forming the blanks.
It is best to knead the dough using a mixer or a kitchen machine with a hook attachment (5-7 minutes at medium speed), but it will also work out with your hands no worse, but longer (10-12 minutes). It is advisable to grease the bowl in which the dough will ferment with a little vegetable oil - this way the dough will not stick. As a result of kneading, a soft, tender and rather sticky dough is obtained: we round it and leave it to ferment in a warm place for 2.5 hours. In steps 9-17, the dough is fermenting. Where is the best place for dough to roam and what does a warm place mean? There are several options. First of all, in the oven with the light on (it turns out about 28-30 degrees - the ideal temperature for fermenting yeast dough). Then we tighten the bowl with the dough with cling film or cover with a towel made of natural fabric (linen is best suited) so that the surface does not wind up and does not become covered with a crust. You can also let the dough ferment in the microwave, in which we first bring a glass of water to a boil. The dough will rise with the door closed, and the glass will stand in the same place. Then the bowl does not need to be closed with anything, since the water will evaporate, thereby maintaining the necessary humidity. Just make sure that no one accidentally turns on the microwave, otherwise the dough will disappear and homemade bread will not work.
After 1 hour of fermentation, the yeast dough will noticeably increase in volume - at least twice.
In this recipe for homemade bread, we will use a technique called "stretch and fold", which means "stretch and fold" in English. This is how we will affect the dough (stretch and fold), due to which gluten will develop, and the dough itself is not only smooth, but also very fluffy. It must be said that this is the best way to passively develop gluten in the dough. I will try to show in the photo how it looks in the process without video. So, moisten our hands a little with water, take the far edge of the dough, spread it to the sides and fold it to the near side. At this stage, you will already notice a difference in the consistency and texture of the dough: it has become smooth, stretches well and does not tear.
We turn the bowl over and repeat the manipulations: from the far edge we pull the dough with both hands (do not forget to moisten them in water after each time) and put it back to the near side. Due to the fact that we greased the dishes with oil, the dough practically does not stick to it, thus the gluten frame will be perfectly preserved.
It remains to stretch and fold the dough in the same way two more times. From a narrower edge, stretch and fold the dough towards you, then turn the bowl over 180 degrees and repeat the action.
It turns out to be an almost square workpiece.
It must be turned over with the seam downward, parallel to giving the dough a slightly rounded shape. Leave the dough warm for another 30 minutes.
The second time, yeast dough for Barvikhinsky bread will suit even faster.
Repeat folding and leave the bun to ferment for another 1 hour.
This is what the dough looks like after 2.5 hours of fermentation - this is the total time.
Lightly sprinkle the work surface with wheat flour. I decided to cook 2 small loaves, so I divided the dough into 2 equal parts. You can also bake 1 large loaf. Round off the pieces of dough.
We take one piece of yeast dough and gently knead it on the work surface with our palms.
Divide the dough into 3 parts visually. We fold one edge to the center, sealing the seam with a short punching with the edge of the palm.
We repeat in the same way with the second end of the workpiece.
Now fold the dough in half along the seam and seal the seam in the same way.
We roll up the workpiece, giving it an oval shape. Let's shape the second piece of dough in the same way.
Now we put the blanks in a baking dish / mold, which we grease with a small amount of vegetable (I have sunflower) oil. I also did not indicate it in the ingredients - literally a teaspoon is enough. Here I use my favorite cute little loaf molds. You can bake Barvikhinsky bread in any form suitable for its volume, but keep in mind that the dough will double in two times exactly during baking. Cover the workpiece with a towel or cling film and leave to distance for 40-45 minutes at room temperature. Time again depends on the temperature in the kitchen and the activity of the yeast. The main thing is that the dough grows well. At this time, we heat the oven (210 degrees).
When the workpiece has doubled or slightly more, you can put the future bread in a hot oven. Additionally, lightly sprinkle the surface of the dough with water from a spray bottle.
We bake Barvikhinsky bread at 210 degrees for about 75-80 minutes on an average level for a couple. In other words, this wheat bread needs to be baked at a relatively high temperature and high humidity. Steam can be created in two ways. Firstly, just throw a few large ice cubes into an already heated oven at the very bottom. Or put a bowl of water on the bottom of the oven in advance. By the way, if you bake bread in the form of one large loaf, it may take a little more time - be guided by the appearance of the product and the nature of your oven.
We immediately take out the finished loaves from the molds, cool them on a wire rack and enjoy fresh, fragrant, tender and very tasty pastries.
Unusually attractive Barvikhinsky bread with a crispy crust, tender, airy, almost weightless crumb is delicious and aromatic pastries at home. Cook for health, friends!
Sign up to receive email updates on new recipes.
FoodNerdy is a powerful platform to manage and keep your recipes You do not need any experience in web development, It is very easy to use and customize
Some example text some example text. John Doe is an architect and engineer
.jpg)


