


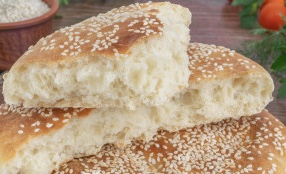
Ruddy, fluffy, tender and aromatic tortillas are simple but delicious homemade baked goods. Bread cakes can be served with first courses or taken with you to the countryside with a barbecue. Of course, bread cakes are most delicious when they are still warm, but they do not lose their freshness for several days.
Whey is included in the recipe for the tortillas that we will bake in the oven. I'm sure many hostesses who cook homemade cottage cheese know a lot of dishes where you can add it. Whey baked goods always turn out to be very aromatic and tender.
In the absence of this ingredient, you can always take water, milk or sour milk (low-fat kefir, sour milk, natural drinking yogurt). True, in this case it will be necessary to slightly adjust the amount of wheat flour.
From the specified number of ingredients, 4 rather large cakes are obtained. After cooling, store the baked goods in a tightly tied plastic bag and container with an airtight lid.
Sign up to receive email updates on new recipes.
FoodNerdy is a powerful platform to manage and keep your recipes You do not need any experience in web development, It is very easy to use and customize
Some example text some example text. John Doe is an architect and engineer
.jpg)


