


Something today I so wanted to write about some baked goods in a lot and in detail. Otherwise, nothing, because we are talking about homemade bread, for the preparation of which I have a special weakness. Please love and favor - Ciambella bread bagel. This is incredibly tasty and aromatic wheat flour based bread that is quite simple to prepare and does not require a lot of experience in home baking. The crispy crust, airy and porous crumb will definitely justify your diligence!
Ciambella bread-bagel won me over at first sight - I really liked the unusual ways of molding homemade baked goods. By the way, the name of this Italian bread means a round muffin or bread with a hole. In fact, it is: Ciambella looks like a huge bagel (I got it weighing 810 grams).
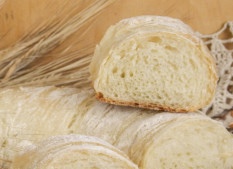
Yeast dough for this bread will not be entirely familiar. I am referring to the structure and consistency of the dough for regular homemade bread. It turns out to be very sticky, soft and literally floats in all directions. It is about the ratio of flour and water (in fact, it has a lot in common with the same Ciabatta or Styrato) - due to the increased humidity, the bread crumb is obtained with a large number of rather large pores.
For the rest, the recipe for this homemade bread is solid pluses: mixing all the ingredients in two steps, very quick and easy dough kneading and simple molding. Well, the result will certainly delight you not only with its original appearance, but also with excellent taste. I hope I didn't have to persuade you for a long time and you are already writing down the recipe in your culinary notebook.

Something today I so wanted to write about some baked goods in a lot and in detail. Otherwise, nothing, because we are talking about homemade bread, for the preparation of which I have a special weakness. Please love and favor - Ciambella bread bagel. This is incredibly tasty and aromatic wheat flour based bread that is quite simple to prepare and does not require a lot of experience in home baking. The crispy crust, airy and porous crumb will definitely justify your diligence!
Ciambella bread-bagel won me over at first sight - I really liked the unusual ways of molding homemade baked goods. By the way, the name of this Italian bread means a round muffin or bread with a hole. In fact, it is: Ciambella looks like a huge bagel (I got it weighing 810 grams).
Yeast dough for this bread will not be entirely familiar. I am referring to the structure and consistency of the dough for regular homemade bread. It turns out to be very sticky, soft and literally floats in all directions. It is about the ratio of flour and water (in fact, it has a lot in common with the same Ciabatta or Styrato) - due to the increased humidity, the bread crumb is obtained with a large number of rather large pores.
For the rest, the recipe for this homemade bread is solid pluses: mixing all the ingredients in two steps, very quick and easy dough kneading and simple molding. Well, the result will certainly delight you not only with its original appearance, but also with excellent taste. I hope I didn't have to persuade you for a long time and you are already writing down the recipe in your culinary notebook.
Sign up to receive email updates on new recipes.
FoodNerdy is a powerful platform to manage and keep your recipes You do not need any experience in web development, It is very easy to use and customize
Some example text some example text. John Doe is an architect and engineer
.jpg)


