- Serves: -
- Prepare Time: -
- Cooking Time: -
- Calories: -
- Difficulty:
Easy
Print
Well, if yesterday we prepared pumpkin puree for the winter, then we must definitely bake something with it. And it will be Cinnabon pumpkin buns! Truly sunny, unusually fragrant, tender, tasty and satisfying homemade cakes that will please everyone without exception. Just do not overuse: Cinnabones are very high-calorie buns, so I advise you to enjoy them in moderation.
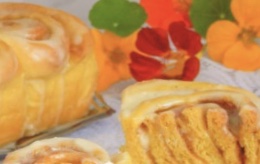
In general, for those who have never tried such pastries, I will tell you that Cinnabon buns look like tall and lush mini-rolls based on yeast dough. In the role of a fragrant layer, it is customary to use a mixture of brown (cane) sugar and ground cinnamon, which is applied to a layer of butter. Ready-made buns, while almost hot, are necessarily covered with a thick creamy glaze, which melts from the heat, soaking the delicate and soft dough.
From the specified number of ingredients used, I get 8 large (one is enough for two, if you are not a sweet tooth) buns, so if you wish, you can make 16 pieces, but half the size. Pumpkin puree, of course, you can buy ready-made in the store, but it is best to make it yourself at home - see the recipes here and here.
Ingredients
Directions
- Cinnabon Pumpkin Buns require quite a few ingredients to make, but don't be intimidated - they are all readily available. So, for the preparation of yeast dough, we take premium wheat flour, pumpkin puree, milk of any fat content, granulated sugar, butter (it must be melted and cooled in advance), salt, a pinch of vanillin (you can replace a teaspoon of vanilla sugar) and fast-acting yeast (about yeast I'll write a little below). In addition, for the filling we need brown cane sugar (if you don't have it, use plain white), ground cinnamon, and soft (take it out of the fridge in an hour) butter. For a delicious fudge, which we will cover the finished buns, you need any cream cheese (I have Mascarpone, you can take Philadelphia, but any domestic unsalted analogue, such as Almette, will do), powdered sugar, a little milk and lemon juice.
- Let's start by making a yeast dough for the Cinnabon pumpkin buns. About yeast: it is not necessary to take fast-acting yeast - just dry (also 5 grams is a heaped teaspoon) or pressed (you need 3 times more, that is, 15 grams) are perfect. Such yeast is not immediately mixed with flour, but pre-activated in a warm sweetish liquid for 10-15 minutes. In our case, you can slightly warm up half a glass of milk with a tablespoon of sugar and dissolve the yeast in it. Since I used fast-acting ones, I added them directly to the flour, which I had previously sieved twice. Put 50 grams of sugar there, a pinch of vanillin for flavor and half a teaspoon of fine salt. Mix everything well so that the dry ingredients are evenly distributed throughout the mixture.
- We make a depression in the center and pour warm (not hot, but pleasantly warm) milk into it. Put the pumpkin puree there. Mix everything with your hand or a spoon so that the flour is moistened.
- When you get such flour lumps, you can add melted, slightly warm butter. We start kneading the dough with our hands or using a kneader (bread machine).
- You need to knead this yeast dough for a rather long time - at least 10 minutes, and even better longer. The result is a smooth, completely uniform dough. It shouldn't be too soft or sticky. Such yeast dough keeps its shape perfectly, it is firm and elastic. During the kneading process, you may need a little more or a little less flour than I indicated in the ingredients - it depends on its moisture content. We roll the dough into a ball and leave it in a bowl (I always wash the dishes in which the dough ferments - I just don't like dirty ones). We send the dough to heat for 40 minutes, after which we do a light kneading, re-rounding and again in heat for another 50 minutes. Where is the best dough to wander and what does a warm place mean? There are several options. First of all, in the oven with the light on (it turns out about 28-30 degrees - the ideal temperature for fermenting yeast dough). Then we tighten the bowl with the dough with cling film or cover it with a towel made of natural fabric (linen is best suited) so that the surface does not wind up and does not become covered with a crust. You can also let the dough ferment in the microwave, in which we first bring a glass of water to a boil. The dough will rise with the door closed, and the glass will stand in the same place. Then the bowl does not need to be closed with anything, since the water will evaporate, thereby maintaining the necessary humidity. Just make sure that no one accidentally turns on the microwave, otherwise the dough will disappear and there will be no buns.
- After 40 minutes, the dough will work well - it will at least double in volume.
- We knead it, round it and again with heat for 50 minutes.
- The second time, the yeast dough will grow even more - exactly 3, or maybe 4 times. By the way, I want to tell you a little about the fermentation time of the yeast dough and the proofing of the blanks. I hope you understand that this is a relative concept. What does it mean? Well, for example, the recipe says that the dough should be allowed to rest for 1 hour. You understand that 1 hour is the time it took for the author of this recipe. +/- 10-15 minutes is a perfectly acceptable deviation, the entire fermentation time of the yeast dough depends on many factors. The freshness (and, as a consequence, the activity) of the yeast, the quality of the flour, the temperature in the room, the amount of dough - all this affects the time of fermentation and proofing. Therefore, never strictly follow these recommendations - you must feel the dough, understand what it needs, and then you will cook it purely intuitively.
- We're done with the lyrics: let's move on to shaping future buns. Put the yeast dough on the work surface. It is not sticky at all, so we do not need additional flour for the tanning (well, or quite a bit). If you consider yourself to be a culinary aesthetic (and I'm sure you are) and you care how beautiful the finished baked goods look like, you have to do a little bit of math. Roughly estimate how many buns you want to get (I have 8 pieces) and what size you need a baking dish (I took a rectangular 30x20 centimeters). Now you need to understand what height the workpieces will be - I had 5 centimeters each. Accordingly, using a rolling pin, roll out the dough into a rectangle, the side of which along the larger edge will be 40 centimeters. The other side is not that important, but try to roll out the dough quite thin (no thicker than 7 mm). The dough is very pliable and elastic, it can be trimmed with the palm of your hand or stretched with your hands.
- Lubricate the dough layer with soft butter (45 grams). At first I did it with a brush, but it is much more convenient and faster to grease the dough with my hand. To the very edges!
- We make the filling (I would call it a sprinkling): just combine brown sugar and ground cinnamon.
- Mix everything with a fork or spoon. If cane sugar is not available to you, feel free to take the usual white, but due to brown, the finished baked goods will have a pleasant caramel taste and aroma.
- We distribute aromatic sweet sprinkles over all surfaces of the dough - just pour it in and smooth it out with the palm of your hand.
- It remains to gently roll the dough into a tight roll. Do not forget that you need to twist from the wide side (the one that is 40 centimeters).
- Now you will need to cut this roll. To make everything perfect, we first measure it with a ruler - each workpiece is 5 centimeters long. But you understand that I was the one doing THIS. You can not bother and do as you please. With a knife we make visible notches along which we will divide the roll.
- I do not advise you to cut the blanks with a knife - it will not work perfectly smoothly and beautifully, since the dough will deform. There is a way out: use a thread or fishing line. I came up with such a device: I took a piece of thin fishing line and tied both ends to the wine corks. Very convenient - no need to wrap the line around your fingers. We cut the roll as follows: raise the workpiece and run the fishing line under it (at the notch level). Now we raise both ends of the line, twist them crosswise and spread them to the sides. Thus, in one motion, a neat and even piece of roll is cut off. Divide the rest of the blanks in the same way.
- We lay the baking dish with parchment paper (you do not need to lubricate with oil) and transfer the blanks to it with a cut up. Future buns will noticeably increase in volume, so there should be space between the blanks. Let the mini rolls rest for 30-35 minutes in a warm place (cover the blanks with a towel or cling film). By the way, baking pumpkin cinnabons is not necessary in the form, it will work out great just on a baking sheet (but then the buns will not be high).
- During this time, the dough will be defrosted and the pieces will be rounded - while they are baked. There is no need to lubricate the surface - this rich yeast dough will brown on its own.
- Cooking Cinnabon pumpkin buns in a preheated oven for 25-35 minutes on an average level at 180-185 degrees. Remember what I wrote about time? In this case, the cooking time can also vary - it all depends on your oven. The main indicator of the readiness of the buns is their appearance - as soon as they are browned and you like it, everything is ready. It is important not to overdry the baked goods and then the finished dough will be juicy, tender and soft. We take out the buns and let them cool for 5-10 minutes in the form.
- At this time, we will prepare a creamy fudge - it is incredibly tasty, believe me. In a bowl, combine any cream cheese, icing sugar, milk and lemon juice.
- Mix everything with a spoon or fork - the fondant is ready. Taste it - you may be low on sugar (although I doubt it), or you might want to add more lemon juice. It is not worth making the fondant liquid - in consistency it turns out like thick fat sour cream.
- We take the buns out of the mold and leave them on the paper.
- Cover the still warm pastries with creamy fudge, simply spreading it on top. Due to the heat, the fondant will begin to melt, drain, falling into the cuts of the rolls and soaking them. You can let the buns cool completely, but you can hardly resist freshly cooked, still warm homemade cakes.
- Delicate, such a sunny, insanely soft and just fabulous dough that melts in your mouth, a fragrant cinnamon-caramel layer and an incomparable creamy fudge ... and forever.
Cinnabon pumpkin buns
- Serves: -
- Prepare Time: -
- Cooking Time: -
- Calories: -
- Difficulty:
Easy
Well, if yesterday we prepared pumpkin puree for the winter, then we must definitely bake something with it. And it will be Cinnabon pumpkin buns! Truly sunny, unusually fragrant, tender, tasty and satisfying homemade cakes that will please everyone without exception. Just do not overuse: Cinnabones are very high-calorie buns, so I advise you to enjoy them in moderation.
In general, for those who have never tried such pastries, I will tell you that Cinnabon buns look like tall and lush mini-rolls based on yeast dough. In the role of a fragrant layer, it is customary to use a mixture of brown (cane) sugar and ground cinnamon, which is applied to a layer of butter. Ready-made buns, while almost hot, are necessarily covered with a thick creamy glaze, which melts from the heat, soaking the delicate and soft dough.
From the specified number of ingredients used, I get 8 large (one is enough for two, if you are not a sweet tooth) buns, so if you wish, you can make 16 pieces, but half the size. Pumpkin puree, of course, you can buy ready-made in the store, but it is best to make it yourself at home - see the recipes here and here.
Ingredients
Directions
- Cinnabon Pumpkin Buns require quite a few ingredients to make, but don't be intimidated - they are all readily available. So, for the preparation of yeast dough, we take premium wheat flour, pumpkin puree, milk of any fat content, granulated sugar, butter (it must be melted and cooled in advance), salt, a pinch of vanillin (you can replace a teaspoon of vanilla sugar) and fast-acting yeast (about yeast I'll write a little below). In addition, for the filling we need brown cane sugar (if you don't have it, use plain white), ground cinnamon, and soft (take it out of the fridge in an hour) butter. For a delicious fudge, which we will cover the finished buns, you need any cream cheese (I have Mascarpone, you can take Philadelphia, but any domestic unsalted analogue, such as Almette, will do), powdered sugar, a little milk and lemon juice.
- Let's start by making a yeast dough for the Cinnabon pumpkin buns. About yeast: it is not necessary to take fast-acting yeast - just dry (also 5 grams is a heaped teaspoon) or pressed (you need 3 times more, that is, 15 grams) are perfect. Such yeast is not immediately mixed with flour, but pre-activated in a warm sweetish liquid for 10-15 minutes. In our case, you can slightly warm up half a glass of milk with a tablespoon of sugar and dissolve the yeast in it. Since I used fast-acting ones, I added them directly to the flour, which I had previously sieved twice. Put 50 grams of sugar there, a pinch of vanillin for flavor and half a teaspoon of fine salt. Mix everything well so that the dry ingredients are evenly distributed throughout the mixture.
- We make a depression in the center and pour warm (not hot, but pleasantly warm) milk into it. Put the pumpkin puree there. Mix everything with your hand or a spoon so that the flour is moistened.
- When you get such flour lumps, you can add melted, slightly warm butter. We start kneading the dough with our hands or using a kneader (bread machine).
- You need to knead this yeast dough for a rather long time - at least 10 minutes, and even better longer. The result is a smooth, completely uniform dough. It shouldn't be too soft or sticky. Such yeast dough keeps its shape perfectly, it is firm and elastic. During the kneading process, you may need a little more or a little less flour than I indicated in the ingredients - it depends on its moisture content. We roll the dough into a ball and leave it in a bowl (I always wash the dishes in which the dough ferments - I just don't like dirty ones). We send the dough to heat for 40 minutes, after which we do a light kneading, re-rounding and again in heat for another 50 minutes. Where is the best dough to wander and what does a warm place mean? There are several options. First of all, in the oven with the light on (it turns out about 28-30 degrees - the ideal temperature for fermenting yeast dough). Then we tighten the bowl with the dough with cling film or cover it with a towel made of natural fabric (linen is best suited) so that the surface does not wind up and does not become covered with a crust. You can also let the dough ferment in the microwave, in which we first bring a glass of water to a boil. The dough will rise with the door closed, and the glass will stand in the same place. Then the bowl does not need to be closed with anything, since the water will evaporate, thereby maintaining the necessary humidity. Just make sure that no one accidentally turns on the microwave, otherwise the dough will disappear and there will be no buns.
- After 40 minutes, the dough will work well - it will at least double in volume.
- We knead it, round it and again with heat for 50 minutes.
- The second time, the yeast dough will grow even more - exactly 3, or maybe 4 times. By the way, I want to tell you a little about the fermentation time of the yeast dough and the proofing of the blanks. I hope you understand that this is a relative concept. What does it mean? Well, for example, the recipe says that the dough should be allowed to rest for 1 hour. You understand that 1 hour is the time it took for the author of this recipe. +/- 10-15 minutes is a perfectly acceptable deviation, the entire fermentation time of the yeast dough depends on many factors. The freshness (and, as a consequence, the activity) of the yeast, the quality of the flour, the temperature in the room, the amount of dough - all this affects the time of fermentation and proofing. Therefore, never strictly follow these recommendations - you must feel the dough, understand what it needs, and then you will cook it purely intuitively.
- We're done with the lyrics: let's move on to shaping future buns. Put the yeast dough on the work surface. It is not sticky at all, so we do not need additional flour for the tanning (well, or quite a bit). If you consider yourself to be a culinary aesthetic (and I'm sure you are) and you care how beautiful the finished baked goods look like, you have to do a little bit of math. Roughly estimate how many buns you want to get (I have 8 pieces) and what size you need a baking dish (I took a rectangular 30x20 centimeters). Now you need to understand what height the workpieces will be - I had 5 centimeters each. Accordingly, using a rolling pin, roll out the dough into a rectangle, the side of which along the larger edge will be 40 centimeters. The other side is not that important, but try to roll out the dough quite thin (no thicker than 7 mm). The dough is very pliable and elastic, it can be trimmed with the palm of your hand or stretched with your hands.
- Lubricate the dough layer with soft butter (45 grams). At first I did it with a brush, but it is much more convenient and faster to grease the dough with my hand. To the very edges!
- We make the filling (I would call it a sprinkling): just combine brown sugar and ground cinnamon.
- Mix everything with a fork or spoon. If cane sugar is not available to you, feel free to take the usual white, but due to brown, the finished baked goods will have a pleasant caramel taste and aroma.
- We distribute aromatic sweet sprinkles over all surfaces of the dough - just pour it in and smooth it out with the palm of your hand.
- It remains to gently roll the dough into a tight roll. Do not forget that you need to twist from the wide side (the one that is 40 centimeters).
- Now you will need to cut this roll. To make everything perfect, we first measure it with a ruler - each workpiece is 5 centimeters long. But you understand that I was the one doing THIS. You can not bother and do as you please. With a knife we make visible notches along which we will divide the roll.
- I do not advise you to cut the blanks with a knife - it will not work perfectly smoothly and beautifully, since the dough will deform. There is a way out: use a thread or fishing line. I came up with such a device: I took a piece of thin fishing line and tied both ends to the wine corks. Very convenient - no need to wrap the line around your fingers. We cut the roll as follows: raise the workpiece and run the fishing line under it (at the notch level). Now we raise both ends of the line, twist them crosswise and spread them to the sides. Thus, in one motion, a neat and even piece of roll is cut off. Divide the rest of the blanks in the same way.
- We lay the baking dish with parchment paper (you do not need to lubricate with oil) and transfer the blanks to it with a cut up. Future buns will noticeably increase in volume, so there should be space between the blanks. Let the mini rolls rest for 30-35 minutes in a warm place (cover the blanks with a towel or cling film). By the way, baking pumpkin cinnabons is not necessary in the form, it will work out great just on a baking sheet (but then the buns will not be high).
- During this time, the dough will be defrosted and the pieces will be rounded - while they are baked. There is no need to lubricate the surface - this rich yeast dough will brown on its own.
- Cooking Cinnabon pumpkin buns in a preheated oven for 25-35 minutes on an average level at 180-185 degrees. Remember what I wrote about time? In this case, the cooking time can also vary - it all depends on your oven. The main indicator of the readiness of the buns is their appearance - as soon as they are browned and you like it, everything is ready. It is important not to overdry the baked goods and then the finished dough will be juicy, tender and soft. We take out the buns and let them cool for 5-10 minutes in the form.
- At this time, we will prepare a creamy fudge - it is incredibly tasty, believe me. In a bowl, combine any cream cheese, icing sugar, milk and lemon juice.
- Mix everything with a spoon or fork - the fondant is ready. Taste it - you may be low on sugar (although I doubt it), or you might want to add more lemon juice. It is not worth making the fondant liquid - in consistency it turns out like thick fat sour cream.
- We take the buns out of the mold and leave them on the paper.
- Cover the still warm pastries with creamy fudge, simply spreading it on top. Due to the heat, the fondant will begin to melt, drain, falling into the cuts of the rolls and soaking them. You can let the buns cool completely, but you can hardly resist freshly cooked, still warm homemade cakes.
- Delicate, such a sunny, insanely soft and just fabulous dough that melts in your mouth, a fragrant cinnamon-caramel layer and an incomparable creamy fudge ... and forever.
You may also like


.jpg)


