


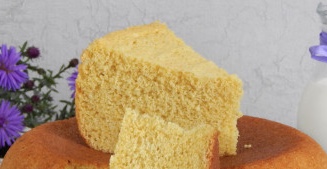
A new recipe for a sponge cake in a slow cooker: we cook it with corn flour, and without adding a single gram of wheat flour, the baked goods will be gluten-free. In the finished form, the corn biscuit will be fluffy, airy, slightly crumbly, moderately dry, quite aromatic due to the addition of orange peel and so sunny.
I propose this recipe for simple homemade baking for a multicooker (I have a Scarlett SC-411, the power of the appliance is 700 W, the volume of the bowl is 4 liters). In the absence of this useful electrical appliance, corn biscuit can be cooked without any problems in a simple oven. If you want a tall crust, take a mold (do not forget to grease with butter) with a diameter of 20-22 centimeters. Bake it in a preheated oven at 180 degrees for about 35-40 minutes until dry.
Sign up to receive email updates on new recipes.
FoodNerdy is a powerful platform to manage and keep your recipes You do not need any experience in web development, It is very easy to use and customize
Some example text some example text. John Doe is an architect and engineer
.jpg)


