- Serves: -
- Prepare Time: -
- Cooking Time: -
- Calories: -
- Difficulty:
Easy
Print
I dreamed of making this homemade bread for a very long time, but somehow my hands did not reach. The fact is that I bake bread literally every other day, while I like to invent new ones or try recipes from other chefs, but I don’t forget the old ones (those that are dearly loved in our family). Japanese milk bread really turned out the way I imagined it - the most delicate, fluffy and airy, like a cloud.
I wondered where this wonderful bread got its name from. Why dairy is understandable - the main ingredient in its composition is milk (including dry) and cream. But why is it Japanese, and even the incomprehensible word Hokkaido.
So, I found information on the Internet that milk from cows grazing on the Furano meadows on the Japanese island of Hokkaido is taken to prepare this tasty and aromatic bread. True or not, I don't know. But we definitely cannot get such milk, so we will prepare this bread from our Belarusian milk.
According to the recipe, I want to note that the original uses a much larger amount of yeast, but I have significantly reduced it. The taste and quality of the finished bread, I think, has improved markedly, and the benefits have increased. Cream in the sources needs 30% fat, but I took 10% - this is not so important, I thought. It's just that with more heavy cream, this milk bread will not only have a richer creamy aroma, but also a higher calorie content.
We select a rectangular baking dish for Japanese milk bread (I have a little less than 10x30 centimeters). The finished loaf turns out to be quite large and after cooling it weighs 1070 grams. It is very tasty to eat this delicate and aromatic bread for breakfast with butter or jam under a cup of hot tea or a glass of milk. Just stop in time ...
Ingredients
Directions
- To make this tender and airy bread, we need premium wheat flour, milk, cream (I have 10%), milk powder, chicken egg, granulated sugar, salt and yeast. It is not necessary to take fast-acting yeast - just dry (also 5 grams is a heaped teaspoon) or pressed (you need 3 times more, that is, 15 grams) are perfect. Such yeast is not immediately mixed with flour, but pre-activated in a warm sweetish liquid for 10-15 minutes. In our case, you can slightly warm up half a glass of milk with a teaspoon of sugar and dissolve the yeast in it.
- Sift (preferably twice) the wheat flour into a large bowl. Due to this, the flour will not only be loosened and saturated with oxygen, but possible debris will also go away.
- Add fast-acting yeast, granulated sugar, milk powder and salt to the flour. Mix everything thoroughly with a fork or whisk.
- Now you need to combine the free-flowing mixture with the liquid ingredients for the dough. To do this, make a hole in flour and pour warm (slightly warmer than the human body) milk and cream into it. We break a chicken egg there. It is at this stage that yeast milk is added if you are using dry or compressed yeast.
- Now we knead the dough for at least 10, and preferably 15-20 minutes. It should become completely homogeneous, smooth, tender and very soft. Tighten the bowl with the dough with cling film or cover with a towel and leave it warm to ferment for 1.5 hours. After 40 minutes (of the total time), gently knead the dough to release carbon dioxide from it, round it up and return to heat.
- This is how the dough looks after 1.5 hours of fermentation - it has grown very well and has increased in volume three times exactly. But I want to say that an hour and a half is not at all necessary, because the temperature in the room is different for everyone, and the strength of the yeast is also different, so the main thing is that the dough fits well. And this may take more time (and for someone less).
- Now we divide the dough into 4 equal parts. We roll each into a ball and put it on a board sprinkled with flour. Cover it with something to prevent it getting windy and crusty, and let it rest for 20 minutes.
- During this time our koloboks will swell (that is, they will begin to ferment again) - they are ready for further work. It's time to move on to molding milk bread.
- Sprinkle a little wheat flour on the working surface (the mass is not included in the above ingredients) and roll one roll in length with a rolling pin. It turns out here such a long oval (ideally a rectangle) across the width of the form. The dough is very tender and pliable, perfectly listens.
- We roll the layer into a tight roll, bending the edges of the dough in parallel. After each revolution, be sure to press the roller against the layer so that later there are no voids in the finished bread (that is, large air bubbles).
- Here is a roll of dough that you should get. In total, we make 4 rolls according to the number of dough pieces.
- Now we put the blanks in a baking dish, which we grease with a small amount of vegetable (better still, butter - it lays down smoother) butter. I also did not indicate it in the ingredients - literally a tablespoon is enough. Cover the workpiece with a towel or cling film and leave to distance for 1-1.5 hours. Time again depends on the temperature in the kitchen and the activity of the yeast. The main thing is that the dough grows well. At this time, we heat the oven (175 degrees).
- When the workpiece is doubled, you can put the future bread in a hot oven.
- But before that, grease the dough with milk for a golden brown crust. By the way, for the same purpose, you can use egg yolk or a mixture of yolk and milk.
- We bake Japanese Hokkaido milk bread at 175 degrees for about 40 minutes. As you can see, the baked goods have grown very well and have browned perfectly. And what a scent!
- Let the finished bread stand for a couple of minutes in the form, then take it out and cool on the wire rack.
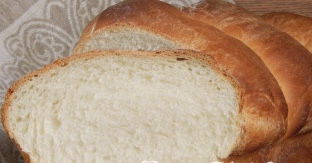
- When the milk bread has cooled completely, you can cut it. Be sure to try this delicate milky cloud with an airy, aromatic crumb and the finest ruddy crust.
Hokkaido Japanese milk bread
- Serves: -
- Prepare Time: -
- Cooking Time: -
- Calories: -
- Difficulty:
Easy
I dreamed of making this homemade bread for a very long time, but somehow my hands did not reach. The fact is that I bake bread literally every other day, while I like to invent new ones or try recipes from other chefs, but I don’t forget the old ones (those that are dearly loved in our family). Japanese milk bread really turned out the way I imagined it - the most delicate, fluffy and airy, like a cloud.
I wondered where this wonderful bread got its name from. Why dairy is understandable - the main ingredient in its composition is milk (including dry) and cream. But why is it Japanese, and even the incomprehensible word Hokkaido.
So, I found information on the Internet that milk from cows grazing on the Furano meadows on the Japanese island of Hokkaido is taken to prepare this tasty and aromatic bread. True or not, I don't know. But we definitely cannot get such milk, so we will prepare this bread from our Belarusian milk.
According to the recipe, I want to note that the original uses a much larger amount of yeast, but I have significantly reduced it. The taste and quality of the finished bread, I think, has improved markedly, and the benefits have increased. Cream in the sources needs 30% fat, but I took 10% - this is not so important, I thought. It's just that with more heavy cream, this milk bread will not only have a richer creamy aroma, but also a higher calorie content.
We select a rectangular baking dish for Japanese milk bread (I have a little less than 10x30 centimeters). The finished loaf turns out to be quite large and after cooling it weighs 1070 grams. It is very tasty to eat this delicate and aromatic bread for breakfast with butter or jam under a cup of hot tea or a glass of milk. Just stop in time ...
Ingredients
Directions
- To make this tender and airy bread, we need premium wheat flour, milk, cream (I have 10%), milk powder, chicken egg, granulated sugar, salt and yeast. It is not necessary to take fast-acting yeast - just dry (also 5 grams is a heaped teaspoon) or pressed (you need 3 times more, that is, 15 grams) are perfect. Such yeast is not immediately mixed with flour, but pre-activated in a warm sweetish liquid for 10-15 minutes. In our case, you can slightly warm up half a glass of milk with a teaspoon of sugar and dissolve the yeast in it.
- Sift (preferably twice) the wheat flour into a large bowl. Due to this, the flour will not only be loosened and saturated with oxygen, but possible debris will also go away.
- Add fast-acting yeast, granulated sugar, milk powder and salt to the flour. Mix everything thoroughly with a fork or whisk.
- Now you need to combine the free-flowing mixture with the liquid ingredients for the dough. To do this, make a hole in flour and pour warm (slightly warmer than the human body) milk and cream into it. We break a chicken egg there. It is at this stage that yeast milk is added if you are using dry or compressed yeast.
- Now we knead the dough for at least 10, and preferably 15-20 minutes. It should become completely homogeneous, smooth, tender and very soft. Tighten the bowl with the dough with cling film or cover with a towel and leave it warm to ferment for 1.5 hours. After 40 minutes (of the total time), gently knead the dough to release carbon dioxide from it, round it up and return to heat.
- This is how the dough looks after 1.5 hours of fermentation - it has grown very well and has increased in volume three times exactly. But I want to say that an hour and a half is not at all necessary, because the temperature in the room is different for everyone, and the strength of the yeast is also different, so the main thing is that the dough fits well. And this may take more time (and for someone less).
- Now we divide the dough into 4 equal parts. We roll each into a ball and put it on a board sprinkled with flour. Cover it with something to prevent it getting windy and crusty, and let it rest for 20 minutes.
- During this time our koloboks will swell (that is, they will begin to ferment again) - they are ready for further work. It's time to move on to molding milk bread.
- Sprinkle a little wheat flour on the working surface (the mass is not included in the above ingredients) and roll one roll in length with a rolling pin. It turns out here such a long oval (ideally a rectangle) across the width of the form. The dough is very tender and pliable, perfectly listens.
- We roll the layer into a tight roll, bending the edges of the dough in parallel. After each revolution, be sure to press the roller against the layer so that later there are no voids in the finished bread (that is, large air bubbles).
- Here is a roll of dough that you should get. In total, we make 4 rolls according to the number of dough pieces.
- Now we put the blanks in a baking dish, which we grease with a small amount of vegetable (better still, butter - it lays down smoother) butter. I also did not indicate it in the ingredients - literally a tablespoon is enough. Cover the workpiece with a towel or cling film and leave to distance for 1-1.5 hours. Time again depends on the temperature in the kitchen and the activity of the yeast. The main thing is that the dough grows well. At this time, we heat the oven (175 degrees).
- When the workpiece is doubled, you can put the future bread in a hot oven.
- But before that, grease the dough with milk for a golden brown crust. By the way, for the same purpose, you can use egg yolk or a mixture of yolk and milk.
- We bake Japanese Hokkaido milk bread at 175 degrees for about 40 minutes. As you can see, the baked goods have grown very well and have browned perfectly. And what a scent!
- Let the finished bread stand for a couple of minutes in the form, then take it out and cool on the wire rack.
- When the milk bread has cooled completely, you can cut it. Be sure to try this delicate milky cloud with an airy, aromatic crumb and the finest ruddy crust.
You may also like


.jpg)


