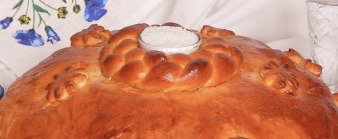
Homemade loaf

Bread 518 Last Update: Jul 28, 2021 Created: Jul 28, 2021 0 0 0
Homemade loaf
  • Serves: -
  • Prepare Time: -
  • Cooking Time: -
  • Calories: -
  • Difficulty: Easy
Print

Have you ever made a homemade loaf? If not, then be sure to try it! There is something festive, solemn and triumphant in the process of making this bread. By the way, this is not surprising, because the loaf is the main wedding bread among the Slavs. It is customary to taste it first for the young at a wedding, and then share this skillfully decorated bread among all the participants in the celebration.

But here's another interesting thing: according to Russian custom, it is customary to meet dear guests with a loaf (this is called "Bread-Salt"), but also to see off the dead. So, for the day of mourning, a loaf is baked, which is then placed on the lid of the coffin, and distributed to the relatives of the deceased at the cemetery ...

This is such a many-sided bread, I suggest you bake. The crumb in the loaf turns out to be very airy, fluffy, and the bread itself is unusually tasty (after all, we have yeast dough). Try it and you will cook your first loaf!

Ingredients

Directions

  1. So, let's prepare products for this great homemade bread: wheat flour, sugar, milk, butter, chicken eggs, salt and dry yeast (can be replaced with fresh ones - 30 grams).
  2. First of all, take 150 milliliters of milk, a couple of tablespoons of granulated sugar, yeast and 4 tablespoons of wheat flour. Add yeast and sugar to warm (no more than 38 degrees) milk, mix and add sifted flour. You should get a mass, in consistency like sour cream - this is called a dough. We will leave it warm for 40-45 minutes.
  3. In the meantime, let's deal with the rest of the ingredients: we leave one tablespoon of milk to grease the homemade loaf, and combine the rest with butter, salt and granulated sugar (3 tablespoons). We heat everything in a water bath or in a microwave oven to melt the butter.
  4. The result is such a milky-oil liquid mixture. Let us cool it down to a pleasant warm state, that is, to 37 degrees.
  5. During this time, the dough has risen - it has grown well and foamed. It woke up and yeast started working - it's time to start kneading the yeast dough.
  6. We transfer the finished dough into a bowl of a suitable size. Beat the chicken eggs a little, while leaving 1 yolk to grease the workpiece. Add barely beaten eggs to the dough.
  7. Then add some of the sifted wheat flour - about two glasses. We mix everything.
  8. Now add the milk-oil mixture to the dough.
  9. Mix and add the rest of the wheat flour.
  10. After mixing, you will get such a very sticky, liquidish and heterogeneous dough, which is difficult to call a dough. We pass to a very important stage - kneading dough for a loaf.
  11. The kneading of this test must be continued for at least 20 minutes. And I advise you to do it with your hands! It's hard, right? But it's worth it - we don't bake CARAVAI every day! Gradually, the dough will become more and more homogeneous, acquiring smoothness and elasticity. First, it will begin to move away from the walls of the bowl, and then it will completely turn into the most delicate, but at the same time, elastic bun. Now cover the bowl with a towel made of natural fabric (so the dough can breathe without winding up). Leave the dough to rest for 1.5 hours. After 40 minutes (of the total time), gently knead the dough and again in a warm place.
  12. This is how our kolobok has grown - it has grown three times more.
  13. Now let's start molding a homemade loaf. To do this, divide the dough into 2 parts - about 2 to 3.
  14. We take a large part and make a smooth round bun out of it. We transfer it to a baking sheet, which we cover with parchment and sprinkle with flour.
  15. We make decorations from the second (smaller) kolobok. We divide it into 2 parts. From one we weave a braid and lay it not very tightly to the base bun.
  16. Then we make a small pigtail and put it in the shape of a ring on the top of the loaf. This is a place for a salt shaker - insert a ball of food foil into it so that the depression does not grow during the baking process.
  17. We make various decorations from the remains of the dough - I have spikelets and flowers. We attach them to the loaf. But this is all optional and as your imagination allows.
  18. Lubricate the future loaf with a mixture of yolk and milk (remember, we left them). Let the workpiece rest a little - about half an hour. Meanwhile, preheat the oven to 200 degrees. The first 20 minutes we bake the loaf at this temperature, then we make 170 ° C and bake it for another 40 minutes. If your oven is very blush, you can cover the loaf with cling foil at the end.
  19. Here we have such a homemade loaf! Ruddy and appetizing.
  20. Cool it on the wire rack, remove the foil ball. The loaf is ready.

Homemade loaf


  • Serves: -
  • Prepare Time: -
  • Cooking Time: -
  • Calories: -
  • Difficulty: Easy

Have you ever made a homemade loaf? If not, then be sure to try it! There is something festive, solemn and triumphant in the process of making this bread. By the way, this is not surprising, because the loaf is the main wedding bread among the Slavs. It is customary to taste it first for the young at a wedding, and then share this skillfully decorated bread among all the participants in the celebration.

But here's another interesting thing: according to Russian custom, it is customary to meet dear guests with a loaf (this is called "Bread-Salt"), but also to see off the dead. So, for the day of mourning, a loaf is baked, which is then placed on the lid of the coffin, and distributed to the relatives of the deceased at the cemetery ...

This is such a many-sided bread, I suggest you bake. The crumb in the loaf turns out to be very airy, fluffy, and the bread itself is unusually tasty (after all, we have yeast dough). Try it and you will cook your first loaf!

Ingredients

Directions

  1. So, let's prepare products for this great homemade bread: wheat flour, sugar, milk, butter, chicken eggs, salt and dry yeast (can be replaced with fresh ones - 30 grams).
  2. First of all, take 150 milliliters of milk, a couple of tablespoons of granulated sugar, yeast and 4 tablespoons of wheat flour. Add yeast and sugar to warm (no more than 38 degrees) milk, mix and add sifted flour. You should get a mass, in consistency like sour cream - this is called a dough. We will leave it warm for 40-45 minutes.
  3. In the meantime, let's deal with the rest of the ingredients: we leave one tablespoon of milk to grease the homemade loaf, and combine the rest with butter, salt and granulated sugar (3 tablespoons). We heat everything in a water bath or in a microwave oven to melt the butter.
  4. The result is such a milky-oil liquid mixture. Let us cool it down to a pleasant warm state, that is, to 37 degrees.
  5. During this time, the dough has risen - it has grown well and foamed. It woke up and yeast started working - it's time to start kneading the yeast dough.
  6. We transfer the finished dough into a bowl of a suitable size. Beat the chicken eggs a little, while leaving 1 yolk to grease the workpiece. Add barely beaten eggs to the dough.
  7. Then add some of the sifted wheat flour - about two glasses. We mix everything.
  8. Now add the milk-oil mixture to the dough.
  9. Mix and add the rest of the wheat flour.
  10. After mixing, you will get such a very sticky, liquidish and heterogeneous dough, which is difficult to call a dough. We pass to a very important stage - kneading dough for a loaf.
  11. The kneading of this test must be continued for at least 20 minutes. And I advise you to do it with your hands! It's hard, right? But it's worth it - we don't bake CARAVAI every day! Gradually, the dough will become more and more homogeneous, acquiring smoothness and elasticity. First, it will begin to move away from the walls of the bowl, and then it will completely turn into the most delicate, but at the same time, elastic bun. Now cover the bowl with a towel made of natural fabric (so the dough can breathe without winding up). Leave the dough to rest for 1.5 hours. After 40 minutes (of the total time), gently knead the dough and again in a warm place.
  12. This is how our kolobok has grown - it has grown three times more.
  13. Now let's start molding a homemade loaf. To do this, divide the dough into 2 parts - about 2 to 3.
  14. We take a large part and make a smooth round bun out of it. We transfer it to a baking sheet, which we cover with parchment and sprinkle with flour.
  15. We make decorations from the second (smaller) kolobok. We divide it into 2 parts. From one we weave a braid and lay it not very tightly to the base bun.
  16. Then we make a small pigtail and put it in the shape of a ring on the top of the loaf. This is a place for a salt shaker - insert a ball of food foil into it so that the depression does not grow during the baking process.
  17. We make various decorations from the remains of the dough - I have spikelets and flowers. We attach them to the loaf. But this is all optional and as your imagination allows.
  18. Lubricate the future loaf with a mixture of yolk and milk (remember, we left them). Let the workpiece rest a little - about half an hour. Meanwhile, preheat the oven to 200 degrees. The first 20 minutes we bake the loaf at this temperature, then we make 170 ° C and bake it for another 40 minutes. If your oven is very blush, you can cover the loaf with cling foil at the end.
  19. Here we have such a homemade loaf! Ruddy and appetizing.
  20. Cool it on the wire rack, remove the foil ball. The loaf is ready.

Add Your Comment

You may also like

Newsletter

Sign up to receive email updates on new recipes.